How to fix the “401 Unauthorized” error
Sep 03, 2025
/
Hasna A. & Matleena S.
/
6 min Read
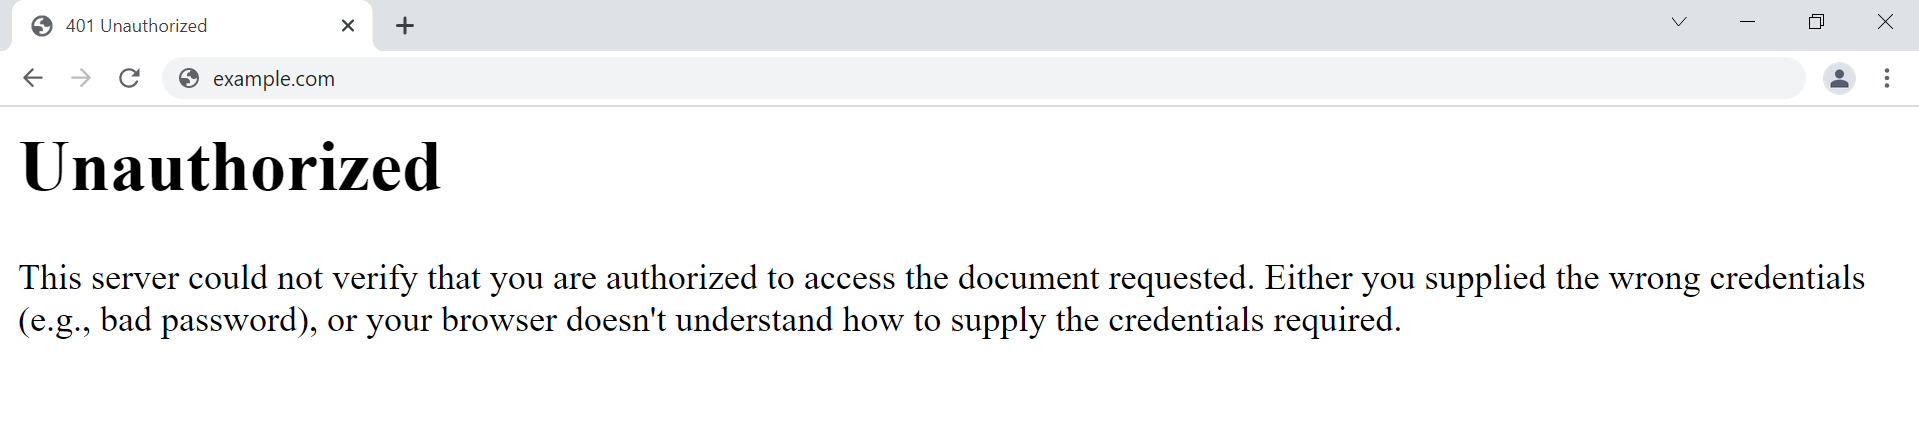
The “401 Unauthorized” error is an HTTP status code that occurs when a web server denies access to a specific web page or resource you are trying to reach. This happens because the request lacks valid authentication credentials, such as a username and password, or the provided credentials are incorrect.
This error doesn’t affect your ability to access other parts of the website that don’t require authentication. Essentially, the server recognizes your request but will not fulfill it until you can prove you have permission to access the content.
There are seven quick methods to fix the “401 Unauthorized” error:
- Check authentication credentials. Try re-entering your username, password, or API key carefully.
- Confirm the URL is correct. Double-check if the link is misspelled or if the resource path is incorrect.
- Clear your browser’s cookies and cache. Remove stored data in your browser settings, then try again.
- Flush DNS cache. Run a DNS flush command to reset old entries.
- Disable password protection. Review and adjust your server’s .htaccess or hosting panel settings.
- Disable plugins, modules, and themes. Temporarily deactivate them one by one to spot any conflicts.
- Check the WWW-Authenticate header. Inspect the response header to see the required authentication method.
Keep reading for a walkthrough of all the methods to solve the 401 error, learn the causes, and recognize error variations.
1. Check authentication credentials
The 401 page may appear when you’re trying to gain access to restricted resources, such as a password-protected page, with invalid authentication credentials. As a result, you’re unable to open the page.
First thing to do is double-check whether you’re logged in with a valid user ID and password. If you’re sure that you have entered valid authentication credentials, try changing the password.
If you’re having trouble accessing a password-protected WordPress site, make sure you know how to change your WordPress admin password.
In case you’re accessing a resource via an application programming interface (API), ensure that your API keys or tokens are correct and have the necessary permissions. Incorrect or missing API credentials can also trigger a 401 error.
2. Confirm the URL is correct
A wrong URL is a common cause of 401 HTTP status codes. So, make sure that the web address is typed correctly in your browser’s address bar, especially if it includes special characters or numbers.
Typos in hyperlinks from other sites can also lead to this error. If unsure, navigate from the website’s homepage or use a search engine to find the correct web pages.
3. Clear your browser’s cookies and cache
A corrupted or outdated browser cache and cookies may lead to a server authentication failure. It’s also possible that the current cache and cookies are outdated and in need of manual refreshing.
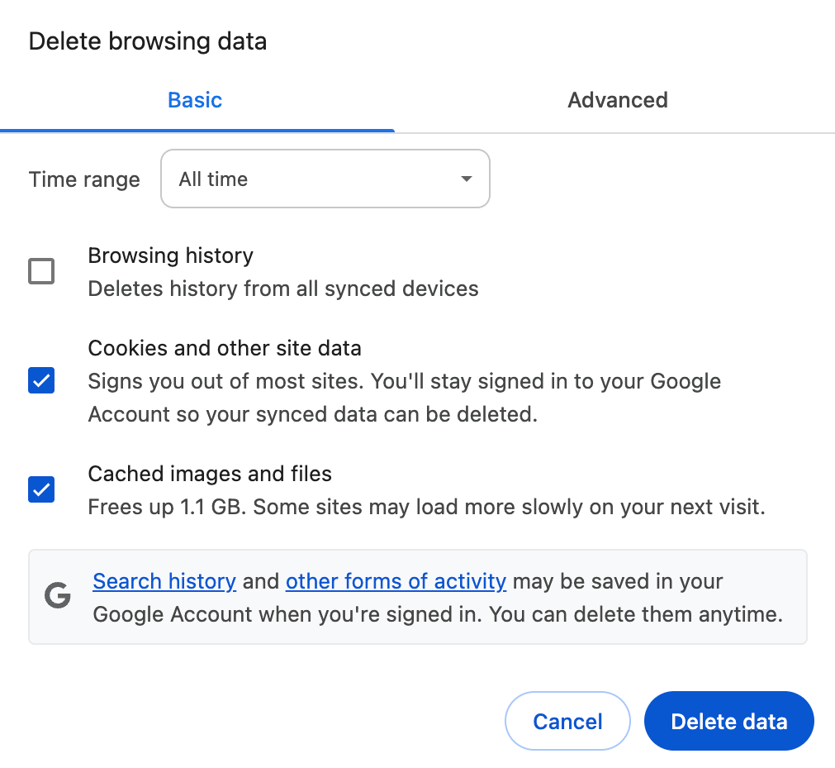
To delete the cached data and browser cookies, go to your browser’s settings and find the option to clear them. If you use Google Chrome, follow these steps:
- Click on the three dots to open the menu in the top-right corner.
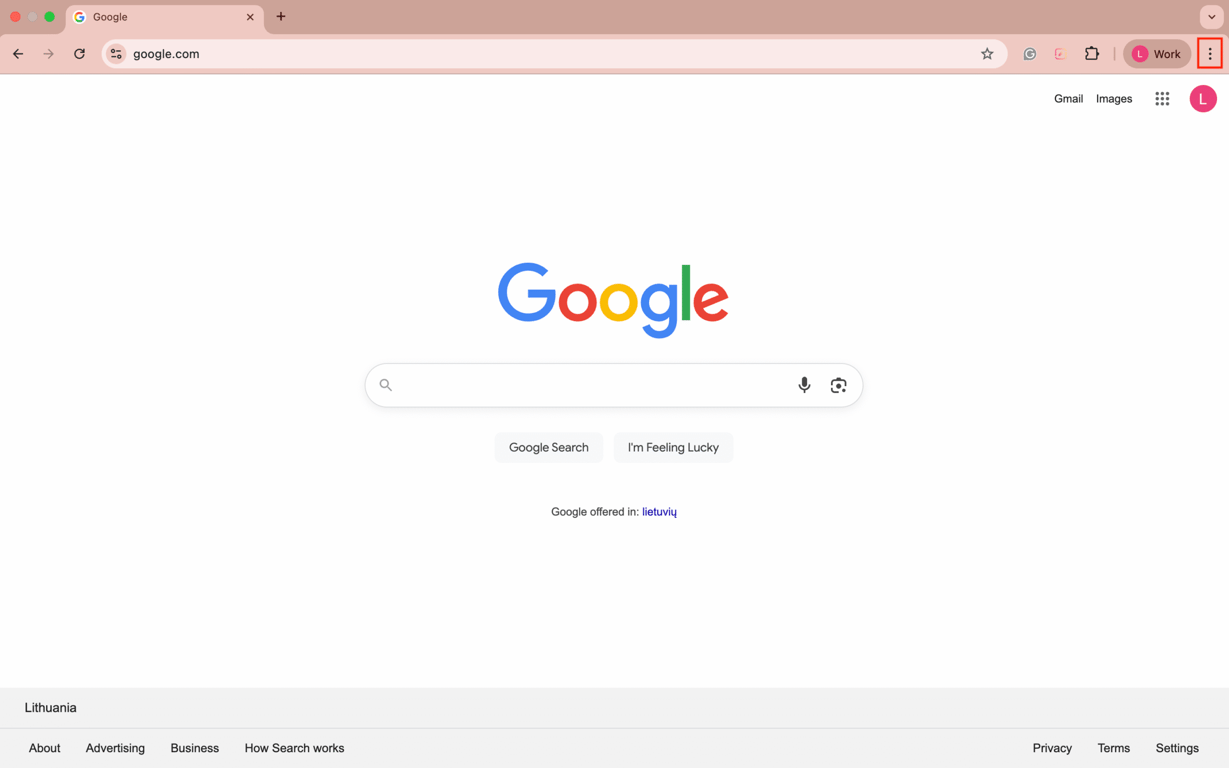
- Select Delete Browsing Data.
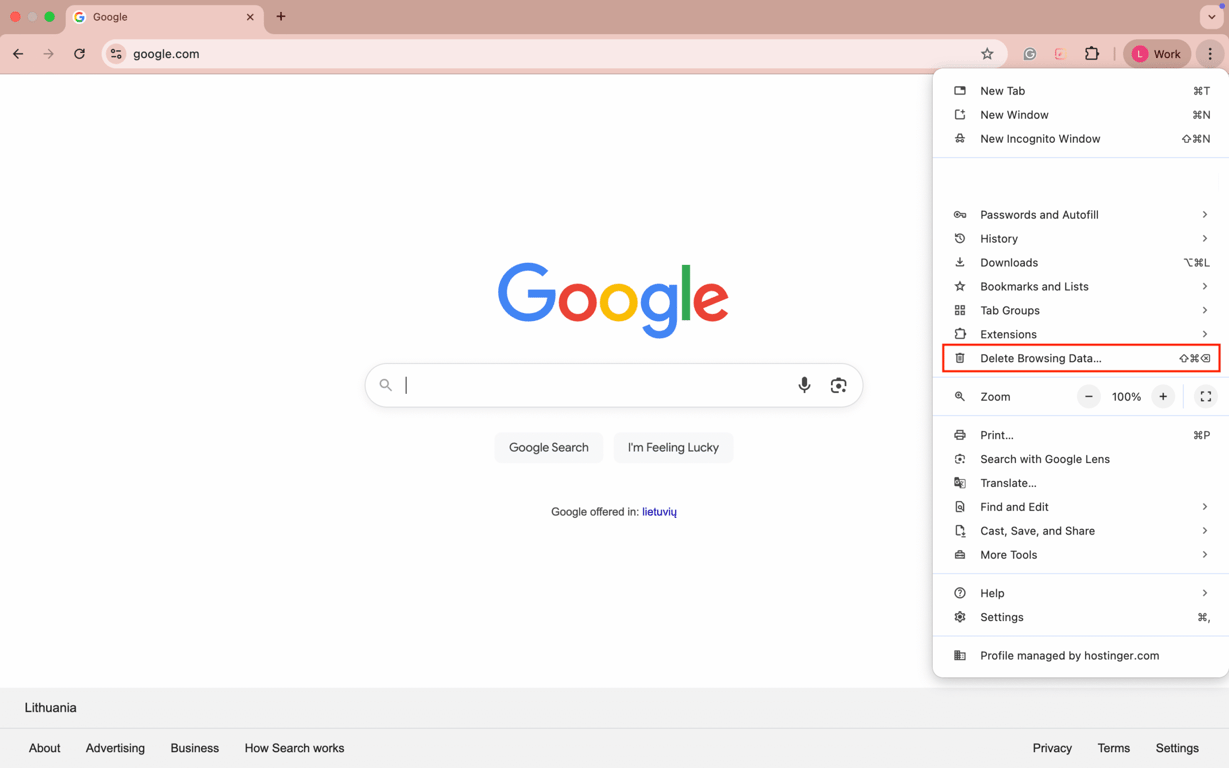
- In the Time range drop-down menu, select All time.
- Check Cookies and other site data and Cached images and files.
- Click the Delete data button to finish.
For a detailed guide on how to do this on other browsers, check out our tutorial on how to clear browser cache.
4. Flush DNS cache
The data in the domain name system (DNS) cache lets your device match URLs to their IP addresses faster for shorter loading times. However, unlike the browser’s cache and cookies, the DNS cache operates on the system level.
Although rare, a DNS error may result in the 401 HTTP status code. The cache may be outdated and contain incorrect URL and IP address details.
Flushing your DNS will clear the existing DNS records of your device. Thsi will force it to make a completely new request and re-authenticate the URLs.
Follow our guide on how to flush the DNS cache if you’re not sure how to do it.
5. Disable password protection
If you’re a website owner trying to solve the 401 error, it’s worth temporarily disabling password protection for the problematic section of your website.
If you have enabled password protection using .htaccess and .htpasswd files, follow these steps to disable it:
- Go to your web hosting account’s File Manager.
- Open the password-protected website directory.
Find the .htaccess file that you created when you first enabled password protection. Its content should look similar to this:
AuthType Basic
AuthName "Your authorization required message."
AuthUserFile /path/to/.htpasswd
require valid-user
- Back up the content of the .htaccess file in case you want to re-enable password protection in the future.
- Delete the .htaccess file from the directory.
- Find the secret location of the .htpasswd file, back it up, and delete it as well.
For more information, follow this guide to learn how to locate and create a WordPress .htaccess file.
Pro tip
If you host a website on Hostinger, you can manage password-protected website directories on hPanel.
6. Disable plugins, modules, and themes
If you get the “401 Unauthorized” error as a website’s administrator, you can try to identify its cause by disabling the plugins, modules, and themes you have installed on your website.
For example, if you have a WordPress site and can access its admin dashboard, consider changing your theme to the default and disabling all your plugins.
To change back to the default theme, go to Appearance → Themes and Activate the default theme.
To disable all WordPress plugins at the same time, go to Plugins → Installed Plugins. Bulk-select all the plugins, choose Deactivate from the drop-down menu, and click Apply.
The process to change your design template and disable the modules should be similar to any other CMS dashboard.
If you don’t have access to your WordPress admin dashboard, you can disable your WordPress plugins by opening the File Manager on your hosting account and renaming the Plugins folder. Hostinger users can manage their plugins straight from hPanel.
Similarly, you can change your WordPress theme without opening the admin dashboard by making changes to files through File Manager and phpMyAdmin.
7. Check the WWW-Authenticate header
A server generating a “401 Unauthorized” response has to send a WWW-Authenticate header field containing at least one challenge applicable to the target resource, according to the IETF.
This response header determines the authentication method the web browser should follow to access a specific page. Knowing what response the header sends and which authentication method is used will help determine the problem.
To check a WWW-Authenticate header for the cause of the 401 error, follow these steps:
- Access the page that generates the 401 error code. If you’re using Chrome, right-click it and select Inspect or press Ctrl+Shift+J to open the developer console.
- Open the Network tab, then reload the page. Click on the entry with the 401 error status.
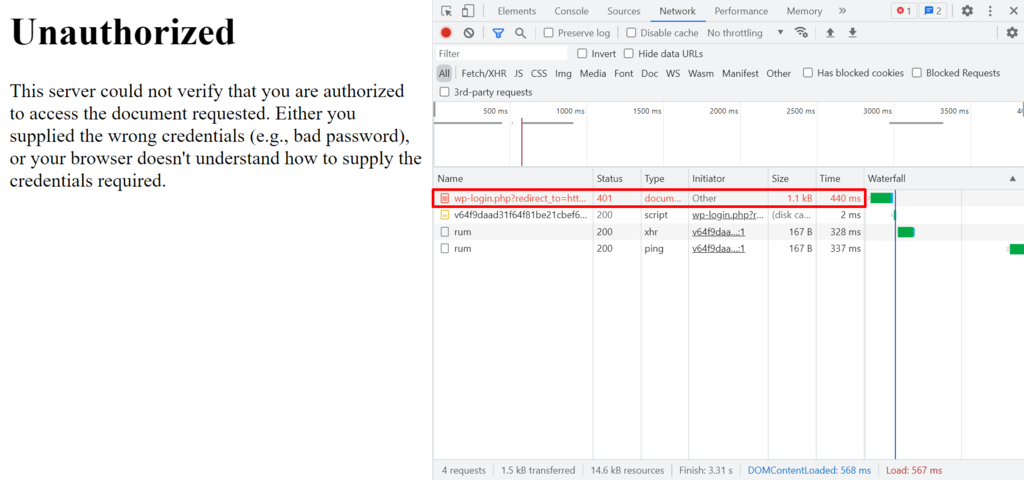
- Open the Headers tab. Find the WWW-Authenticate entry under the Response Headers section. It will show the authentication method the server enforces to provide access to the content.
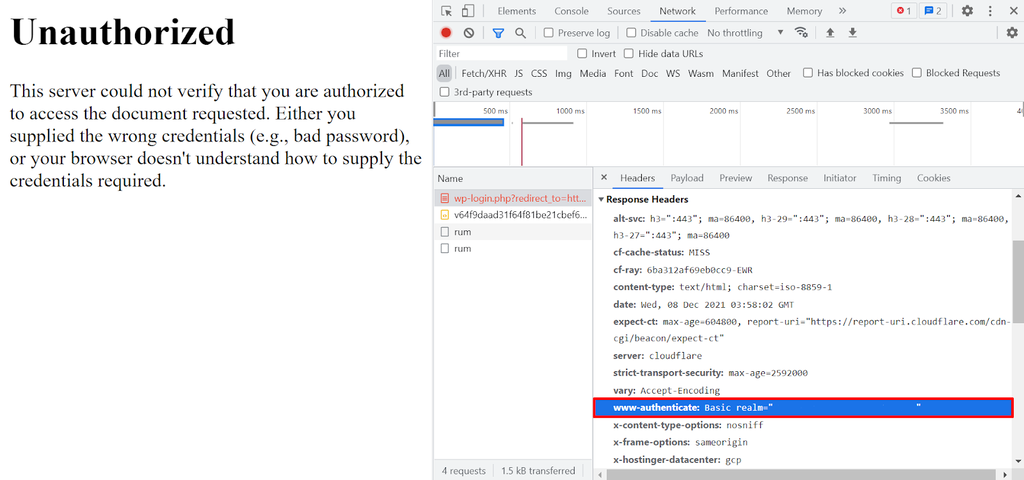
- Refer to the HTTP Authentication Scheme Registry to find out the page’s authentication method. In this case, the page uses the basic authentication method, which means that it only requires standard login credentials.
What causes the “401 Unauthorized” error?
A 401 error occurs when a page requires valid authentication credentials but they’re missing, invalid, or expired. Some common triggers include:
- Incorrect authentication credentials. This happens when the login details you provide, such as your username, password, or API key, don’t match the records stored on the server. Even small mistakes, like a typo or using outdated credentials, can trigger the error.
- Incorrect URL. A mistyped or outdated URL may point to a resource that requires authentication but doesn’t recognize your request, resulting in a 401 response.
- Session timeout. Many websites use time-limited sessions for security. If you stay idle for too long, the server invalidates your session, and any further requests are denied until you log in again.
- Misconfigured permissions. On the server side, file or directory permissions might be set incorrectly.
- Unsupported authentication method. Some servers require specific authentication protocols, like Basic Auth, OAuth, Bearer tokens. If your request uses a different or outdated method, the server won’t accept it, leading to a 401 error.
What are the 401 error variations?
When encountering a 401 response, instead of reaching the intended web page, your browser will display an error message. These messages serve as indicators of the specific type of 401 error you’re experiencing.
Commonly seen messages include:
- HTTP Error 401
- 401 Authorization Required
- 401 Unauthorized Error
- Access Denied
- Unauthorized
Each variation of the 401 error provides insights into why the authentication process failed, helping you diagnose and resolve access issues.
Below is a detailed list of various 401 error codes, along with their specific meanings:
- 401.1. The login attempt has failed, usually due to incorrect authentication credentials being provided.
- 401.2. The login attempt has been obstructed by server configuration issues, preventing successful authentication.
- 401.3. Access is denied due to the access control list (ACL) settings, which restrict resource access based on user permissions.
- 401.501. Too many requests have been generated by the client, or the client has reached the maximum request limit.
- 401.502. This error occurs when a particular client (same IP) sends multiple requests to a single server, reaching the dynamic IP Restriction Concurrent request rate limit.
- 401.503. The client’s IP address is included in the server’s deny list.
- 401.504. The client’s hostname is included in the server’s deny list.
401 Unauthorized vs 403 Forbidden error
The 401 error is just one example of the many errors in the 400 range you might encounter. Another common one that often causes confusion is the 403 Forbidden error.
While a 401 error means unauthorized access due to invalid or missing credentials, a 403 error indicates you’re forbidden from accessing the page, even with valid credentials, often due to permissions set by the website administrator. The difference lies in the root cause:
- A “401 Unauthorized” error means authentication is required or the provided credentials are invalid.
- A “403 Forbidden error,” on the other hand, means the server understands your request and knows who you are, but it’s refusing access because you don’t have the necessary permissions.
401 and 403 are just two of the many errors you might encounter online. If you’d like to learn what different codes stand for and the steps to fix them, read our complete guide to HTTP status codes.
All of the tutorial content on this website is subject to Hostinger's rigorous editorial standards and values.

Hasna is passionate about tech, culture, and the written word. She hopes to create content that helps people succeed on the web. When not writing, rearranging, or polishing sentences, she enjoys live music and overanalyzing movies.

Matleena is a seasoned Content Writer with 5 years of content marketing experience. She has a particular interest in emerging digital marketing trends, website building, and AI. In her free time, Matleena enjoys cups of good coffee, tends to her balcony garden, and studies Japanese. Follow her on LinkedIn