How to Create a WordPress Chat Room to Boost Website Engagement + Plugin Recommendations
If you run a forum or membership site and want to improve visitor engagement, installing a chat room can be a great solution.
Chat rooms are virtual spaces where visitors can communicate with the website owner and other participants in real time via text.
For WordPress CMS users, many excellent chat room plugins let you add this functionality to your site easily.
In this article, we will share how to add a chat room to a WordPress site and explore the benefits of using one. You will also learn several tips to improve your WordPress chat room functionality and user experience.
Download all in one WordPress cheat sheet
Why Add a Chat Room to a WordPress Website
Adding a chat room to a WordPress forum or membership site offers these benefits:
- Networking – a chat room provides a space for your visitors to discuss and build an active community.
- Instant support – you can use a chat room as a live chat to provide customer support by answering users’ questions in real time.
- User retention – a chat room can convert visitors into registered chat participants and encourage them to return.
- Feedback – suppose you launch a new post format on your WordPress site, such as podcasts or videos. In this case, a chat room enables you to ask for live feedback.
However, you must have a reliable managed WordPress host to enjoy these benefits – users won’t be able to utilize a chat room on a website that doesn’t load. Starting at $2.99/month, Hostinger’s WordPress hosting plans come with a 99.9% uptime guarantee and unlimited bandwidth.

How to Create a Chat Room on WordPress
In this section, we will go over the steps of choosing and setting up a chat room with a plugin.
1. Pick a Chat Room Plugin That Fits Your Needs
The following are several features you should consider when looking for a WordPress chat room plugin:
- Mobile-friendliness – ensure a consistent user experience across desktop and mobile devices.
- Multiple chat rooms – make chat room channels for members with specific interests.
- Chat moderation – control user behavior in the chat room, such as filtering bad words and banning or kicking users.
- Customization – change the chat room theme, font, and background color, making it more appealing to members.
- Backup – secure chat history containing valuable information, such as feedback and media files.
If you need help deciding on the plugin, go to this article’s section covering WordPress chat room recommendations.
2. Activate and Configure the Plugin
Once you have picked your preferred chat room solution, head to the WordPress admin dashboard and install the plugin.
First, configure its settings so the plugin works properly. To demonstrate, we’ll use the Wise Chat plugin. We’ll show how to configure the General and Messages Posting settings.
To access the plugin settings, navigate to Settings → Wise Chat Settings. On the General tab:
- Go to the Chat Access Settings section and select Disable Anonymous Users to limit the chat participants to registered users only.
- Scroll down to the Chat Opening Hours and Days section. Select Enable Opening Control to specify when the chat is available for users.
- Save the changes.
After that, navigate to the Messages Posting tab and follow these steps:
- On the General Settings section, define the length of messages a user can send by filling out the field. The default value is 400.
- Go to the User Notifications section and add notification sounds to several events, such as new messages, online and offline users, and username mentions.
- Navigate to the File Attachment Settings section and choose whether to enable the file-sharing feature. If yes, decide the allowed file extensions and size limit.
- Save the changes.
3. Add the Chat Room to a WordPress Website
You can add the Wise Chat plugin to your website via a shortcode and a widget. Here is how:
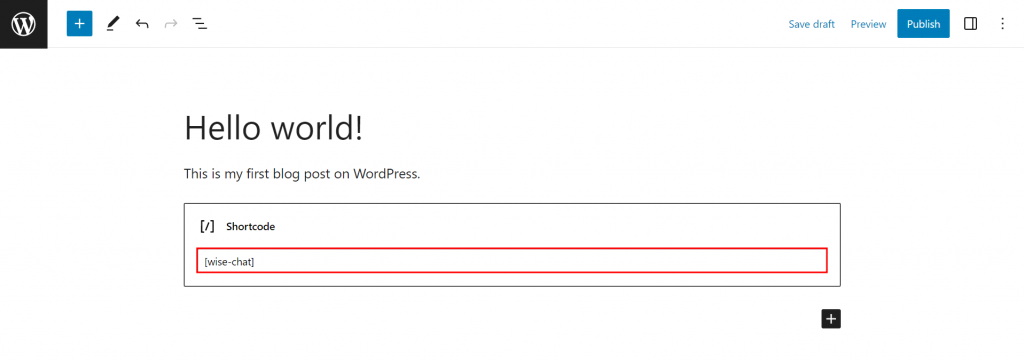
Shortcode
- Navigate to Posts → Add New to create a new post.
- Open the block inserter tool and look for the Shortcode block. Alternatively, type /shortcode to quickly add the block in the editor.
- Type[wise-chat] in the text field.
- Publish the post to save the changes.
Widget
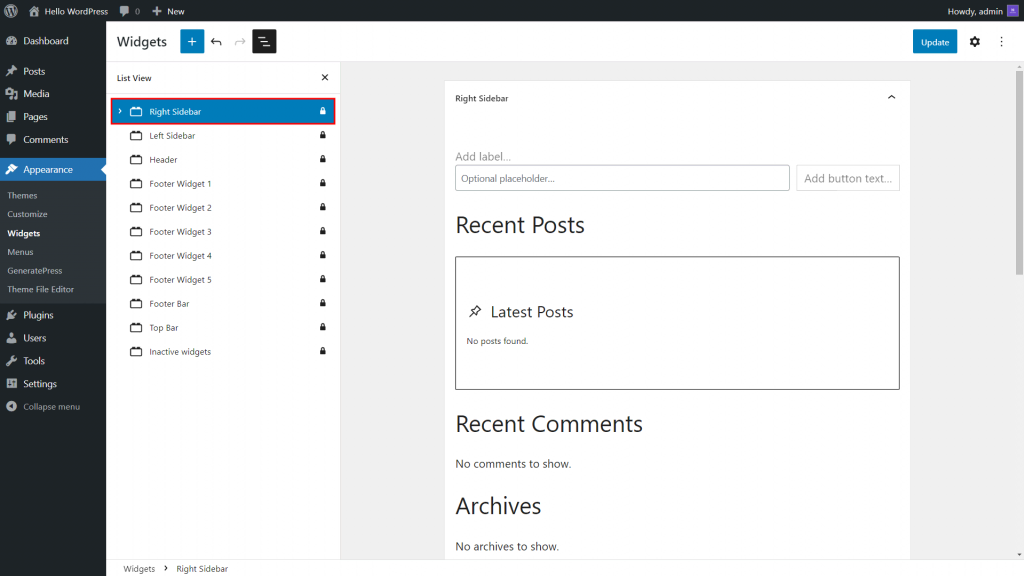
- Go to Appearance → Widgets.
- Click List View and choose a widget from the list. For instance, we used the Right Sidebar widget.
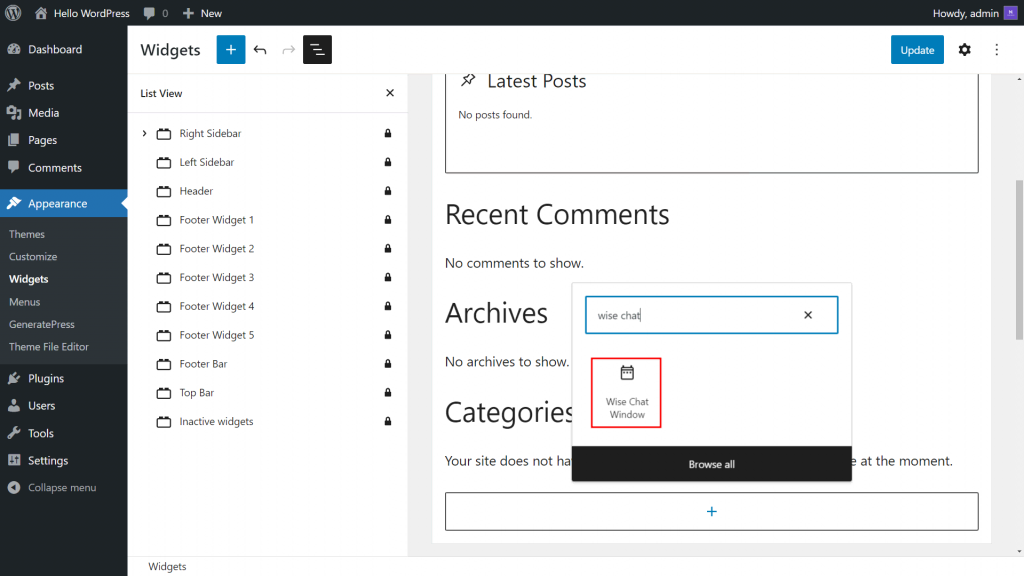
- Select the Add Block button and insert the Wise Chat Window block.
- Click Update to save the changes.
4. Customize and Test the Chat Plugin
You can modify the chat appearance to fit your website’s theme or design. Here are the steps to do it using Wise Chat:
- Open Wise Chat Settings and click Appearance.
- On the Chat Window Appearance section, choose a theme from the dropdown list. Then, modify the background and font color and specify the font size.
- Go to the Message Appearance section and set the message date and time format. Select the Username Display Mode option and choose Link to page.
- Save the changes.
Finally, test the chat room to check if it works as expected:
- Open an incognito or private browsing tab and visit your website.
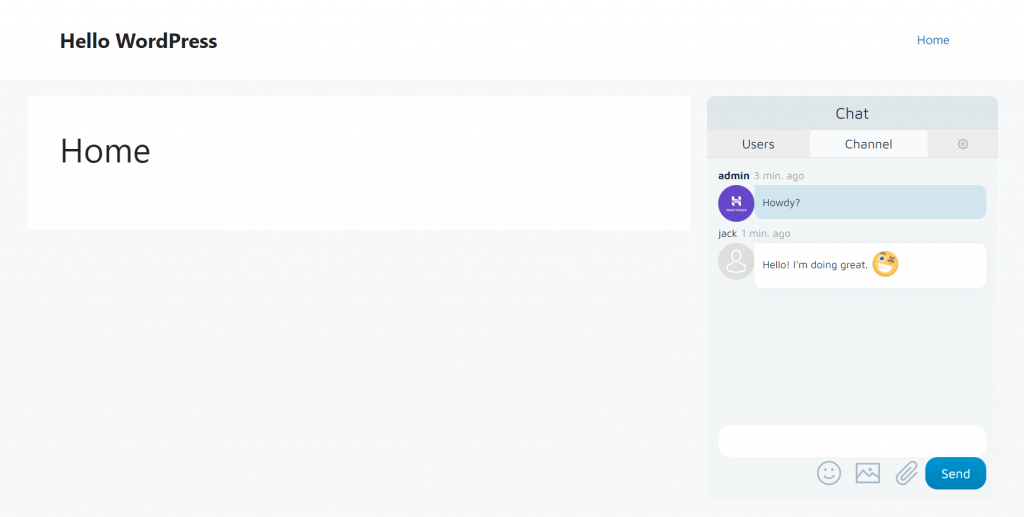
- The chat room window should appear depending on where you insert it.
- Try sending text messages and uploading media to the chat room.
Tips for Improving Your Chat Functionality and User Experience
Various WordPress chat rooms offer excellent tools to create a great user experience. However, it is up to you to ensure the chat works as intended.
To accomplish this, follow the tips below:
Promote the Chat Room to Encourage Users to Participate
We recommend promoting your chat room to inform site members and visitors about the update. Doing so also helps you motivate them to use the chat room.
You can promote the chat room by creating a social media campaign and posting it to multiple platforms, such as Twitter, Facebook, or LinkedIn. Also, consider sending newsletters to your site members or subscribers.
Enable a User Login Feature on the Chat Room
Activating a user login feature ensures secure interaction between chat participants, as you only allow logged-in or authorized users to enter the chat room.
The feature also lets users customize their profiles with their preferred names and avatars, making your chat room more appealing and interactive.
You can also collect data from chat participants, such as the most-used features and their contact details, like names and email addresses. The data can help you improve your chat room functionality and user experience.
Use a Chat Moderation Tool to Control User Behavior
Using a moderation tool ensures the conversations in your chat room stay productive and positive.
If you have multiple chat rooms, you can create a rule for each room and assign moderators to monitor them. Moderators can perform various actions, such as muting, banning, or kicking users who violate the chat room rules, making the chat environment safer and more comfortable.
A moderation tool lets you monitor inappropriate content, such as spam or phishing attempts, creating a more reliable and secure chat room environment.
Top 3 Chat Rooms for WordPress
In this section, we have listed the top three WordPress chat room plugins. We will discuss their main features in detail, so you can better understand which chat room plugin suits you best.
1. Wise Chat
Wise Chat Stats
- Rating: 4.5/5
- Best for: making group chat rooms and live chat
- Pricing model: freemium
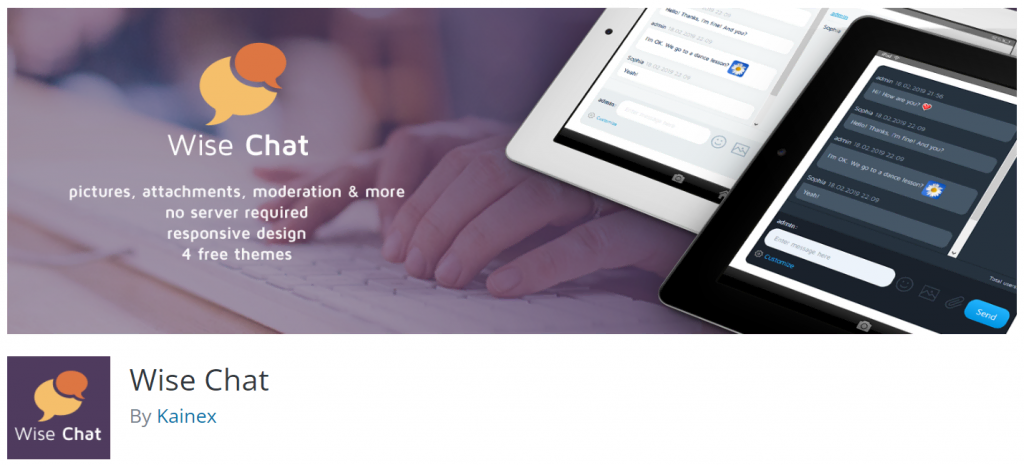
Wise Chat is a great WordPress chat solution that lets you add public chat rooms to your website. To embed the chat room, you only need to insert a shortcode on a post or page or add it to your website’s widget, such as the sidebar.
The plugin provides a user-friendly interface with four pre-configured themes – Default, Light Gray, Cold Dark, and Air Flow. You can also insert custom CSS styles to add advanced customization options to the chat room, like changing the width or height and adding a transition effect.
Wise Chat also enables you to create a blocklist of specific IP addresses. Therefore, you can easily ban or mute users permanently. The plugin can also filter bad words and replace them with any text.
The Wise Chat plugin has a demo account that lets you test the chat features before installing it.
However, as its free version has limited features, consider purchasing the premium plan at $60/license to unlock all the features.
Key Features
- Unlimited chat rooms
- Private chat channels
- Backups
- Customizable chat appearance
[DOWNLOAD]
2. Simple Ajax Chat
Simple Ajax Chat Stats
- Rating: 4.8/5
- Best for: creating public group chat rooms
- Pricing model: freemium
As Simple Ajax Chat has a minimalist chat room design, this plugin needs fewer resources. The installation process is also simple since you only need a shortcode to add the chat room to your site.
If you insert multiple chat rooms, you can customize each chat window with a different theme, text color, and font style. Chat users can also enable browser notifications and email alerts for upcoming messages directly from the chat window.
Moreover, The Simple Ajax Chat plugin includes advanced security features. For example, you can utilize Google reCaptcha and create a list of banned phrases or terms.
The plugin’s free version offers anonymous user settings, 1-click export chat messages, and anti-spam protection. With Simple Ajax Pro, ranging from $60–580/year, you can access advanced features such as unlimited chat rooms, chat management tools, and email notifications.
Key Features
- A self-hosted chat room plugin
- Unlimited chat rooms
- Chat room smart performance optimization
- Robust anti-spam security
[DOWNLOAD]
3. Minnit Chat
Minnit Chat Stats
- Rating: 4.5/5
- Best for: creating public group chat rooms
- Pricing model: freemium
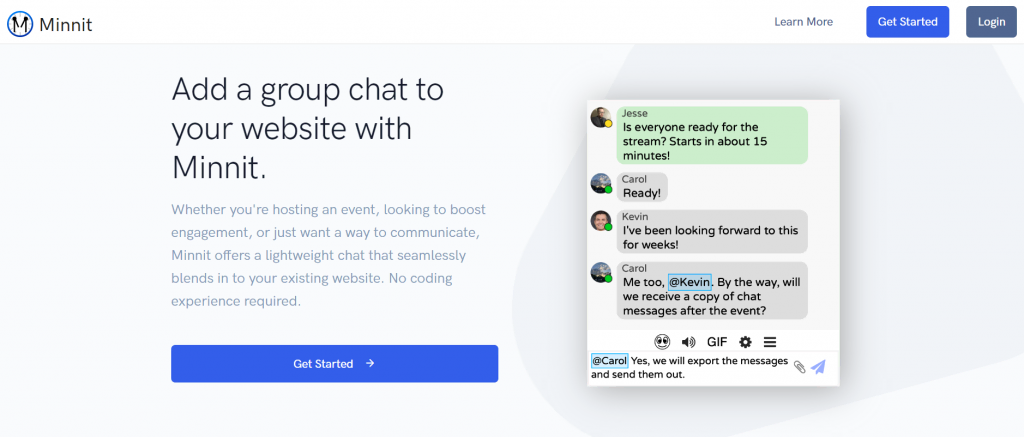
The Minnit Chat plugin is a great fit for small to large companies who want to create WordPress group chat rooms for specific events, such as webinars and live streams.
The chat room window has a clean and minimalist interface, letting users interact with other participants without any distractions.
It also provides an SSO feature that lets registered users automatically log in to the chat room once they return. The plugin enables you to stream on a radio station from SHOUTcast, ICEcast, iHeartRadio, or TuneIn Radio.
The Minnit Chat’s free trial includes two chat room channels, SSO, and an embedded chat feature. Meanwhile, the premium plans, ranging from $18–500/month, offer more features like API access, custom domains, notifications, and auto-moderation.
Key Features
- Customizable themes
- Embed chat
- Chat moderation tools
[DOWNLOAD]
Conclusion
Utilizing a chat room on your website is a great way to increase visitor engagement. This way, you can effectively build brand recognition, gather valuable feedback for a better user experience, and increase conversion rates.
Setting up a chat room on your WordPress site is quite straightforward. In this article, you have learned how to set up and customize a chat room plugin using the Wise Chat plugin.
As a recap, the following are the four steps on how to create a chat room in WordPress:
- Pick a plugin that fits your needs.
- Activate and configure the plugin.
- Add the chat plugin to a WordPress website.
- Customize and test the plugin.
We also have provided several recommendations for chat room plugins to help you decide.
We hope this article has helped you understand how to add chat functionality to WordPress. Leave a comment below if you have any questions. Good luck!
All of the tutorial content on this website is subject to Hostinger's rigorous editorial standards and values.
