How to create a newsletter in WordPress
To create a newsletter in WordPress, you need to first choose between a WordPress plugin or a third-party service, then design, optimize, and test your newsletter before sending it to your audience.
As you send more newsletters, focus on monitoring performance metrics and maintaining a clean subscriber list. This includes ensuring GDPR (General Data Protection Regulation) compliance, removing inactive contacts, and continuously optimizing your campaigns through A/B testing, segmentation, timing adjustments, and more effective calls-to-action.
We’ll explain the WordPress newsletter creation process in detail, from choosing between plugins and external services to designing compelling content and tracking performance. You’ll also discover best practices to improve email deliverability, ensure GDPR compliance, and optimize your email campaigns for long-term success.
Why do you need a newsletter?
A newsletter is one of the most effective tools for building direct and long-term relationships with your audience. Unlike social media platforms that rely on algorithms, email marketing campaigns go straight to your subscribers’ inboxes. This gives you complete control over how and when your message is delivered.
Here are some key benefits of using newsletters in WordPress:
- Direct communication. A newsletter lets you speak directly to your audience without relying on intermediaries and algorithms. Whether you’re sharing updates, promotions, or valuable content, your message lands right where it matters most: their inbox.
- Increased engagement. Newsletters help you stay top-of-mind by delivering valuable content directly to subscribers’ inboxes. This can help maintain interest between website visits and create opportunities for interaction through links, replies, and social shares.
- Higher conversion rates. Email marketing consistently delivers a strong return on investment (ROI). In fact, every $1 spent on email marketing gives back $36. By sending targeted messages to interested subscribers, you’re more likely to drive traffic, generate sales, and reach your goals.
- Build a loyal community. When you regularly provide relevant content, spotlight customers, and offer member perks like early access to products or exclusive discounts, subscribers are encouraged to keep opening your emails, participate in your community, and advocate for your brand to others.
Newsletter in WordPress: step-by-step guide
Setting up a newsletter in WordPress involves four key steps: choosing your approach, configuring subscription forms and email sending, launching your first campaign, and monitoring performance for continuous improvement.
Step 1: Choose your WordPress newsletter approach
Before you start designing your newsletter, it’s important to decide how you want to manage it within WordPress. There are two main methods:
- Installing a WordPress plugin, such as MailPoet, Newsletter, or Mailster, that allows you to manage everything (including forms, subscribers, and campaigns) directly from your dashboard.
- Connecting WordPress with a third-party email marketing service like Mailchimp, Kit, or Brevo for more advanced tools and scalability.
Each approach comes with its own set of features, advantages, and ideal use cases. Here’s a side-by-side comparison to help you decide:
| Approach | Description | Pros | Cons |
| WordPress newsletter plugin | Install a plugin on your WordPress site that manages newsletter forms, email creation, and sending all from your dashboard. | ✅ Beginner-friendly ✅ Fully managed from WordPress, no need for external accounts ✅ Easy to set up and use ✅ Free or low-cost options available | ❌ Limited scalability ❌ May affect site performance ❌ Basic subscriber management (limited segmentation options) |
| Third-party email marketing service | Use an external platform that connects to WordPress via a plugin or API integration. | ✅ Advanced marketing features, including detailed segmentation ✅ Better deliverability and newsletter templates ✅ Scalable for growing lists | ❌ Requires a separate account ❌ Learning curve for new users ❌ Often involves additional costs based on subscriber count |
A WordPress plugin is a good choice if you’re a beginner or want a simple solution that keeps everything inside your WordPress dashboard. This is great for small blogs or websites that don’t need advanced subscriber segmentation.
However, you should choose a third-party service if you need more advanced features like finer audience segmentation, A/B testing, or detailed performance tracking. This is ideal for marketers, online stores, and growing businesses that want more feedback and scalability.
Whichever method you pick, you’ll be able to create and send newsletters from WordPress – what changes is how powerful and scalable your system is.
Step 2: Implement your newsletter solution in WordPress
Now it’s time to set everything up. Depending on your choice, you’ll either configure one of the recommended WordPress newsletter plugins or connect your website to a third-party email platform.
Option A: Install and set up a newsletter plugin
Newsletter plugins can be installed directly in your WordPress dashboard through the plugin repository. We’ll use the Newsletter plugin as an example in this walkthrough, but the installation and setup process remains almost identical for other options.
Here’s how to set it up:
Install the plugin
- Go to your WordPress dashboard.
- Navigate to Plugins → Add Plugin.
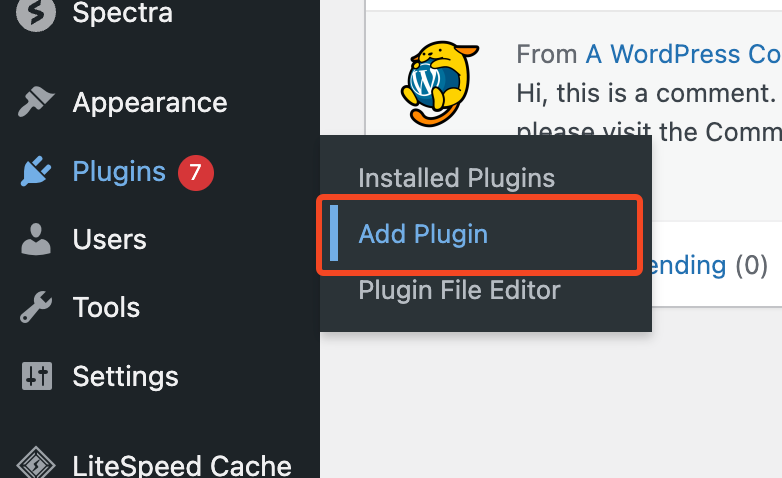
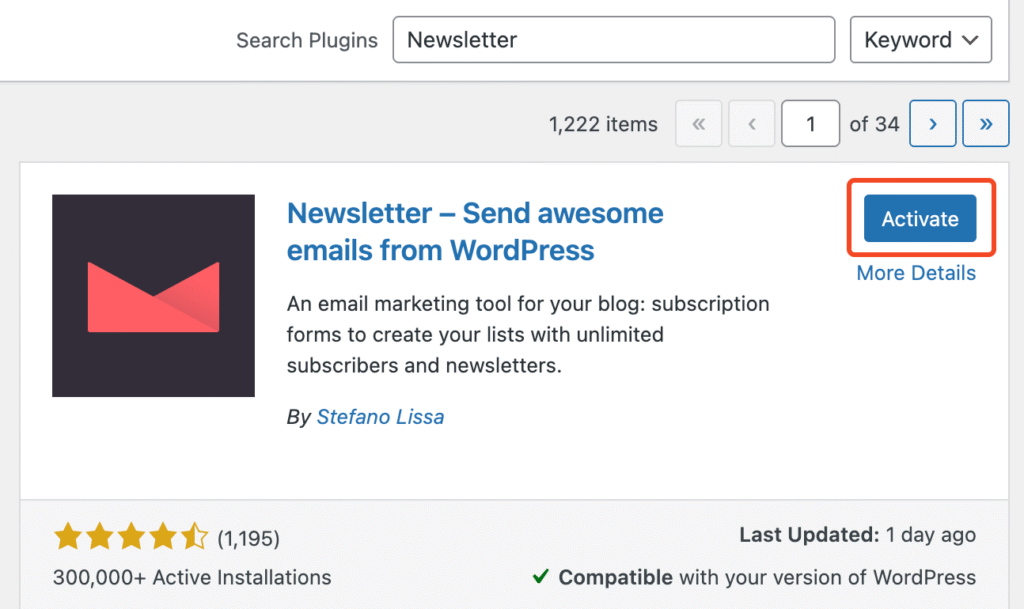
- In the search bar, type “Newsletter” or the name of your chosen plugin. If you’re unsure which plugin to choose, consider reviewing some of the best WordPress newsletter plugins to find the one that best suits your needs.
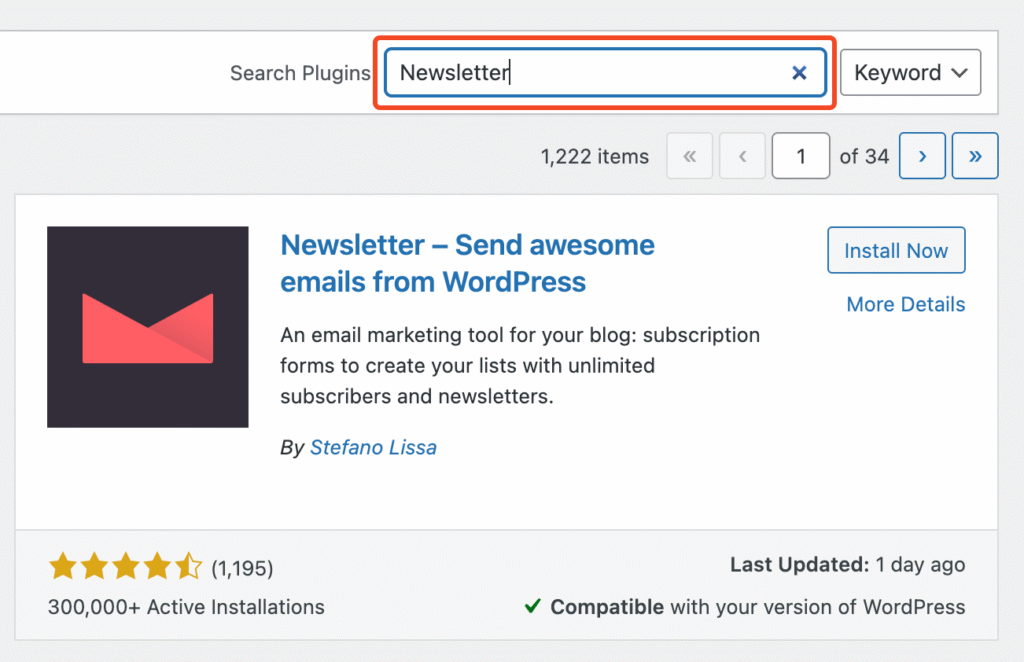
- Click Install Now, then Activate once the installation is complete.
Initial setup and configuration
- After activation, the plugin will add a new section to your WordPress dashboard sidebar. Click on it to access the plugin’s settings and begin setup.
- Enter your sender name and email address. Make sure this matches your domain to improve deliverability.
- Choose what personal data you want to request from your subscribers, such as their name, email address, and whether you want a privacy checkbox. You can also customize the Subscribe button label. Click the field to change its name, and then click Next once you’ve finished configuring these settings.
- Use the test feature to make sure the plugin is working correctly. Enter your email address and click the Send Test Message button to confirm that messages are being delivered successfully.
If the email arrives in your inbox, it’s time to start creating your newsletter.
Option B: Integrating with an external email service
Email marketing services offer more advanced features than plugins, including detailed segmentation, automation workflows, and professional templates, but can be more complex to set up.
Hostinger Reach uses AI to simplify advanced design, complex automation workflows, and comprehensive analytics, making this email marketing tool accessible even for beginners.
Plus, if you’re already in the Hostinger ecosystem, it offers automatic integration and built-in compliance features.
Here’s how to set it up:
1. Create your Hostinger Reach account
- If you’re an existing Hostinger customer: Log into your hPanel dashboard, look for the Email Marketing section in the sidebar menu, and click on Hostinger Reach to get started.
- If you’re new to Hostinger: Visit reach.hostinger.com and click the Get Started button. Choose either the free plan or select a paid plan that fits your needs.
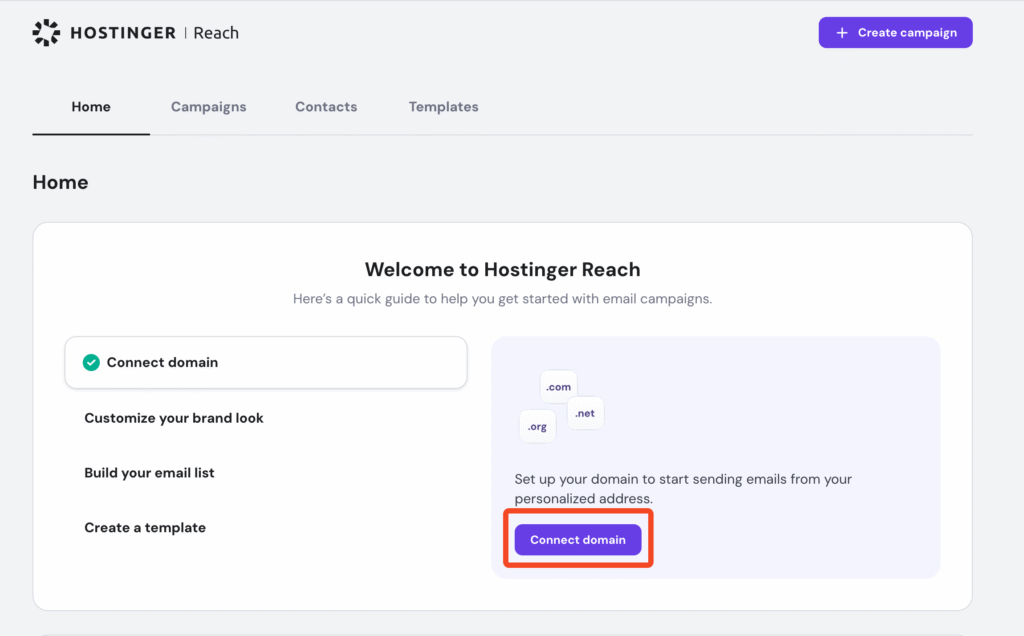
- Once inside Reach, you’ll see a Connect domain button. Click it and select your domain from the dropdown menu (if you have multiple domains) or enter your domain name manually.
- After connecting your domain, you’ll be directed to the Sender Settings page (or look for a Settings tab in the main navigation). Here, set up your sender name, email address, and business details.
One major advantage of Hostinger Reach is that it automatically handles the technical email authentication setup in your DNS settings which helps your emails reach inboxes instead of spam folders.
Other email services require manual configuration, which can be daunting for beginners. You can learn more about email authentication records if you’re curious about the technical details.
2. Install the WordPress plugin
- In WordPress, go to Plugins → Add New.
- Search for the official “Hostinger Reach” plugin.
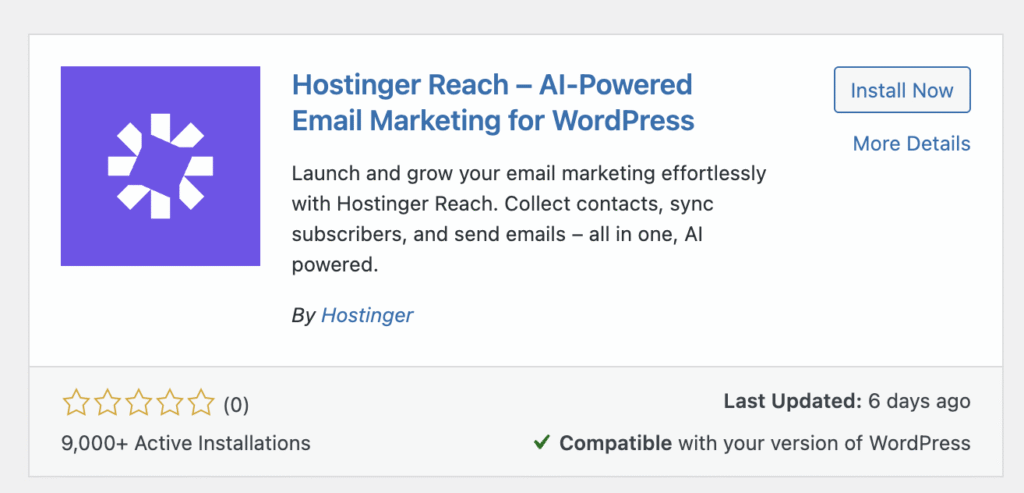
- Click Install Now, then Activate the plugin.
- The plugin allows automatic syncing of contacts from your WordPress forms directly to your Reach subscriber list.
3. Connect WordPress to Hostinger Reach
- Open the plugin’s settings panel from your WordPress dashboard.
- Open the plugin’s settings panel from your WordPress dashboard (look for Hostinger Reach in your sidebar menu).
- You’ll need to create an API key from your Reach account. In Reach, go to Settings → API Keys, click Generate New Key, and copy the key that appears.
- Back in WordPress, paste this API key into the API Key field in the plugin settings.
- Click Connect or Test Connection. You’ll see a green success message when the link is established.
- Choose which subscriber lists to sync and whether to automatically add new WordPress users to your email lists.
If you have existing subscribers from another platform, you can import them by going to your Reach dashboard → Contacts → Import. Upload a CSV file containing email addresses and any other pertinent information, like names or locations. This is useful when switching from services like Mailchimp or when you have a spreadsheet of customer emails you want to add to your newsletter.
Now your WordPress site is connected to Hostinger Reach and ready to automatically capture subscribers while you create professional email campaigns with AI assistance.
Step 3: Design and send your newsletter
A well-designed and interactive newsletter not only looks professional but also builds trust with your audience. While the specific tools and editors will differ slightly depending on your chosen plugin or platform, the core process is essentially the same for all of them.
Plan your newsletter content
Before diving into design, take a moment to clarify your newsletter’s purpose. What do you want your readers to do after opening it? This could be visiting your blog, checking out a new product, signing up for an event, or simply staying informed.
Popular newsletter formats include:
- Blog updates and curated articles
- Announcements, product launches, or seasonal promotions
- Educational tips, tutorials, or how-tos
- Event invitations or community highlights
- Personalized or behind-the-scenes messages
Make sure each newsletter has a clear goal and call to action (CTA), whether that’s clicking a link, reading a blog post, or making a purchase. Keep your branding consistent across all newsletters by using the same colors, fonts, and logo placement – this builds recognition and trust over time.
Create a new campaign or newsletter
There are two main ways to create and design your newsletter campaign: using a third-party email platform like Hostinger Reach or working within your chosen WordPress plugin’s built-in editor.
The process varies depending on which approach you selected during setup, but both will likely offer drag-and-drop functionality and design customization options.
1. Using a third-party email platform
Hostinger Reach’s AI template creator lets you generate professional, mobile-friendly emails from simple prompts. Simply tell the AI what your email is about (whether it’s a product launch, newsletter, or special offer) and it automatically creates both the content and design for you. You can then track opens, clicks, and performance in real-time without any technical setup required.
Here’s how to get started:
- In your Reach dashboard, click Create Campaign and select Newsletter.
- Describe your newsletter content in the AI prompt field.
- Adjust colors, fonts, and layout to match your brand, or upload your logo and product images.
- Edit the AI-generated content to match your voice and add specific details.
- Check how your newsletter appears on desktop, tablet, and mobile before sending.
2. Using WordPress plugin’s built-in editor
If you’re using a WordPress plugin like MailPoet or Newsletter, head to the plugin’s email or campaign section in your dashboard and click the button to create a new email. Most plugins offer several newsletter templates to choose from, such as a standard newsletter, a welcome email, or an automatic post update.
Use the built-in drag-and-drop editor to structure your content. Typically, you’ll want to include a strong subject line, a brief introduction, one or two main content blocks (such as a featured post or offer), and a clear call-to-action button. You can also personalize your email with tags (like the subscriber’s first name) and add visual elements to support your message.
📚Suggested reading
Check out our comprehensive guide on how to create email newsletters.
Optimize for readability and engagement
Keep your message focused. Try to communicate one primary idea per newsletter, whether that’s driving traffic to your latest article or promoting a specific offer. Use clear headings, short paragraphs, and bullet points to break up the text for easier scanning.
Visuals can help grab attention and reinforce your message, but don’t overdo it by using too many images or large file sizes that slow down loading times. Include only high-quality images that support the content, and always add alt text in case images fail to load. Emails with excessive images can also trigger spam filters or fail to display correctly on mobile devices with limited data connections.
Most importantly, make sure your design is responsive. Over half of all emails are opened on mobile devices, so test how your newsletter looks on smaller screens and ensure that buttons are large enough to tap easily.
Preview, test, and send
Before sending your newsletter, preview it inside the editor and on different devices if possible. Most tools offer a test email feature – use it to check formatting, click all the links, and proofread the content one last time.
Once everything looks good, you can either send the email immediately or schedule it to go out at a specific time. Depending on your audience, certain days or hours may perform better. For example, weekday mornings often yield higher open rates, but this can vary based on your industry.
Step 4: Track email statistics and optimize campaigns
Whether you’re using a plugin or a third-party service, most tools offer built-in analytics that track opens and user actions. These metrics tell you if your subject lines hooked readers, which links they cared about, who is losing interest, and which emails drove real actions. Use that insight to repeat what works and rethink what doesn’t.
Here are the most important performance indicators to keep an eye on:
| Metric | Explanation | Industry Average |
| Open rate | The percentage of recipients who open your email. This is often influenced by your subject line, sender name, and send timing. | 42.35% |
| Click-through rate (CTR) | The percentage of recipients who click on a link in your email. This reflects how compelling your content and calls to action are. | 2.00% |
| Bounce rate | The percentage of emails that couldn’t be delivered. A high bounce rate may indicate issues with email quality or outdated addresses. | Varies by list quality |
| Unsubscribe rate | The number of people who opted out after receiving your email. Occasional unsubscribes are normal, but consistent spikes may signal a problem with content relevance or frequency. | Below 0.08% |
| Conversion rate | The percentage of subscribers who completed a desired action after clicking through, such as making a purchase or signing up for something on your site. | Varies by industry |
While these numbers can vary depending on your industry or audience, they offer a useful starting point for evaluating your own performance.
Best practices for newsletter success on WordPress
To ensure long-term effectiveness, you need to follow a few best practices that help you reach inboxes, stay compliant with regulations, and consistently deliver value. This section covers the technical, legal, and strategic elements that contribute to a successful newsletter experience on WordPress.
Email deliverability and GDPR compliance
Making sure your emails land in your subscribers’ inboxes and not their spam folders is essential. Email deliverability is influenced by both technical setup and your sender reputation.
If you’re using a third-party service, verify your sending domain and configure SPF (which tells email providers which servers can send emails from your domain), DKIM (which adds a digital signature to verify your emails are authentic), and DMARC (which protects against email spoofing). Most email service providers offer step-by-step guides for setting up these DNS records through your hosting provider or domain registrar.
You should also keep your list clean by removing inactive or bounced addresses regularly. Avoid sending emails to users who haven’t explicitly opted in; this can damage your sender reputation and result in higher unsubscribe or spam complaint rates.
On the legal side, compliance with privacy laws like the General Data Protection Regulation (GDPR) and CAN-SPAM is non-negotiable. Here are some essential practices you must follow:
- Always include an unsubscribe link in every newsletter.
- Identify your organization clearly in the footer.
- Collect email addresses using explicit consent (no pre-checked boxes).
- Keep a record of when and how subscribers joined your list.
Most WordPress plugins and external platforms offer GDPR-friendly features to help you automate these requirements.
Analyzing performance and iterating for improvement
Tracking your key metrics is just the start – the real work is turning those insights into higher-performing newsletters. Each metric tells a different story about what’s working and what needs attention.
Improving low open rates (Below 30%)
- Test different subject lines. Try shorter subjects (under 50 characters), add urgency (“Limited-time offer”), or ask questions.
- Optimize sender name. Use a recognizable name instead of a generic company email.
- Experiment with send timing. Test different days and times to find when your audience is most active.
- Clean your list. Remove inactive subscribers who haven’t opened emails in 6+ months.
Boosting low click-through rates (Below 1.5%)
- Strengthen your CTAs. Use action words like “Get,” “Download,” or “Start” instead of “Click here”.
- Improve email layout. Make your main CTA button larger and use contrasting colors.
- Reduce options. Include only one primary CTA per newsletter to avoid choice overload.
- Match content to expectations. Ensure your email delivers what the subject line promised.
Reducing high bounce rates (Above 5%)
- Validate email addresses. Use email verification tools before adding new subscribers.
- Remove hard bounces immediately. Delete permanently undeliverable addresses.
- Check your sender reputation. Ensure your domain and IP aren’t blacklisted.
- Avoid spam triggers. Don’t use excessive caps, exclamation marks, or sales-heavy language.
Lowering high unsubscribe rates (Above 0.5%)
- Segment your audience. Send more targeted content based on interests or behavior.
- Reduce frequency. If many people unsubscribe after every send, you may be emailing too often.
- Set clear expectations. Remind subscribers what they signed up for and how often they’ll hear from you.
- Provide value consistently. Focus on helpful content rather than constant sales pitches.
Increasing conversion rates
- Align landing pages. Ensure the page you link to matches your email’s message and design.
- Create urgency. Use limited-time offers or countdown timers to encourage immediate action.
- Simplify the conversion process. Reduce form fields and remove unnecessary steps.
- A/B test everything. Try different email layouts, CTA placement, and offer types to see what converts best.
Remember, improvement takes time. Test one element at a time, give each test at least a few sends to gather meaningful data, and always keep your audience’s preferences in mind when making changes.
📚Suggested reading
For more on testing and refining your email strategy, reviewing proven email marketing tips can help you apply industry-backed techniques to improve performance and build a stronger connection with your audience.
How often should I send out my newsletter?
According to a study by Campaign Monitor, sending a newsletter no more than twice a week and at least once a month is ideal to maintain engagement without overwhelming subscribers. This frequency provides regular touchpoints with your audience while giving you enough time to prepare quality content.
The best schedule depends on your goals, content type, and audience expectations. Weekly newsletters work well for sites that publish fresh content, run frequent promotions, or want to build a strong brand presence. Biweekly or monthly emails are suitable if you offer in-depth updates or have a smaller content pipeline.
Be transparent about your schedule when users subscribe. Let them know how often they’ll hear from you and stick to that schedule. If you plan to change frequency later, communicate that clearly with your audience.
Regularly reviewing engagement metrics will also help fine-tune your strategy. If you notice spikes in unsubscribes after a specific campaign or a drop in engagement, consider adjusting how often you send or what type of content you deliver.
Next steps for WordPress newsletter success
Setting up a newsletter in WordPress is only the beginning. Once the foundation is in place, your focus should shift to consistency, refinement, and long-term growth.
Audience segmentation, for example, allows you to send more relevant content to specific groups of subscribers based on their behavior, interests, or engagement level. This improves both open and click-through rates while making your emails feel more personalized.
A/B testing is another useful strategy for ongoing improvement. This involves sending two slightly different versions of your newsletter to small portions of your audience to see which performs better, then sending the winning version to everyone else.
Whether you’re experimenting with subject lines, layouts, call-to-action buttons, or landing pages, testing helps you understand what works best for your audience. Learn how to get started with WordPress A/B testing to improve your post-clickthrough newsletter performance through informed experimentation.
Finally, as your list grows, think about how to attract more quality subscribers. Tactics like using lead magnets, optimizing signup forms, and promoting your newsletter across your website and social platforms can help expand your reach organically.
Your newsletter strategy should evolve alongside your audience and goals. Keep analyzing your results, adjusting your approach, and prioritizing value in every email. With time, your WordPress newsletter can become one of the most effective tools for nurturing a loyal, engaged community around your brand.
All of the tutorial content on this website is subject to Hostinger's rigorous editorial standards and values.

Emman is a Content Writer at Hostinger where she helps simplify complex topics for readers around the world. With over 5 years of experience in crafting SEO content, she’s passionate about making tech topics easy to understand. In her free time, Emman enjoys traveling and watching Formula 1 races. Follow her on LinkedIn.