Docker tutorial: A complete guide to running containers
Oct 31, 2025
/
Aris S.
/
11 min Read
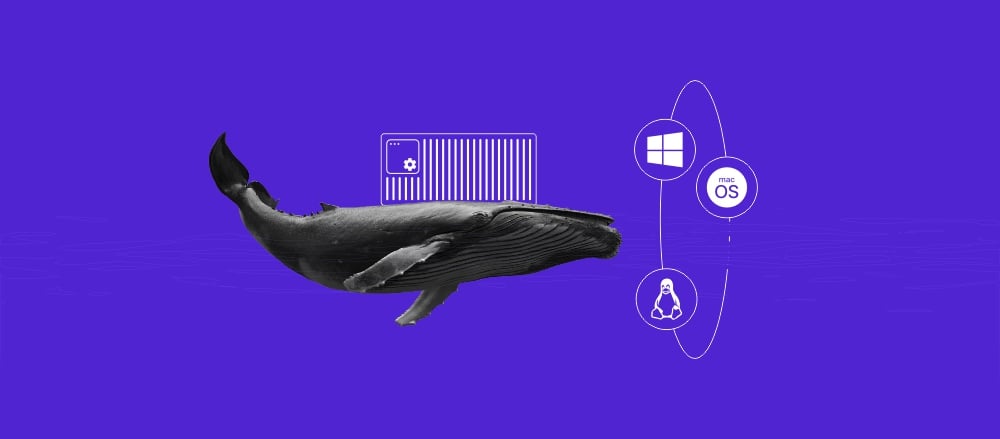
Docker is an open platform designed to simplify the process of developing, shipping, and running applications. It streamlines software delivery by using containerization, a technology that packages your application and its dependencies into isolated, runnable units called containers. This ensures your software runs consistently regardless of the environment.
At its core, Docker relies on several key concepts: the Docker Engine, Docker Hub, Images, Containers, Dockerfiles, and Docker Compose. Understanding all of these components enables you to create, deploy, and manage containerized applications.
You can use and interact with Docker using commands, but this platform also offers a desktop version with a graphical interface. Their configuration process is different: You can set up the desktop version as a typical .dmg or .exe application, while the CLI requires installation via a package manager like APT or Homebrew.
When using the Docker ecosystem, various errors can occur on any layer, whether it’s on the image, Dockerfile, or the container itself. Since these problems can cause the whole containerization system to malfunction, it’s crucial to learn more about the common issues, their causes, and the solutions. We’ll dive deeper into these after exploring the essential Docker concepts.
What is containerization?
Containerization is an operating-system-level virtualization that packages software applications to run in isolated user spaces called containers.
A container bundles an application with all its necessary components – code, system libraries, dependencies, and configuration files – to create an isolated environment.
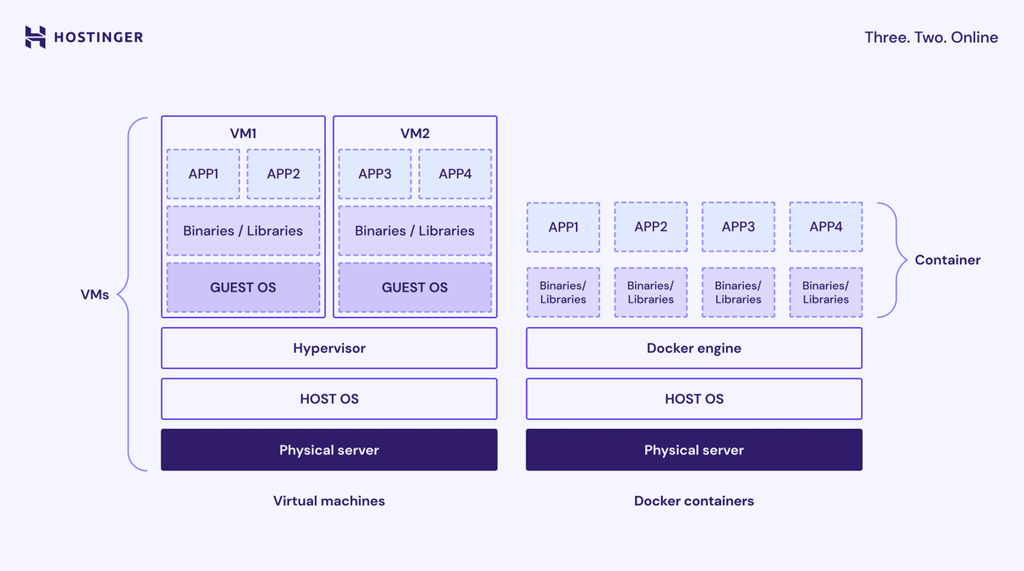
Unlike Virtual Machines (VMs), containers are lightweight because they share the host system’s common operating system kernel. This independence from the underlying infrastructure enables applications to run consistently across different environments.
The benefits of containerization include:
- Portability. Containers run consistently in any environment, from a local machine to a remote server from providers like Hostinger. This eliminates the common problem where applications encounter compatibility issues when moved to different systems during deployment or collaboration.
- Efficiency. While VMs require a full guest operating system and a hypervisor, containers don’t. This capability makes them a more lightweight and efficient form of virtualization.
- Isolation. Each container runs isolated processes, with its own software, configuration, network stack, and environment variables. This enhances security and prevents conflicts between applications.
Why should I use Docker?
You should use Docker because it provides a reliable, efficient, and standardized way to build, share, and run applications. It solves several real-world software development and deployment problems:
- The “but it works on my machine” problem. Docker guarantees that an application runs in exactly the same way for every developer and in every stage of production, eliminating environment-related bugs.
- Rapid development and deployment. It simplifies the process of creating a reproducible environment. Developers can integrate features like maps or payment gateways without building them from scratch, which saves time.
- Scalability and portability. Using tools like Docker Compose, you can define a complex multi-container application stack in a single file and easily share it, ensuring consistency across teams and scaling services as needed.
- Resource efficiency. Since containers are lightweight and share the host OS kernel, they require fewer resources than traditional VMs.
What are the core Docker concepts?
Docker organizes the concept of containerization into a set of core, interdependent components. These elements work together as a platform to manage the entire lifecycle of a containerized application, from building the initial blueprint to running the final multi-service application.
Docker Engine
Docker Engine is the core open-source technology for building and containerizing your applications. It uses a client-server architecture to manage all Docker objects, like images, containers, and networks.
The three main parts of the Docker Engine are:
- The server. A long-running daemon process (dockerd) that handles all the important tasks, such as creating, running, and destroying containers.
- APIs. Interfaces that allow programs, including Docker CLI, to communicate with and instruct the daemon.
- The CLI client. The Docker command-line tool, which is the primary way for users to interact with the platform.
To better understand this concept, think of the Docker Engine as the chef, kitchen, and waiter in a restaurant.
- The Server (dockerd) is the chef who prepares the food, or runs the container in the context of Docker.
- The APIs are the menu and order slips that tell the chef what to make.
- The Docker CLI is the waiter who takes your orders in the form of commands and delivers these requests to the kitchen.
To check if your Docker Engine is running and connected to the client, simply run a command to see if it responds to your request. For example, execute the following:
docker ps
This command asks the Docker Daemon to list all currently running containers. If Docker Engine is working properly, it should display a list of the running containers.
Docker Hub
Docker Hub is the default public Docker registry – a storage and distribution service for Docker images. It hosts official images for popular software like nginx, node, and python and allows users to create private repositories for their custom images.
When you build a container, you need to install various software packages from images. Docker Hub simplifies the process by allowing you to download images from a centralized repository.
Docker Hub uses tags to label and identify images, which denote a specific version of the software package, such as latest. This maintains container consistency and functionality across different environments.
Think of Docker Hub as a community cookbook library. It stores pre-written recipes for common dishes that anyone can download and use to create a meal. You can also upload your own recipes to share or to keep as private backups.
You can interact with Docker Hub using the Docker command. For example, use the following to download an image from the registry:
docker pull <name>:<tag>
For instance, to download the latest official Ubuntu image:
docker pull ubuntu:latest
Docker images
A Docker image is a read-only template that contains all the instructions and files needed to create a Docker container. It packages the application code, configuration files, system libraries, and the base operating system files.
Images are built from a Dockerfile, where each instruction creates a distinct, immutable layer that defines what the image should contain or do.
Simply put, an image is the blueprint for a machine. It contains a set of instructions detailing exactly what the final product should contain, but it can’t be changed once built. When you follow the blueprint, you create a Docker container.
To list the images you have locally downloaded, use:
docker images
Then, the following command builds a container in your current directory using a specific image. If the image isn’t already downloaded, Docker will automatically pull it from the Hub:
docker build -t your-image-name:latest .
The best practice when using images is to use a minimal base image to reduce the size and minimize the potential attack surface commonly introduced by unnecessary packages or components.
Docker containers
A container is a runnable instance of an image. It is the isolated space where your application executes, along with its configuration, dependencies, and required software packages.
When you create a Docker container, a writable layer is added on top of the image’s read-only layers, allowing you to make file modifications in its local filesystem.
Containers are designed to be ephemeral or stateless, meaning they can be stopped, destroyed, rebuilt, and replaced with minimal configuration. An individual container is managed with the Docker CLI, while multiple ones are administered using Docker Compose or an orchestration tool like Kubernetes.
Using the same analogy, a container is the actual, running appliance or machine built from the blueprint or image. When you create a Docker container, you’re assembling and starting that machine to run the processes defined within the image.
To create a Docker container and run a command inside it, simply use the run command:
docker run -it ubuntu /bin/bash
This command runs the Ubuntu image, starting an interactive container and executing the /bin/bash shell.
Dockerfiles
A Dockerfile is a plain text file that contains a sequence of step-by-step instructions for building a Docker image. It defines everything from the base operating system to the environment variables and application code.

Here are some of the most common key instructions in a Dockerfile and their purpose:
- FROM. Specifies the base image for a new build stage.
- RUN. Executes commands during the image build process.
- COPY or ADD. Copies files from the build context into the image.
- CMD or ENTRYPOINT. Defines the command that runs when the container starts.
- ENV. Sets environment variables that will be available during the build and at runtime.
- WORKDIR. Sets the working directory for the subsequent RUN, CMD, ENTRYPOINT, COPY, and ADD instructions.
Some Dockerfile instructions create a layer – a step in the image build process. However, instructions that set configuration or metadata, like WORKDIR, don’t.
Here’s an example of what a Dockerfile looks like:
FROM python:3.9-slim
WORKDIR /app
COPY requirements.txt .
RUN pip install -r requirements.txt
COPY . .
CMD ["python", "app.py"]
Docker Compose
Docker Compose is a tool that simplifies the definition and management of multi-container applications using a single configuration file, typically named docker-compose.yml.
Within the configuration file, developers can define all the containers, networks, and volumes to build a complex application stack. Then, they can start and manage all the containers, otherwise called services in the context of Docker Compose, with a single command.
Without Docker Compose, you will need to configure each container manually in your image and manage them individually using Docker CLI. If your application comprises multiple interconnected services, this process is tedious and time-consuming.
If a container is a single appliance, Docker Compose is the wiring diagram for an entire kitchen. It defines how the oven, the refrigerator, and the toaster are all connected and powered on together using one switch to serve their purposes in cooking.
Here’s an example of a Docker Compose file:
services:
  web:
    build: ./web  # Build the image from Dockerfile in the ./web directory
    ports:
      - "8000:8000"  # Map host port 8000 to container port 8000
    depends_on:
      - db     # Wait for the db service to be started
      - redis  # Wait for the redis service to be started

  db:
    image: postgres:15  # Use the official PostgreSQL 15 image
    environment:
      POSTGRES_USER: myuser       # Set database username
      POSTGRES_PASSWORD: mypassword  # Set database password
      POSTGRES_DB: mydb           # Set initial database name
    volumes:
      - db-data:/var/lib/postgresql/data  # Persist database data using a named volume

  redis:
    image: redis:alpine  # Use a lightweight Redis image for caching

volumes:
  db-data:  # Define a named volume to store database data
To build and start all the services defined in your docker-compose.yml file in the background, run the command with the -d or detached flag:
docker compose up -d
There are other docker compose commands that allow you to manage all the containers simultaneously throughout the application lifecycle. To learn more about them, check out our What is Docker Compose tutorial.
How to install Docker
The Docker installation process differs depending on its type. If you use Docker Desktop, you can simply download the installer package from the official page and unpack it as you would with other applications.
Meanwhile, you can install Docker CLI with commands using your system’s package manager, like Ubuntu’s APT or macOS’s Homebrew. Check the official documentation to learn more about the commands for configuring Docker on your operating system.
Note that the Docker CLI doesn’t ship with certain features, such as Docker Compose, meaning you must install it separately. If you use Hostinger’s Docker hosting solution, you don’t need to set it up separately, as our built-in Docker Manager feature has a Compose functionality.

Understanding basic Docker commands
Use the Docker CLI to interact with Docker Engine and manage your containers. Here are some of the most essential Docker commands for different tasks:
- docker ps -a. Lists all containers, including those that are stopped.
- docker pull <name>:<tag>. Downloads an image from the registry to your local machine.
- docker rmi <image>. Deletes a local image.
- docker stop <container>. Gracefully stops a running container.
- docker rm <container>. Deletes a container.
For a complete reference of the most-used commands for images, containers, volumes, and more, check out our comprehensive Docker cheat sheet.
How to manage Docker volumes
Volumes are the preferred and primary mechanism to maintain data persistence in Docker, ensuring that data remains accessible even after a container is removed.
This is important because throughout the container lifecycle, you may need to tear them down for updates or maintenance. If this container runs applications like a database where data integrity is vital, setting up proper volumes is essential.
Docker offers three main types of storage:
- Volumes. Persistent data of your containers in the Docker storage area, which is typically /var/lib/docker/volumes/ on the host system.
- Bind mounts. Map a file or directory from the host machine directly into the container.
- tmpfs mounts. Store data in the host’s memory, which is lost when the container stops.
Here are the steps to create and manage a volume for persistent data:
- Create a named volume using the following command. For example, this will set up a volume called my-database-data:
docker volume create my-database-data
- Start your database container using the -v flag to map the named volume to the container’s internal data directory. The command looks like this:
docker run -d \
  --name my-database \
  -e MYSQL_ROOT_PASSWORD=securepassword \
  -v my-database-data:/var/lib/mysql \
  mysql:latest
- Inspect the volume’s details and location on the host by running:
docker volume inspect my-database-data
- To remove unused volumes that aren’t attached to any container and free up disk space, use:
docker volume prune -a
Instead of commands, you can declare and mount a volume by writing the configuration inside Docker Compose’s YAML file. This helps you track volumes each container uses more easily, which is helpful when you have multiple services.
For example, the following YAML configuration covers the steps for creating a volume and mounting a container above:
services:

  my-database:

    image: mysql:latest

    container_name: my-database

    environment:
      MYSQL_ROOT_PASSWORD: securepassword

    volumes:
      - my-database-data:/var/lib/mysql

volumes:
  my-database-data:
How to create a Docker network
Docker networks maintain isolation and enable communication between containers and external systems. By default, containers are connected to a bridge network. To set up communication for a multi-service application, you should create a user-defined bridge network.
Docker networks allow containers to communicate with each other and with external systems.
By default, Docker connects a container to a special network called the default bridge network, which allows it to communicate with the host. However, this default bridge network isn’t suitable for multi-container setups, as it has limited functionality in allowing services to connect with one another.
For multi-service applications, the best practice is to create a user-defined bridge network that enables containers to communicate with each other using their service names. This simplifies service discovery, improves control over how containers interact, and minimizes service interference between services.
You can connect a container with a user-defined bridge network by adding the networks directive to the service’s configuration within Docker Compose’s YAML file. Here’s an example:
services:

  my-database:

    image: mysql:latest

    container_name: my-database

    environment:
      MYSQL_ROOT_PASSWORD: securepassword

    volumes:
      - my-database-data:/var/lib/mysql

    networks:
      - my-app-network #create a network
Alternatively, you can create a user-defined bridge network using the following command, with my-app-network being its name:
docker network create my-app-network
Then, you can start your container using Docker CLI with the –name flag to define the service name and –network to specify which network it attaches to. Here’s an example:
docker run -d \
  --name my-database \
  --network my-app-network \
  -e MYSQL_ROOT_PASSWORD=securepassword \
  -v my-database-data:/var/lib/mysql \
  mysql:latest
If you want to run and connect to another container, simply repeat the command with updated information about the service. In the following example, we add an extra -p flag to publish the container’s internal port 80 to the host machine’s port 8080 for external access:
docker run -d \
  --name my-webapp \
  --network my-app-network \
  -p 8080:80 \
  my-web-app-image:latest
Troubleshooting common Docker issues
When working with Docker, common failure points typically involve the layered system, including images, containers, volumes, and networks. Below, we’ll break down recurring problems and their solutions.
Container exits immediately
Containers might immediately stop after being started because their main process, defined by the CMD or ENTRYPOINT in the Dockerfile, finishes executing or crashes. A common cause is that Docker Engine attempts to run a background-only service without using a detached mode.
Some solutions for this error include:
- Checking logs. Use docker logs <container_name> to view the application’s stdout and stderr and identify the crash reason.
- Inspect the Dockerfile directives. Ensure the container is running a long-lived process by checking if the Dockerfile contains CMD or ENTRYPOINT. For example, a web server must stay running to serve requests.
- Run in detached mode. If the application is a long-running service and you want it in the background, ensure you use the -d or –detach flag when running docker run or docker compose run.
Image layer caching issues
If changes to your Dockerfile – such as updating a package version – don’t seem to be taking effect, you might be encountering an issue with Docker’s layer caching. This mechanism reuses previously built layers to speed up the image creation process, rather than rebuilding them from scratch.
While this improves efficiency, it can cause issues when changes are made to the early layers of the Dockerfile, as the subsequent instructions will become invalid.
The simplest solution for this issue is to force a complete rebuild and ignore the layer cache. Do it by adding the –no-cache option when initiating the build process, like this command:
docker build --no-cache -t my-app:latest .
When installing packages using a Dockerfile, also explicitly include a command that prevents the package manager from reusing old layers with outdated package lists. In Debian-based distributions, you can achieve this by combining apt-get update and apt-get install -y –no-install-recommend in the same RUN statement like so:
RUN apt-get update && apt-get install -y --no-install-recommends
Registry authentication failure
If you receive an error like “denied: requested access to the resource is denied” when pushing an image to a registry, such as Docker Hub, it means the Docker CLI client has not been authenticated with the registry server.
The solution is to log in and authenticate your account with the registry. Here are the steps:
- Log in to the registry using the following command, with my-registry-example.com being the actual address of the registry. If you want to push images to Docker Hub, you can omit the address:
docker login my-registry.example.com
- Enter your username and password when prompted.
- Tag the image correctly with the registry host, repository, and tag before pushing using this command:
docker tag my-local-image:latest my-registry.example.com/my-repo/my-local-image:latest
- Push the image to the registry by running this command:
docker push my-registry.example.com/my-repo/my-local-image:latest
What are the next steps to master Docker?
To master Docker and use it on real-world production use cases, you’ll need to go beyond the basics of using a single container and simple commands. The next steps involve understanding advanced techniques for the deployment and management of complex, high-availability applications.
In addition to Docker Compose, learning advanced orchestration tools like Docker Swarm or Kubernetes is crucial for managing and scaling multiple containers across a cluster of machines.
Also, deepen your knowledge of network drivers, such as the Overlay Network Driver used in Docker Swarm mode for connecting hosts across a cluster. Connecting multiple machines using Docker’s default networking is a complex and manual process, whereas overlay networks simplify and automate cross-host communication in a scalable and reliable way.
Finally, explore Docker use cases to gain a deeper understanding of how to utilize this containerization tool for various tasks during development and deployment.
All of the tutorial content on this website is subject to Hostinger's rigorous editorial standards and values.

Aris is a Content Writer specializing in Linux and WordPress development. He has a passion for networking, front-end web development, and server administration. By combining his IT and writing experience, Aris creates content that helps people easily understand complex technical topics to start their online journey. Follow him on LinkedIn.