How to create a Docker container for efficient application management
Aug 28, 2025
/
Jordana A. & Ariffud M.
/
5 min Read
Docker containers let you efficiently manage applications across different environments. Continue reading to learn how to create a Docker container and unlock its full potential for streamlined development and deployment.
Creating a Docker container is a simple process:
- Get a Docker image. An image is a blueprint containing all the necessary code, libraries, and dependencies, which you can download from a public registry like Docker Hub.
- Write a Dockerfile. If you need a custom image, write a Dockerfile – a simple text file with instructions for Docker on how to build your image.
- Create the container. Using the image, you’ll run a command to create a live, running instance called a container.
- Manage the container. Once your container is running, you can manage its lifecycle with commands to start, stop, and monitor it.
Download free docker cheat sheet
What is a Docker container?
A Docker container is a lightweight, standalone software package that includes everything needed to run an application: code, libraries, dependencies, and runtime.
Just as a physical container can be moved from a ship to a train to a truck without changing its contents, a Docker container lets you move an app from a developer’s laptop to a testing environment and into production without any changes.
This solves the classic “it works on my machine” problem.
For example, you can run a MySQL container to provide a portable database or a Node.js container for web apps.
Containers are based on Docker images, which act as blueprints. Each time you run an image, Docker creates a new container instance. Check out our guide on Docker image vs container to learn about their differences.
Prerequisites
Before you start creating containers, make sure you have:
- A server or local machine. This guide uses an Ubuntu 24.04 Server, but the commands will work on most modern Linux distributions.
- Docker installed. Make sure it’s running on your system. If you need help, follow our tutorial on how to install Docker on Ubuntu.
- Basic command-line knowledge. Familiarity with navigating directories and running basic Docker commands will be helpful.
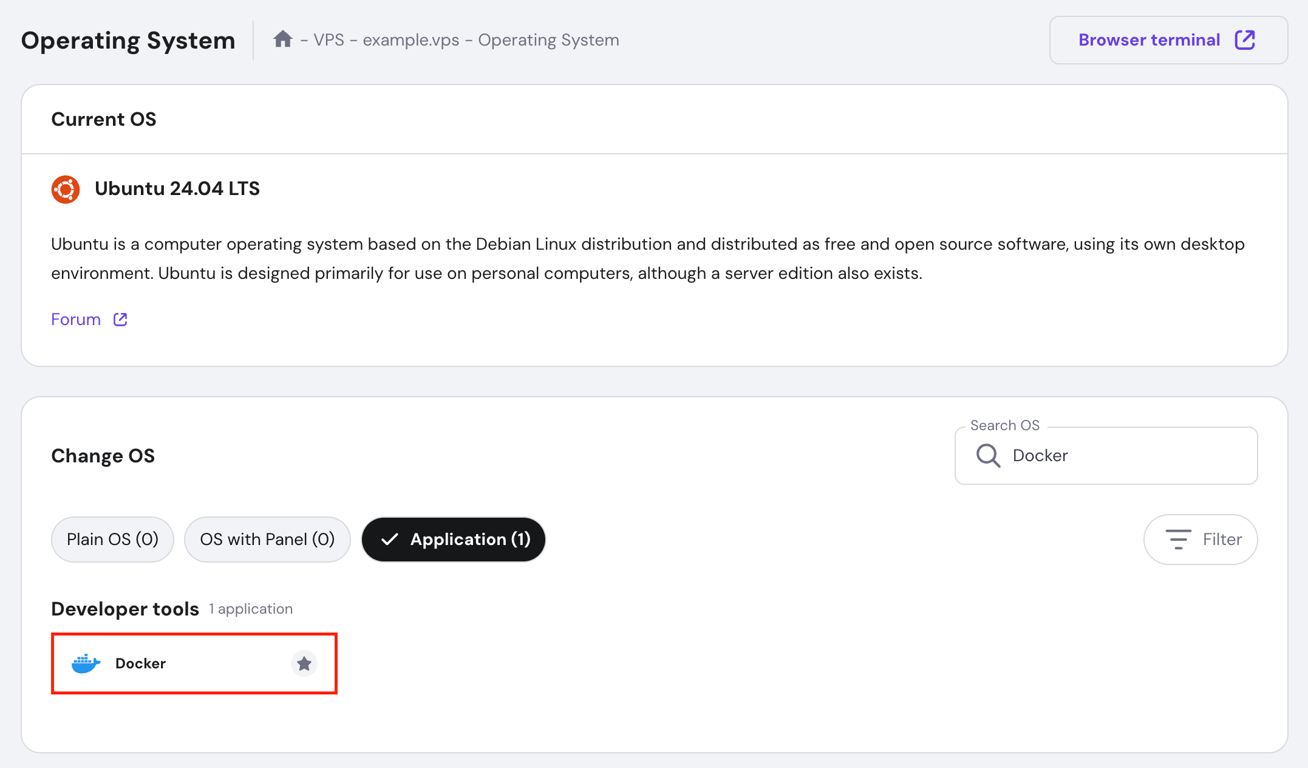
For Hostinger’s Docker VPS customers, Docker and all its required components are automatically installed during your server setup.
If you own one of our regular VPS plans, don’t worry. You can set it up yourself in just a few clicks:
- Log in to hPanel with your Hostinger account, then navigate to VPS → Manage.
- Select OS & Panel → Operating System from your VPS dashboard’s left sidebar.
- Scroll down to the Change OS section, type “Docker” in the search box, and select it.
- Follow the on-screen instructions and wait around five minutes for the process to finish.

How to create a Docker container
Creating a Docker container involves four main steps. Below, we’ll cover everything from getting a base image to running and managing your new container.
1. Build a Docker image
A blueprint for your container, a Docker image contains the necessary files and instructions for running your app. You can create images from scratch, but it’s much faster to use official, pre-built images available on Docker Hub.
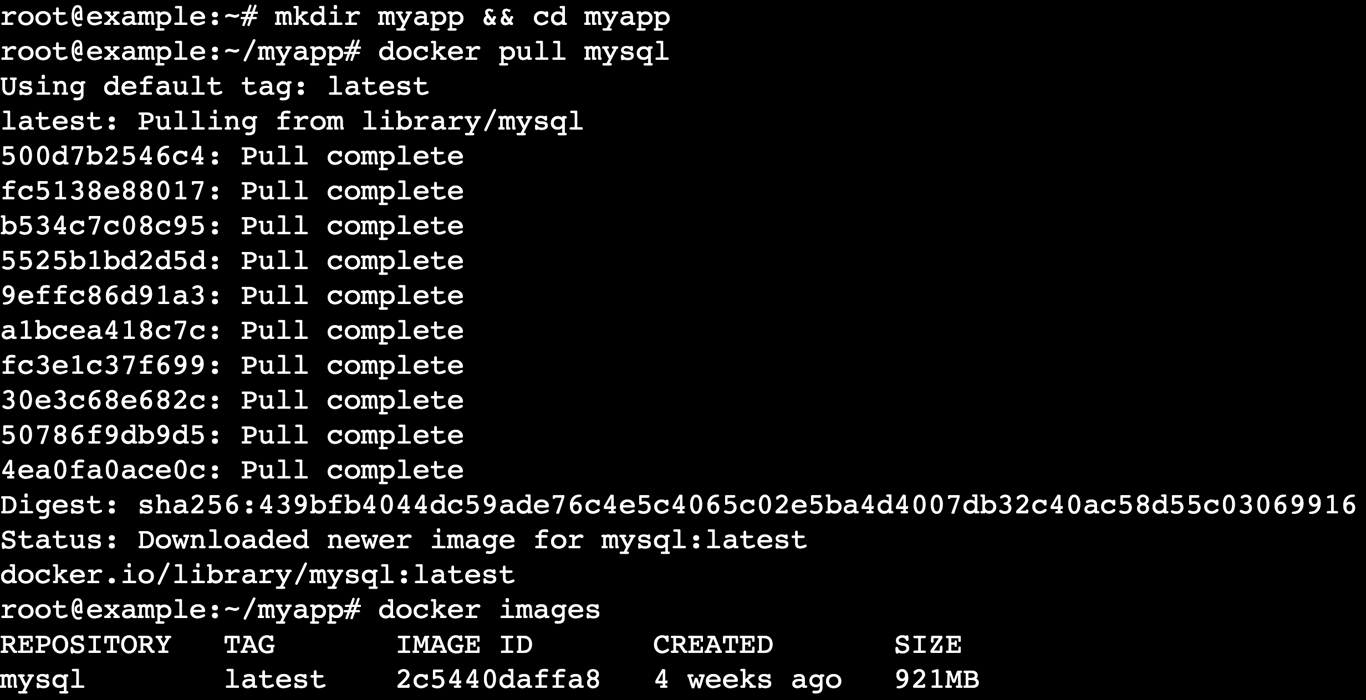
- Create a directory to store your app, then navigate to it:
mkdir myapp && cd myapp
- Pull an image from Docker Hub to your local system using the docker pull command followed by the image name:
docker pull image_name
For example, to get the latest MySQL image:
docker pull mysql
- Once the download is complete, list all the images on your system to confirm it’s there:
docker images
2. Write a Dockerfile
If a pre-built image doesn’t fit your needs, you can create a custom one using a Dockerfile. This is a text document that contains all the commands needed to assemble an image.
Important! This step is only necessary for custom apps. If you’re using a pre-built image like MySQL directly, skip to the next step.
- Create a Dockerfile using the nano text editor:
nano Dockerfile
- Paste the following sample Dockerfile content inside the file. This will create a basic HTTP Python server.
# Use the official Python image from Docker Hub
FROM python:3.8-slim

# Set the working directory in the container
WORKDIR /app

# Install curl (just as an example of using RUN)
RUN apt-get update && apt-get install -y curl

# Expose the port that the HTTP server will run on
EXPOSE 8000

# Start a simple HTTP server when the container runs
CMD ["python", "-m", "http.server", "8000"]
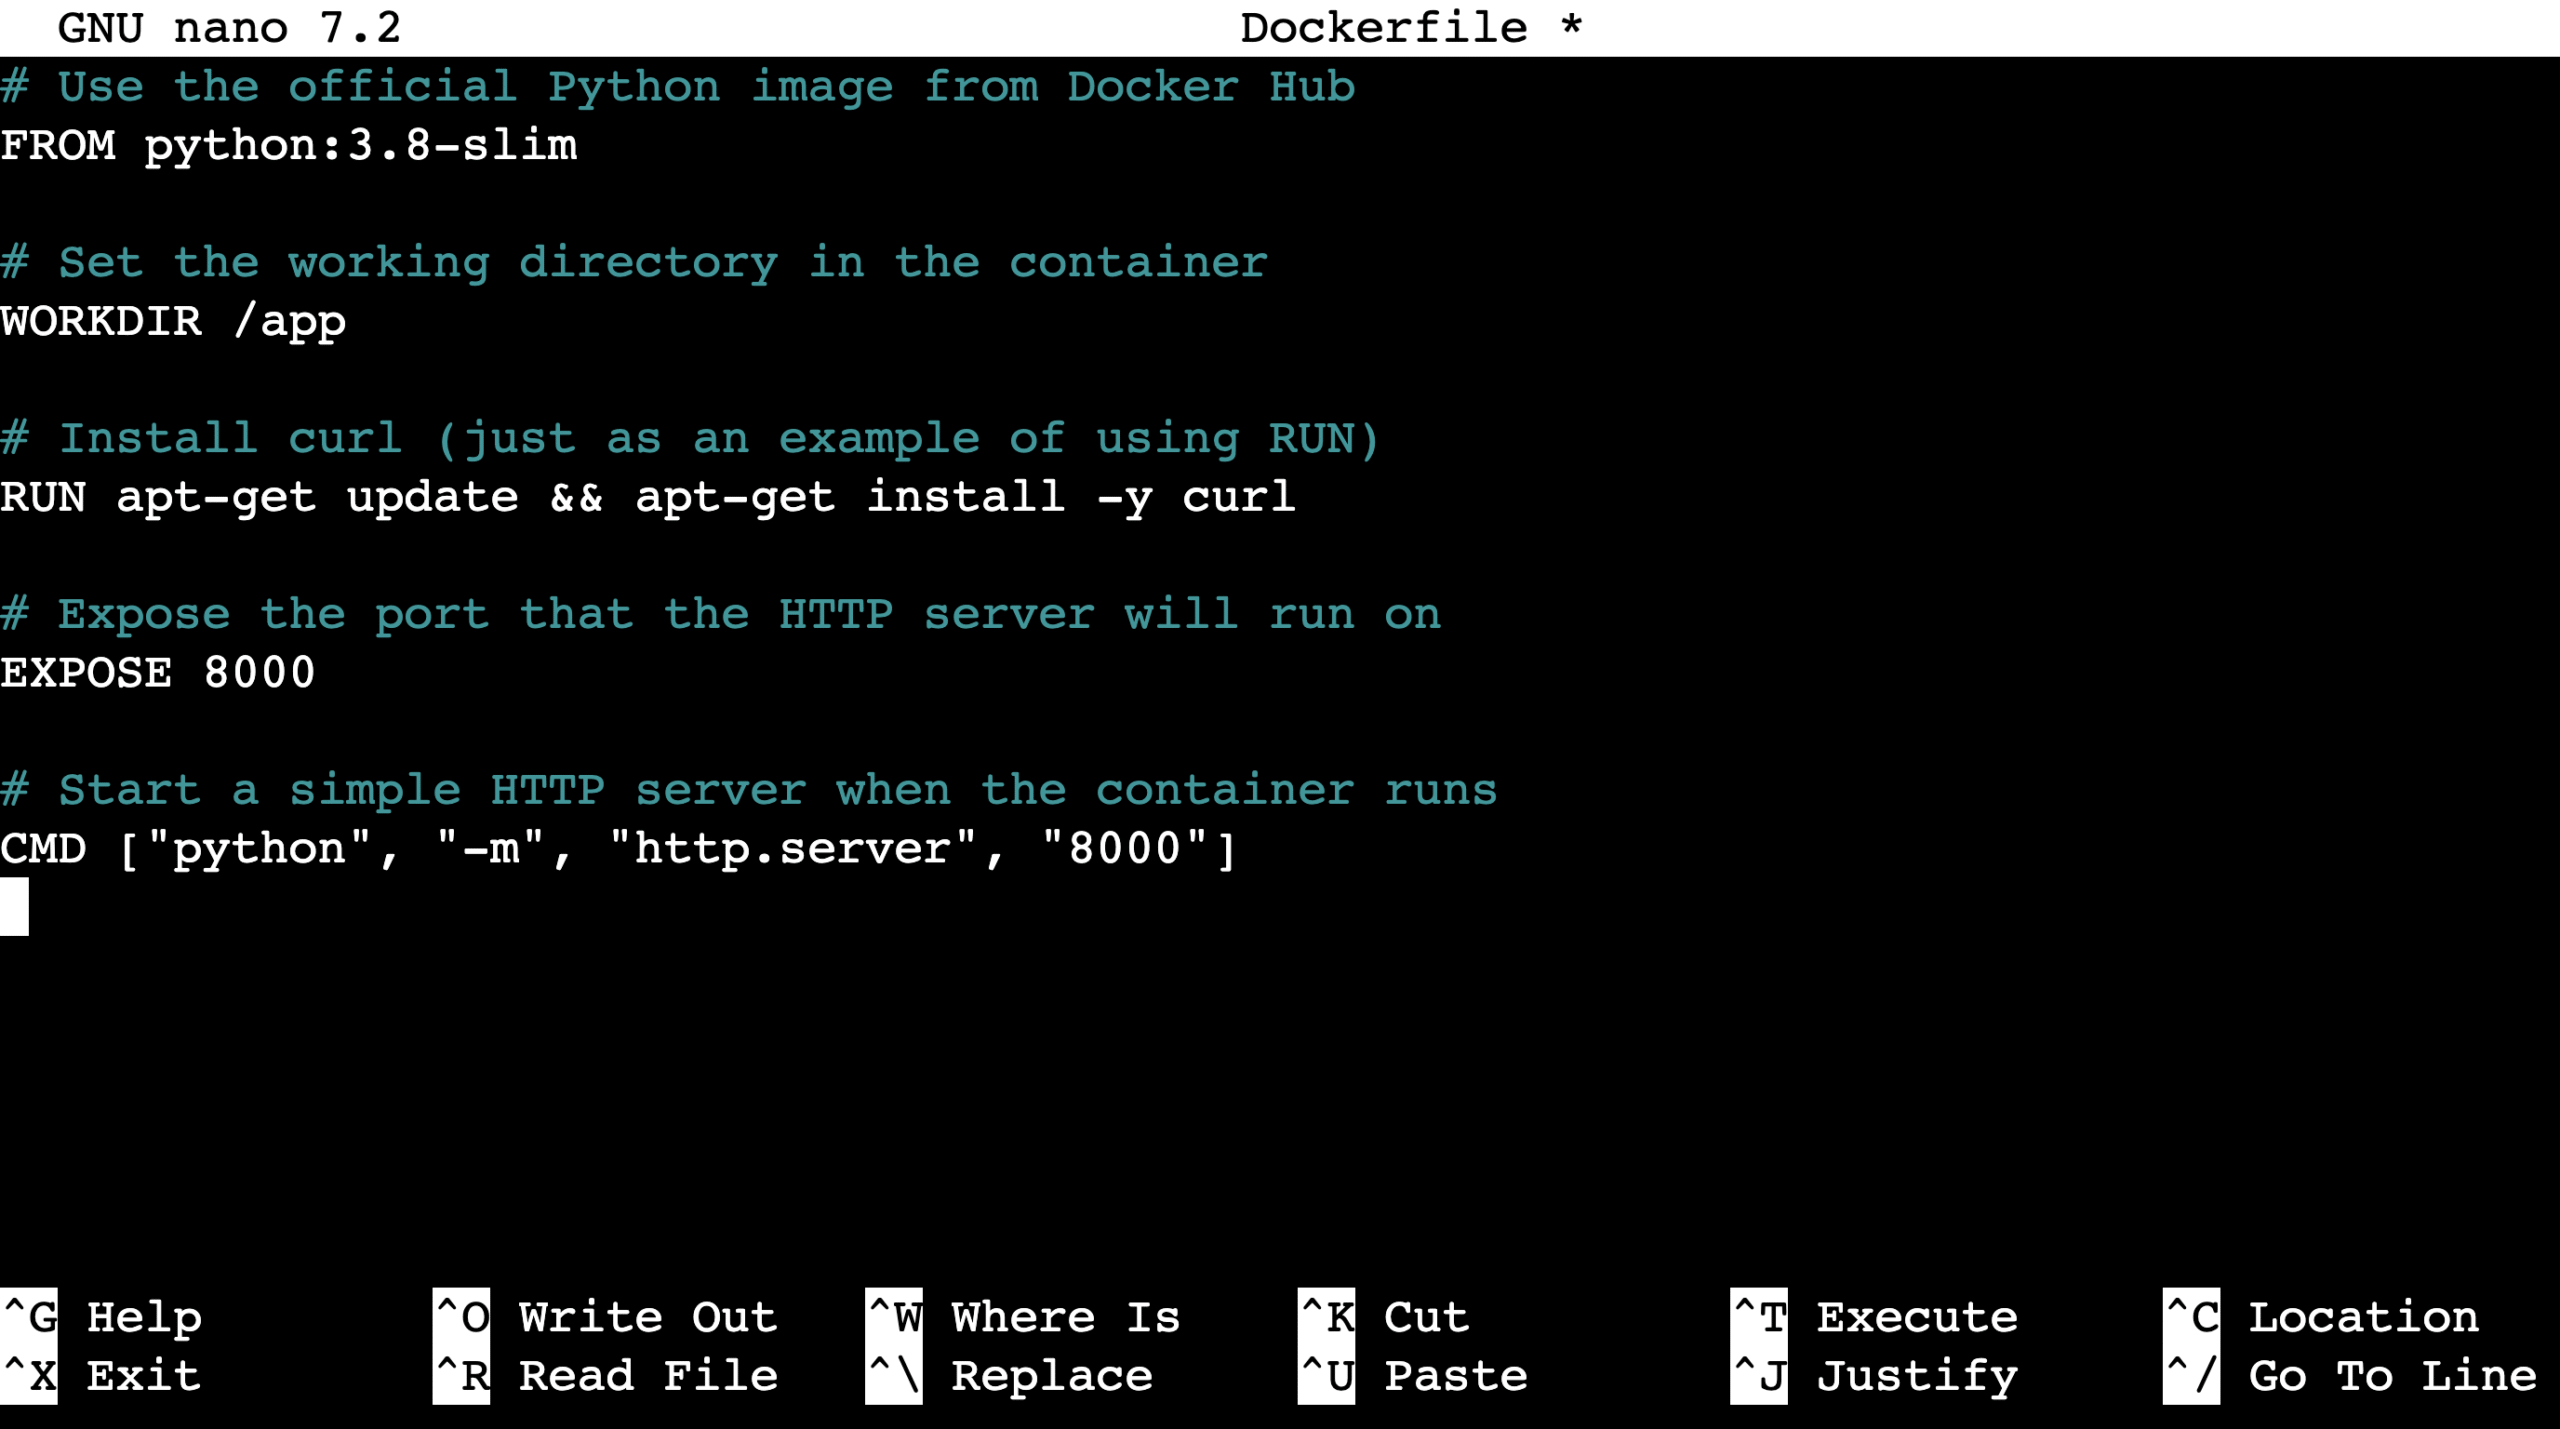
Here’s a quick breakdown of the key commands:
- FROM. Specifies the base image to build upon.
- RUN. Executes a command during the build process, such as installing software.
- CMD. Provides the default command for an executing container.
- Once you’re done, save the file and exit nano by pressing Ctrl + X → Y → Enter.
3. Create the Docker container
Now it’s time to create the container. You’ll use two key commands: docker build to create an image from a Dockerfile, and docker run to create and start a container from an image.
- If you created a Dockerfile, run docker build with the -t flag to tag the image with a name. For example:
docker build -t my-python-server .

- With your image ready (whether you built it or pulled it), use docker run to create the container. Here’s how you would run your custom Python image:
docker run --name my-python-container -d -p 8000:8000 my-python-server
If you want to run the MySQL image you pulled earlier, use:
docker run --name my-mysql-container -e MYSQL_ROOT_PASSWORD=my-secret-password -d mysql

For both commands, –name assigns a custom name for easier management, and -d runs the container in detached mode (in the background).
4. Run and manage containers
Once your container is running, you can manage it with several useful commands.
- List running containers:
docker ps

- View container logs for debugging:
docker logs my-mysql-container
- Stop a container:
docker stop my-mysql-container
- Check real-time resource usage:
docker stats

For advanced container management, use the docker exec command. It lets you execute a command inside an already running container without disrupting its operation.
Why use Docker containers
Docker containers offer significant advantages for developers and businesses by improving how applications are built, shipped, and run. Here are the main benefits:
- Portability. Containers bundle an app with its dependencies so that it runs consistently across any environment, from a local machine to the cloud.
- Cost-effectiveness. Containers share the host system’s kernel, making them much more lightweight than traditional virtual machines (VMs). This means you can run more containers on a single server, maximizing resources.
- Scalability. You can quickly create multiple instances of a container to handle increased load, making it easy to scale apps up or down as needed.
- Speed. You can create Docker containers in seconds, speeding up development, testing, and deployment cycles.
- Isolation. Each container runs in an isolated environment, preventing conflicts between apps and their dependencies.
For a closer look at how Docker containers power real-world applications, check out the top Docker use cases.
What are some Docker container best practices?
Following best practices ensures your Docker containers are efficient, secure, and easy to manage. These are especially useful in scenarios such as hosting sites and deploying apps.
- Keep images lightweight. Start with a minimal base image, such as alpine. In your Dockerfile, combine RUN commands and clean up temporary files in the same layer to minimize image size. For instance:
RUN apt-get update && apt-get install -y python3 && rm -rf /var/lib/apt/lists/*
- Use official images. Whenever possible, use official images from Docker Hub. They are regularly updated, scanned for security vulnerabilities, and optimized for performance.
- Run containers as a non-root user. By default, containers run with root privileges, which poses a security risk. Create a dedicated user in your Dockerfile and use the USER instruction to run the app with fewer permissions.
- Secure sensitive information. Avoid hardcoding sensitive data, such as API keys, directly in your Dockerfile. Use environment variables (-e flag) or Docker secrets to manage sensitive information securely.
- Limit container resources. Prevent a single container from consuming all the host’s resources by setting CPU and memory limits when you run it:
docker run --cpus=0.5 --memory=500m image-name
Next steps for using Docker containers
We’ve covered how to create, manage, and optimize Docker containers, which let you build more consistent, portable, and efficient applications. This foundation streamlines the development lifecycle and makes software deployment more reliable.
When you start working with multiple containers for a single app, consider exploring container orchestration. Tools like Docker Swarm and Kubernetes automate the deployment, scaling, and management of containerized apps.
Docker Swarm offers a simple setup and tight integration with Docker, and it works best for small to medium-sized clusters. Kubernetes, on the other hand, provides greater power and features, making it ideal for large-scale, production-grade deployments with advanced scheduling and self-healing capabilities.
The choice is yours: use Swarm for a lightweight, easy-to-use solution, or choose Kubernetes for maximum flexibility and scalability.
All of the tutorial content on this website is subject to Hostinger's rigorous editorial standards and values.

Jordana is a Senior Content Writer with a background in Information Systems. She has over five years of experience in WordPress and is casually dabbling with PHP and MySQL. Her passion for writing and technology drives her to create tutorials for anyone wanting to build their online presence. Follow her on LinkedIn.

Ariffud is a Technical Content Writer with an educational background in Informatics. He has extensive expertise in Linux and VPS, authoring over 200 articles on server management and web development. Follow him on LinkedIn.