How to migrate from Squarespace to a new platform
Oct 02, 2026
/
By Ariffud M.
/
11 min Read

To migrate from Squarespace, move your content and site setup to the new platform, preserve your URLs and SEO, reconnect your domain, and test the replacement site before canceling Squarespace.
Keep your Squarespace site live until the migration and testing are complete so visitors can still access the original site while you check and fix anything that didn’t transfer correctly.
Here’s how to migrate from Squarespace to a new platform, whether it’s WordPress, a website builder, or an ecommerce platform:
- Review your Squarespace site. Record the pages, content, SEO settings, features, integrations, ecommerce data, and domain setup you need to carry over.
- Choose a platform that fits your site. Compare your current requirements with what WordPress, website builders, or ecommerce platforms support before setting up the replacement.
- Export the data Squarespace supports. Download your site content and any separate product, order, contact, or form data you need to retain.
- Recreate anything that doesn’t transfer. Rebuild missing layouts, media, forms, store details, and integrations using the tools available on your new platform.
- Protect your existing search visibility. Keep the same URLs where possible, redirect changed URLs, and restore the SEO settings you want to preserve.
- Move or reconnect your domain. Keep the domain registered with Squarespace and point it to the new site, or transfer it to your new provider.
- Check the migrated site. Test the new site’s pages, links, forms, store functions, domain, search visibility, and performance.
- Cancel Squarespace last. End the website subscription only after the new site works correctly, and review any other Squarespace subscriptions separately.
Why migrate from Squarespace
The main reasons to migrate from Squarespace are its limited support for custom web apps, added selling fees on most plans, no proper staging environment, and fewer AI site-generation options.
- Limited web app support. Squarespace isn’t designed for custom web app development because it doesn’t let you run your own databases or server-side backend logic. This becomes a limitation once your project grows beyond a basic website and requires custom backend functionality.
- Transaction fees on most plans. Squarespace charges a 2% commerce transaction fee on the Basic plan, while its digital product fees range from 7% on Basic to 0% on the most expensive Advanced plan. Moving to a platform without platform transaction fees makes more financial sense than upgrading solely to reduce or avoid these fees.
- No dedicated staging environment. Squarespace lets you duplicate your site for testing, but changes to the duplicate don’t sync back to the live version. A platform with a dedicated staging environment lets you modify and test your site freely, then publish the changes only when you’re satisfied, without affecting the live site in the meantime.
- Limited AI site-generation options. Squarespace Blueprint AI generates sites from prompts, but it doesn’t generate sites from existing materials such as live URLs, screenshots, images, or PDF files. AI builders that support these inputs save time and produce results that more closely reflect the reference material than sites generated solely from a prompt.
1. Audit your Squarespace site
Audit your Squarespace site by creating an inventory of its pages, URLs, content, SEO settings, design, forms, ecommerce data, integrations, and domain setup. This gives you a record of everything you need to account for during the migration.
Start with your page list. Open Website → Pages in Squarespace and record the pages you want to keep from Main navigation and Not linked.
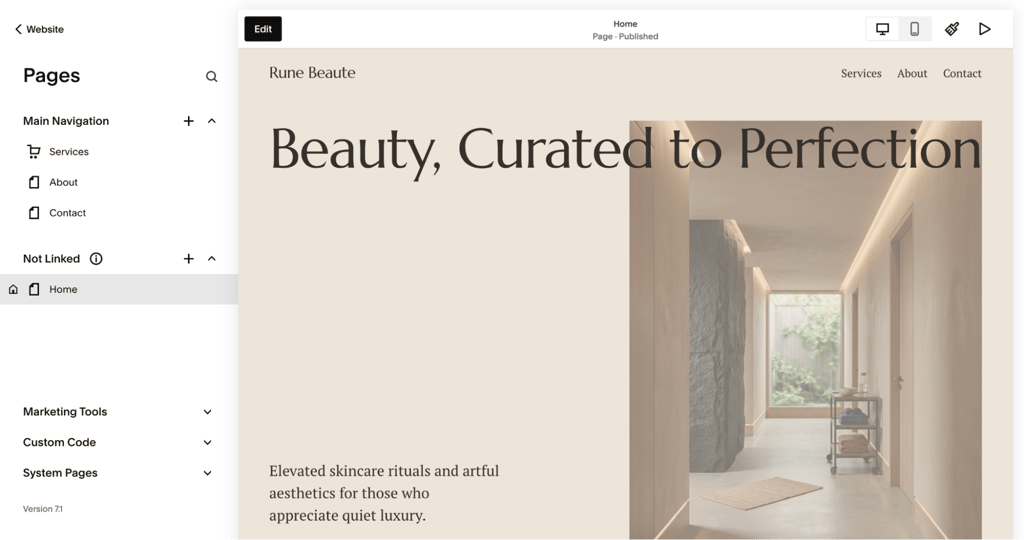
Next, check your public URLs by adding /sitemap.xml to your site’s domain, for example, domain.tld/sitemap.xml.
Use the sitemap to capture the public URLs listed for search engines, but don’t treat it as a complete page inventory because it excludes disabled, password-protected, and hidden-from-search pages.
Then use a spreadsheet to record the rest of the site:
| What to audit | What to record |
| Pages and site structure | Page names, current URLs, page types, navigation placement, blog posts, landing pages, and other content you want to keep |
| SEO | URL slugs, SEO titles, meta descriptions, heading structure, image alt text, and indexing settings |
| Content and media | Text, images, videos, galleries, PDFs, downloadable files, and other important assets |
| Design | Header, footer, navigation layout, fonts, colors, page layouts, and reusable sections |
| Forms | Form fields, submission destinations, email notifications, stored submissions, and connected automations |
| Ecommerce | Products, variants, SKUs, inventory, product images, orders, customer data, shipping settings, taxes, discounts, and payment setup |
| Integrations | Analytics, tracking pixels, scheduling tools, email marketing services, embeds, custom code, and other third-party services |
| Domain and email | Domain registrar, nameservers, subdomains, and DNS records used for email or other services |
Use Squarespace Analytics and any connected analytics or search tools to flag the top 20% of pages by visits over the last 90 days. Also flag any pages with external backlinks or recorded leads or sales.
Give these pages extra attention during the migration because changes to them are more likely to affect your traffic or revenue.
You should have one record of everything you intend to carry over from Squarespace by the end of the audit. Keep it open throughout the migration so you don’t overlook pages, assets, or site features.
2. Choose your new website platform
To choose your new platform, compare the pages, features, integrations, and ecommerce functions you rely on in Squarespace with what each alternative supports, then select the option that meets those requirements.
Review the platforms you can move to from Squarespace before signing up for a paid plan or setting up the replacement site.
Choose WordPress for a content-focused site that needs plugins, custom code, or more control over its structure. Check that suitable themes and plugins exist for the features you need before choosing a hosting plan.
Squarespace exports supported site content in a WordPress-compatible XML format, a plain text file WordPress can read directly, so WordPress also provides a direct import method for that content.
Consider a website builder like Hostinger AI Builder or Wix if you prefer visual editing and want to manage your site design, hosting, and updates from one dashboard.
Check that the builder supports the forms, integrations, ecommerce functionality, and custom code your Squarespace site relies on before choosing one.
Choose a website builder with strong SEO features if your Squarespace site receives organic search traffic.
At minimum, look for editable page URLs, SEO titles, meta descriptions, image alt text, controls for allowing or blocking pages from search engines, and redirects.
Opt for an ecommerce platform like Shopify if you sell products on Squarespace.
Check that the platform supports your product types, variants, inventory data, customer records, payment methods, shipping regions, tax settings, and integrations before committing to it.
Create the replacement site and complete its basic setup after choosing the platform.
Install WordPress and your chosen theme and plugins, create a blank site or select a template in a website builder, or configure your store’s basic settings on an ecommerce platform, such as payment methods, shipping regions, taxes, and currency.
Keep the new site unpublished or on a temporary domain while you transfer and rebuild the content.
3. Export your Squarespace data
Export your Squarespace pages and blog posts as an XML file, then download products, orders, contacts, and form submissions separately as CSV files.
Save the original files in one folder and don’t edit them so you have clean copies to import or reference later.
Start with your pages and blog content. Go to Settings → Website → Import & Export Content. Then, select Export → WordPress.
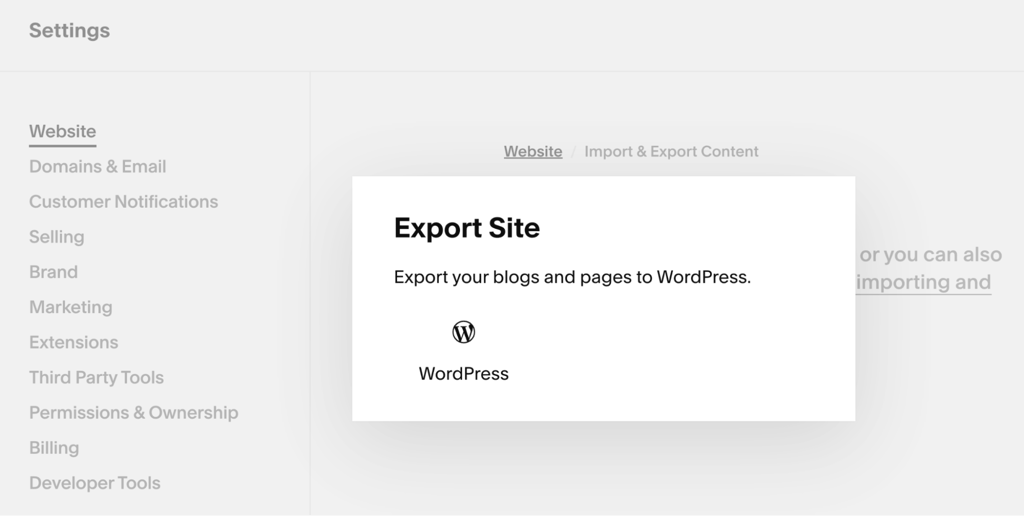
Choose the blog you want to export if Squarespace asks you to pick a primary blog, then click Export and Download after Squarespace finishes processing the file.
Squarespace exports supported site content as a WordPress-compatible XML file, even if you’re moving to another platform. However, the file doesn’t include portfolio and store pages, more than one blog page, page-specific headers and footers, dropdowns, audio, product, and video blocks, drafts, style settings, and custom CSS.
It also leaves out your SEO titles and meta descriptions, existing redirects, forms and their submissions, and all product and order data.
Export your products separately from Products & Services → Products by clicking Export all. Squarespace exports up to 10,000 physical and service products to a CSV file.
Select individual products and click Export instead if you only want part of your catalog. Note that the product CSV doesn’t include customer reviews, featured images, product image alt text, variant images, or additional product information.

Export your order history from Products & Services → Orders → Export data → Download CSV. Select the order statuses, date range, and products you want to include, then download the file.
Next, export your contacts from Contacts. Open the three-dot menu, select Export all contacts, and click Confirm.
Also, export stored form submissions separately for each form you want to keep. Open Pages, edit the page containing the form, open the form block, and select Content → Export Submissions.
The CSV doesn’t include uploaded files, so download them separately using the links in their submissions.
Once done, import the files your new platform supports. In WordPress, for example, go to Tools → Import and select WordPress. Then, install the importer if prompted and run it to upload the Squarespace XML file.
Check your platform’s import requirements before importing data into a website builder or ecommerce platform because supported file formats and required fields vary by platform.
Compare your new site with your Squarespace site side by side after importing the available data. Make a list of pages, content, media, design elements, product details, and features that didn’t transfer so you know exactly what to rebuild.
4. Rebuild what didn’t transfer from Squarespace
To rebuild what didn’t transfer from Squarespace, recreate each missing page, media item, design element, form, store detail, and integration with the equivalent tools on your new platform.
On WordPress, use your theme, the block editor, and plugins to recreate missing layouts, forms, galleries, navigation, embeds, and other features.
Check Media → Library after importing your XML file because WordPress Importer may leave some images linked to Squarespace instead of copying them to your new site. Download any missing images from Squarespace and upload them directly to WordPress.
Use WordPress features or plugins to replace Squarespace functionality, such as forms, scheduling, memberships, or subscriptions. Reconnect any external services your site still uses.
On a website builder, use its page editor to recreate missing layouts and sections. Rebuild your header, footer, navigation, forms, galleries, embedded content, and other elements that didn’t transfer.
You don’t need to reproduce the original editor or layout system exactly as long as the new site provides the same content and functionality you need.
Replace Squarespace-specific features with the closest built-in feature or supported integration on your new builder.
On an ecommerce platform, open each imported product alongside its Squarespace version and add the missing product details, images, and customer-facing content that your new platform supports.
Then recreate any store features or integrations that weren’t part of the imported data.
Mark each item off your missing-content list as you rebuild it. Note any feature you replaced with a different tool or integration, so you remember to test the replacement before launch.
5. Preserve your SEO during migration
Preserve your SEO during migration by matching each Squarespace URL to its replacement, keeping the same URL where possible, and creating a 301 redirect – a permanent forwarding rule that tells browsers and search engines a page has moved – for every URL that changes.
Then copy the SEO settings from your old pages to the new ones.
Start with the URL list from your Squarespace audit. Keep the same path for each page, such as /about or /contact, if your new platform supports it. Existing links will continue to work without a redirect when the domain and page path stay the same.
Check the URL structure your new platform uses for blog posts, products, categories, and other page types.
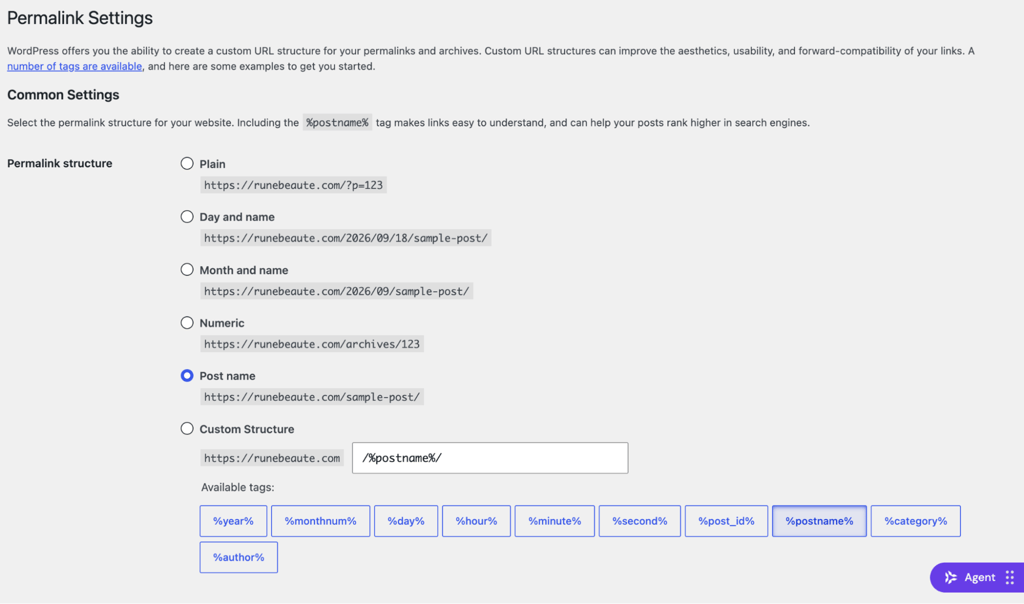
WordPress lets you configure the permalink structure under Settings → Permalinks, while website builders and ecommerce platforms have their own URL rules.
Create a URL map for every address that needs to change. Put the old Squarespace URL in one column and the matching new URL in another so you know exactly where each redirect should lead.
Set up a permanent 301 redirect for each changed URL using your new platform’s redirect plugin, tool, or server settings.
Send each old URL directly to the page with the same or most similar content, avoid redirect chains such as old URL → intermediate URL → final URL, and don’t send unrelated URLs to your homepage.
Next, copy the SEO settings you recorded from Squarespace to the corresponding pages on your new site. Restore SEO titles, meta descriptions, image alt text, and indexing settings.
Make sure you don’t set pages that should appear in search to noindex, the setting that tells search engines to leave a page out of results.
Update links within your new site so they point directly to the final URLs. Don’t leave internal links pointing to old addresses or rely on redirects if the correct pages exist.
Keep the completed URL map with your migration records so you have a destination for every changed Squarespace URL.
6. Point or transfer your Squarespace domain
To point your domain, update its DNS settings so the existing registration loads your new site. To transfer it, unlock the domain in Squarespace, request its authorization code, and submit that code to your new provider.
Pointing is faster and reversible, so choose it unless you want your new provider to handle renewals and records. Keep the DNS records from your Squarespace audit available to preserve any settings your email or other services use.
To prepare your domain for transfer in Squarespace:
- Go to Settings → Domains dashboard and select the domain you want to transfer. Disable DNSSEC in the advanced settings if you previously enabled it.
- Find the DOMAIN LOCK option and turn it off. Wait for the lock period to end if Squarespace shows Can’t unlock domain.
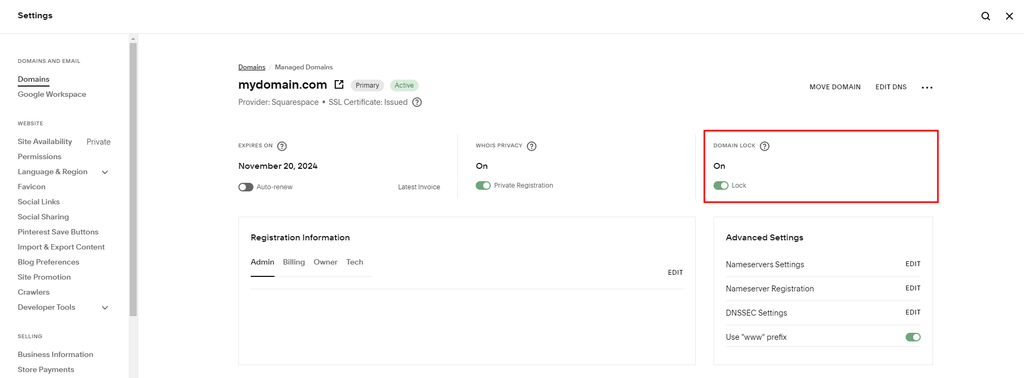
- Click Request transfer code, authenticate your Squarespace account when prompted, then click Continue → Ok.
- Check the email address in your domain registration information for the transfer authorization code. Copy the code to use with your new provider.
Next, follow your new provider’s instructions to complete the transfer.
For example, when moving your Squarespace domain to Hostinger, point that domain to Hostinger’s nameservers and purchase the domain transfer.
Then, enter the authorization code in your Hostinger account and approve the confirmation email. The transfer completes within five to seven days.
7. Test your new site
Test your migrated site by checking that its pages, links, forms, store functions, domain, search visibility, and performance all work correctly. Use a private browsing window on desktop and mobile so cached content and logged-in settings don’t affect your tests.
- Check pages and navigation. Open the homepage, use the main menu, visit your most important pages, click buttons, and open downloads. Test in another browser and on a different screen size too, since browser compatibility and responsive layouts are among the checks to complete before launching your new site.
- Test links and redirects. Click internal links and open the old Squarespace URLs from your URL map to confirm they reach the correct pages. Fix 404 errors, redirect loops, and redirects that lead to the wrong content.
- Test forms and connected services. Submit your contact, newsletter, booking, and other forms, then confirm that the submissions reach the correct inbox, dashboard, or connected service. Check any confirmation messages and automated emails they trigger.
- Test your store if you sell online. Complete a test purchase and check product options, cart behavior, shipping, taxes, discounts, checkout, and order notifications. Use your platform’s test or sandbox (a safe practice mode that doesn’t charge real cards) payment mode when available.
- Check your domain, HTTPS, and email. Open the site using its final domain and make sure it loads over https:// without certificate warnings. Send and receive a test email too if you use the domain for email.
- Check search visibility. Make sure you’ve removed password protection from the migrated site and haven’t left important pages set to noindex or hidden from search.
- Measure site speed. Test your homepage and a few important pages on mobile and desktop. Look for slow loading times, delayed images, and layout shifts when testing your site’s performance after migration.
Fix any problems you find, then repeat the tests for the affected areas.
8. Cancel your Squarespace subscription
Cancel your Squarespace website subscription from the Billing panel. Select your website plan, choose Cancel subscription, and follow the prompts to confirm the cancellation.
Here’s how:
- Go to Settings → Billing → Subscriptions.
- Select your website plan and click CANCEL SUBSCRIPTION.
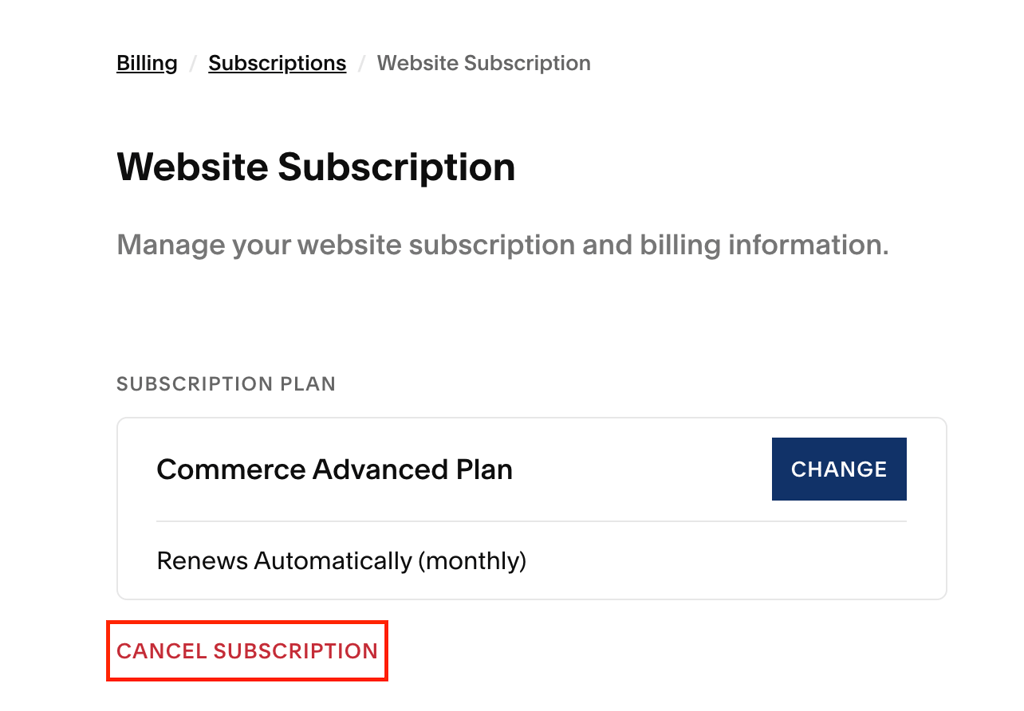
- Review the cancellation details. Choose Retain Access to cancel the site at the end of your billing cycle, or Get Refund Immediately to end the service immediately and receive a refund, if you’re within Squarespace’s refund window. Hit CONTINUE.
- Select your reason for canceling and click CONTINUE.
- Hit CANCEL SUBSCRIPTION to confirm.
Also review any other active Squarespace subscriptions, such as Google Workspace, Acuity Scheduling, or Email Campaigns.
Squarespace bills these separately from your website plan, so keep the services you still use and cancel each subscription you no longer need.
Set up a replacement before canceling any service you still rely on. For example, move your business email to a new provider or switch to another scheduling tool before canceling that Squarespace service.
How to recreate a Squarespace site with Hostinger AI Builder
To recreate a Squarespace site with Hostinger AI Builder, enter your site’s public URL. It then generates an editable version for you to review and customize before publishing.
The builder includes an AI Website Cloner feature. It uses the public version of your Squarespace site as a reference for its page structure, text, images, colors, and overall design.
Recreating an existing site is an alternative to rebuilding every page manually. Note that AI Website Cloner doesn’t transfer account data or settings that aren’t part of the public website.
Keep your Squarespace site publicly accessible, then:
- Purchase a Hostinger AI Builder plan if you haven’t already.
- Choose Agentic as your website building method.
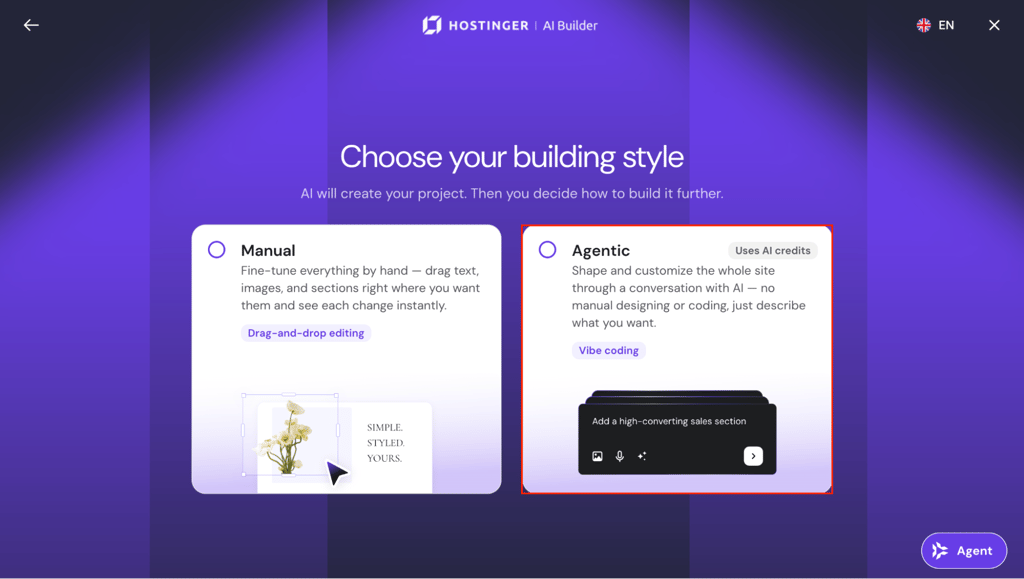
- Enter your current Squarespace URL and ask the AI to recreate the site.
- Compare the generated pages, navigation, text, images, colors, and layouts with your Squarespace site.
- Edit anything that doesn’t match what you want. Make the changes directly in the preview pane or ask the AI to update them for you.
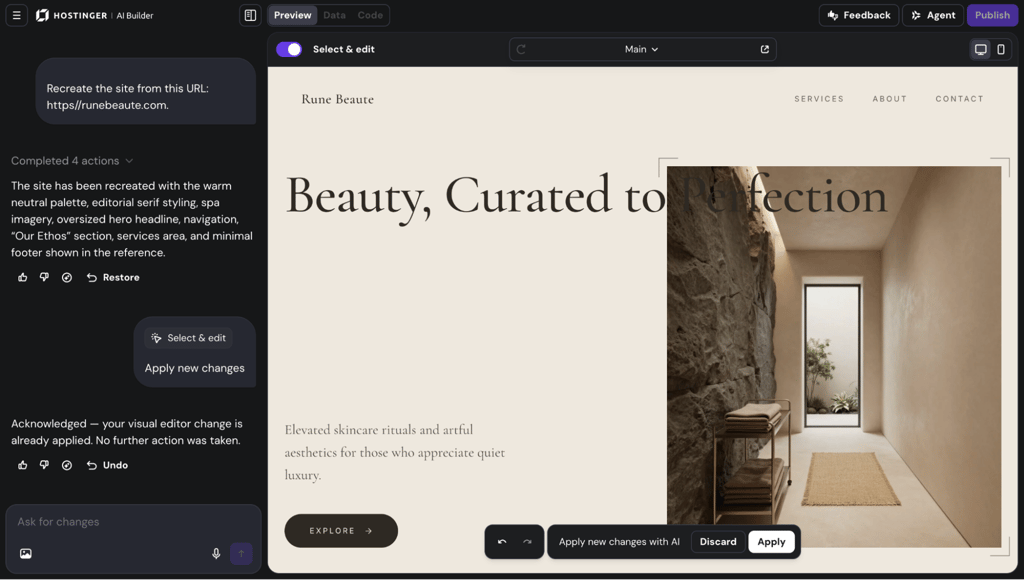
- Repeat the same process for your other pages.
Handle these remaining parts separately once the generated site is ready:
- SEO settings and redirects. Ask AI Builder to apply the SEO settings you recorded, such as page titles, meta descriptions, and other metadata. Set up 301 redirects separately for any URLs that change.
- Forms. Recreate the forms you need by telling AI Builder which fields, submission behavior, and notification email you want. Connect related automation separately.
- Domain. Keep the domain registered with Squarespace and connect it to Hostinger, or transfer it to Hostinger. Then assign the domain to your new site after you hit Publish.
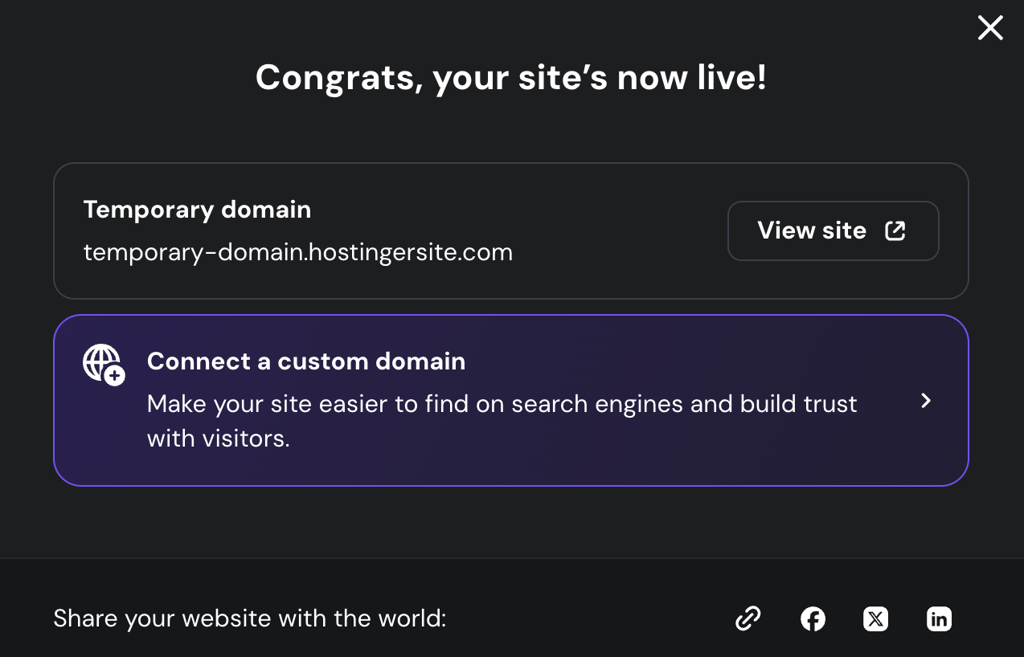
- Ecommerce. Get a separate Hostinger Ecommerce plan, then set up your store functions, including products, payments, shipping, and taxes. Add or import any customer or order data you need to retain.
- Integrations. Reconnect the services you still need after cloning the site. For example, use AI Builder’s built-in database for features that need stored data or Hostinger Reach for email marketing.
This article is a localized version of How to migrate from Squarespace to a new platform, originally published in English.
All of the tutorial content on this website is subject to Hostinger's rigorous editorial standards and values.

Ariffud is a Technical Content Writer with an educational background in Informatics. He has extensive expertise in Linux and VPS, authoring over 200 articles on server management and web development. Follow him on LinkedIn.


