How to install WordPress plugins
Mar 10, 2026
/
Nabilla R. & Larassatti D.
/
6 min Read

WordPress plugins are add-ons that extend the functionality of a WordPress website without custom coding. As plugins interact directly with your website’s core files, installing them correctly is essential to ensure smooth performance, avoid conflicts with themes or other plugins, and reduce security risks.
Even if you’re new to WordPress, installing a plugin is straightforward, and following the correct steps helps you get the most value from each plugin.
Here are the three easy ways to install WordPress plugins, depending on your needs and experience level:
- Via the WordPress admin dashboard. The easiest and most common method for beginners. You only need to search for free plugins directly from your WordPress dashboard and install them in just a few clicks.
- Uploading the plugin files. Useful when installing premium or custom plugins, this method requires you to upload a plugin’s ZIP file to your site.
- Using an FTP client. A more advanced option, typically used when the dashboard isn’t accessible or when troubleshooting issues. It involves uploading plugin files directly to your server.
Each method has its own advantages, and choosing the right one depends on where the plugin comes from and how comfortable you are managing your site.
How to search and install a WordPress plugin from the dashboard
The easiest way to install WordPress plugins is directly from the WordPress dashboard, using the options available in the official plugin directory.
The plugins you can install with this method are free, though many offer paid upgrades with additional features.
Follow these steps to install a plugin from the WordPress dashboard:
- Log in to your WordPress dashboard and go to Plugins → Add Plugin.
- Search for a plugin by entering its name in the search bar, or browse through the Featured, Popular, or Recommended tabs.
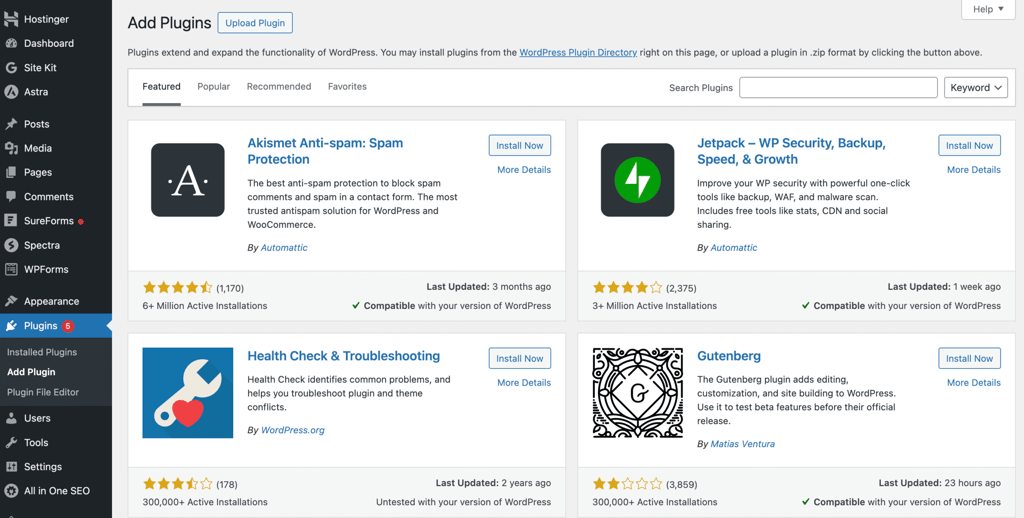
- Find the plugin you want in the results. For example, searching for Site Kit by Google will show it as the first result.
- Click the Install Now button to begin the installation process.
- Once installation is complete, click Activate to start using the plugin.
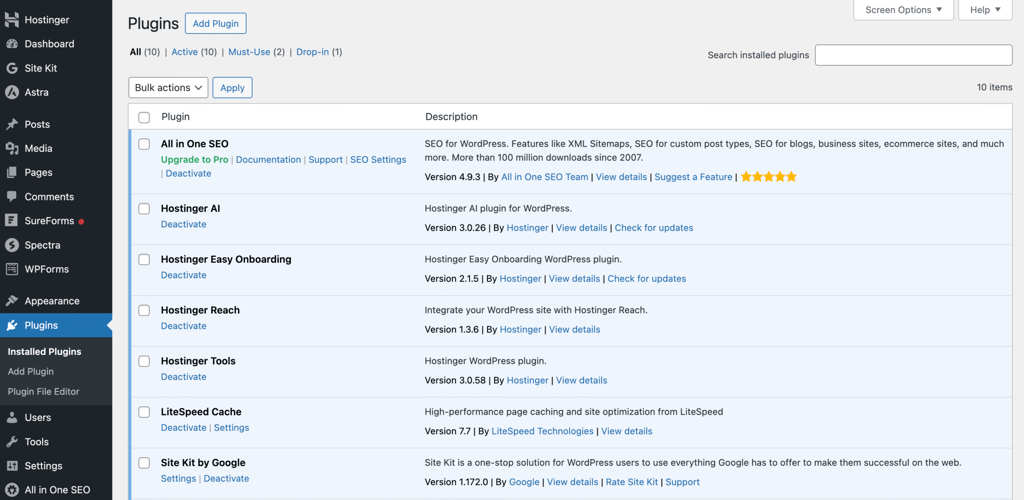
After activation, you can configure the plugin settings by navigating to Plugins → Installed Plugins.
💡 Before installing any WordPress plugin, it’s always a good idea to evaluate its quality and reliability. Check user reviews and ratings to see how others rate their experience, and look at the Last Updated date to make sure the plugin is actively maintained. The best WordPress plugins are frequently updated to ensure security and compatibility with the latest core software versions.
How to upload a WordPress plugin using a ZIP file
In addition to installing plugins directly from the WordPress dashboard, you can also install them by manually uploading a plugin ZIP file. This method is still beginner-friendly and doesn’t require any technical knowledge beyond accessing your dashboard.
Uploading a plugin’s ZIP file is useful for premium or custom plugins distributed through third-party marketplaces like CodeCanyon or Codester.
Before you begin, make sure you’ve downloaded the plugin’s ZIP file from a trusted source.
Then follow these steps to upload and install a WordPress plugin using a ZIP file:
- Log in to your WordPress dashboard and go to Plugins → Add Plugin.
- Click the Upload Plugin button located at the top of the page.
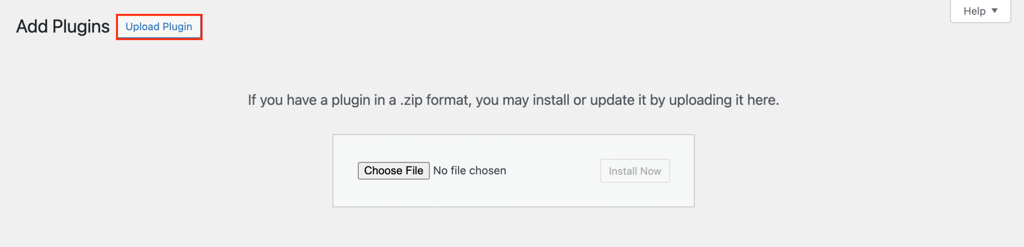
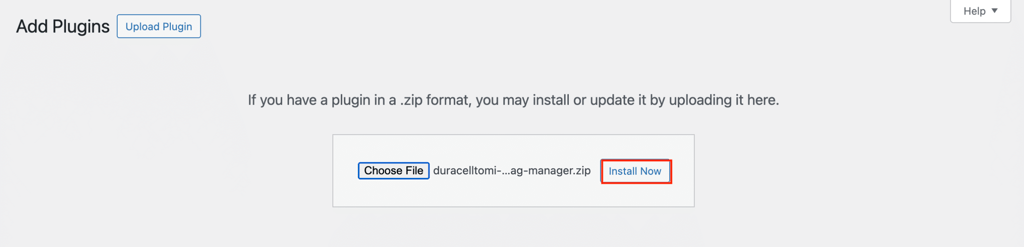
- Click Choose File, and select the plugin ZIP file from your computer.
- Click Install Now to start the installation process.
- Once the installation is complete, click Activate Plugin to enable it on your site.
Expert tip
If you are looking for plugins, make sure you are downloading them from a trusted source, like the official WordPress repository or offical websites. Plugins from untrustworthy sites may contain hidden malware or viruses.
Egidijus N.
Head of Cyber Security
How to install a WordPress plugin using an FTP client
Some premium and custom WordPress plugins need to be installed manually using a File Transfer Protocol (FTP) client. This method is slightly more advanced, as it requires connecting directly to your website’s server and managing files. That said, it’s a reliable option when other installation methods aren’t available.
To proceed with this method, you’ll need to configure an FTP client. In the steps below, we’re using FileZilla. If you’d like a detailed walkthrough on setting up and using an FTP client, this guide on FileZilla FTP configuration can help you get started.
Here’s how to install a WordPress plugin via an FTP client:
- Extract the plugin ZIP file on your computer.
- Gather your FTP credentials from your hosting provider. If you’re a Hostinger user, log in to hPanel, open your hosting account dashboard, and go to Files → FTP Accounts.
- Open the FTP client, enter your FTP credentials, then click Quickconnect.
- Navigate to the wp-content/plugins/ folder in the Remote Site panel.
- In the Local Site panel, upload the extracted plugin folder from your computer to the wp-content/plugins/ directory on your server.
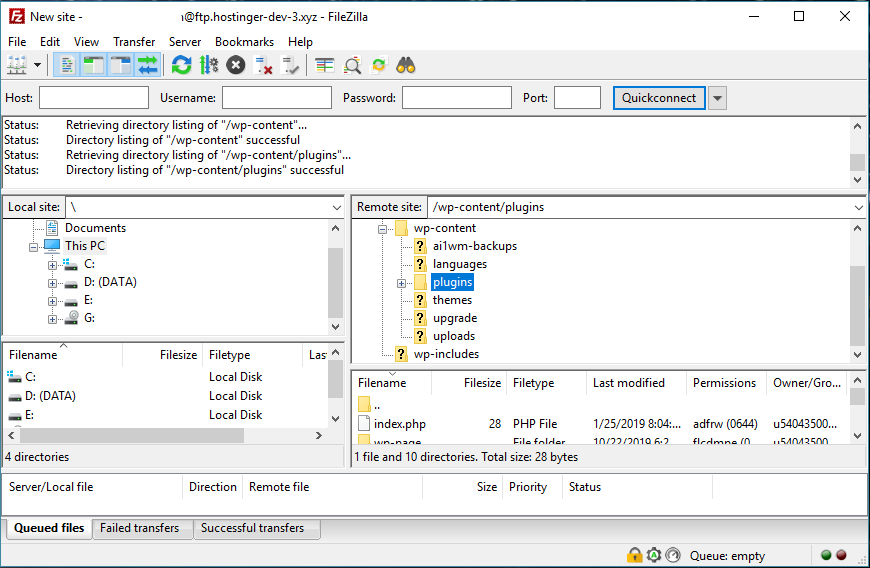
- Wait for the file transfer to complete. Once finished, the plugin should appear on your WordPress dashboard.
- Go to Plugins → Installed Plugins to locate the newly uploaded plugin. Click Activate to finish.
Alternatively, check whether your hosting provider’s control panel allows you to manage file uploads. If yes, you can upload plugin files directly to your server. Hostinger users can do it via Hostinger’s File Manager, so there’s no need to set up an FTP client.
Alternative ways to install WordPress plugins
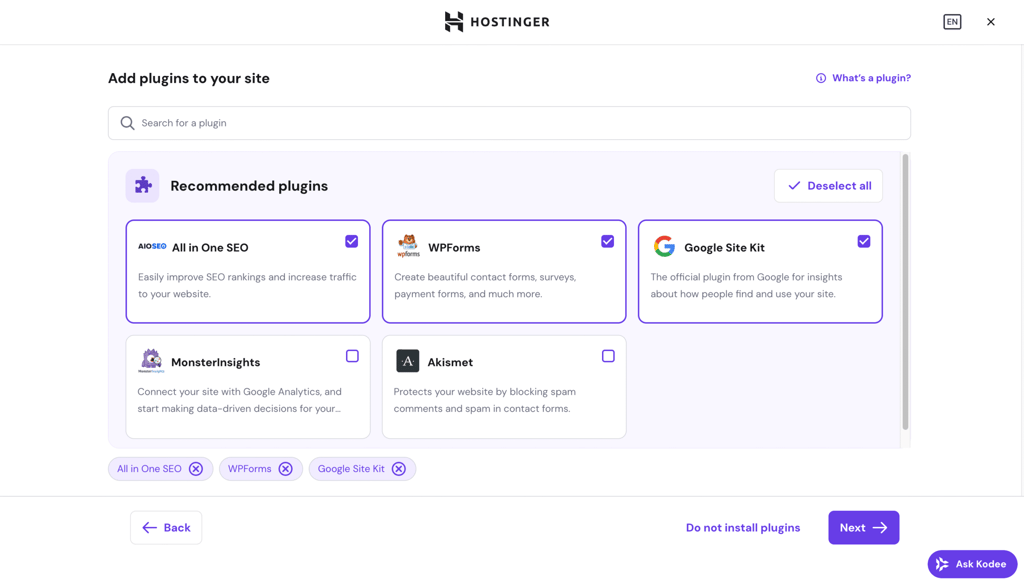
Hostinger suggests installing several important plugins when you create a new WordPress website using hPanel.
During the website creation onboarding steps, you’ll be asked to choose whether you want to pre-install some WordPress plugins or not. If you do, you can select the plugins you want and click Next to have them installed on your site.
If you’re an active Hostinger user, you can also manage all your plugins via hPanel. Simply navigate to WordPress → Security on your hosting account dashboard, and you’ll find the list of your themes and plugins. Here, you can also delete or update the plugins.
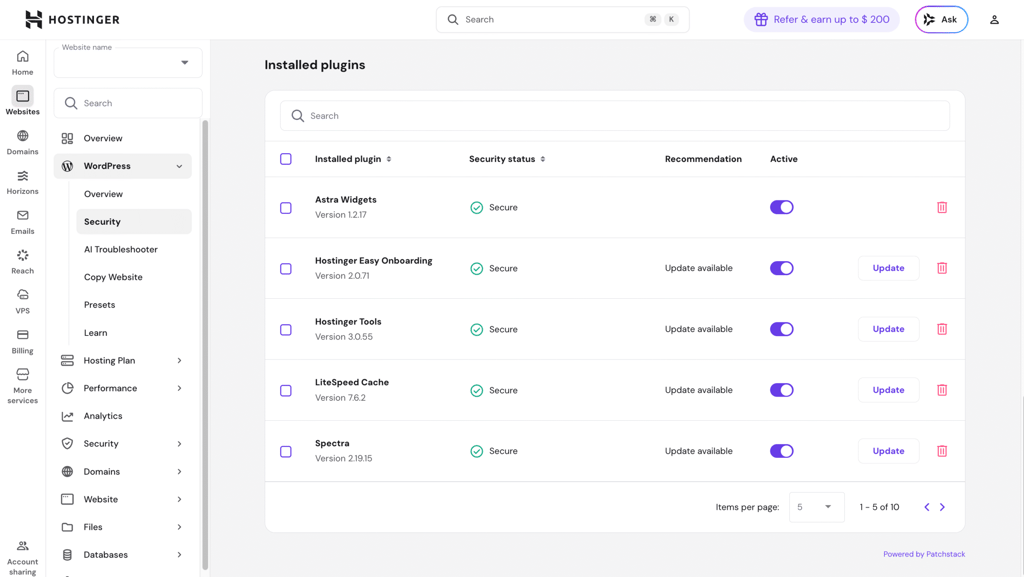
In the same menu, you can enable WordPress smart auto-updates so plugin patch updates are applied automatically without any action on your part.

What are the important considerations when installing a WordPress plugin?
With so many WordPress plugins available from the official directory and third-party sources, it’s tempting to install plugins quickly as you build your site.
Before installing any WordPress plugin, though, consider these factors to avoid performance issues, security risks, or unnecessary features:
Regular updates and active development
WordPress core version is updated regularly to improve performance, strengthen security, fix bugs, and introduce new features. Plugins should follow the same pattern. Before installing a plugin, check the following indicators of active development:
- Last updated. Plugins that are updated frequently are less likely to contain security vulnerabilities and are usually better maintained by their developers.
- Active installations. This number shows how widely used a plugin is. As a general rule, plugins with higher installation numbers tend to be more stable and reliable.
- Ratings and reviews. User feedback helps you understand how the plugin performs in real-world scenarios, including potential issues or limitations.
- Compatibility. Always check whether the plugin is compatible with the latest version of WordPress. Plugins that receive regular updates are more likely to work smoothly with current WordPress releases.
Essential functionality and use case fit
Before installing a plugin, make sure it actually does what your site needs. Review the plugin description carefully, read the documentation, and browse the support forums to see how responsive the developers are to user questions and issues.
It’s also helpful to read independent reviews and comparisons published by trusted blogs. At Hostinger, for example, plugins are tested and reviewed across categories such as menu, Google Analytics, and review plugins to help users make informed decisions.
Individual plugin installation and testing
When adding new functionality to your site, it’s best to install and test plugins one at a time. This makes it easier to identify the cause of any errors, conflicts, or performance issues that may arise.
If you want to try multiple plugins for the same purpose, deactivate the previous plugin before testing a new one. Once you’ve chosen the best option, delete any unused or inactive plugins, as keeping them installed can unnecessarily clutter your site and impact performance.
Plugin quantity and performance impact
Although they are essential for extending functionality, installing too many WordPress plugins can slow your website down. Each plugin adds extra code and may load additional assets, such as CSS, JavaScript, or images, increasing the number of HTTP requests and slowing page load speed.
Installing multiple plugins that serve the same purpose can also lead to conflicts. For example, SEO plugins often overlap in functionality, so choosing one well-maintained option is usually enough. The best practice is to use a single plugin for each core feature on your site.
Next step: Maintaining WordPress plugins
Plugins receive regular updates to fix bugs, patch security vulnerabilities, and introduce new features. When you skip these updates, you risk running outdated code that could make your website susceptible to hacks or compatibility issues with your theme or other plugins.
To make the most out of the tools you’ve added to your site, update your WordPress plugin versions as a regular part of your WordPress maintenance routine. This way, you’re protecting your site from security vulnerabilities while also benefiting from the latest improvements and enhancements developers release.
All of the tutorial content on this website is subject to Hostinger's rigorous editorial standards and values.

Nabilla is a website hosting and development enthusiast. She loves to share her knowledge with others in order to help them grow their online presence. When she's not busy writing, Nabilla enjoys exploring nature and going on adventures. She is passionate about helping people achieve their online goals.

Larassatti Dharma is a content writer with 4+ years of experience in the web hosting industry. She has populated the internet with over 100 YouTube scripts and articles around web hosting, digital marketing, and email marketing. When she's not writing, Laras enjoys solo traveling around the globe or trying new recipes in her kitchen. Follow her on LinkedIn
Comments
11 responsesMay 14 2017
Hi, I have migrated my blog http://www.imnepal.com yesterday. All the things are good but got error in the plugin. I have deleted all the plugins. While i am starting to install the plugin, then No, any plugin is adding. While adding.... Messages appears like this... Could not create directory. /home/danfeh5/public_html/imnepal.com/wp-content/plugins/boombox-theme-extensions Can you help me?
April 26 2018
really helpful tutorial and it worked
May 26 2022
Hellow Ms. Nabilla, Thanks for the post
August 18 2022
hello i would like to know if i can install third party plugins of mature ads (crackrevenue etc) and if yes does it require to pay for premium plan as in regular wordpress ? thanks in advance
August 19 2022
Hey there! When referring to 3rd party plugins, it's usually done by WordPress.com, as they limit what kind of plugins you can install, however with WordPress.org, 3-rd party plugins are fully supported, so you can either install them from the plugins directory or by downloading the plugin from the plugin's website and installing the plugin manually ?
July 19 2023
Can I install plugins with a Business or Cloud startup plan on hostinger?
July 21 2023
Hey there! You can install WordPress plugins with all of our hosting plans. After installing WordPress, you will be able to access your WordPress dashboard and install your desired WordPress plugins.
May 22 2024
My wordpress dashboard does NOT have an Add Plugin button. I have always had to do it in the cpanel and now that won't even work.
May 29 2024
Hello! It sounds like there may be a technical issue with your WordPress dashboard. Have you tried clearing your browser cache or accessing it from a different browser? If the problem persists, you might want to consider reaching out to our Customer Success Team so they can investigate this issue further for you.
January 11 2025
Hi, If I buy a hosting plan from hostinger, do I still need to buy a business plan on Wordpress to access the plugins? As I understand that Wordpress requires you to upgrade to a business plan so that you can use the plugins.
January 15 2025
Great question! When you buy a hosting plan from Hostinger, you don’t need to purchase a WordPress.com Business plan to access plugins. With Hostinger, you can install WordPress and have the freedom to add any plugins you need for your site ;)