WordPress image sizes: understand default image sizes and how to change them
Apr 28, 2025
/
Domantas G.
/
4min read
Handling images in WordPress can be a challenge. If you don’t pay enough attention to the requirements and resolutions, you may get a messy website appearance or it can even impact the loading time.
Therefore, you need to learn about the default WordPress image sizes and how to change them. In this article, we will explain all you need to know about WordPress image sizes, how to customize them, and how to use a WordPress plugin to regenerate image custom image sizes.
What Are WordPress Default Images Sizes
WordPress creates four different image sizes when you upload an image with the resolution as follows:
- Thumbnail: 150 x 150 pixels
- Medium size: maximum 300 x 300 pixels
- Large size: maximum 1024 x 1024 pixels
- Full size: original image size uploaded
How Does WordPress Process Images
Once you upload an image to your media library, WordPress will automatically generate additional images with three default sizes and store them separately.
Therefore, you will see four image options when you upload an image. The first three options are called default WordPress image sizes, while the full-size option is the original size that you upload.
WordPress creates these options because placing images in different locations will require different image resolutions. For example, the image resolution in the thumbnail may differ from the image resolution used in the slider.
Thus, you don’t need to edit and resize images manually if you want to use the same images in different places with different resolutions. Only one image is needed, and WordPress will do the rest.
How to Change Default WordPress Image Sizes
Although WordPress already gives you three default sizes if you decide that these choices don’t meet your needs, there are alternatives to get the best size for website images. Maybe, you need smaller thumbnails or wider featured images. Therefore, you need to change the default image size in WordPress. To do so, you can follow the steps below:
- Go to your Admin Dashboard
- Hover your cursor to Setting → Media
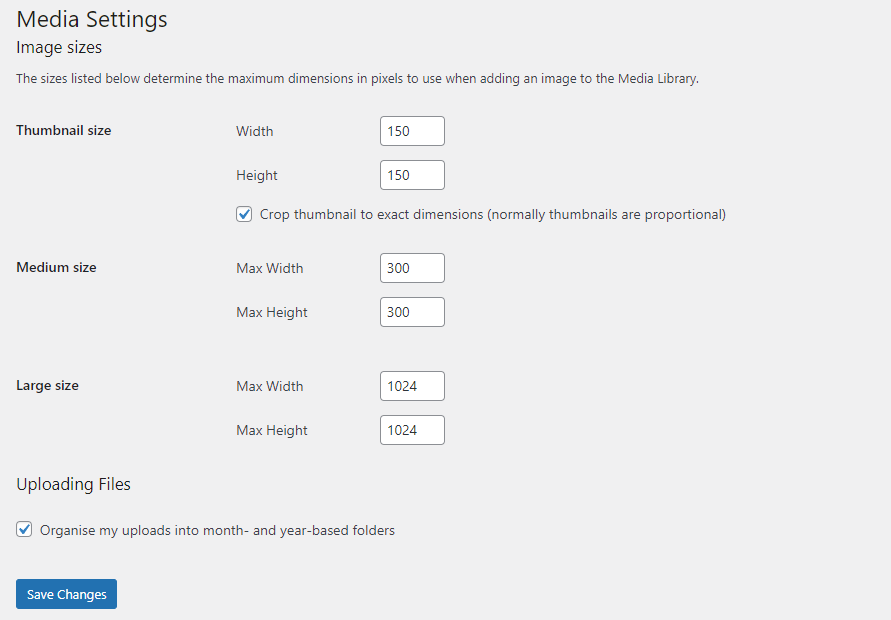
- In the Media Settings window, you can adjust the desirable pixels for each size
- Hit the Save Changes button to save the setting.
How to Add Your Custom WordPress Image Size
So, you have the three default sizes. Let’s say you have thumbnail size image for your thumbnail, medium size image for your post’s image, and large size image for your featured image.
But, you realize that you need more default image sizes for your pop up banner and widgets. In this case, you can add custom WordPress image sizes to fulfill those needs.
Step 1. Add Custom WordPress Image Size by Editing the function.php File
Some themes give you additional size options. But, if you can’t find them, you can add your own custom image sizes.
Important! We will be dealing with code. So, make sure to make a backup file and create WordPress child theme before modifying anything.
- Go to your admin dashboard
- Hover your pointer to Appearance → Editor
- Edit the functions.php file
- Copy the script below and paste it in the file
add_theme_support( 'pop-up-banner' );
- Hit the Update File button.
The script above will activate the add_image_size() function. If this function is already active, you can add new WordPress images such as the following:
add_image_size( 'pop-up banner size', 1000, 590 );
add_image_size( 'widget size', 220, 180 );
In these examples, you’ll to give the additional size name “Pop-up banner size” and “Widget size.” The two numbers following the size name stand for the width and height.

Step 2. Display the Custom Sizes in Your Theme
You have successfully added the new custom image sizes. But, it has not been displayed in your WordPress theme. Now, you have to enable the new sizes in your theme.
First, make a backup of your site before you make any changes. Access your theme file inside the post loop and edit it. Then, paste this code:
<?php the_post_thumbnail( 'your-specified-image-size' ); ?>
You should change your-specified-image-size with the name that you set in the previous step. For example, you can change it into pop-up-banner size. After following these steps, you can find pop-up-banner size options when you upload images to your media library.
How to Regenerate Image Sizes Using a Plugin
Setting a new custom image size in WordPress won’t affect your previous images. So, you need to regenerate your previous custom image sizes.
Luckily, you don’t need to do it one by one manually. There is a plugin named Regenerate Thumbnails that will help you to update your previous image size. Follow the steps below to do this.
- Go to your admin dashboard
- Click Plugins → Add New
- Type Regenerate Thumbnails in the search bar.
- Install and Activate the plugin
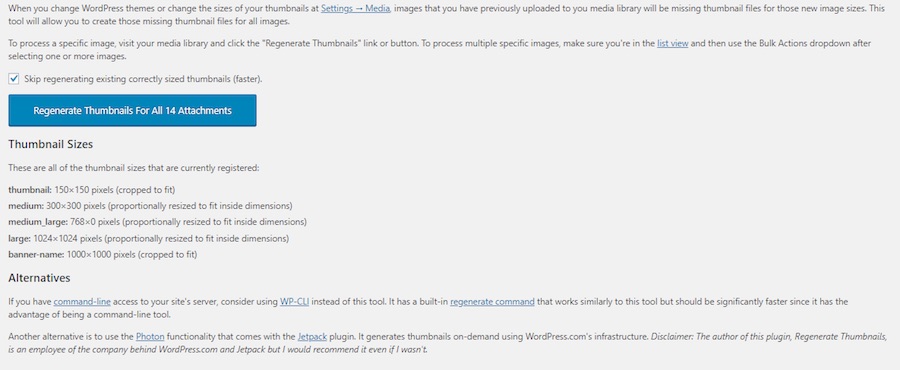
- Now, go to Tools → Regenerate Thumbnails
- Click the Regenerate Thumbnails For X Attachments Button
- Now, all your earlier uploaded images will be regenerated to new image settings.
Conclusion
WordPress image sizes look like a trivial thing, but in fact, can give you a headache. Sometimes you will find that the image file you upload doesn’t fulfill the desired size that you want.
To solve this, you can try two methods. You can change the default WordPress image sizes or add custom image sizes. Before you set up the new size, remember that uploading big images with a high resolution is not a good idea. Large size images will take up a lot of space and slow down your site’s loading time.
We hope this article helps you to choose the right images, in the right place, with the right sizes.
Learn Other Advanced WordPress Techniques
All You Need to Know Guide About WordPress Database
WordPress GDPR Guide
How to Add WordPress Custom Fields
How to Setup WordPress Pagination
How to Create a Shortcode in WordPress
How to Optimize Images in WordPress
How to Speed Up a WordPress Site
All of the tutorial content on this website is subject to Hostinger's rigorous editorial standards and values.

Domantas leads the content and SEO teams forward with fresh ideas and out of the box approaches. Armed with extensive SEO and marketing knowledge, he aims to spread the word of Hostinger to every corner of the world. During his free time, Domantas likes to hone his web development skills and travel to exotic places.


