How to back up your emails: Gmail, Outlook, Thunderbird, Yahoo, Mac, and Hostinger
Dec 22, 2025
/
Ariffud M.
/
11 min Read

Backing up email data is crucial for both personal and professional use. It safeguards important conversations from unforeseen events such as accidental deletions, security breaches, or ransomware attacks.
In this article, you’ll learn various email backup methods across different platforms. Whether you rely on traditional email systems for business correspondence or use modern email services for casual interactions, our guide ensures your email communications are well-protected.
Download website launch checklist
How to Back Up Your Emails
This section covers various methods for backing up your emails, from Hostinger’s email service to Yahoo Mail.
How to Back Up Your Hostinger Emails
Securing your email data starts with selecting the right email backup solution. Hostinger’s email hosting service provides versatile options for backing up emails tailored to meet various needs and preferences.
Our customers can choose from several file formats for their backups, including EML, Mbox, and Maildir. EML files are ideal for individual messages, Mbox is suited for handling bulk emails, and Maildir is favored for its structured storage, reducing data corruption risk.

1. Use Hostinger’s Built-in Export Feature for Backup
Hostinger’s built-in import-export feature offers a simple way to back up and restore your email messages. It enables you to download your email backups in various formats, ensuring that your data remains secure and accessible whenever needed.
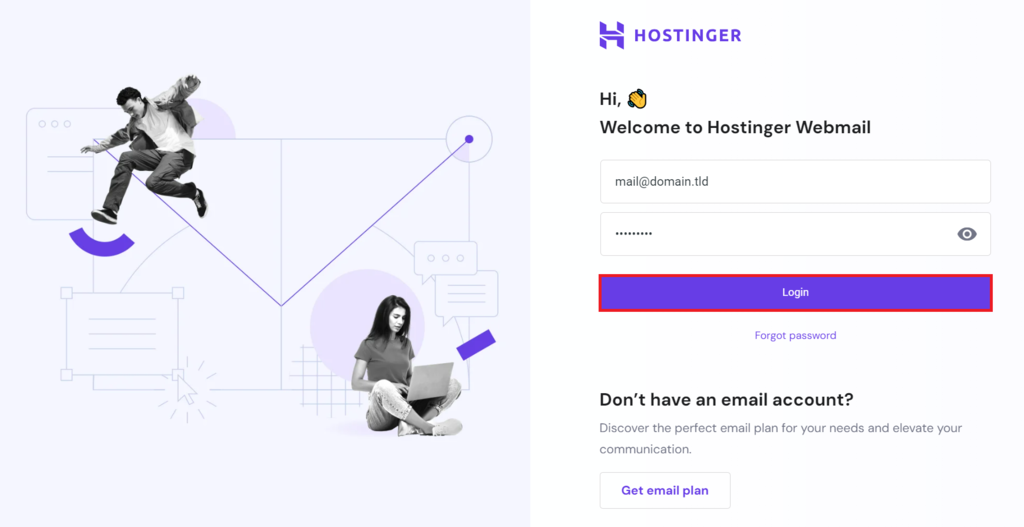
To start, open Hostinger Webmail login page, enter your email address and password in the provided fields, and click Login.
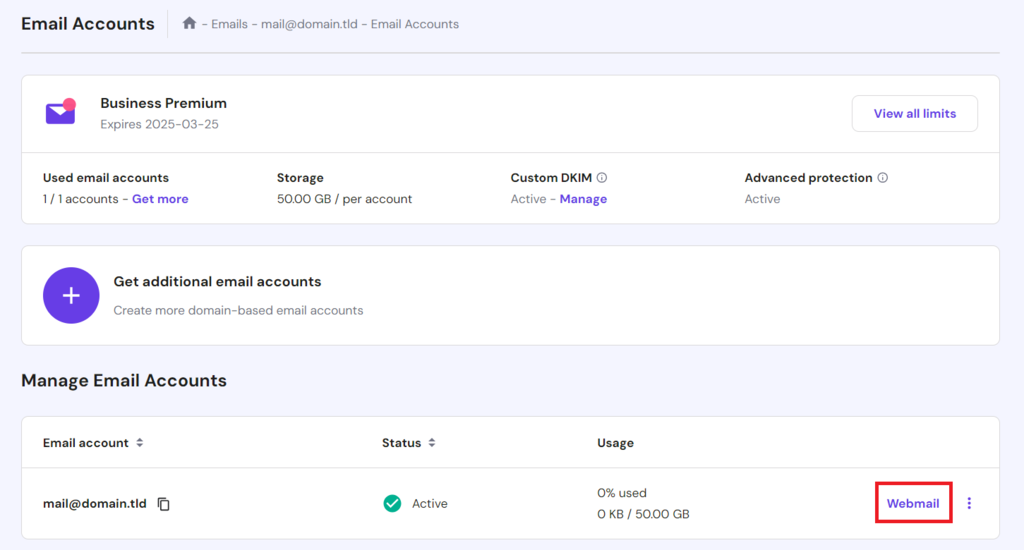
Alternatively, access hPanel and navigate to Emails → Manage next to your email address. In the Email Accounts dashboard, select Webmail.
Once logged in, follow these steps to complete the email export process:
- Identify the specific emails you wish to back up. You can select individual emails, specific folders, or the entire mailbox. Use the Select button to pick your emails more efficiently.
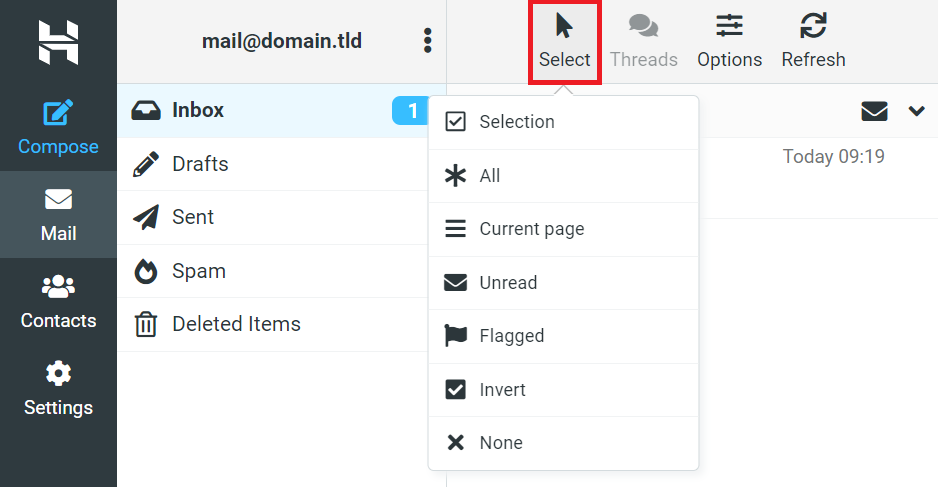
- After selection, click More → Download and choose your preferred export format.
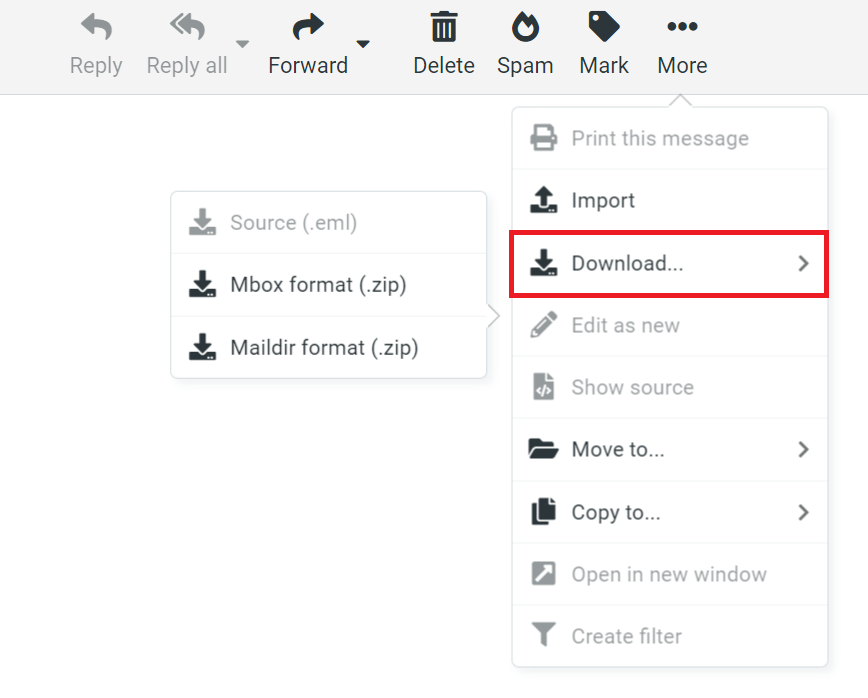
- The system will prepare your selected emails in the chosen format. When ready, download the file to your local device.
Please note that the EML format is designed to download one email per operation, while the Mbox and Maildir formats compile your backup emails into a ZIP file, facilitating bulk downloads.
Suggested Reading
New to Hostinger email or need a refresher? Explore our comprehensive guide on using Hostinger Email, which covers everything from creating email accounts to integrating them with various email clients.
2. Back Up with Third-Party Software
Besides using Hostinger’s built-in features, you can also employ third-party software to secure your email data. Zook Email Backup Software provides advanced features and is compatible with Hostinger Email.
This email backup tool allows you to back up Hostinger emails to over 30 different formats, including cloud-based email accounts like Gmail and Outlook. It also offers backup filtering options based on specific criteria such as date range, subject, and sender/receiver addresses.
How to Back Up Your Gmail Emails
Google provides native Gmail email backup options, along with third-party tools that offer more features. However, due to Gmail’s heavy use in Google Workspace, you might have to deal with a lot of data that needs backup.
Whether backing up specific emails or doing a full Google Workspace email backup, it’s important to check Google’s data export limits and plan your backup strategy accordingly.
1. Use Google Takeout
Google Takeout is a built-in Google tool that allows users to export data from various Google services, including Gmail. It is handy for migrating email data or creating a complete backup of your Gmail account. Here’s how to use it:
- Go to the Google Takeout page and sign in with your Google account.
- Select the data to include in your backup. If focusing on Gmail, make sure to choose Mail.
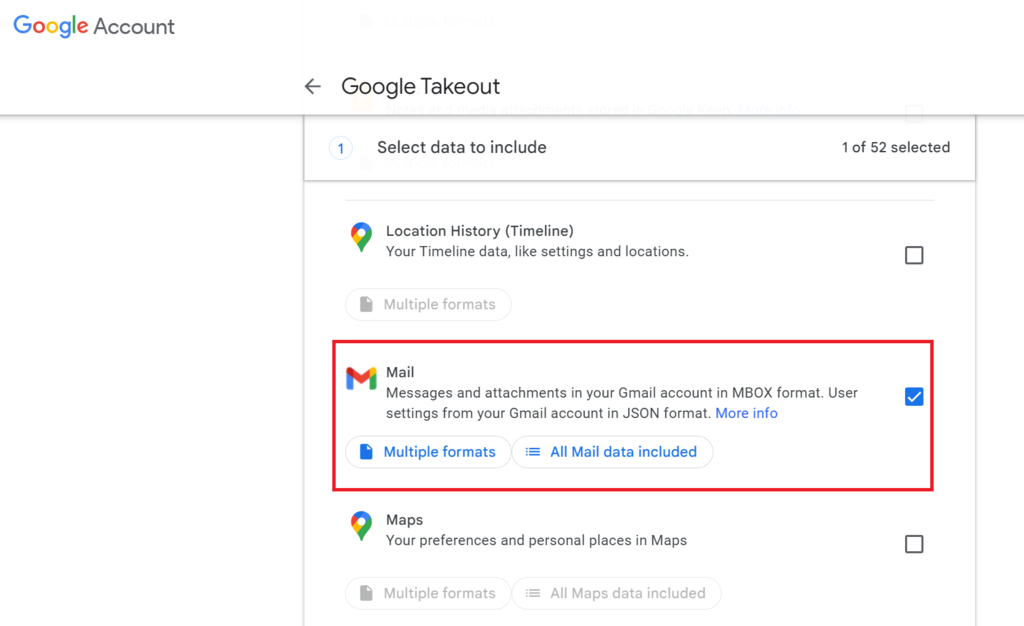
- After selecting the data from the service you wish to back up, click Next step.
- Choose the file format for your backup and the delivery method, such as receiving a download link via email or adding the archive to your Google Drive.
- Select the export frequency, file type, and size. Google will split the backup into multiple files if it exceeds the chosen size.
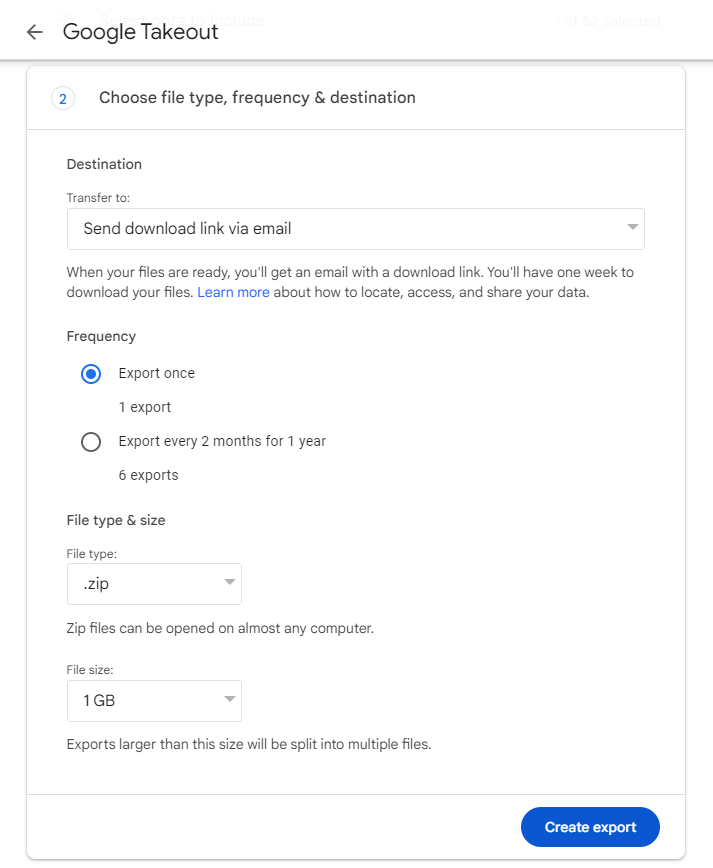
- Click Create export to start the process. Preparing your files might take some time, depending on the amount of data.
- You’ll receive a download link once your backup is ready.
2. Set Up a Desktop Email Client
Setting up a desktop email client like Outlook or Thunderbird is another way to back up your Gmail emails. With this method, you configure the email client to access your Gmail account using POP3 or IMAP protocols, enabling local storage of your emails.
First, log in to your Gmail account and navigate to Settings → See all settings → Forwarding and POP/IMAP. Then, click Enable IMAP, which is recommended for keeping your emails synced across devices, or select POP3 if you prefer.

Next, follow these steps to configure your email client:
For Microsoft Outlook:
- Open Outlook and go to File → Add Account.
- Enter your Gmail address and follow the prompts. Outlook typically configures the necessary settings automatically.
- If manual setup is required, enter the following:
- Incoming mail (IMAP) – imap.gmail.com, SSL required, port 993.
- Outgoing mail (SMTP) – smtp.gmail.com, SSL required, port 465, or TLS required, port 587.
For Mozilla Thunderbird:
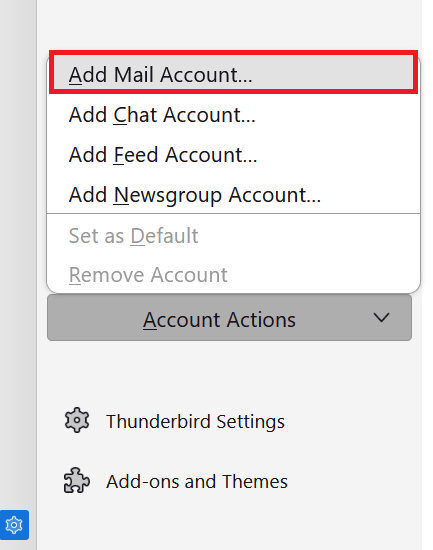
- Launch Thunderbird and navigate to Account Settings → Account Actions → Add Mail Account.
- Enter your name, Gmail address, and password, and proceed. Thunderbird usually detects the default settings automatically.
- For manual setup, apply the same IMAP and SMTP port settings as outlined for Outlook.
After configuration, your email client will begin downloading your Gmail messages. This might take some time, depending on email volume.
Suggested Reading
Considering an external SMTP server like Google's? Discover how to use the Google SMTP server in our article.
3. Archive Your Emails Regularly
If your email service offers unlimited storage, archiving can be an effective way to keep your inbox clutter-free while ensuring that essential emails are not deleted. Mail archiving removes emails from your inbox but keeps them in your account for future access, unlike deleted items.
Here’s how to use Gmail’s archiving feature:
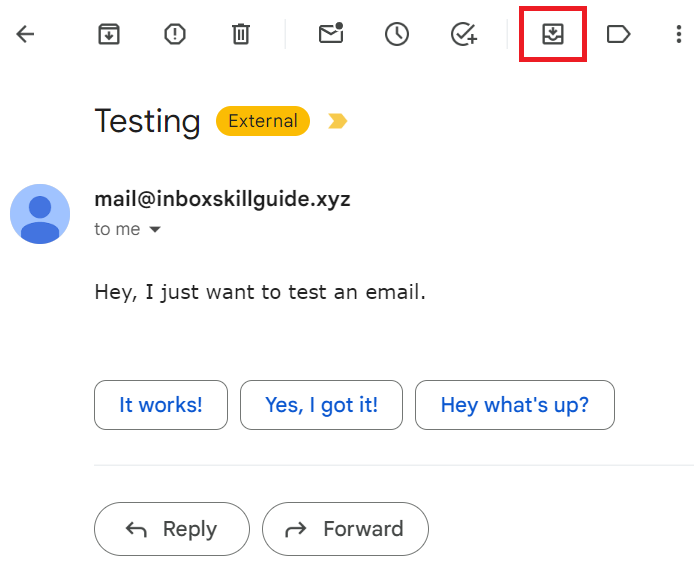
- Open the email you wish to archive or select it from your inbox, then click the Archive button on the toolbar.
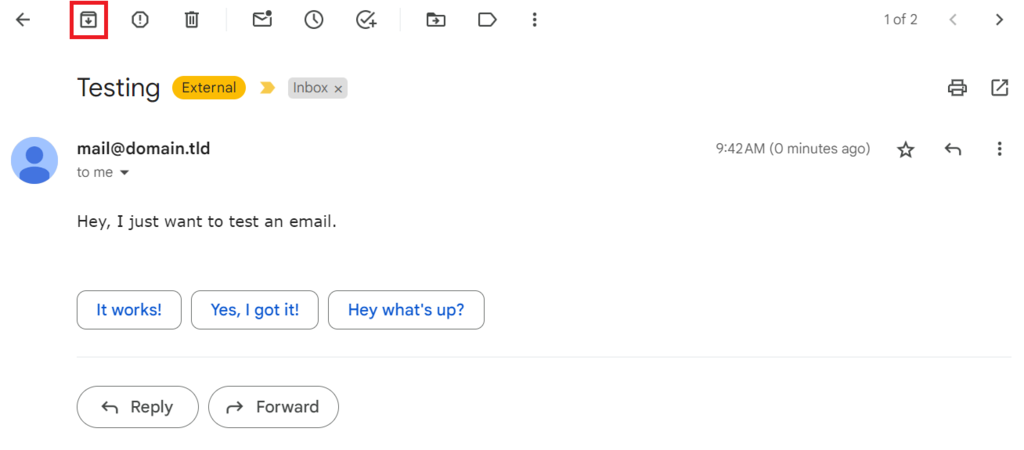
- To archive multiple emails simultaneously, check the boxes next to each email before clicking Archive.
- To locate your archived emails, navigate to the All Mail label on the left panel.
- If you need to move an email back to your inbox, open the email under this label and click Move to Inbox.
How to Back Up Your Outlook Emails
If you’ve set up your email with Microsoft Outlook, you’ll find built-in features to export your emails, contacts, and calendar items.
However, please note that Outlook has a preconfigured size limit of 50 GB on data files. For large mailboxes, you may need to split your backup into multiple files to accommodate this restriction.
1. Export Outlook Emails to PST
Exporting your Outlook emails to a PST file is a reliable method for backing up your data. A PST (personal storage table) file acts as a local archive of your Outlook data, including emails, contacts, and calendar events.
On the other hand, an OST file is automatically created by Outlook for accounts that use Exchange, Outlook.com, or IMAP and stores a synchronized copy of your mailbox data.
Please note that the PST file option is available only in Outlook’s desktop application. Here’s how to perform the Outlook export process:
- Open the Microsoft Outlook application on your computer.
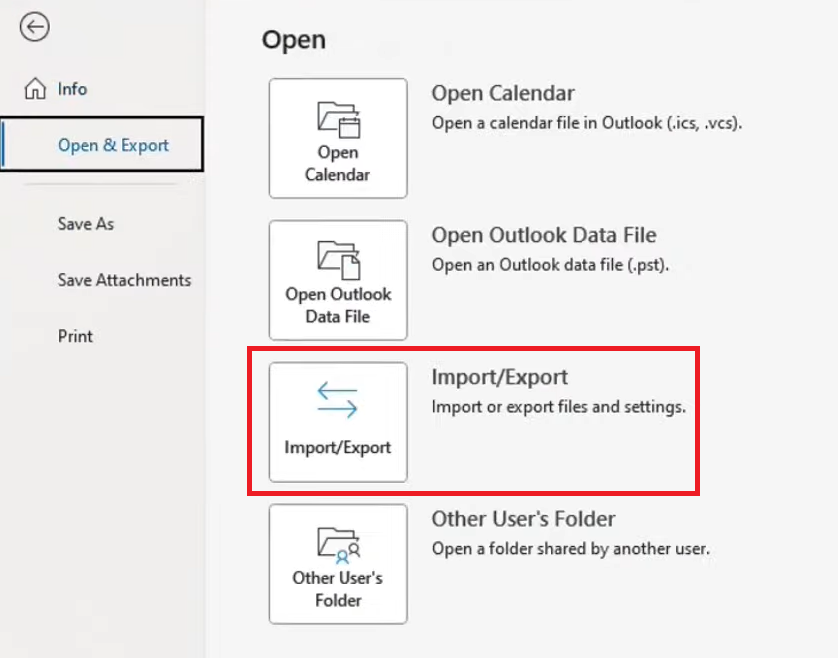
- Navigate to File → Open & Export → Import/Export.
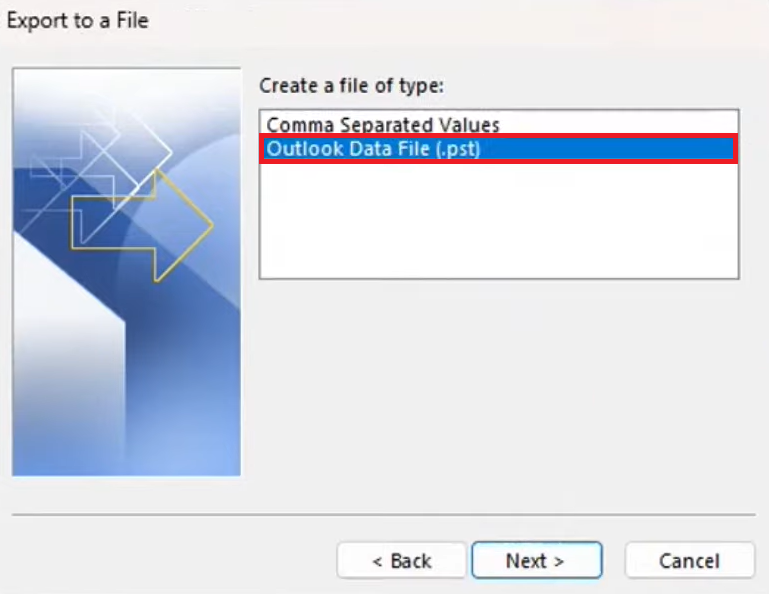
- In the software wizard, choose Export to a file and click Next.
- Select Outlook Data File (.pst) as the type of file you wish to export to, then click Next.
- Pick the mailbox or specific folders you want to back up. To back up everything, select your entire mailbox.
- Decide where to save the PST file on your computer and choose your preferred options for handling duplicate items.
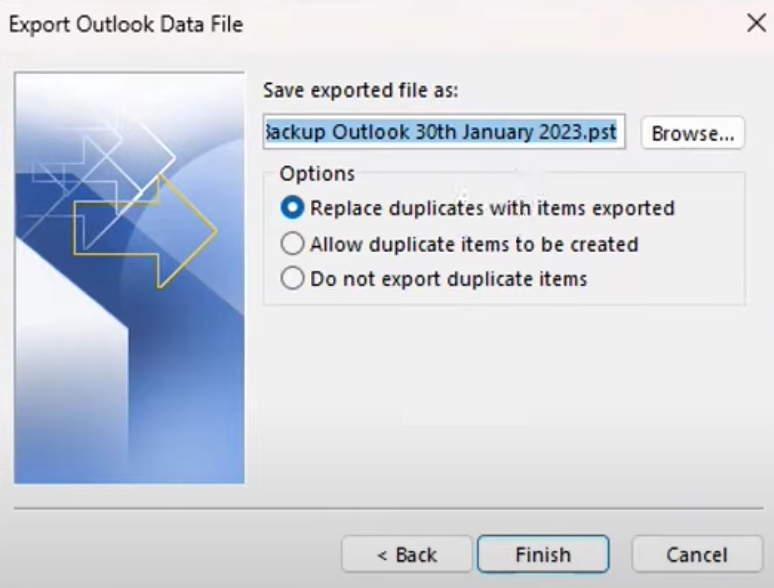
- Click Finish. If prompted, you can protect the PST file by setting a password or skip this step by clicking OK.
The process for Microsoft 365 email backup is similar. However, you can access your account and data online, which provides an extra layer of backup.
2. Use Outlook’s Built-In Archive
Another option to back up Outlook emails is to use its AutoArchive feature. It keeps your Outlook account organized by moving older items to an archive folder, reducing your mailbox size on the mail server.
Follow these steps to enable AutoArchive in Outlook:
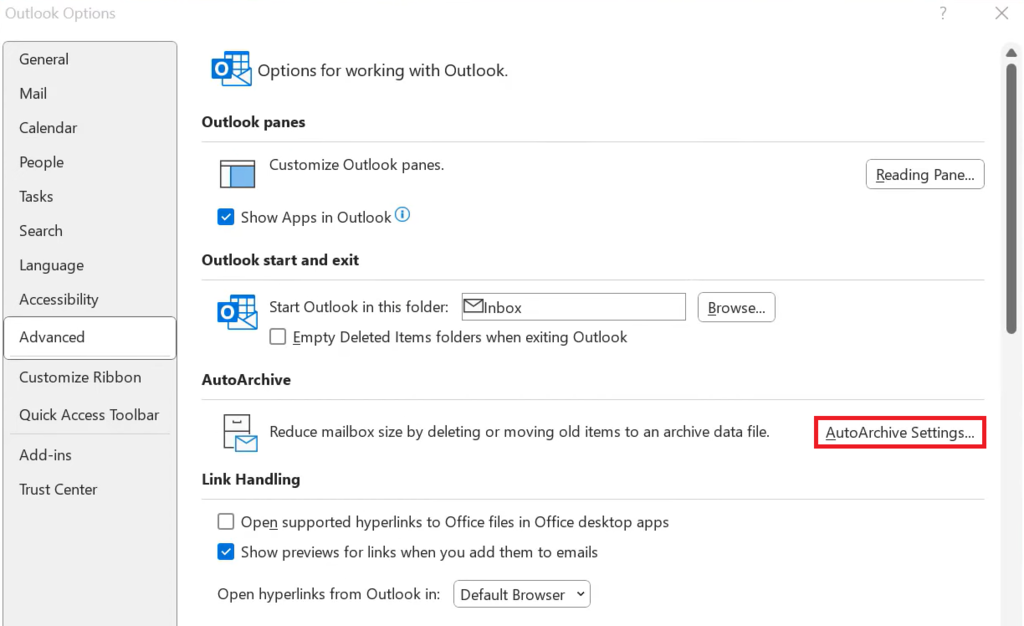
- Open Outlook and navigate to File → Options → Advanced.
- Scroll to the AutoArchive section and click AutoArchive Settings.
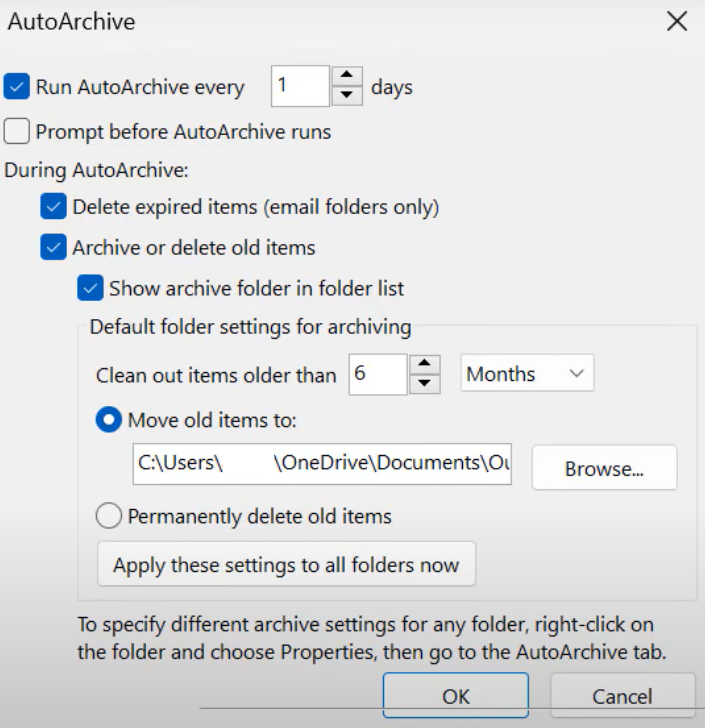
- Check the Run AutoArchive every [x] days box and set the AutoArchive frequency value.
- Configure additional options as needed, such as the age of items to be archived, the archive file location, and whether to prompt before archiving.
- To apply AutoArchive settings to specific folders, right-click on the folder, select Properties → AutoArchive, and adjust the AutoArchive settings for that folder.
- Once configured, AutoArchive will operate automatically at the set intervals.
For Exchange account users, be aware that server policies might influence how archiving functions. Please consult with your IT department or administrator for more details.
3. Back Up Using Third-Party Tools
Using third-party tools to back up Outlook emails can provide additional features and flexibility not available with Outlook’s built-in options. Here are two reliable solutions to streamline the Outlook backup operation:
- Mailstore Home. A popular free tool for individual users to back up emails from multiple sources, including Outlook. It features a user-friendly interface along with efficient email management and search capabilities.
- BackupAssist. Designed for small and medium-sized businesses, it offers comprehensive backup solutions that extend beyond Outlook emails to cover entire systems. It ensures data integrity with robust encryption.
How to Back Up Your Thunderbird Emails
Mozilla Thunderbird is an open-source email client that supports email setup from numerous providers, including Gmail, Outlook, and Hostinger Email.
Before starting a complete Thunderbird email backup, it’s crucial to know where your emails are stored on your local computer. This involves locating the profile folder, which houses all your emails, settings, and other significant data.
Suggested Reading
Consider checking out our article on setting up emails with Thunderbird if you're new to this email client.
1. Use Thunderbird’s Profile Backup
The profile folder in Thunderbird contains your emails, settings, address books, extensions, and other personal information. Regularly saving this folder to secure devices ensures that your data remains safe from system failures.
Here’s how to manually back up your Thunderbird profile folder:
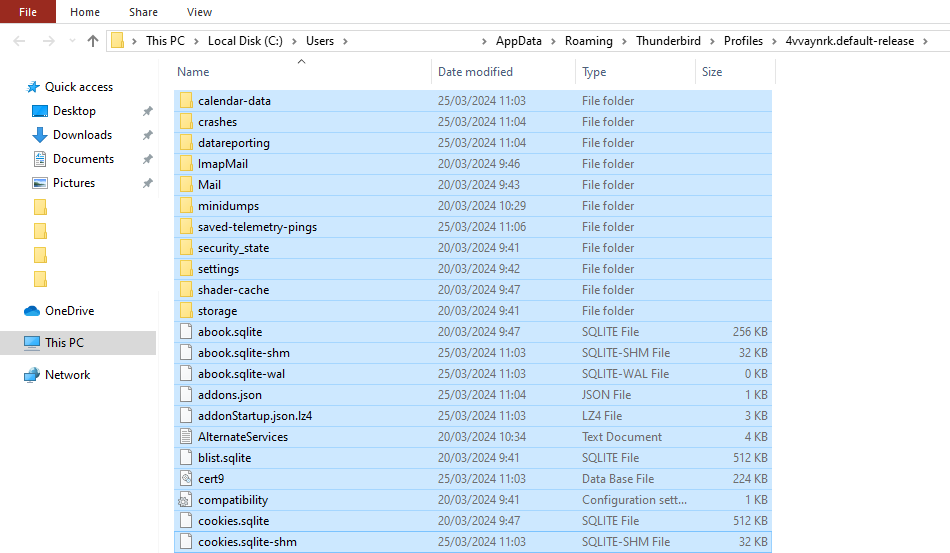
- Locate the path to your profile folder within Thunderbird by going to Help → Troubleshooting Information. Look under the Application Basics section for the Profile Folder.
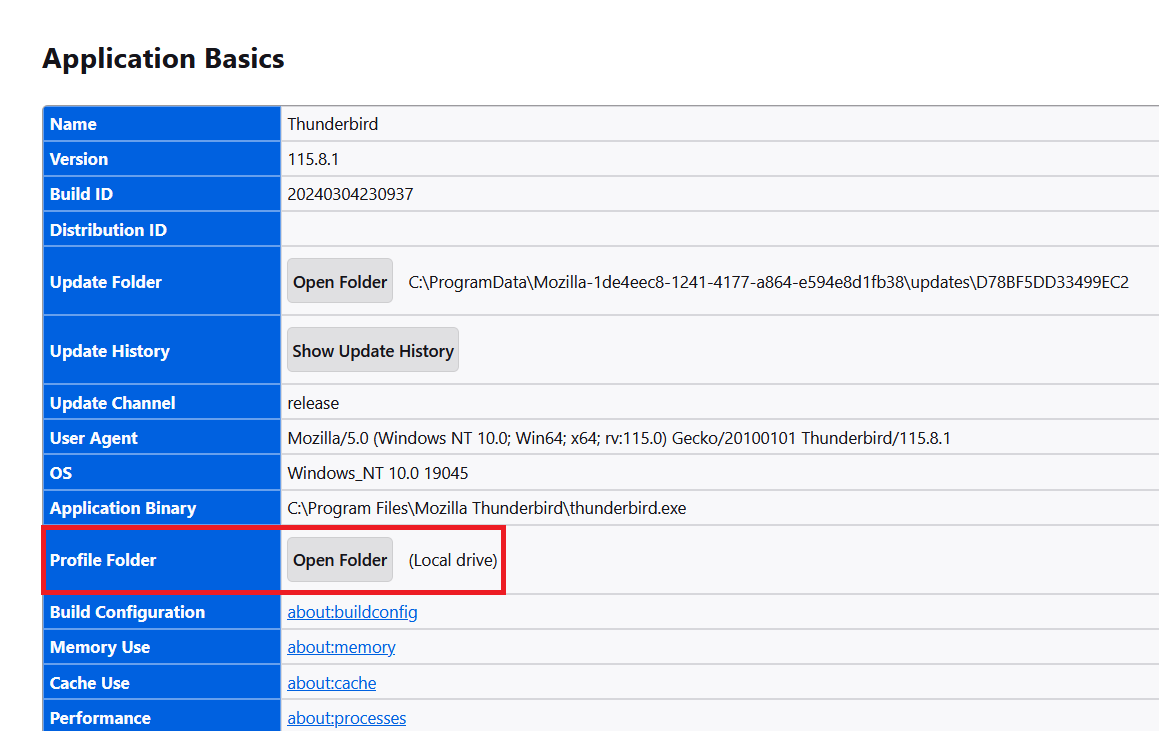
- Click on Open Folder to display the profile folder in your file system.
- Close Thunderbird before starting the backup process to prevent data loss or corruption.
- In your file explorer, navigate to the profile folder. Copy the entire folder to a secure location, such as an external hard drive, another computer, or cloud storage.
2. Employ Thunderbird Add-Ons
Thunderbird’s rich ecosystem includes various add-ons that offer additional features beyond the base application. Here are a couple of recommended add-ons to facilitate easy email backups:
- ImportExportTools NG. A key tool for exporting and importing messages and folders in multiple formats. You can either schedule regular backups or manually export your entire profile or selected folders.
- AutoarchiveReloaded. This add-on provides more flexibility in how and when emails are archived. It allows you to set up automatic archiving based on custom rules and schedules.
3. Copy Thunderbird Emails Manually
Manually copying Thunderbird emails is a simple approach for those who prefer not to use add-ons and built-in features. Here’s how to do it:
- Locate and open the Thunderbird profile folder on your local computer.
- Inside the profile folder, open the Mail or ImapMail folders, which contain your emails. These are stored in files that usually have no extension or sometimes a .msf extension, depending on whether you’re using POP or IMAP.
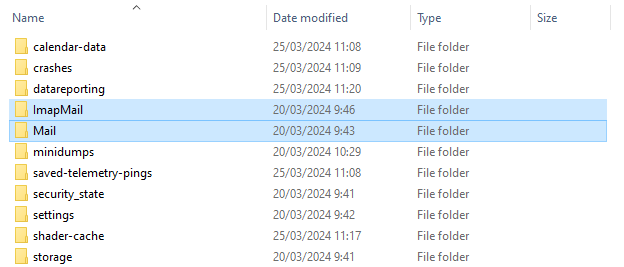
- Ensure Thunderbird is closed, then copy the Mail and ImapMail folders to another location, such as an external hard drive, USB drive, or cloud storage.
How to Back Up Your Mac Emails
Backing up your Mac emails involves employing the built-in Time Machine feature, which covers the entire system, including Mail app data. Additionally, exploring third-party applications and manual techniques can offer more flexibility and control over your email backups.
Suggested Reading
Adding an email account to Mac Mail is simple. Learn how by reading our tutorial on adding an email account to Mac Mail.
1. Use Time Machine for Backup
Time Machine is macOS’s built-in backup feature that automatically saves copies of all your files, including emails, system files, applications, accounts, preferences, music, photos, movies, and documents.
Please note that this option is not available on iOS devices. If you’ve set up an email account on iOS and wish to back it up, ensure you connect the same account on your Mac to use this feature.
Apply the following steps to set up the Time Machine:
- Time Machine requires an external storage device. Connect an external hard drive or a Thunderbolt drive to your Mac.
- Navigate to System Settings → General → Time Machine.

- Choose Add Backup Disk and enter your password to proceed.
- Select your connected storage device and click Set Up Disk.
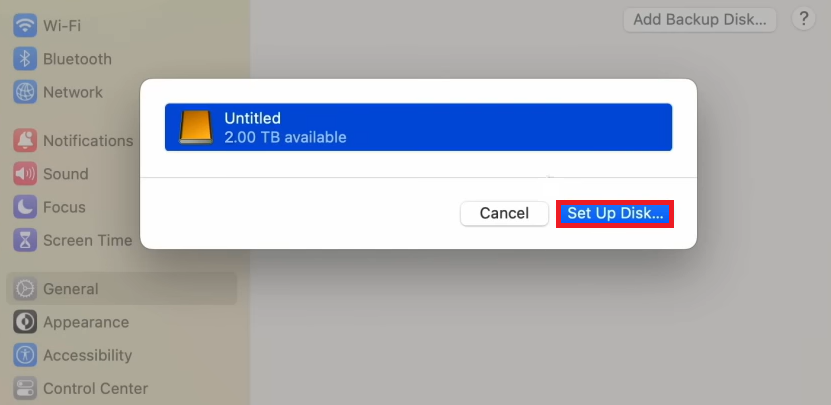
- Once the setup is complete, your Mac will automatically begin using the storage device for backups.
Time Machine performs hourly backups for the last 24 hours, daily backups for the past month, and weekly backups for all preceding months.
2. Export Mailboxes Manually
Exporting mailboxes manually in Mac Mail allows you to create standalone .mbox files for individual mailboxes. These files can be stored externally and imported back into Mac Mail or other compatible email clients.
Here’s how to export mailboxes in Mac Mail:
- Open the Mail app and select one or more mailboxes you wish to export.
- With mailboxes chosen, go to Mailbox → Export Mailbox.
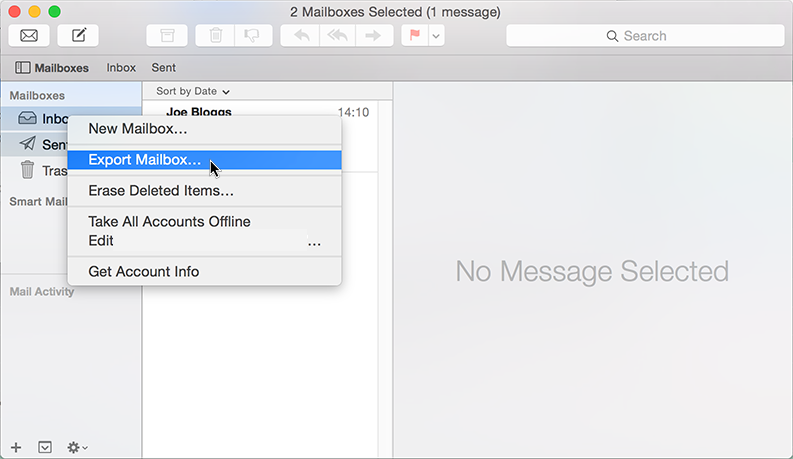
- Choose your desired location to save the .mbox file, then click Choose.
- Mac Mail will create a .mbox file for the selected mailboxes in the specified location.
If you have previously exported a mailbox, Mac Mail will not overwrite the existing .mbox file. Instead, it creates a new file with a numerical suffix, such as My Mailbox 1.mbox.
3. Back Up with Third-Party Software
Using third-party software for Mac Mail backups often offers more advanced backup options, such as scheduled or incremental backups. Here are two notable options:
- Horcrux IMAP Backup. This tool allows you to back up your email accounts in the background automatically. It can create incremental backups, ensuring that each email is only backed up once, even if it exists across multiple mailboxes.
- Mail Backup X. A versatile backup and recovery application that provides numerous features, including the ability to create mirror backups, archive emails in PDF format, and compress backup files to save space.
How to Back Up Your Yahoo Emails
Backing up your Yahoo emails involves a tailored approach, given the unique features and functionalities of this platform. Although Yahoo Mail provides some built-in options for exporting emails, you may need to explore external solutions for a more thorough backup.
1. Forward Emails to Another Email Account
Automatically forwarding emails from your Yahoo account to another email service is an effective method for backing up your incoming messages. However, this feature is exclusive to Yahoo Plus, the premium version of Yahoo Mail.
Here’s how to set up automatic email forwarding in Yahoo Plus:
- Log in to your Yahoo Mail account and navigate to Settings → More Settings.
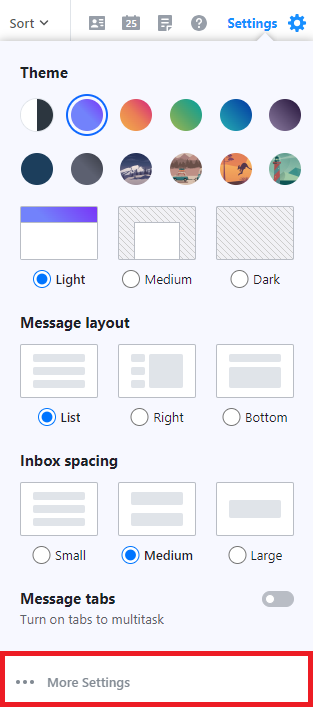
- Select Mailboxes and choose your Yahoo email account.
- Locate the Forwarding section and enter the email address where you wish to forward your Yahoo emails.
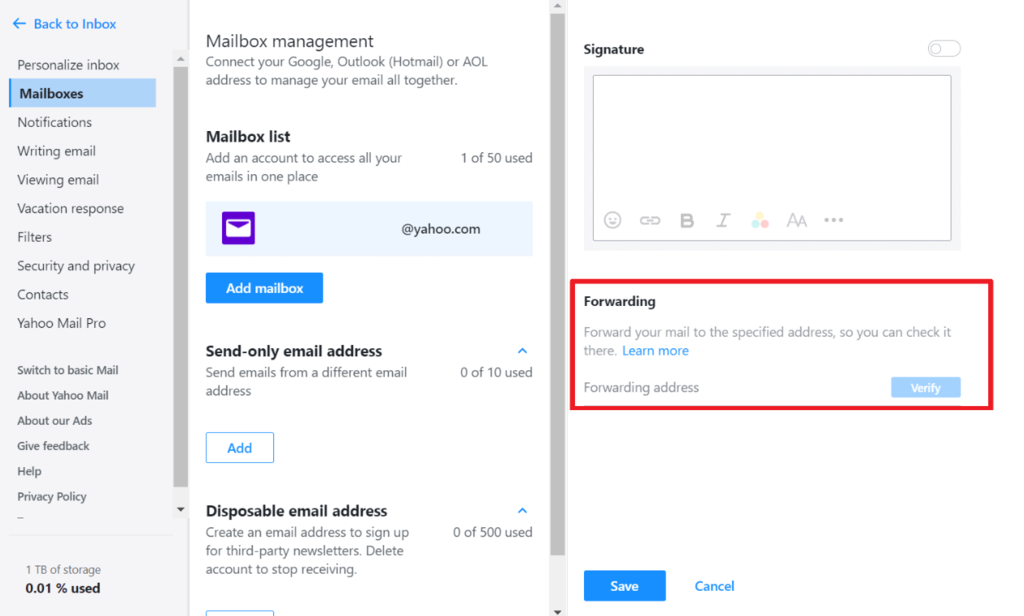
- Yahoo may require verification of the forwarding email address. Follow the instructions to complete the verification process.
- Once configured, new emails arriving in your Yahoo account will be automatically forwarded to the specified backup email account.
It’s important to note that only new incoming emails will be forwarded. Emails previously received and stored in your Yahoo account will not be affected by this setting.
2. Use POP to Download Emails
Using POP (Post Office Protocol) to download your Yahoo Mail emails is an effective backup strategy. POP allows you to download copies of your email messages to your local computer for offline access.
Here’s how to configure it using Mozilla Thunderbird:
- Launch Thunderbird on your computer, then go to Account Settings → Account Actions → Add Mail Account.
- Enter your Yahoo Mail account details. Thunderbird may attempt to configure the settings automatically. Select POP3 from the Available configurations section.
- For manual setup, input the following POP settings:
- Incoming Server – pop.mail.yahoo.com
- Port – 995
- SSL – SSL/TLS
- Authentication – Normal password
- Outgoing Server (SMTP) – smtp.mail.yahoo.com
- SMTP Port – 465 or 587
- SSL – SSL/TLS (for port 465) or STARTTLS (for port 587)
- Authentication – Normal password

- Complete the account setup by following the remaining prompts.
By default, the POP protocol downloads emails to your local device and may remove them from the server. To keep a copy of your emails on the Yahoo Mail server, make sure to select the Leave messages on server option in Thunderbird’s POP settings.
Suggested Reading
Learn more about the differences between POP, IMAP, and SMTP protocols by reading our article.
3. Back up Emails Using Third-Party Tools
Backing up emails with third-party tools offers Yahoo Mail users advanced backup capabilities. Many of these tools are compatible with various email services, including Yahoo Mail.
Dropmyemail is a cloud-based backup tool that backs up emails from services like Yahoo Mail. It offers automatic backups, ensuring continuous protection of your email content without manual intervention.
Conclusion
In this guide, we’ve covered a wide array of strategies to manage and safeguard your email data through backups, from utilizing built-in features of email services to leveraging third-party tools and cloud solutions.
Remember, establishing a regular backup routine is fundamental to preventing data loss and ensuring your valuable communications remain protected for the long term.
Email Backup FAQ
This section will answer the most common questions about how to back up emails.
How Does Email Backup Work?
Email backup works by creating copies of your email data and storing them in a separate location, like a local drive or cloud service. This ensures data retrieval in cases of accidental deletions or system failures.
How Do I Backup My Entire Email?
To back up your entire email, first, use your email client’s export feature or a third-party backup tool to save all messages to a file. Then, store this file on an external drive or in a cloud service.
Can I Backup My Emails to an External Hard Drive?
Yes, you can back up your emails to an external hard drive or USB drive by exporting your email data from your client service and saving the backup files to the drive.
What Is the Difference Between Email Backup and Email Archiving?
Email backup creates copies of emails for recovery purposes. In contrast, email archiving stores emails long-term for legal compliance, easy retrieval, and reducing server load, often with indexed and searchable features.
All of the tutorial content on this website is subject to Hostinger's rigorous editorial standards and values.

Ariffud is a Technical Content Writer with an educational background in Informatics. He has extensive expertise in Linux and VPS, authoring over 200 articles on server management and web development. Follow him on LinkedIn.