What is WordPress Multisite: A complete guide to setting up a WordPress website network
May 04, 2026
/
Jordana A. & Ariffud M.
/
13 min Read
WordPress Multisite is a feature that lets you create and manage a network of multiple websites from a single WordPress installation. It’s ideal for businesses, schools, or anyone who needs to run several related sites efficiently – all from one dashboard.
Setting up a network involves a few key configuration steps. Here’s a quick overview of the process:
- Enable the Multisite feature. Add a specific line of code to your wp-config.php file to activate the network setup option in your dashboard.
- Install the network. After enabling the feature, run the built-in WordPress network installer, where you’ll choose between subdomains or subdirectories for your sites.
- Set up wildcard subdomains. If you choose the subdomain option, configure a wildcard DNS record to correctly route all your new sites.
- Update your core files. WordPress will provide two code snippets to add to your wp-config.php and .htaccess files, which finalize the network’s structure.
- Configure network settings. Once installed, log in as the Super Admin to set network-wide options, such as user registration and default site settings.
What is WordPress Multisite?
WordPress Multisite is a built-in feature of WordPress (introduced in version 3.0) that lets a single installation power an entire network of websites. Think of it as a central hub for all your sites.
While each site in the network shares the same core WordPress files, themes, and plugins, they have separate media upload directories and individual database tables.
This setup enables each site to have its own unique content, settings, and appearance while still being managed from one central location.
The network is controlled by a Super Admin, a user role with permissions to manage network-wide settings, add or remove sites, and control which themes and plugins are available to individual site administrators.
Regular Site Admins can only manage their specific subsites, such as writing posts and managing users for that site alone.
How does WordPress Multisite work?
A WordPress Multisite network works by adding a layer of control on top of a standard WordPress installation. It shares core resources while keeping each site’s data separate. Let’s break down the key components.
User roles
WordPress Multisite uses the same user roles as single-site installations, with one addition – the Super Admin.
The Super Admin has full control over the entire network, including adding sites and users, managing themes and plugins, and editing network-wide settings. In short, they oversee everything within the network.
Admins manage individual subsites. They handle content, users, and settings for their specific site, but don’t have access to network-wide features. This separation lets site managers work independently without affecting the rest of the Multisite network.
Subsites and domain mapping
You can create subsites in a Multisite network in two ways:
- Subdomains. These look like standalone sites, making them ideal for unrelated entities within a network. For example: men.myboutique.com and women.myboutique.com.
- Subdirectories. These are organized as folders under the main site’s URL, making them great for blogs, categories, or sections of the same website. For example: pawcare.com/services and pawcare.com/contact.
With domain mapping, you can assign custom domains to subsites. You can use the same domain with subdomains or subdirectories, or give each subsite its own unique domain.
Using the same domain simplifies management and can strengthen domain authority, which helps with SEO. Meanwhile, unique domains are better for giving each subsite independent branding.
Core WordPress files
A WordPress Multisite network shares one set of core WordPress files (such as wp-admin and wp-includes) across all sites in the network. This means you only need to manage and update a single WordPress installation.
While themes and plugins are shared in the main wp-content/plugins and wp-content/themes folders, the wp-content/uploads directory is structured differently.
It includes a sites folder that contains a separate subfolder for each subsite, identified by its unique site ID (for example, wp-content/uploads/sites/2). This setup keeps all media uploads separate and organized.
Database structure
Just like the core files, a Multisite network uses a single WordPress database. However, to keep each site’s data separate, WordPress creates a new set of tables for every subsite you add.
A standard WordPress installation has 12 database tables (such as wp_posts, wp_options, and others). When you create a new subsite (for example, with ID 2), Multisite generates 10 new tables for that site, using a prefix like wp_2_posts, wp_2_options, and so on.
Network-wide data, such as users (wp_users and wp_usermeta), is stored in the main tables and shared across all sites.
This setup lets a single user account access multiple sites within the network. Additional tables, such as wp_blogs and wp_site, store information about the network itself.
Theme and plugin installation
Super Admins can install or update themes and plugins across the entire network. They can also choose to network activate them, which makes the theme or plugin available on all subsites ‒ overriding Site Admins.
Keep in mind that each subsite has its own set of database tables, so theme and plugin settings or customizations apply only to that specific site, not the whole network.
How to set up a WordPress Multisite network
Before you begin, make sure you have the following prerequisites in place:
- A web hosting plan that supports WordPress Multisite. Most quality WordPress hosting plans are compatible, but it’s always best to check. For example, all of Hostinger’s managed WordPress hosting plans fully support the Multisite feature.
- Admin access to your WordPress files. You’ll need access to the wp-config.php and .htaccess files through your hosting file manager or an FTP client.
- A new or existing WordPress installation. While you can activate Multisite on an existing site, it’s strongly recommended to start with a fresh WordPress installation to avoid conflicts. If you’re using an existing site, deactivate all plugins and create a full backup before getting started.

1. Enable WordPress Multisite via the wp-config.php file
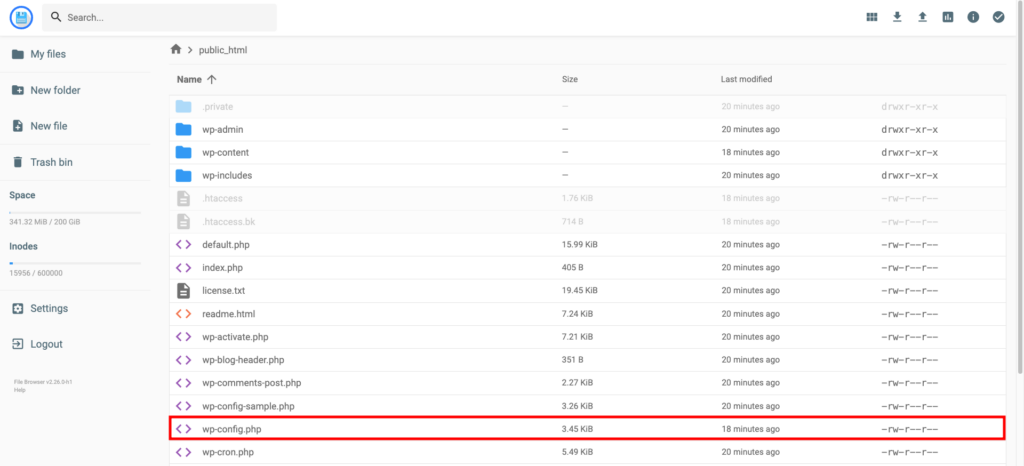
The wp-config.php file stores your website’s configuration, including database settings, hostnames, username, and password. You can find this file in your site’s root directory (public_html) using your hosting file manager, or access it via an FTP client like FileZilla.
Follow these steps:
- Locate the wp-config.php file in the root directory of your WordPress installation.
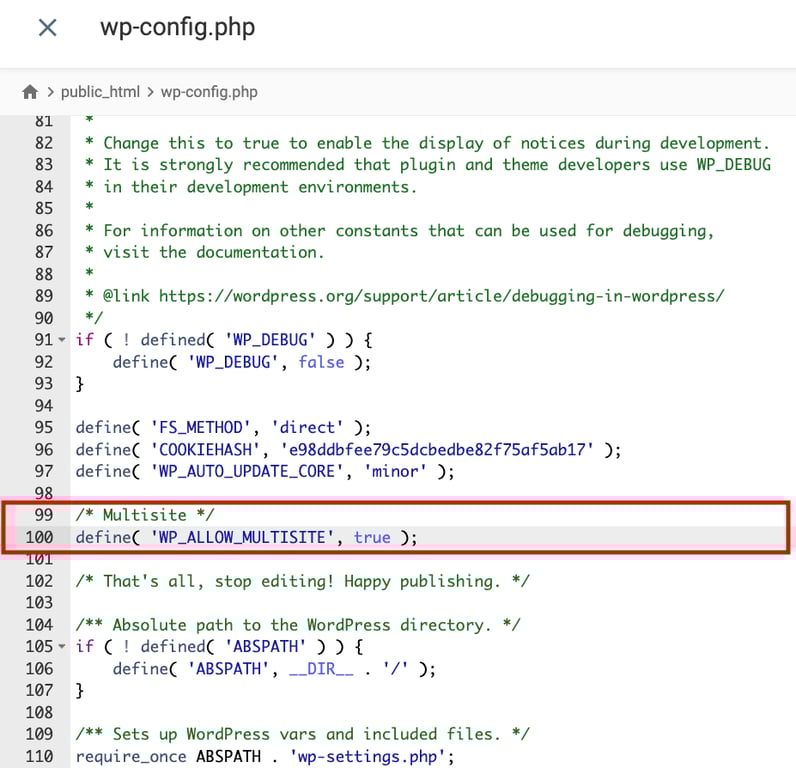
- Open the file and scroll to the bottom until you find the line: /* That’s all, stop editing! Happy blogging. */. Sometimes, this line may read: /* That’s all, stop editing! Happy publishing. */.
- Add the following code snippet above that line:
/* Multisite */
define( 'WP_ALLOW_MULTISITE', true );
Save your changes and move on to the next step.
2. Set up the WordPress Multisite network
Now that Multisite is enabled on your WordPress installation, you can start configuring the network. Here’s how:
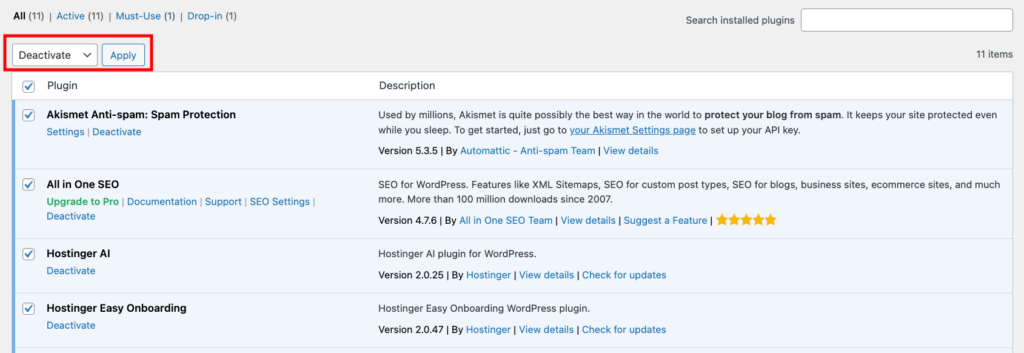
- Go to Plugins → Installed Plugins in your WordPress dashboard and deactivate all plugins using the Bulk actions menu. Since not all plugins support Multisite, this helps prevent potential conflicts.
- Navigate to Tools → Network Setup to create your WordPress Multisite network.
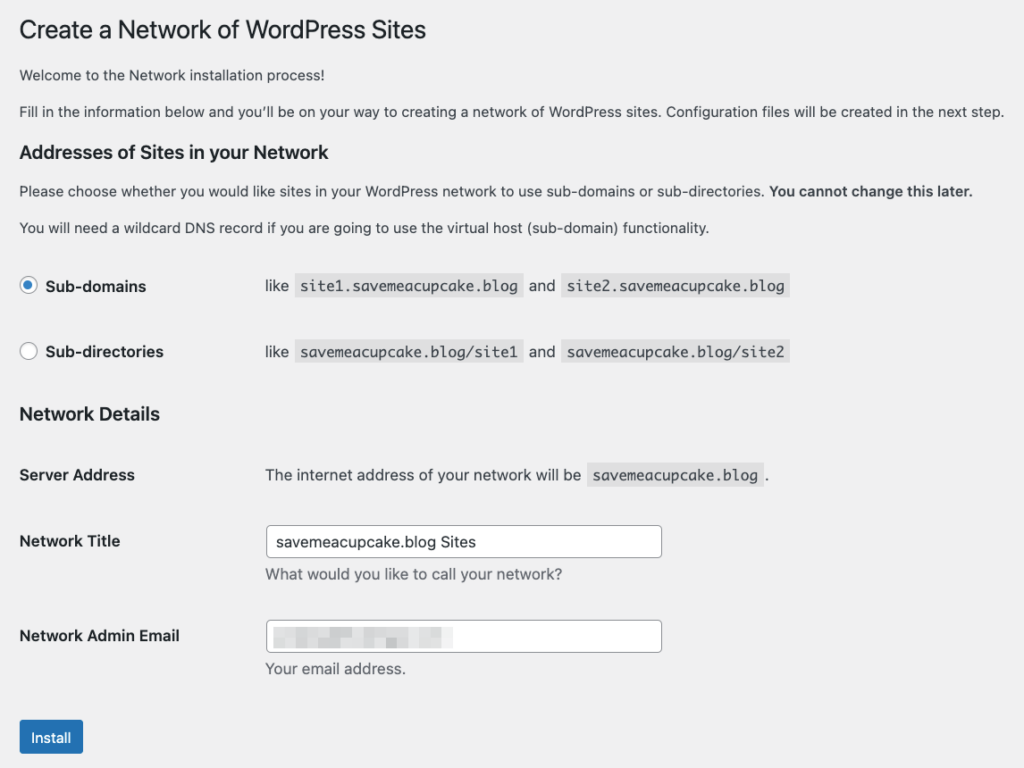
- Under the Addresses of Sites in your Network section, choose whether to use sub-domains or sub-directories. If these options aren’t available, WordPress will default to subdirectories.
This security measure applies to installations older than 30 days to prevent URL conflicts. We recommend setting up a new WordPress installation if you plan to use subdomains.
- In the Network Details section, enter the network name in the Network Title field and the Super Admin’s email address in the Network Admin Email field. Double-check all the details, then click Install.
3. Set up a wildcard subdomain
A wildcard subdomain is a placeholder that handles all subdomains under your main domain, making this step essential for subdomain-based Multisite networks.
For example, if your main domain is example.com, a wildcard subdomain can route traffic for site1.example.com, blog.example.com, or any other subdomain you create.
You can set it up by adding a wildcard DNS record (*) in your domain’s DNS settings and pointing it to your server’s IP address.
Here’s how to create a wildcard DNS record on Hostinger:
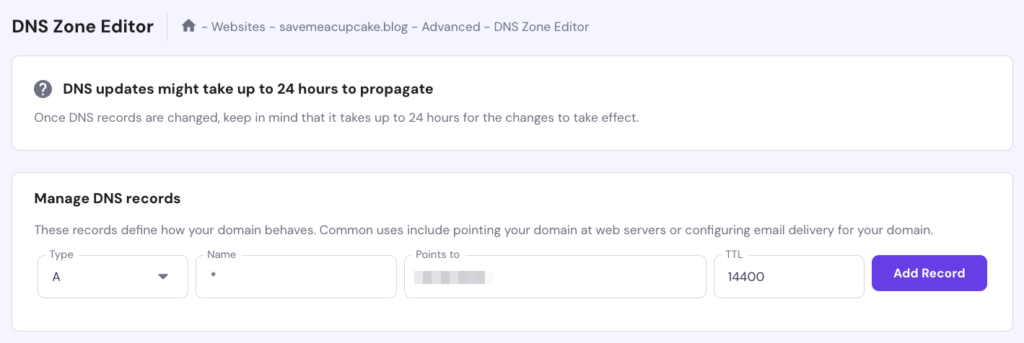
- Go to Advanced → DNS Zone Editor in your hPanel dashboard.
- Under Manage DNS records, enter * in the Name field and your hosting account’s IP address in the Points to field. You can find your host IP address under Hosting Plan → Plan Details. Click Add Record.
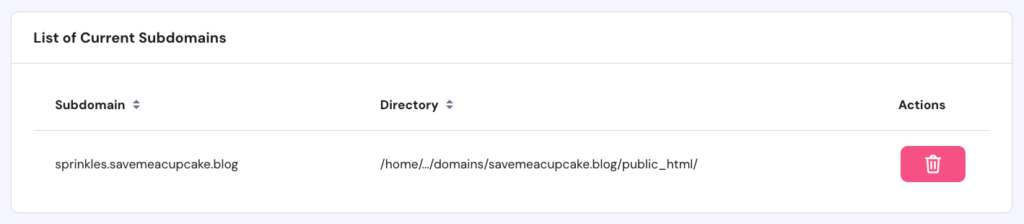
- Head to Domains → Subdomains and enter the subdomain you want to create. Check the Custom folder for subdomain and Use public_html directory boxes, then click Create.

That’s it – the new subdomain will appear under the List of Current Subdomains.
Keep in mind that wildcard subdomain propagation can take 24-48 hours. You can use a DNS checker to confirm when the process is complete.
4. Update the wp-config.php and .htaccess files
Before making any changes to the wp-config.php and .htaccess files, back up both files so you can easily restore them if needed. If you’re a Hostinger user, use the Download feature in File Manager to save copies of the files.
The steps to update wp-config.php and .htaccess configurations are below:
- Go back to Tools → Network Setup in your WordPress dashboard to find the code snippets for your wp-config.php and .htaccess files.
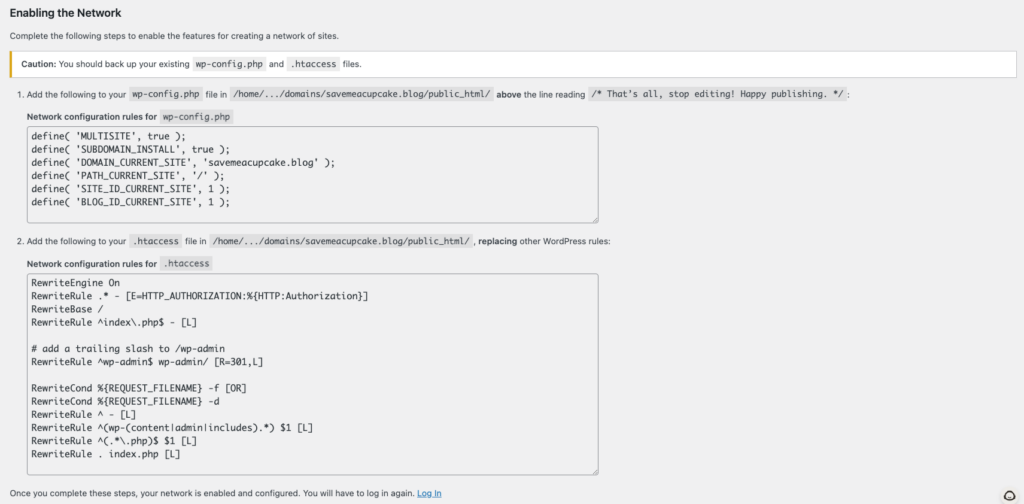
- Access your wp-config.php file through File Manager or an FTP client. Add the following code snippet above the line /* That’s all, stop editing! Happy publishing. */:
define( 'MULTISITE', true );
define( 'SUBDOMAIN_INSTALL', true );
define( 'DOMAIN_CURRENT_SITE', 'yourdomain.tld' );
define( 'PATH_CURRENT_SITE', '/' );
define( 'SITE_ID_CURRENT_SITE', 1 );
define( 'BLOG_ID_CURRENT_SITE', 1 );
Replace yourdomain.tld with your actual domain name.
- Locate the .htaccess file in the same public_html directory as your wp-config.php file. Open it and insert the following code snippet inside the IfModule tags:
RewriteEngine On
RewriteRule .* - [E=HTTP_AUTHORIZATION:%{HTTP:Authorization}]
RewriteBase /
RewriteRule ^index\.php$ - [L]

# add a trailing slash to /wp-admin
RewriteRule ^wp-admin$ wp-admin/ [R=301,L]

RewriteCond %{REQUEST_FILENAME} -f [OR]
RewriteCond %{REQUEST_FILENAME} -d
RewriteRule ^ - [L]
RewriteRule ^(wp-(content|admin|includes).*) $1 [L]
RewriteRule ^(.*\.php)$ $1 [L]
RewriteRule . index.php [L]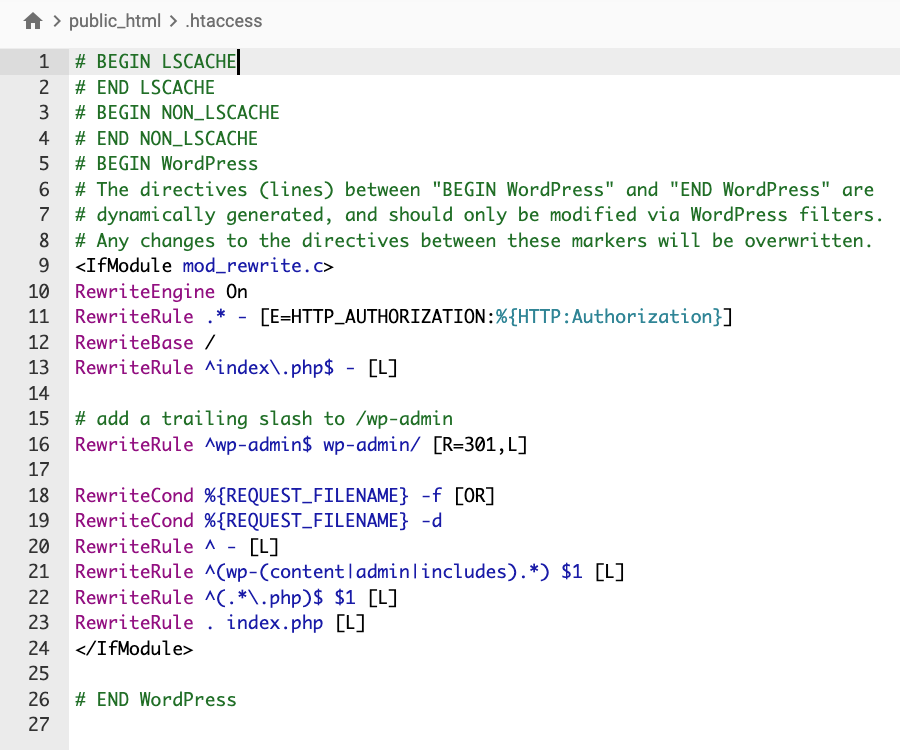
Save the changes to both files and close the editor.
5. Configure the network settings
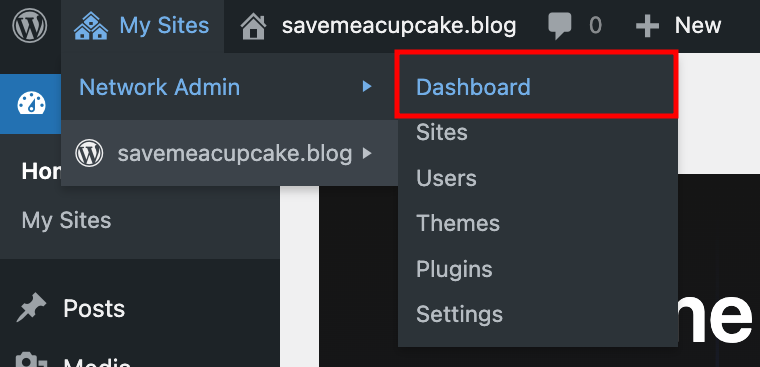
At this point, your WordPress Multisite network is technically active. You’ll see the Network Admin dashboard under the new My Sites drop-down menu after logging back in. However, it’s not fully configured yet.
Follow these steps to complete the setup:
- Go to My Sites → Network Admin → Dashboard. This is where Super Admins manage all sites in the network.
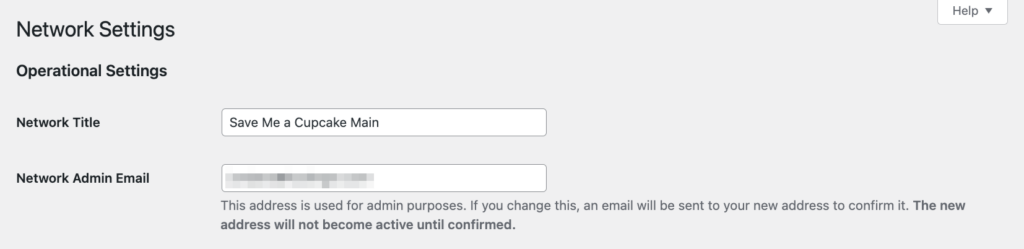
- From the dashboard, navigate to Settings → Network Settings.
- Under Operational Settings, update the network’s name and admin email address if you want to receive network-wide notifications.
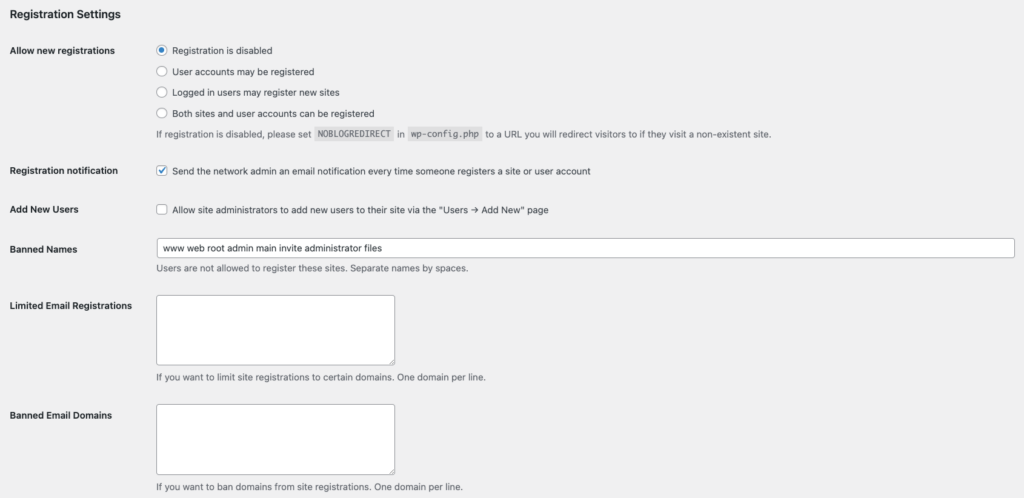
- In the Registration Settings section, configure user and site registration options:
- Allow new registrations. Controls whether users or sites can register freely, are restricted, or disabled across the network.
- Registration notification. Sends an email notification to the network admin when a new user or site registers.
- Add New Users. Lets site admins add users directly to their subsites.
- Banned Names. Blocks specific site names during registration.
- Limited Email Registrations. Restricts registrations to specific email domains for better control and security.
- Banned Email Domains. Prevents users from registering with email addresses from certain domains.
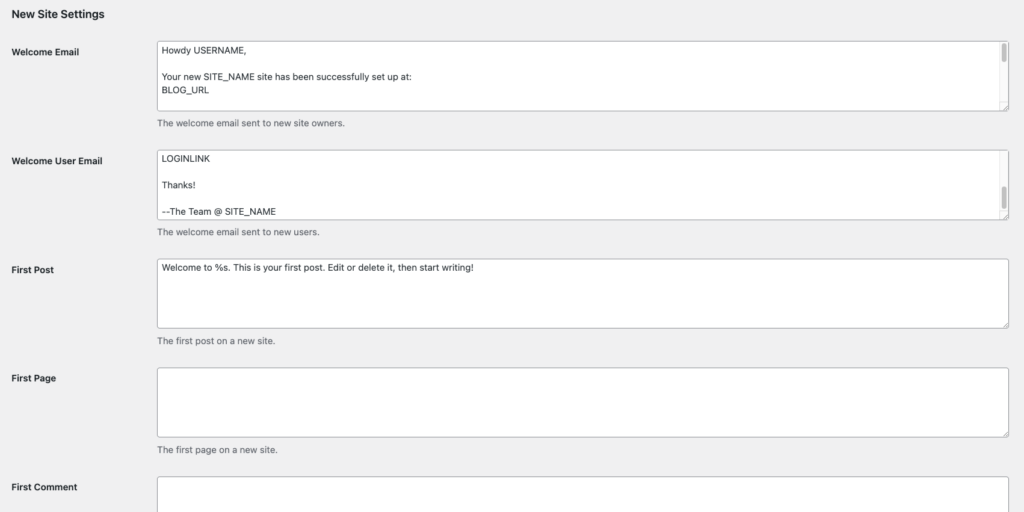
- In New Site Settings, customize the welcome message and initial content for new sites. You can adjust the default post, page, and comment author information shown to new admins.
- Check Upload Settings to control which file types users can upload and how much space each site can use. If you increase the upload limit, make sure it stays within your hosting plan’s storage capacity.

- Under Menu Settings, enable the Plugins option if you want site admins to manage plugins on their subsites.
- Click Save Changes to apply all settings.
Congratulations! Your WordPress Multisite network is now fully configured and ready to host multiple websites.
How to manage a WordPress Multisite network
Now that you’ve set up your network, let’s review some key features for managing it effectively.
Adding a new website to the network
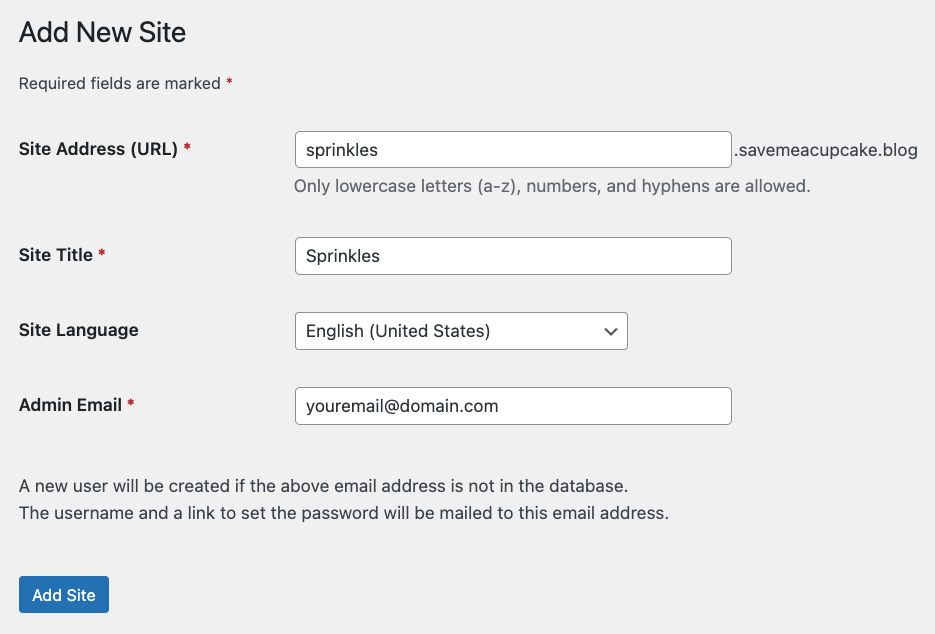
Once you’ve set up Multisite, your network will start with a single website. To create a new subsite, go to Sites → Add New Site in your Network Admin dashboard. Enter the site’s address, title, language, and admin email, then click Add Site when you’re done.
You can manage all subsites under Sites → All Sites, including editing, deactivating, or deleting them. As long as your hosting plan’s resources support it, you can create as many sites as you need.
If you want to assign a custom domain to a WordPress Multisite subsite, follow these steps:
- Search and buy a domain name from your preferred domain registrar site.
- If you bought the domain from the same web host as your WordPress Multisite, skip to step 4.
- Point the domain to your web host’s nameservers. Keep in mind that DNS propagation can take up to 48 hours to complete.
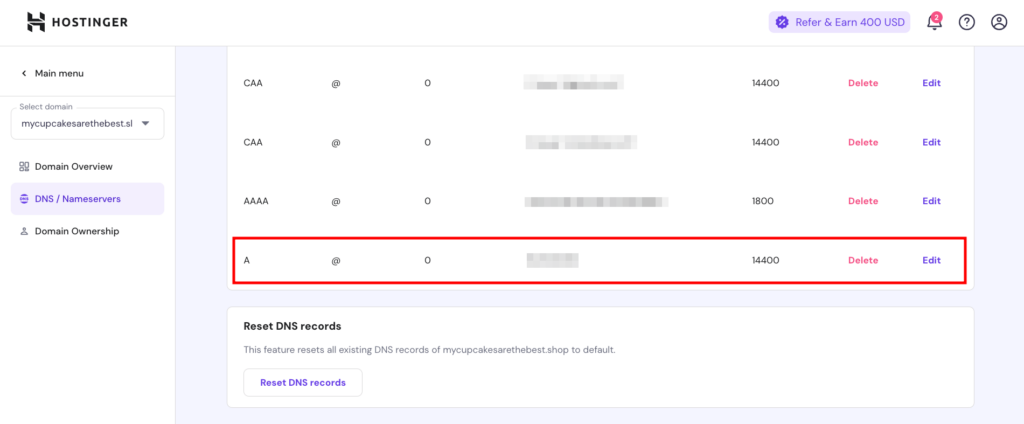
- Update the domain’s A record to point to the IP address of your WordPress Multisite server.
- If you’re using Hostinger, add the domain as a parked domain in your hosting account, then update its A record in DNS/Nameservers.
- Map the custom domain to your subsite. Go to Sites → Editor for the subsite you want to customize, then update the Site Address (URL) field with your custom domain. Click Save Changes when finished.

Domain Name Checker
Instantly check domain name availability.
Adding a new user
As a Super Admin, you can add new users as network or site admins. Go to Users → Add New User and enter the user’s username and email address. After you click Add User, they’ll receive an email invitation to set their password.
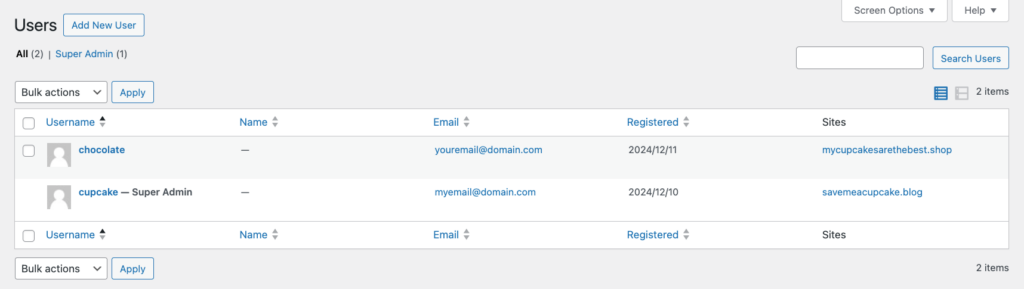
To grant Super Admin privileges, edit the user you just added and check the Super Admin option. Be cautious when assigning this role, as it gives full control over your entire Multisite network. It’s best to limit Super Admin access to one person.
You can also create new users or assign roles for a specific subsite. Head to Sites → All Sites and select the number under Users next to the site you want to manage. In the Users tab, add existing or new users under the appropriate section.

Managing themes and plugins
Installing themes and plugins in a Multisite network works much like on a regular WordPress site. The main difference is that themes and plugins installed by Super Admins are available across the entire network.
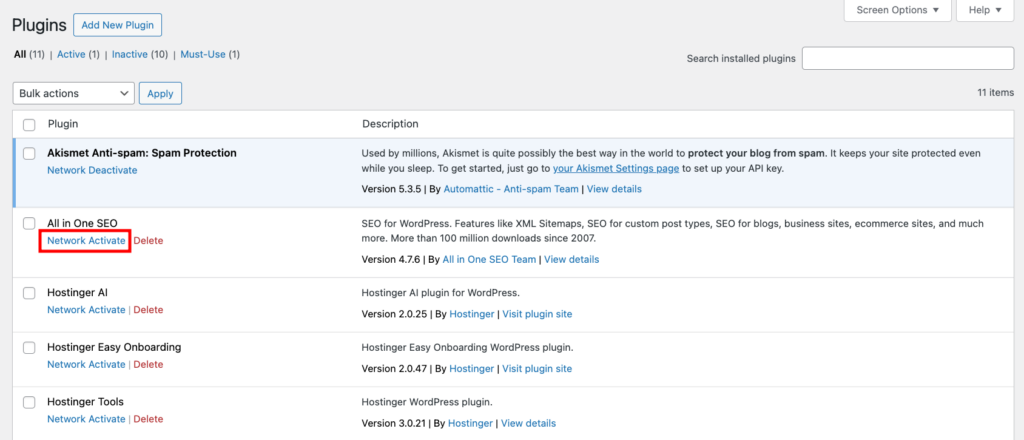
To make a plugin active on all subsites, click Network Activate on the Plugins page. If you leave it deactivated, individual Site Admins can choose to activate it on their own sites.
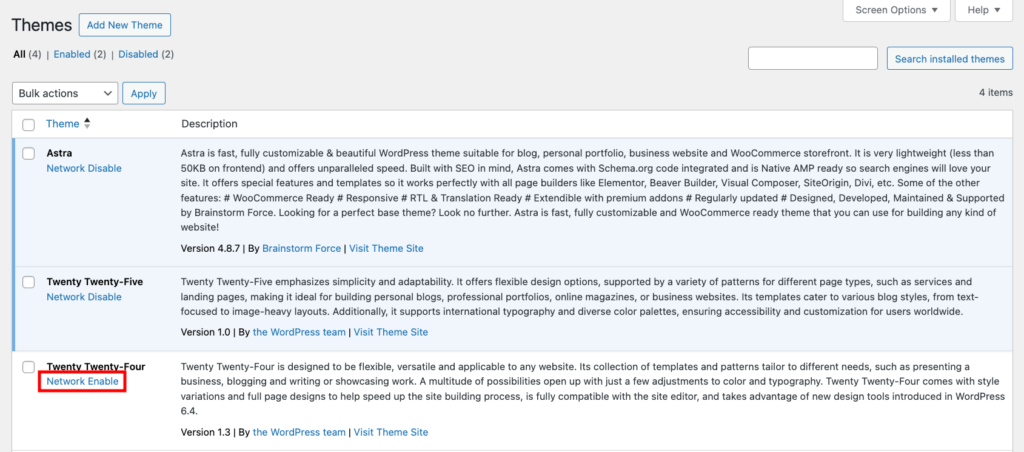
For themes, Super Admins can select Network Enable to make them available to all subsites. Each site’s admin can then activate the theme from their own dashboard as needed.
Remember, Super Admins are responsible for updating and removing inactive themes and plugins to keep all sites in the network running smoothly.
Managing WordPress Multisite database
WordPress uses a single database to store all the network’s data. It organizes content for each site into separate tables, giving every subsite its own space in the database while sharing a few core tables:
- wp_users. Stores user information for all users on the network.
- wp_usermeta. Stores additional metadata about users, such as roles and capabilities.
- wp_site. Contains information about the network itself, including the network name and domain.
- wp_sitemeta. Stores metadata for network-wide settings.
- wp_blogs. Lists all sites within the network, along with their domains, paths, and statuses.
- wp_blog_versions. Keeps track of the WordPress version each site is running.
- wp_signups. Logs user or site signups if registration is enabled.
- wp_registration_log. Records user registration details for management and tracking.
When a new site is created in a WordPress Multisite network, WordPress generates 10 new database tables for that site, using the site’s ID in each table name. For example, if the site ID is 2, the new database tables are:
- wp_2_posts. Stores all posts, pages, and custom post types.
- wp_2_postmeta. Contains metadata for posts, such as custom fields.
- wp_2_comments. Stores comments made on posts and pages.
- wp_2_commentmeta. Contains metadata for comments.
- wp_2_links. Stores blogroll links if used.
- wp_2_options. Contains the site’s settings and configurations.
- wp_2_terms. Stores tags, categories, and custom terms.
- wp_2_term_taxonomy. Defines taxonomy types for terms.
- wp_2_term_relationships. Tracks relationships between content and taxonomy terms.
- wp_2_termmeta. Stores metadata for taxonomy terms.
Note that wp_users and wp_usermeta are shared across all sites in the network and are not duplicated for each subsite.
Use a database management tool like phpMyAdmin to locate the tables for a specific subsite and manage its content.
When should I use a WordPress Multisite?
You should use WordPress Multisite when managing multiple similar websites that share the same themes, plugins, and WordPress core files. For example, BBC America creates subsites for each show, using child themes to give them unique branding.
That said, a Multisite network isn’t a one-size-fits-all solution. If your websites aren’t related or have very different needs, you might find it limiting since most features must be shared and managed by a Network Admin.
Suppose you’re a web developer with multiple clients, each needing a unique website. Since every site requires different plugins, themes, and custom settings, putting them all in a Multisite network could cause compatibility issues.
Managing them separately with their own WordPress installations and settings would be much easier. Here’s a comparison table to help you decide:
| WordPress Multisite | WordPress single site |
| You run websites with similar content and functionality. | You run websites with vastly different content and features. |
| Manage multiple sites with the same server configurations. | Each website requires specific server configurations. |
| Best for businesses or organizations needing separate websites for departments or projects. | Best for businesses or organizations that only need a single website. |
| Best for region-specific sites with different content, branding, or management per location/language | Best for sites where the same content is translated into multiple languages via plugin |
| Cost-effective to start, though costs can increase as the network grows. | Budget is more predictable since each site has dedicated resources. |
Pros and cons of WordPress Multisite
Here are the main advantages of setting up a Multisite network in WordPress:
- Efficient management. As the Network Admin, you can handle updates, backups, and security or performance plugins from a single WordPress dashboard.
- Easier delegation. WordPress Multisite lets you assign lower-level admins to different sites in your network, making it easier to distribute management tasks.
- Greater control. If you run multiple sites, Multisite gives you centralized control over plugins and themes for each site. This helps reduce the risk of security or performance issues affecting the entire network.
- Centralized user management. Manage users across all sites from one dashboard and give them access to multiple sites without creating separate accounts.
- Streamlined updates and maintenance. Since all sites share the same core files, themes, and plugins, you only need to update them once for the entire network, saving time and effort.
Before implementing Multisite, consider the potential drawbacks:
- Shared limitations. Because all subsites use the same database, backups and updates apply to the entire network, not individual sites.
- Higher risk. If the network experiences downtime, all sites are affected. Likewise, a security issue on one site can compromise others.
- Interdependent performance. Each site’s performance depends on the overall network load. A traffic spike on one site can slow down the rest.
- Plugin and theme compatibility. Not all plugins or themes work with Multisite, so your customization options may be limited.
- Hosting requirements. Some web hosts don’t support WordPress Multisite, so verify compatibility before setting it up.
How to troubleshoot common WordPress Multisite problems
To keep your WordPress Multisite network running smoothly, it’s important to understand common issues and how to fix them.
Incorrect domain mapping
This issue often occurs due to DNS misconfigurations. Start by checking whether the A record points to the correct server IP hosting your Multisite. If you’ve recently made changes, keep in mind that DNS updates can take up to 48 hours to propagate globally.
Next, review your WordPress settings. Go to Sites in the Network Admin dashboard, find the problematic subsite, and edit its settings. Double-check the Site Address (URL) field to make sure it uses the correct mapped domain.
Also, validate the domain’s SSL certificate. Issues with SSL can cause HTTP/HTTPS mismatches, which you can fix by enforcing HTTPS connections.
Outdated caching can lead to similar problems. Cached DNS records, server-side caching, or plugin-based caching might interfere with domain resolution. To resolve this, flush the DNS cache along with any server and plugin caches.
Finally, if you’re using a domain mapping plugin, make sure it’s updated and configured correctly.
Incorrect file or directory permissions
File and directory permissions control how your server interacts with WordPress files. Incorrect permissions can prevent the server from reading, writing, or executing essential files, which can cause issues in your Multisite network.
To fix this, check your current permissions using File Manager or an FTP client. The recommended settings are:
- Files: 644. The owner can read and write, while others can only read.
- Directories: 755. The owner can read, write, and execute, while others can only read and execute.
If you’re using Hostinger, fixing permissions is simple. Go to Advanced → Fix File Ownership in hPanel, check the box, and click Execute.
Login issue on subdirectory installation
If you can’t log in to subsites after editing the wp-config.php or .htaccess files, it’s likely due to an incorrect subdirectory configuration.
To fix this, locate the following line in your wp-config.php file:
define( 'SUBDOMAIN_INSTALL', true );
Change true to false, so it reads:
define( 'SUBDOMAIN_INSTALL', false );
This change configures WordPress to use a subdirectory-based Multisite setup instead of subdomains.
Users are not getting activation emails
If new users aren’t receiving activation emails to access their subsites, the issue is likely related to email configuration or server settings.
To improve email deliverability, set up WordPress SMTP to send emails through a reliable third-party provider instead of using your host server’s default mail() function.
SMTP offers a more secure and consistent email delivery process, reducing the chances of messages being marked as spam or failing to send.
Helpful tools to manage multiple WordPress websites
The best tools to manage multiple WordPress websites include WP Umbrella, MainWP Dashboard, and Modular DS. These platforms let you control several standalone WordPress installations from a single dashboard.
While WordPress Multisite is a powerful built-in option for managing related sites under one installation, it’s not always the best choice.
For agencies or developers managing completely separate client sites – each with unique themes, plugins, or hosting environments – a Multisite network can feel restrictive. In those cases, a dedicated WordPress management tool is often a better fit.
To explore your options, check out our guide on 6 tools to manage multiple WordPress sites, which highlights third-party solutions that simplify updates, backups, and monitoring across all your projects.
All of the tutorial content on this website is subject to Hostinger's rigorous editorial standards and values.

Jordana is a Senior Content Writer with a background in Information Systems. She has over five years of experience in WordPress and is casually dabbling with PHP and MySQL. Her passion for writing and technology drives her to create tutorials for anyone wanting to build their online presence. Follow her on LinkedIn.

Ariffud is a Technical Content Writer with an educational background in Informatics. He has extensive expertise in Linux and VPS, authoring over 200 articles on server management and web development. Follow him on LinkedIn.


