How to use React with WordPress
Sep 17, 2026
/
By Ariffud M.
/
11 min Read
To use React with WordPress, keep WordPress as your content management system (CMS), then use its REST API to fetch and display your content in a separate React front end.
In this WordPress-React setup, you build the front end on your computer using Next.js as the React framework, then deploy it to your web app hosting provider.
Here are eight steps to integrate WordPress with React:
- Prepare WordPress as a content back end. Set your permalinks and confirm that the built-in REST API returns your published posts.
- Create your Next.js project. Generate the app, run it locally, and store your WordPress REST API URL in an environment variable.
- Fetch and display WordPress posts. Request your published posts through the REST API and show their titles and excerpts on your Next.js home page.
- Add individual post pages. Create dynamic routes that use each WordPress post slug to fetch and display the matching post.
- Display images and custom content. Add featured images and expose the custom post types or custom fields your Next.js app needs.
- Add authentication for protected content. Use a WordPress Application Password when your app needs drafts, private posts, or write access.
- Add SEO metadata and a sitemap. Create page titles and meta descriptions for your posts, then generate a sitemap for your public URLs.
- Deploy your Next.js app. Publish the app to a web app hosting, connect your domain, and configure its environment variables.
How does React integrate with WordPress?
React integrates with WordPress in three main ways: as a separate headless front end, inside Gutenberg blocks and plugins, or as React components inside a traditional WordPress theme.
With a headless WordPress setup, you keep managing content in WordPress while Next.js retrieves that content through an API and renders your public site.
WordPress provides a built-in REST API, a set of web addresses that return your posts, pages, and media as plain data instead of finished pages, so you don’t need an extra plugin to connect it to Next.js.
You handle navigation, page templates, metadata, and previews in your Next.js app because it replaces your WordPress theme. Plugins that depend on theme output won’t automatically carry over to your front end.
Alternatively, use React inside WordPress for custom Gutenberg blocks, editor interfaces, or plugin screens when you don’t need a separate front end. WordPress continues to handle your theme, URLs, public pages, and most plugin behavior.
You can also keep your traditional WordPress theme and add React only to the parts that need more interactivity. This approach works well for advanced filters, calculators, dashboards, and search tools.
| Approach | How it works | Front-end speed | Development effort | SEO handling | Plugin compatibility |
| Headless WordPress | Your Next.js app gets content from WordPress through an API | High, depending on how you render and cache pages | High | You handle rendering and metadata in Next.js | Low, especially for plugins that depend on theme output |
| Gutenberg and plugins | You use React inside the WordPress editor or plugin interfaces | Depends on your WordPress theme | Medium | WordPress handles your public pages | High |
| React in a theme | You add React components to PHP-rendered WordPress pages | Depends on your theme and React code | Medium | WordPress handles most SEO output | Generally high |
This tutorial uses the headless WordPress approach, with Next.js as the front end and the built-in REST API connecting it to your WordPress content.
What to prepare before integrating React with WordPress
Before integrating React with WordPress, prepare your WordPress site, hosting for your Next.js app, Node.js with npm, and a code editor.
Start with a running WordPress site and publish at least one post with a featured image. You’ll use this content to test the Next.js app later.
You can keep WordPress on your current hosting provider, but you’ll need a separate web app hosting plan for your Next.js app. Get one from Hostinger or another provider that supports Node.js apps.
Next, install Node.js 20.9 or newer on your computer from its official website. npm comes bundled with Node.js, so you don’t need to add it separately.
You’ll also need a code editor such as Visual Studio Code (VS Code) to develop your Next.js front end.

1. Set up WordPress as a headless content back end
Set up WordPress as a headless content back end by switching your permalinks to Post name and confirming that the WordPress REST API returns your published posts.
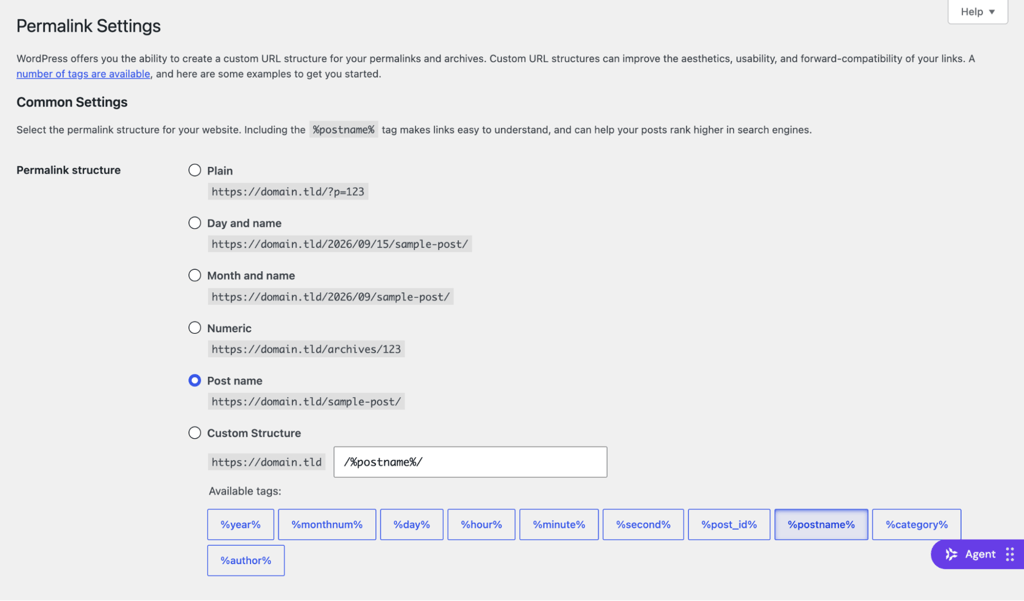
To do this, open your WordPress dashboard and go to Settings → Permalinks. Under Permalink structure, choose Post name, then hit Save Changes.
Next, open the following URL in your browser, replacing domain.tld with your WordPress domain:
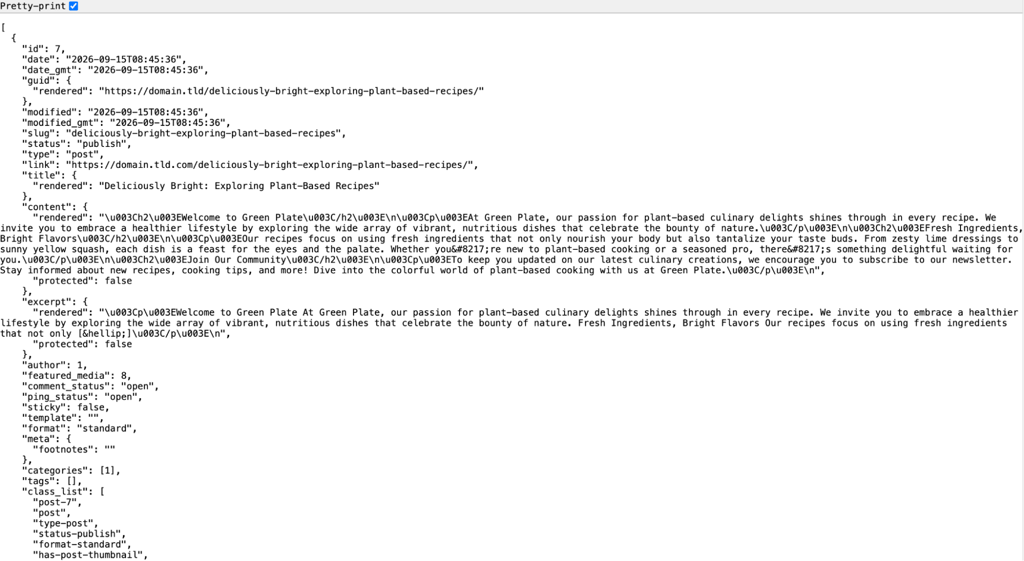
https://domain.tld/wp-json/wp/v2/posts
You’ll see your published posts in JSON format – a plain-text data format that React can read – when the REST API is working correctly.
Double-check your permalink settings and review your security plugin or server configuration if the endpoint returns an error.
2. Create a Next.js project
To create your Next.js project, use create-next-app to generate a new project with the App Router, then start its local development server.
Open a terminal on your computer, then run:
npx create-next-app@latest wordpress-react-frontend --js --eslint --app --no-tailwind --no-src-dir --use-npm --yes
cd wordpress-react-frontend
npm run dev
The –app flag enables the Next.js App Router, which you’ll use later to create the post index and individual post routes.
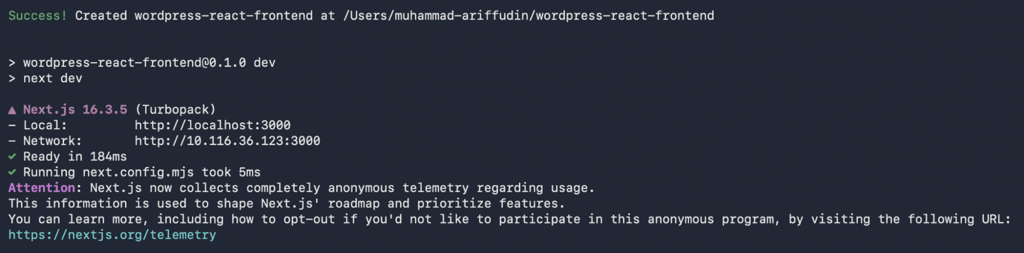
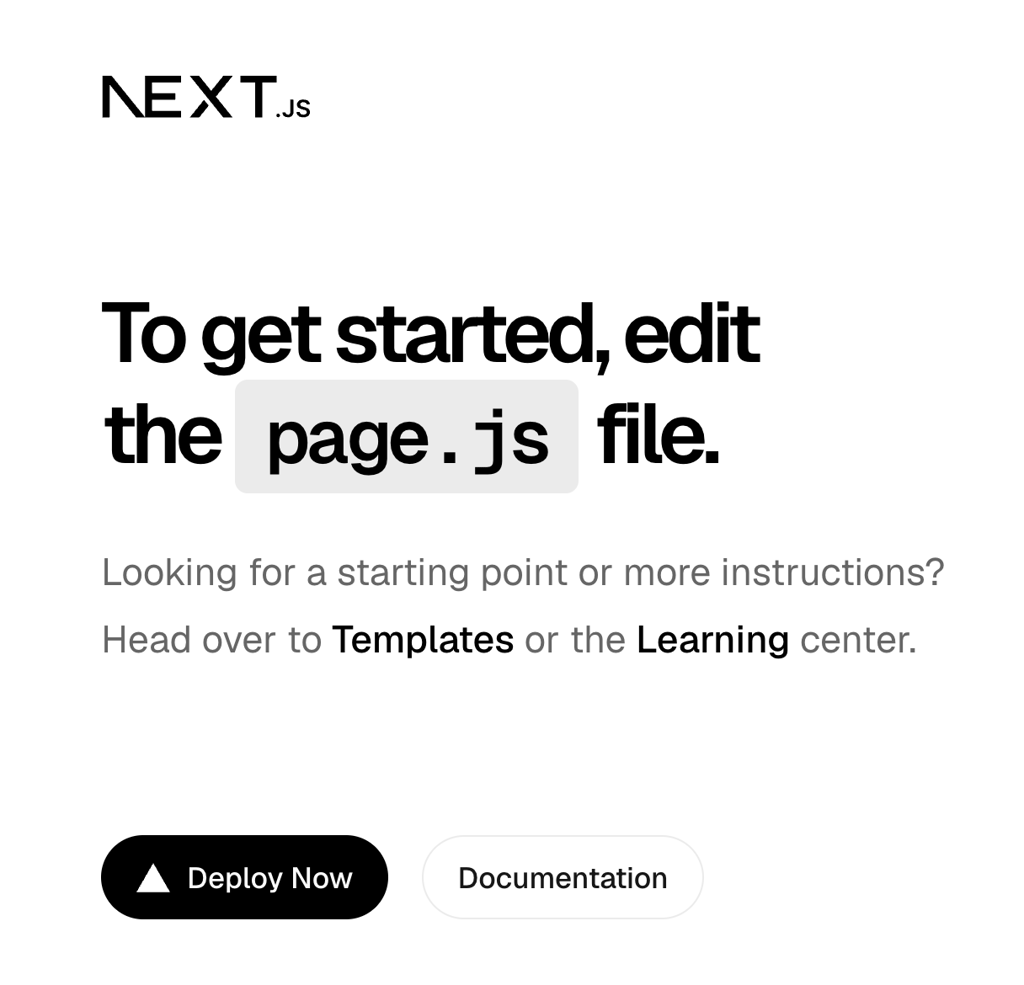
Open http://localhost:3000 in your browser. You should see the default Next.js page.
Next, open VS Code and go to File → Open Folder…, then select the wordpress-react-frontend project folder. In the project root folder, click New File and name it .env.local.
This file stores your WordPress API URL as an environment variable, a setting kept outside your code so you can change it without editing your files. Next.js reads .env.local on the server only, so the value never reaches visitors’ browsers..
Add the following value and replace domain.tld with your own domain:
WORDPRESS_API_URL=https://domain.tld/wp-json/wp/v2
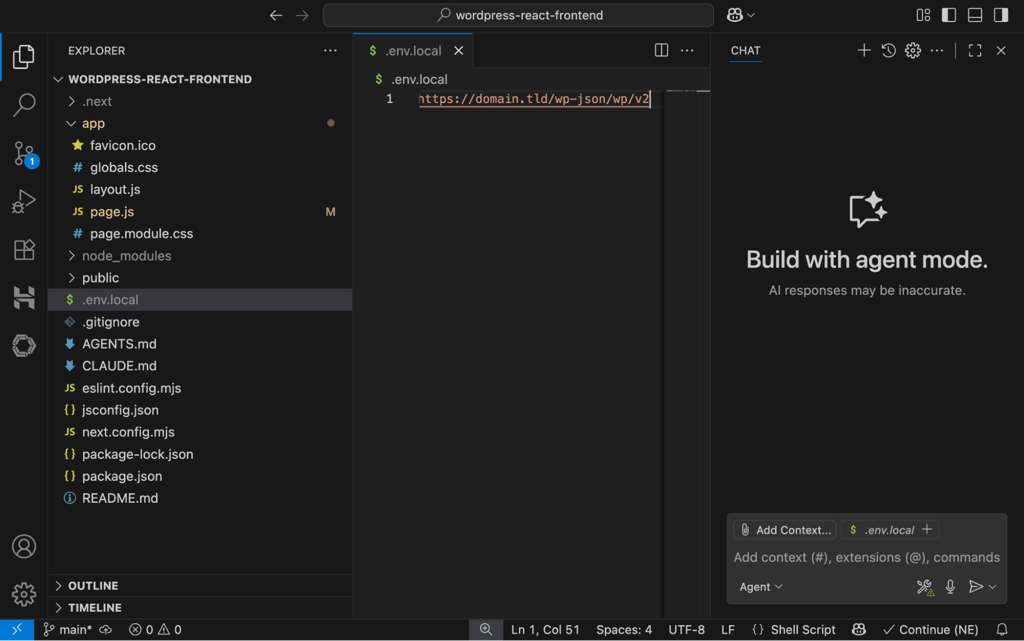
Save .env.local, then return to your terminal and press Ctrl+C to stop the development server. Restart the server, so Next.js loads the new environment variable:
npm run dev
3. Fetch and display WordPress posts
To fetch and display your WordPress posts, update app/page.js so it requests them through the REST API and shows their titles and excerpts on your Next.js home page.
Open the app/page.js file, then replace its contents with:
async function getPosts() {
   const response = await fetch(
      `${process.env.WORDPRESS_API_URL}/posts?_fields=id,title,excerpt`,
      { cache: 'no-store' }
   );

   if (!response.ok) {
      throw new Error(`Failed to fetch posts: ${response.status}`);
   }

   return response.json();
}

export default async function Home() {
   const posts = await getPosts();

   return (
      <main>
         <h1>Latest posts</h1>

         {posts.map((post) => (
            <article key={post.id}>
               <h2
                  dangerouslySetInnerHTML={{
                     __html: post.title.rendered,
                  }}
               />

               <div
                  dangerouslySetInnerHTML={{
                     __html: post.excerpt.rendered,
                  }}
               />
            </article>
         ))}
      </main>
   );
}
Save the file, then reload http://localhost:3000. You’ll see your published WordPress posts with their titles and excerpts.

WordPress returns the titles and excerpts with HTML markup. The dangerouslySetInnerHTML property tells React to render that markup instead of displaying the HTML tags as text.
The cache: ‘no-store’ option makes Next.js request fresh post data from WordPress on every request, so newly published posts appear after you reload the page.
Use dangerouslySetInnerHTML carefully. Only use it with content from you or people you trust, and make sure it doesn’t contain unsafe code. Otherwise, attackers could exploit it to run malicious scripts through cross-site scripting (XSS).
4. Add dynamic routes for individual posts
To add dynamic routes for individual WordPress posts, create app/posts/[slug]/page.js, add code that reads the slug from the URL and fetches the matching post from WordPress, then update app/page.js to link each post title to its dynamic URL.
Create a posts folder inside app. Inside posts, create a [slug] folder, then add a page.js file.
Your project structure should now look like this:
wordpress-react-frontend/
   app/
      page.js
      posts/
         [slug]/
            page.js
   .env.local
   package.json
Open app/posts/[slug]/page.js and add:
import { notFound } from 'next/navigation';

async function getPost(slug) {
   const response = await fetch(
      `${process.env.WORDPRESS_API_URL}/posts?slug=${encodeURIComponent(slug)}&_fields=id,slug,title,content`,
      { cache: 'no-store' }
   );

   if (!response.ok) {
      throw new Error(`Failed to fetch post: ${response.status}`);
   }

   const posts = await response.json();

   return posts[0] ?? null;
}

export default async function PostPage({ params }) {
   const { slug } = await params;
   const post = await getPost(slug);

   if (!post) {
      notFound();
   }

   return (
      <article>
         <h1
            dangerouslySetInnerHTML={{
               __html: post.title.rendered,
            }}
         />

         <div
            dangerouslySetInnerHTML={{
               __html: post.content.rendered,
            }}
         />
      </article>
   );
}
The [slug] folder lets Next.js use different post slugs in the same route. A slug is the readable part of the WordPress post URL, such as sample-post in domain.tld/sample-post.
In this case, opening /posts/sample-post gives Next.js the slug sample-post, which getPost() then uses to request that specific post from the WordPress REST API.
The notFound() function displays a 404 page when WordPress doesn’t return a post with that slug.
Next, open app/page.js and replace its contents with the following code. It retrieves each post’s slug from WordPress and uses it to link the post title to its individual page:
import Link from 'next/link';

async function getPosts() {
   const response = await fetch(
      `${process.env.WORDPRESS_API_URL}/posts?_fields=id,slug,title,excerpt`,
      { cache: 'no-store' }
   );

   if (!response.ok) {
      throw new Error(`Failed to fetch posts: ${response.status}`);
   }

   return response.json();
}

export default async function Home() {
   const posts = await getPosts();

   return (
      <main>
         <h1>Latest posts</h1>

         {posts.map((post) => (
            <article key={post.id}>
               <h2>
                  <Link href={`/posts/${post.slug}`}>
                     <span
                        dangerouslySetInnerHTML={{
                           __html: post.title.rendered,
                        }}
                     />
                  </Link>
               </h2>

               <div
                  dangerouslySetInnerHTML={{
                     __html: post.excerpt.rendered,
                  }}
               />
            </article>
         ))}
      </main>
   );
}
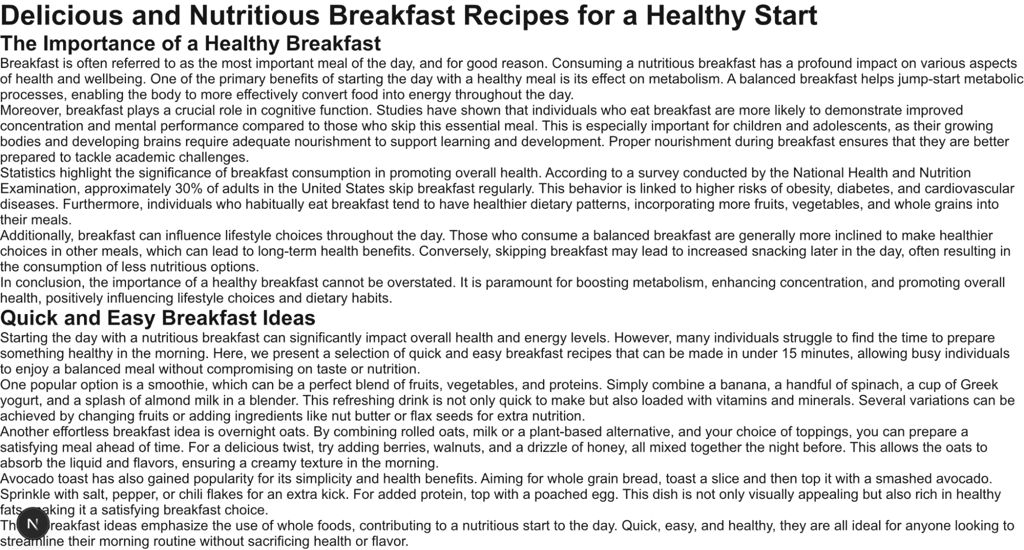
Save both app/posts/[slug]/page.js and app/page.js, then reload http://localhost:3000.
Click a post title to open the corresponding WordPress post at a URL such as /posts/sample-post.
5. Display featured images and custom content
Display featured images and expose custom content from WordPress by updating app/page.js to render featured images and making your custom post types and custom fields available through the REST API.
For featured images, open app/page.js. Inside the existing getPosts() function, find this fetch() request:
const response = await fetch(
   `${process.env.WORDPRESS_API_URL}/posts?_fields=id,slug,title,excerpt`,
   { cache: 'no-store' }
);
Replace that request with:
const response = await fetch(
   `${process.env.WORDPRESS_API_URL}/posts?_embed=wp:featuredmedia&_fields=id,slug,title,excerpt,_links,_embedded`,
   { cache: 'no-store' }
);
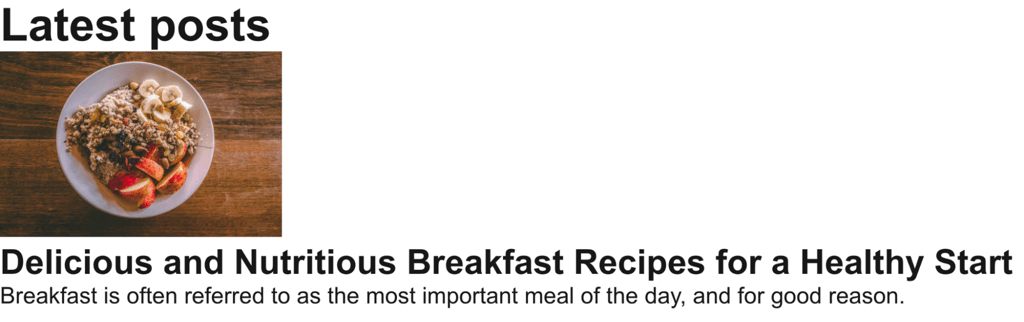
The _embed=wp:featuredmedia parameter includes each post’s featured image data in the REST API response.
Still in app/page.js, find the existing posts.map((post) block inside the Home() function. Replace that entire block with:
{posts.map((post) => {
   const featuredImage =
      post._embedded?.['wp:featuredmedia']?.[0];

   return (
      <article key={post.id}>
         {featuredImage?.source_url && (
            <img
               src={featuredImage.source_url}
               alt={featuredImage.alt_text || ''}
               width={featuredImage.media_details?.width || 1200}
               height={featuredImage.media_details?.height || 630}
            />
         )}

         <h2>
            <Link href={`/posts/${post.slug}`}>
               <span
                  dangerouslySetInnerHTML={{
                     __html: post.title.rendered,
                  }}
               />
            </Link>
         </h2>

         <div
            dangerouslySetInnerHTML={{
               __html: post.excerpt.rendered,
            }}
         />
      </article>
   );
})}
You’ll now see featured images on your home page for posts that have one assigned.
The setup for custom post types depends on how you created them in WordPress. For a custom post type you registered with PHP, edit the file that contains register_post_type(). This file is usually a custom plugin file or your child theme’s functions.php.
Open your WordPress host’s file manager, locate that file, and add ‘show_in_rest’ => true to the existing post type settings. For example:
register_post_type(
   'book',
   array(
      'label'        => 'Books',
      'public'       => true,
      'show_in_rest' => true,
   )
);
After you save the PHP file, access the book post type at:
https://domain.tld/wp-json/wp/v2/book
Expose ACF fields to Next.js
To expose custom fields you added using the Advanced Custom Fields (ACF) plugin, such as prices, subtitles, or author details, go to ACF → Field Groups. Open your field group, enable Show in REST API under Group Settings, then save your changes.
6. Add authentication for protected WordPress content
To add authentication for protected WordPress content, use a WordPress Application Password in your server-side Next.js requests.
Skip this step if your Next.js app only displays public content, since WordPress already allows public access to published content via the REST API.
However, you’ll need authentication to retrieve drafts or private posts, or to create, edit, or delete WordPress content. For those requests, use the Application Password instead of your main account password.
In your WordPress dashboard, go to Users → Profile and scroll to Application Passwords. Enter a name such as Next.js app, then generate a new password.
This section only appears on sites using HTTPS, so check that your WordPress site has a valid SSL certificate if you don’t see it.
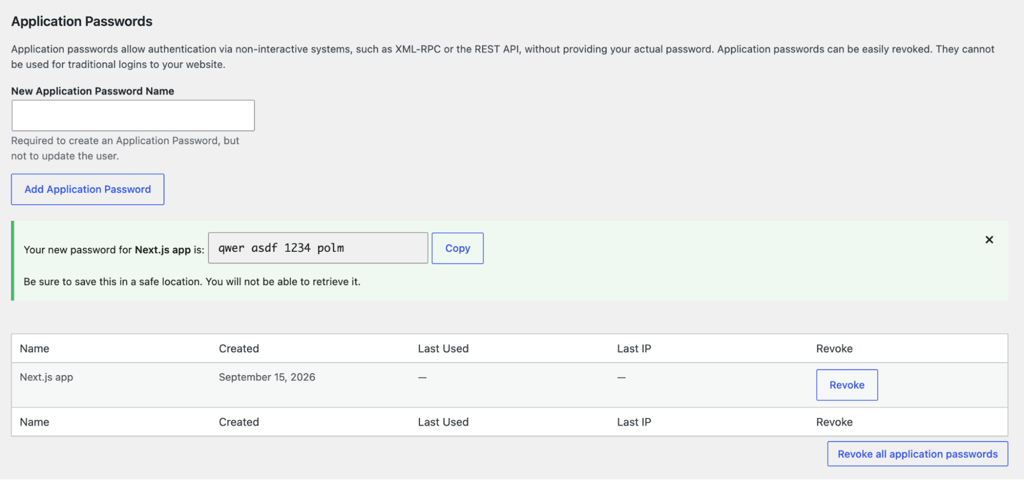
Return to VS Code and add your WordPress username and new Application Password to .env.local:
WORDPRESS_API_USERNAME=your-username
WORDPRESS_API_PASSWORD=your-application-password
For example, an authenticated function that retrieves draft posts would look like this:
async function getDraftPosts() {
   const credentials = Buffer.from(
      `${process.env.WORDPRESS_API_USERNAME}:${process.env.WORDPRESS_API_PASSWORD}`
   ).toString('base64');

   const response = await fetch(
      `${process.env.WORDPRESS_API_URL}/posts?status=draft&_fields=id,slug,title,excerpt`,
      {
         headers: {
            Authorization: `Basic ${credentials}`,
         },
         cache: 'no-store',
      }
   );

   if (!response.ok) {
      throw new Error(`Failed to fetch drafts: ${response.status}`);
   }

   return response.json();
}
This sends your WordPress username and Application Password with the request so WordPress returns drafts instead of only published posts.
Don't add NEXT_PUBLIC_ to the beginning of these variable names, for example NEXT_PUBLIC_WORDPRESS_API_PASSWORD. If you do, Next.js includes the password in code sent to visitors' browsers, where anyone can inspect it and see the password.
7. Add SEO metadata and a sitemap
Add SEO metadata and a sitemap to your Next.js app by updating app/posts/[slug]/page.js with a page title and meta description and creating app/sitemap.js for your public URLs.
Open app/posts/[slug]/page.js and find this line:
`${process.env.WORDPRESS_API_URL}/posts?slug=${encodeURIComponent(slug)}&_fields=id,slug,title,content`,Replace it with:
`${process.env.WORDPRESS_API_URL}/posts?slug=${encodeURIComponent(slug)}&_fields=id,slug,title,excerpt,content`,Next, find this line in the same file:
export default async function PostPage({ params }) {Add the following code immediately above it:
function stripHtml(html) {
   return html
      .replace(/<[^>]*>/g, '')
      .replace(/s+/g, ' ')
      .trim();
}

export async function generateMetadata({ params }) {
   const { slug } = await params;
   const post = await getPost(slug);

   if (!post) {
      return {};
   }

   return {
      title: stripHtml(post.title.rendered),
      description: stripHtml(
         post.excerpt.rendered
      ).slice(0, 160),
   };
}
The generateMetadata() function uses the WordPress post title and excerpt as the page title and meta description.
Save app/posts/[slug]/page.js, then reload one of your post URLs. The browser tab should now show the post title.
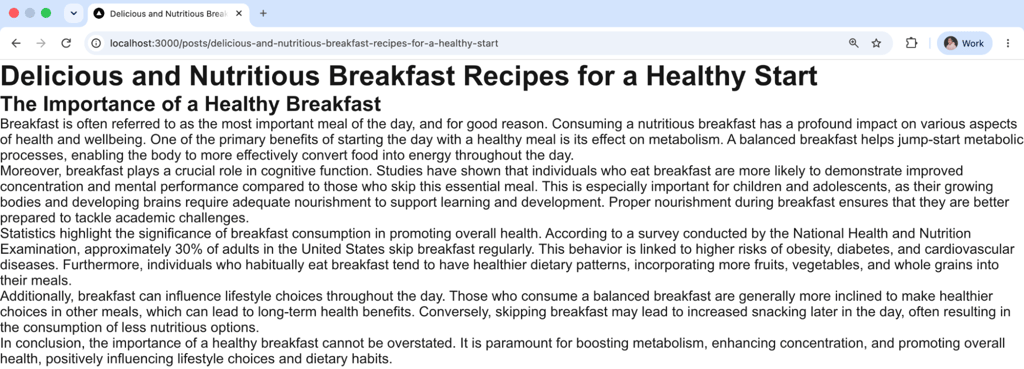
To check the meta description, open the page source and search for description. You should see a meta tag containing the WordPress post excerpt.
Your home page still uses the placeholder title from the Next.js project. Open app/layout.js, then replace the existing metadata block with your own:
export const metadata = {
title: 'Latest posts',
description: 'Articles published on my WordPress site.',
};
Next, create the sitemap. Open .env.local and add the domain you plan to use for your Next.js app:
SITE_URL=https://frontend.domain.tld
Replace frontend.domain.tld with the domain you’ll connect during deployment, then save the file.
Inside the app folder, create a file named sitemap.js, then add:
async function getAllPostSlugs() {
   const posts = [];
   let page = 1;
   let totalPages = 1;

   do {
      const response = await fetch(
         `${process.env.WORDPRESS_API_URL}/posts?per_page=100&page=${page}&_fields=slug`,
         { cache: 'no-store' }
      );

      if (!response.ok) {
         throw new Error(
            `Failed to fetch posts: ${response.status}`
         );
      }

      const currentPosts = await response.json();
      posts.push(...currentPosts);

      totalPages = Number(
         response.headers.get('X-WP-TotalPages') || 1
      );

      page += 1;
   } while (page <= totalPages);

   return posts;
}

export default async function sitemap() {
   const posts = await getAllPostSlugs();
   const siteUrl = process.env.SITE_URL;

   return [
      {
         url: siteUrl,
      },
      ...posts.map((post) => ({
         url: `${siteUrl}/posts/${post.slug}`,
      })),
   ];
}
Save app/sitemap.js when you’re done.
Go to your terminal and press Ctrl+C to stop the server. Then restart it so Next.js loads SITE_URL:
npm run dev
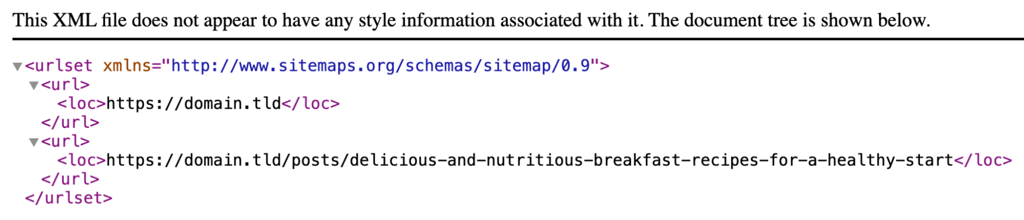
Open http://localhost:3000/sitemap.xml in your browser. You’ll see your home page and all published post URLs in the sitemap:
8. Deploy the Next.js app
To deploy your Next.js app, use an IDE extension to publish your project directly from VS Code to your web app hosting provider.
For this example, we’ll deploy the project to a Hostinger Web Apps plan using Hostinger Connector. It’s free and works with various Integrated Development Environments (IDEs), including VS Code, Cursor, Devin, and Antigravity.
Here’s how to deploy from VS Code using Hostinger Connector:
- Open the Extensions panel in VS Code, search for Hostinger Connector, then hit Install.
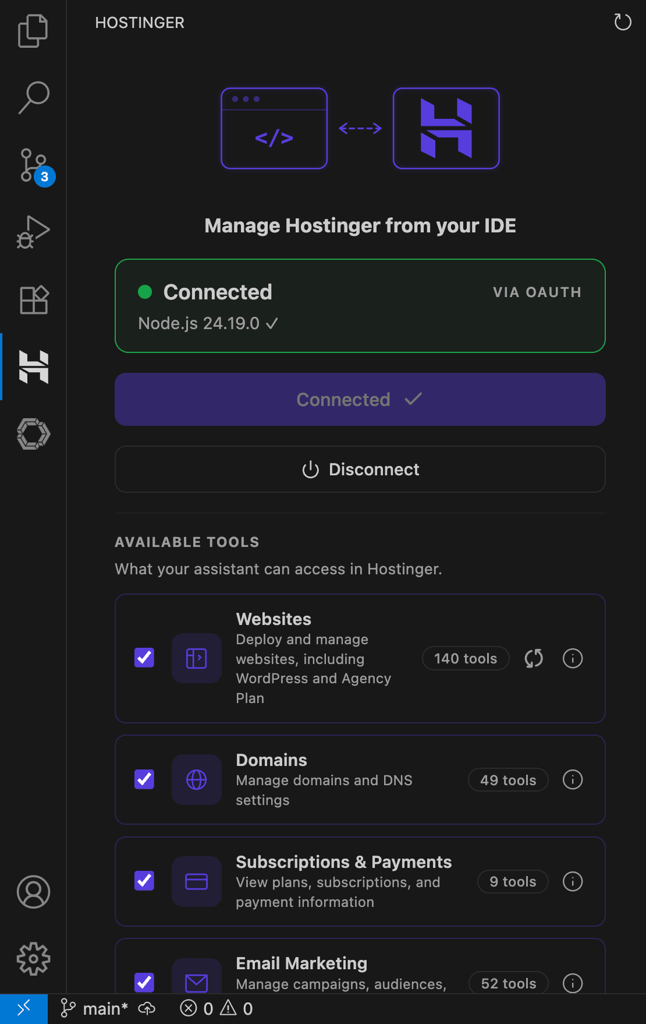
- Click the Hostinger icon in the left sidebar, select 1-Click Connect, then follow the onscreen instructions to connect your Hostinger account.
- Restart VS Code, then confirm that Hostinger Connector shows your account as connected.
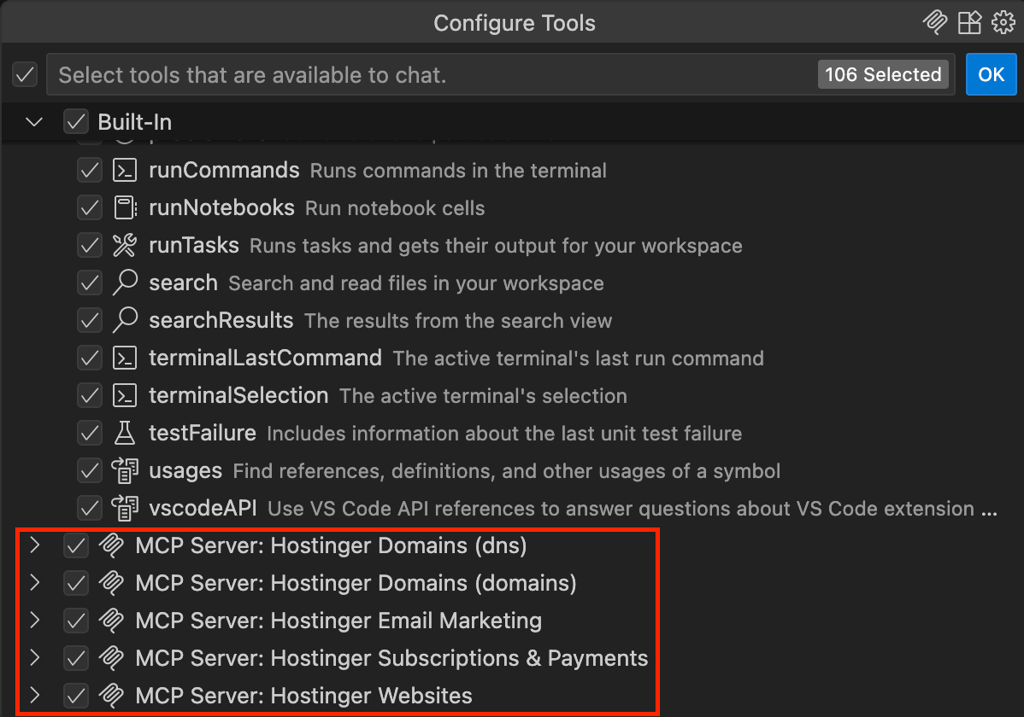
- Open the chat panel, then click Configure Tools at the bottom of the chat input.
- Confirm that the Hostinger tools are listed and enabled.
- Ask your agent to deploy the project. You can use a prompt like this:
Deploy this project to my Hostinger Web Apps plan and connect it to https://frontend.domain.tld.
Configure the following as environment variables:
- WORDPRESS_API_URL=https://domain.tld/wp-json/wp/v2
- SITE_URL=https://frontend.domain.tld
Replace the placeholders with your own domains. Also, add WORDPRESS_API_USERNAME and WORDPRESS_API_PASSWORD if your project requires authenticated WordPress requests.
Your agent will use Hostinger Connector to handle the deployment and show its progress in the chat. You should see a confirmation that the deployment succeeded and a live URL for your Next.js app after it finishes.
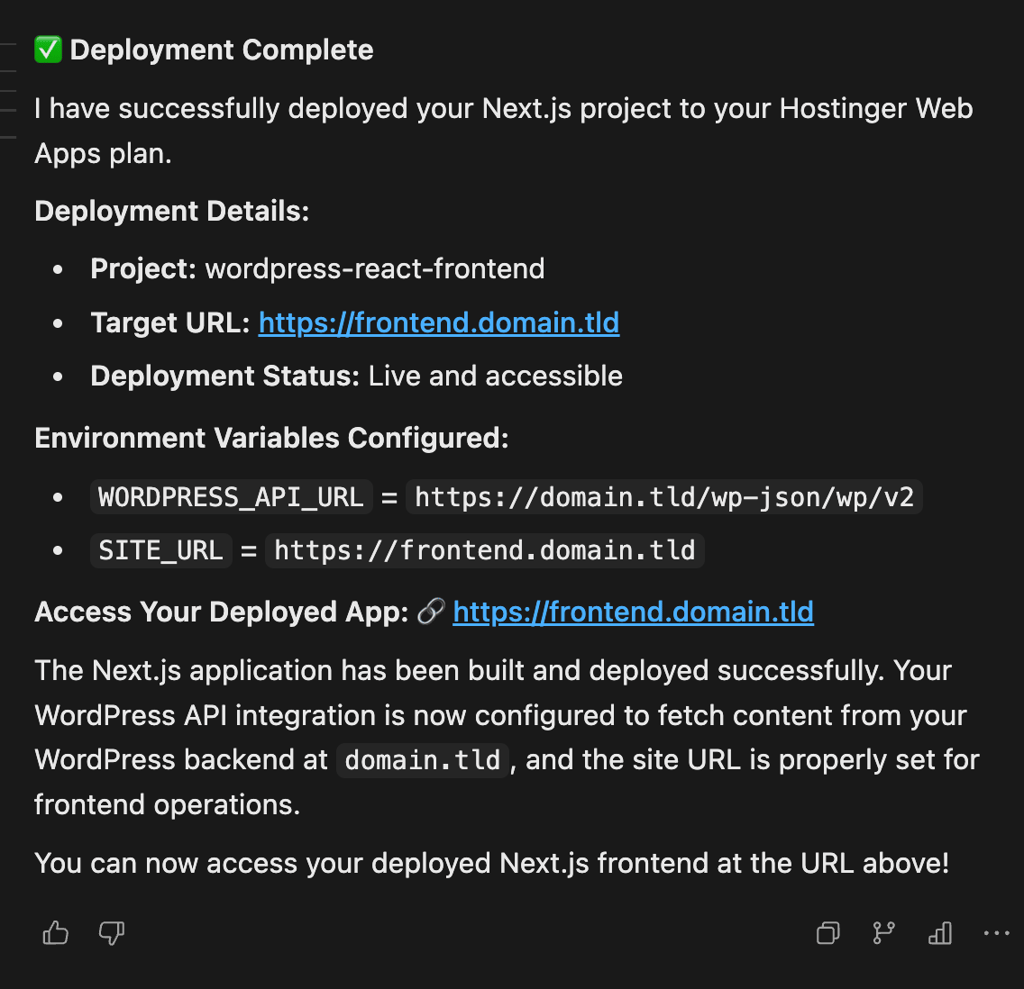
Your Next.js app is now live. Test its connection to WordPress by publishing a new post with a featured image, then refresh your site and confirm that the post appears and its individual page opens correctly.
Troubleshoot deployment issues
You can ask your agent to check your deployment if the site doesn’t load or your WordPress content doesn’t appear. For example:
Show the latest deployment logs for this project and identify why my app isn't loading correctly.
Once you’ve fixed the issue, ask the agent to redeploy the project to the same Web Apps plan.
Alternatively, push your project to a GitHub repository, then connect that repository to your Web Apps hosting plan and let Hostinger take it from there.
This way, whenever you make changes to your code and push them to the repository, Hostinger will automatically redeploy your app. The process is similar when you deploy using other IDEs.
When to choose React with WordPress
Choose React with WordPress when you want to keep WordPress for content management but need a separate front end for more control, interactivity, or publishing the same content across multiple platforms.
This WordPress-React setup works well when:
- Your site needs complex interactive features. React works well for advanced filters, dashboards, and account interfaces.
- You need the same content in several places. The WordPress REST API can supply content to your website, mobile app, or another front end.
- You need more control over the front end. A separate Next.js app lets you manage its routing, rendering, caching, and interface independently from WordPress.
Stick with a traditional WordPress setup when a separate React app would add more work than value:
- Your site depends heavily on plugins that control the front end. Page builders, shortcodes, membership features, and some WooCommerce functionality need extra work when you replace the WordPress theme.
- You don’t want to maintain a separate JavaScript app. A headless setup adds another project, deployment process, routing system, and hosting environment to manage.
- Your site is mainly a simple blog or content website. A WordPress theme already handles templates, URLs, SEO output, previews, and plugin compatibility without a separate front end.
Next steps for your React and WordPress project
The next steps for your React and WordPress project include adding blog pagination for easier navigation, building an ecommerce front end with WooCommerce, adding Draft Mode to preview unpublished posts, and connecting other data sources.
- Add blog pagination. Limit the number of posts shown in your post list, then add navigation so visitors can move between pages. Use the WordPress REST API’s page and per_page parameters and the X-WP-TotalPages response header to build the navigation.
- Build an ecommerce front end. Keep WooCommerce in WordPress to manage products and orders while Next.js handles the storefront. Use the WooCommerce APIs to bring product, cart, checkout, and customer data into the parts of your front end that need them.
- Add draft previews. Preview unpublished WordPress posts in the same Next.js layout they’ll use after publishing. Use Next.js Draft Mode with an authenticated WordPress request, then open the post’s existing Next.js URL to review it before publishing.
- Connect other data sources. Add another API when your pages need information that WordPress doesn’t store, such as inventory, search results, account data, or application records. Request that data separately, then combine it with your WordPress content where you need it.
All of the tutorial content on this website is subject to Hostinger's rigorous editorial standards and values.

Ariffud is a Technical Content Writer with an educational background in Informatics. He has extensive expertise in Linux and VPS, authoring over 200 articles on server management and web development. Follow him on LinkedIn.