WooCommerce hooks: What they are and how to use them
Mar 10, 2026
/
Larassatti D.
/
9 min Read
WooCommerce is well-known for its flexibility, especially when it comes to making code-level customizations.
One feature that makes this possible is WooCommerce hooks – small pieces of code that let you add or change functionality without touching the core plugin. With them, you can tailor your store to meet your exact needs without overriding templates.
In this article, we’ll take a closer look at WooCommerce hooks and how to use them effectively. To illustrate how they work in practice, we’ll also show several hands-on examples you can follow.
What are WooCommerce hooks?
WooCommerce hooks are predefined points to which you can connect custom code to modify the plugin’s functionality.
Just like WordPress hooks, WooCommerce hooks let you automatically run functions at specific points in your store’s workflow, such as when displaying products, updating carts, or processing orders.
There are two types of WooCommerce hooks:
- Action hooks. These run your custom function at a specific moment in the WooCommerce lifecycle. For instance, you can display a custom notification when an order is completed using a function that hooks into woocommerce_order_status_completed.
- Filter hooks. These hooks let you modify WooCommerce’s default data before it’s shown on the frontend or stored in the backend. For example, you can use the woocommerce_get_price hook in your custom code to adjust prices based on specific criteria.
In simple words, action hooks perform a task but don’t return data, whereas filter hooks take in data, modify it, and return the result.
To use both action and filter hooks in WooCommerce, you need to write a callback function and register it using add_action() or add_filter() – depending on the behavior you want to perform.
Why use WooCommerce hooks?
WooCommerce features tools to customize nearly every aspect of your store, even to the code level. That said, editing core plugin files is strongly discouraged, as version updates will overwrite your changes.
That’s where WooCommerce hooks come in – they let you modify your store’s behavior without touching the core files, ensuring your customizations stay intact after updates.
This way, you can control your store’s customizations without relying on third-party plugins. And if you’re building websites for clients, knowing how to use WooCommerce hooks makes it easy to customize stores just the way they want.
If you aspire to be a WordPress developer, you can also group hook-based customizations into a plugin, which can be profitable if you sell it as a digital product.
From simple tweaks to complex features – WooCommerce hooks let you expand your store’s functionality.
Here are just some of the things you can use them for:
- Adding custom content, including banners, notices, or upsell messages on product pages.
- Reordering, adding, or removing checkout fields.
- Adjusting pricing rules or applying dynamic discounts and taxes.
- Inserting custom logic during order processing, like sending data to a CRM or triggering custom email messages after purchases.
- Displaying conditional messages in the cart, checkout, or product pages.
- Loading scripts or styles only on specific pages.
How to use WooCommerce hooks
Ready to implement WooCommerce hooks on your site? Let’s break it down step by step.
1. Find the right WooCommerce hooks for your needs
WooCommerce’s codebase contains a wide range of action and filter hooks, so the first step is to identify the ones that you need.
You can locate these hooks through several methods:
- Consult the official WooCommerce Hook Reference.
- Search for add_action() or add_filter() in the WooCommerce plugin files to pinpoint the hook locations and arguments.
- Use the Query Monitor plugin to identify which hooks are triggered on a specific page or during actions.
- Visit Business Bloomer Visual Hook Guides to map each hook’s location on key WooCommerce pages, such as the product page, cart, or checkout.
2. Write the hook function (callback)
Once you find the right hook, you’ll need to write a callback function, which is your custom code that runs when the hook is triggered.
Here’s a simple example of an action hook used for adding a message above the checkout form:
function custom_checkout_notice() {

    echo '<p class="notice">Free shipping on orders over $50!</p>';

}

add_action( 'woocommerce_before_checkout_form', 'custom_checkout_notice' );
Now, let’s break it down:
- function custom_checkout_notice() – defines a callback function named custom_checkout_notice. You can name this anything you want, but descriptive names make for easier maintenance.
- echo ‘<p class=”woocommerce-message”>Free shipping on orders over $50!</p>’; – outputs a message inside a paragraph with a WooCommerce styling class so it looks like a typical WooCommerce notice.
- add_action( ‘woocommerce_before_checkout_form’, ‘custom_checkout_notice’ ); – tells WooCommerce to run the custom_checkout_notice function when it reaches the woocommerce_before_checkout_form hook.
While the example only demonstrates a basic custom function, you can expand it further to suit your store’s unique needs, like adding conditional logic, tapping into WooCommerce’s functions and objects, or enhancing the front end appearance. Just make sure to use the appropriate add_action() or add_filter() function to hook your code into WooCommerce.
3. Add the hook snippet to the appropriate file
Next, execute your custom code containing the WooCommerce hooks. Here are three alternative ways to do it:
Editing your current theme functions
This method requires adding the custom code to your theme’s functions.php file. While it’s a simple option, it’s not ideal for large or complex customizations, as the code can get messy and will only work as long as your current theme is active.
Unless you’re intentionally inserting your custom code inside an existing function, it’s best to place it at the end of the file. This keeps your tweaks organized and easier to manage.
And if you choose this method, we recommend creating a child theme first to ensure theme updates don’t affect your modifications.
Using a custom code WordPress plugin
Activating plugins like Code Snippets, WPCode, or Post Snippets is a quick method for keeping your custom code organized and independent of your theme.
The plugin lets you add and manage custom functions from your WordPress dashboard, making it easier to troubleshoot, edit, or deactivate snippets without affecting the rest of your site.
Creating your own custom plugin
This method is best for long-term maintenance. It keeps your code organized and separate from the theme files, which is beneficial for adding complex custom functions.
Here are the steps to create a custom plugin using Hostinger’s file manager:
- Navigate to public_html → wp-content → plugins.
- Create a new folder for your plugin.
- Inside the folder, create a new PHP file.
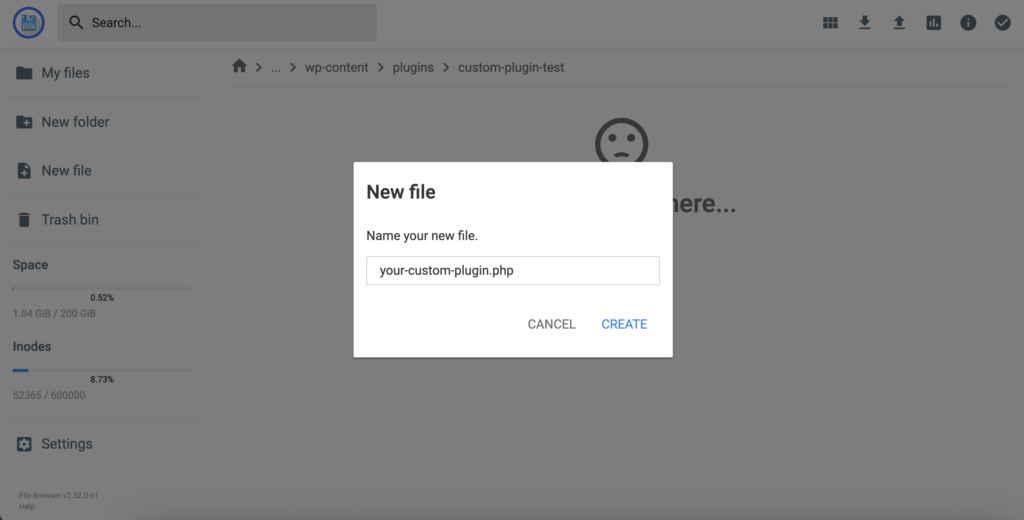
- Add the plugin header to the PHP file and insert your custom code below the header.

- Save the file. Then, log in to your WordPress admin dashboard.
- Open the Plugins menu. You’ll see the My Custom WooCommerce Hooks plugin installed.
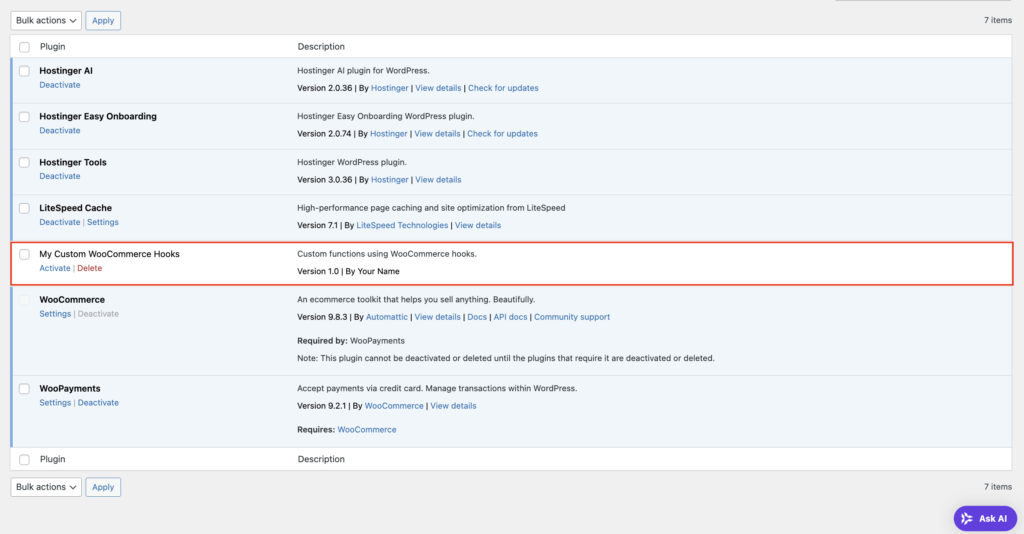
- Click Activate to implement the changes on your site.
Important! Whichever method you choose, make sure the hook you use exists in your current theme or template. Otherwise, your custom code won’t be executed, as the hook will never fire.
Also, if you use a block-based theme with the Site Editor (Gutenberg), your WooCommerce pages are likely built using blocks. These blocks render via React/JavaScript XML, not traditional PHP templates. So, some PHP-based WooCommerce hooks discussed in this article may not work. To ensure they function properly, use the shortcode versions of those pages instead.
List of common WooCommerce hooks
While the complete list of WooCommerce hooks is available in the official documentation, we’ve compiled some commonly used ones below, grouped according to the hook types.
Product page hooks
woocommerce_before_single_product
This hook fires before the single product content starts. It’s often used to add custom banners, product notices, or promotional messages at the top of the product page.
woocommerce_before_single_product_summary
Use it to insert content before the product summary (before the product title, price, etc.). This is a great place to add trust badges or discount info.
woocommerce_single_product_summary
A flexible hook that appears within the summary section (title, price, rating, excerpt, add-to-cart, etc.). To give your online store a fresh look, you can remove or reorder these default elements and insert new ones.
woocommerce_after_single_product_summary
This hook fires after the summary section, so it’s commonly used for adding related products, additional tabs, or custom product specifications.
woocommerce_after_single_product
A hook that runs after all product content is displayed, which is a great spot to display footer messages, support contact info, or upsell prompts.
Shop and archive page hooks
woocommerce_before_main_content
Fires before the main content of the shop or category page. Use it for custom headers, breadcrumbs, or promotional banners.
woocommerce_before_shop_loop
Runs before the product loop begins. Ideal for displaying time-sensitive offers, showcasing featured collections, or announcing store notices.
woocommerce_shop_loop_item_title
This hook fires right where the product title is rendered in the product grid. Use it to wrap titles in custom markup, insert icons, or even add limited-time labels above the title.
woocommerce_after_shop_loop_item_title
Executes just after the product title. Use this hook to customize or reorder the price and rating display, add stock indicators, or insert trust-building elements like “Free shipping” or “30-day returns.”
woocommerce_after_shop_loop_item
Ideal for extra interactivity and call-to-action elements, this hook is triggered after the full product box is in the loop. It gives you room to add links or buttons without interfering with core content.
Cart page hooks
woocommerce_before_cart
Use this hook to grab the shoppers’ attention right before the cart form loads. It’s a great place to show promotional banners, display a free shipping threshold, or add a progress bar toward a reward.
woocommerce_before_cart_table
Executes just before the cart items are shown. You can use it to include section headers, clarify cart policies, or remind users about bundled deals or quantity limits.
woocommerce_cart_contents
This hook is perfect for adding context to individual cart items. It fires for each cart entry, letting you display custom metadata like engraving notes, product-specific fees, or delivery date selections.
woocommerce_after_cart_table
This spot is ideal for nudging upsells or enhancing conversions. Use it to insert a discount field, donation checkbox, suggested add-ons, or related product recommendations.
woocommerce_after_cart_totals
Once totals are calculated, this hook gives you space to reinforce trust or add a sense of urgency. For example, you can show a “Prices update in 5 minutes!” notice, clarify shipping methods, or promote buyer reassurance, such as refund policies.
Checkout page hooks
woocommerce_before_checkout_form
This hook displays content just before the checkout begins. It’s commonly used for login prompts, guest checkout notices, or reminding users to review their cart before finalizing.
woocommerce_checkout_before_customer_details
Runs just before the user enters billing and shipping info, making it a good place to add personalized tips, first-time buyer instructions, or tooltips to guide the data entry process.
woocommerce_checkout_after_order_review
After users review their order, this hook lets you add final nudges or any preferred elements, like legal disclaimers, optional surveys, or a checkbox for agreeing to terms.
woocommerce_checkout_update_order_meta
Functions to save the data input from custom checkout fields into the order metadata when an order is submitted.
woocommerce_after_checkout_form
Wrap things up with this hook after a customer completes the checkout form. Ideal for loading third-party scripts, tracking conversions, or showing a post-checkout checklist or upsell offer.
Practical examples of WooCommerce hooks
We’ve covered the basics – now let’s look at some practical examples of implementing WooCommerce hooks. We’ll walk you through three use cases we tested by editing our theme’s functions.php file.
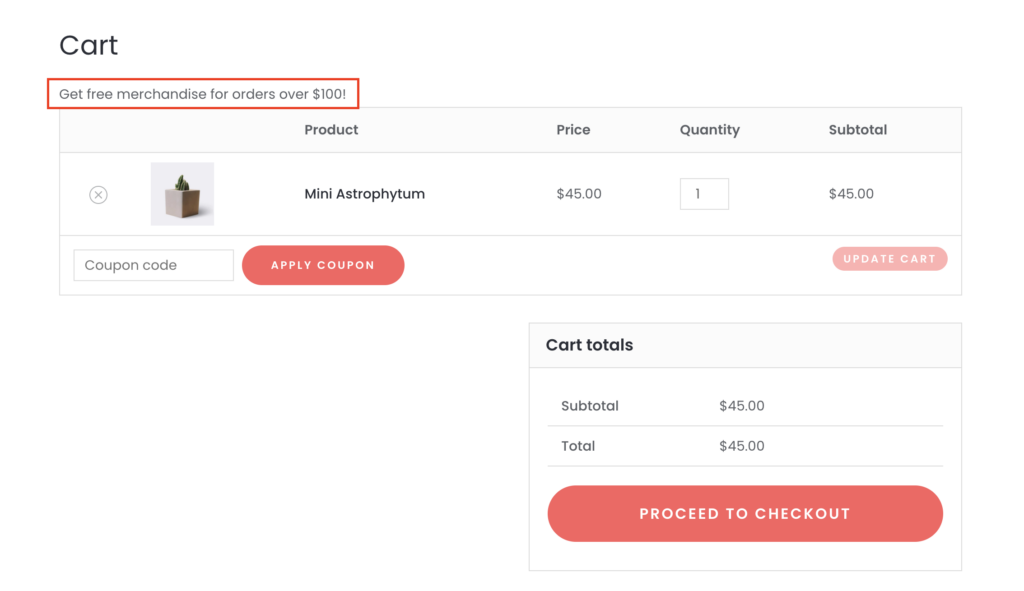
Displaying a custom message on the Cart page
Our goal was to let the visitors know they’ll get free merchandise for completing orders over $100. This was the code snippet added to the custom plugin file:
function custom_cart_message() {

    echo '<p class="custom-message">Get free merchandise for orders over $100!</p>';

}

add_action( 'woocommerce_before_cart', 'custom_cart_message' );
Once the theme file was updated, a new notice appeared on the Cart page.
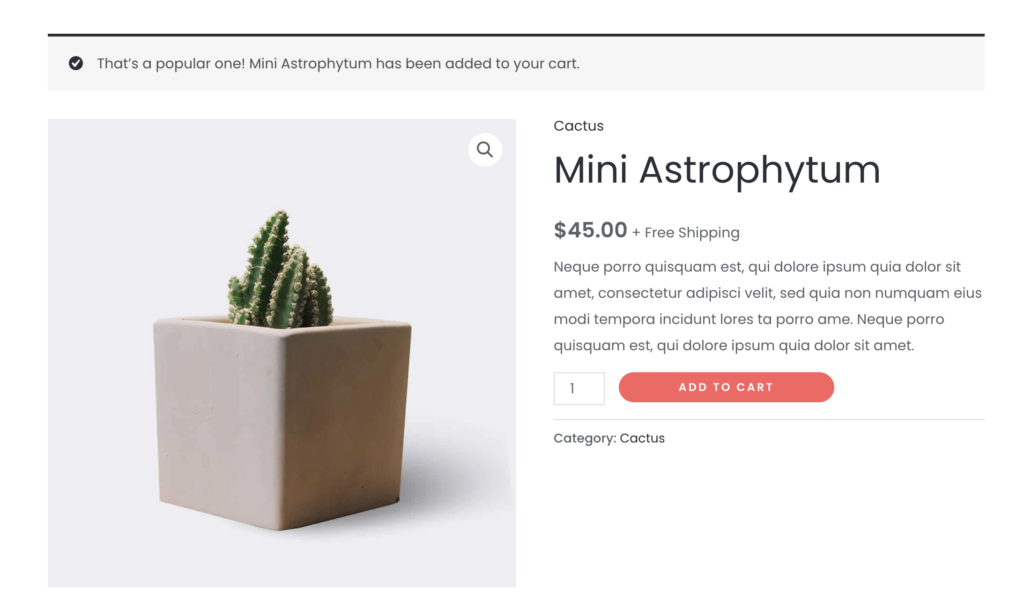
Modifying the default “Product added to cart” notice
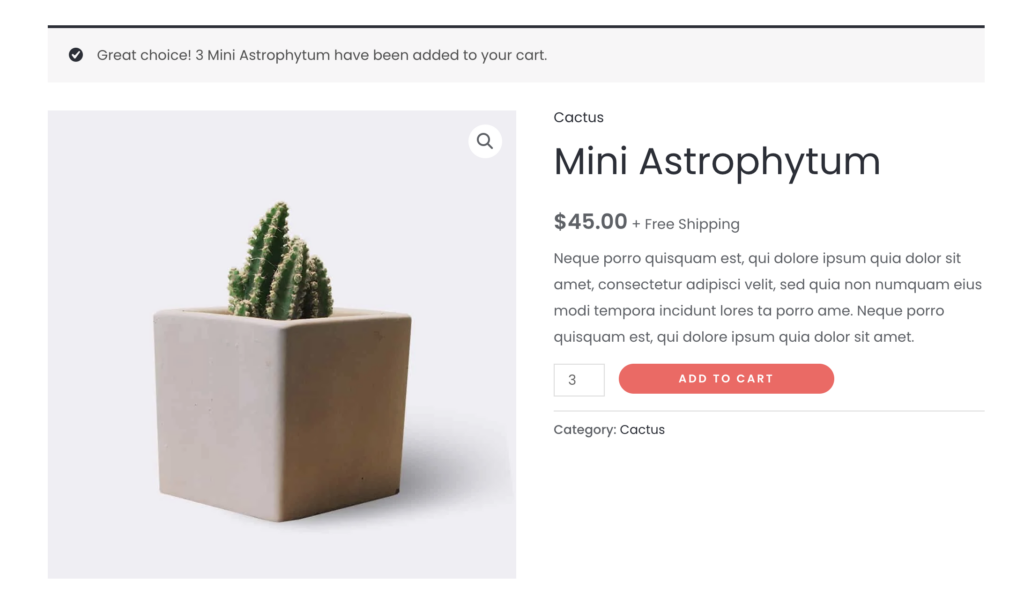
Next, we wanted to make the “Product added to cart” notice more engaging by including the product name.
To do this, we added conditions to the code snippet for different message outputs depending on the item quantity added, and to fall back to the default notice if something goes wrong:
function custom_add_to_cart_message( $message, $products ) {

    // If there are multiple products, create a generalized message

    if ( count( $products ) > 1 ) {

        return sprintf( '%d items have been added to your cart.', array_sum( $products ) );

    }

    // For a single product, personalize with the product name

    foreach ( $products as $product_id => $quantity ) {

        $product = wc_get_product( $product_id );

        $product_name = $product ? $product->get_name() : __( 'Product', 'woocommerce' );

        if ( $quantity > 1 ) {

            return sprintf( 'Great choice! %d %s have been added to your cart.',

                $quantity, esc_html( $product_name ) );

        } else {

            return sprintf( 'That’s a popular one! %s has been added to your cart.',

                esc_html( $product_name ) );

        }

    }

    // Fallback to the original message if something goes wrong

    return $message;

}

add_filter( 'wc_add_to_cart_message_html', 'custom_add_to_cart_message', 10, 2 );
In the add_filter() function, the numbers define the priority (10) and the number of arguments passed to your function (2).
To ensure your hook works properly, check the WooCommerce Hook Reference or the plugin’s files to see how the hook is set up. This will help you determine the priority and the number of arguments (if needed).
So, after we added the snippet to the functions.php file, our test site displayed the new personalized message when a single item was added to the cart.
And when we tested with adding more than one item, the notice dynamically updated to reflect the appropriate message we set.
Adding custom text on a product page
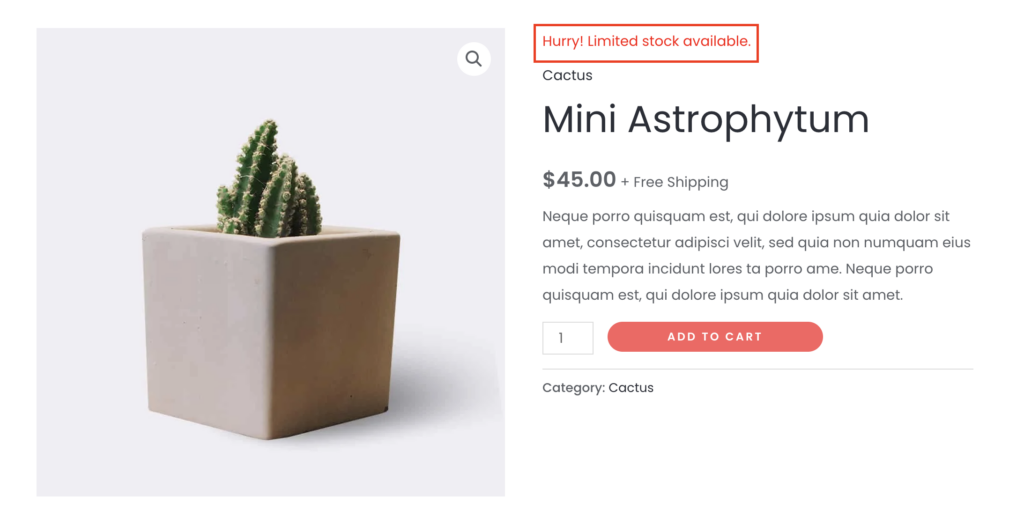
Let’s say you want to highlight a marketing message, like urgency or a special feature, above or below the product title. With WooCommerce hooks, you don’t have to edit every single product page manually.
As an example, we wanted to create a sense of urgency by showing a notice in red. Here’s the snippet we used:
function product_notice() {

    echo '<p class="custom-info" style="color: red;">Hurry! Limited stock available.</p>';

}

add_action( 'woocommerce_single_product_summary', 'product_notice', 6 );
Once the theme file was updated, the product page showed the notice we set.
Pro tip
While the examples in this article demonstrate the basics of using WooCommerce hooks, you can build on them by adding conditions, extending functionality, or applying custom CSS styles.
Conclusion
WooCommerce hooks let you insert your custom code in specific workflow points, so you can modify how your store works without touching the core plugin files.
Here are some examples of what you can do with WooCommerce hooks:
- Modifying product page messages 💬 – add an urgency notice like “Only 2 left in stock!” to drive faster decisions.
- Inserting custom order notes 🧾 – include personalized thank-you messages or instructions in order confirmations.
- Automatically applying discounts 🔄 – trigger discounts based on cart contents or user roles.
- Showing upsells or cross-sells 🚀 – add related product suggestions dynamically in the cart or checkout.
- Adding trust badges or shipping messages 🔐 – display guarantees, return policies, or shipping cutoffs in key areas.
Other than those, you can use WooCommerce hooks in many different ways. Simply consult the WooCommerce Hook Reference documentation to find the hook you want.
In this article, we’ve only scratched the surface with some basic WooCommerce hook examples to help you get started. As you grow more comfortable, you’ll find countless opportunities to tailor your store even further with more advanced customizations. Good luck!

WooCommerce hooks FAQ
What is the difference between WordPress and WooCommerce hooks?
WordPress hooks let you change or extend general site features without editing core files. WooCommerce builds on this system with its own hooks, specifically for customizing the appearance and behavior of ecommerce features like product pages, cart, or order processing.
Where do I add my WooCommerce hooks?
Depending on your preference, you can add WooCommerce hooks in your theme’s functions.php file, within your own custom plugin, or by using a plugin like Code Snippets. Avoid adding them directly to WooCommerce core files, as updates will overwrite your changes.
How do I remove a default WooCommerce hook?
To remove a default WooCommerce hook, use the remove_action() or remove_filter() function (depending on the hook type). You need the hook name, the callback function, and the priority used when it was added. It’s best to do this inside a function hooked to init or after the original hook has been registered.
All of the tutorial content on this website is subject to Hostinger's rigorous editorial standards and values.

Larassatti Dharma is a content writer with 4+ years of experience in the web hosting industry. She has populated the internet with over 100 YouTube scripts and articles around web hosting, digital marketing, and email marketing. When she's not writing, Laras enjoys solo traveling around the globe or trying new recipes in her kitchen. Follow her on LinkedIn


