Ollama CLI tutorial: How to use Ollama in the terminal
Jun 25, 2026
/
Ariffud M.
/
12 min Read
The Ollama CLI is the command-line interface for downloading, running, managing, customizing, and connecting local AI models from your terminal.
With the CLI, you can chat with models, send single prompts, customize model behavior with a Modelfile, expose a local API, automate tasks with scripts, and connect Ollama to coding tools and cloud models.
Using Ollama from the terminal involves five main stages:
- Install Ollama and confirm it responds from the command line.
- Download, run, and manage models on your machine.
- Pass files and prompts to models, save responses, and create embeddings.
- Customize model behavior with a Modelfile.
- Serve a local API and use Ollama with Python, scripts, cron jobs, and coding tools.
What is the Ollama CLI?
The Ollama CLI is the terminal layer for controlling local AI models and the Ollama service that runs them. It lets you manage models with short, scriptable commands instead of clicking through a window.
From the command line, you can pull models, run chats or one-off prompts, list and inspect installed models, remove models, build custom models, start the local server, launch integrations, and sign in to use cloud models. Each command talks to the Ollama service running in the background.
The CLI installs with Ollama, so you don’t need to set up anything else once Ollama is on your machine. The same commands work across Linux, macOS, and Windows.
How to install and verify Ollama in the terminal
CLI commands only work after you install Ollama, so install it first if you haven’t already. The installer also adds the ollama command to your system path.
Installation differs slightly by operating system:
- Linux. Run the official install script, curl -fssl https://ollama.com/install.sh | sh.
- macOS. Download the macOS app from ollama.com. Homebrew, brew install ollama, also works, but it’s a community-maintained method, not the primary official installer.
- Windows. Download and run the official installer from ollama.com.
Once the installation finishes, confirm the version from a terminal:
ollama --version
Running ollama on its own opens the interactive menu, where you can pick a model to run, launch a tool, or browse integrations. Use the arrow keys, ↑/↓, to move the selection, → to change the model, Enter to launch, and /bye to quit:
ollama

To see every command and its flags, use the built-in help:
ollama help
Ollama CLI commands cheat sheet
The following table lists the Ollama CLI commands you’ll use most often, from everyday tasks to advanced workflows. Use it as a quick reference before practicing real tasks in the terminal.
| Command | What it does | When to use it |
| ollama run model-name | Starts a model in an interactive session and pulls it first if needed. | Chatting with a model or sending a quick prompt. |
| ollama pull model-name | Downloads a model to your machine. | Getting a model before the first run. |
| ollama list or ollama ls | Lists the models stored locally. | Checking what’s installed and how much space it uses. |
| ollama show model-name | Shows a model’s architecture, parameters, and license. | Inspecting a model before customizing or deleting it. |
| ollama ps | Lists models currently loaded in memory. | Seeing what’s running and how much memory it uses. |
| ollama stop model-name | Unloads a running model from memory. | Freeing memory without deleting the model. |
| ollama rm model-name | Deletes a downloaded model from disk. | Reclaiming disk space. |
| ollama create model-name -f ./modelfile | Builds a custom model from a Modelfile. | Saving a reusable model with set behavior. |
| ollama serve | Starts the local API server. | Connecting Ollama to apps, scripts, or the API. |
| ollama launch | Configures and opens a supported tool with an Ollama model. | Connecting Ollama to a coding tool or assistant. |
| ollama signin | Signs in to your ollama.com account. | Using cloud models or account features. |
| ollama signout | Signs out of your ollama.com account. | Ending a cloud session. |
Replace model-name with the model you want to use, such as gemma3.
How to download and run models with the Ollama CLI
To run a model with the Ollama CLI, download it with ollama pull and start it with ollama run. Running a model that isn’t installed yet pulls it automatically, so ollama run alone is often enough.
Pull a model by name:
ollama pull gemma3
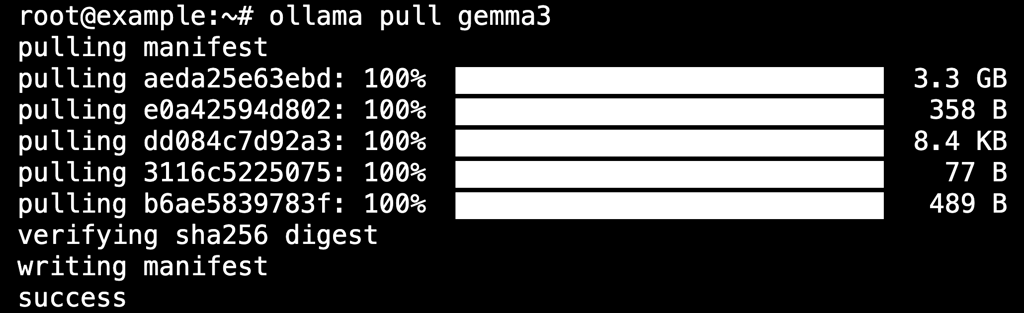
Plain gemma3 pulls the 4B model, which is about 3.3 GB and handles both text and images. On a machine with limited memory, gemma3:1b is around 815 MB, supports text only, and runs on a CPU without a dedicated GPU.
How to run a one-off prompt
A one-off prompt runs a single instruction and returns the answer without opening a session. Pass the prompt as a quoted string after the model name:
ollama run gemma3 "Explain what a cron job does in one paragraph."

One-off prompts work well for scripts, quick lookups, and terminal workflows because they print the answer and exit right away. That makes them easy to combine with other commands or save to a file.
This method works for every model in the library. To use the same approach with a reasoning model, set up DeepSeek with Ollama.
How to start an interactive Ollama chat
An interactive Ollama chat starts when you run a model without a prompt. The session keeps the conversation context, so you can ask follow-up questions.
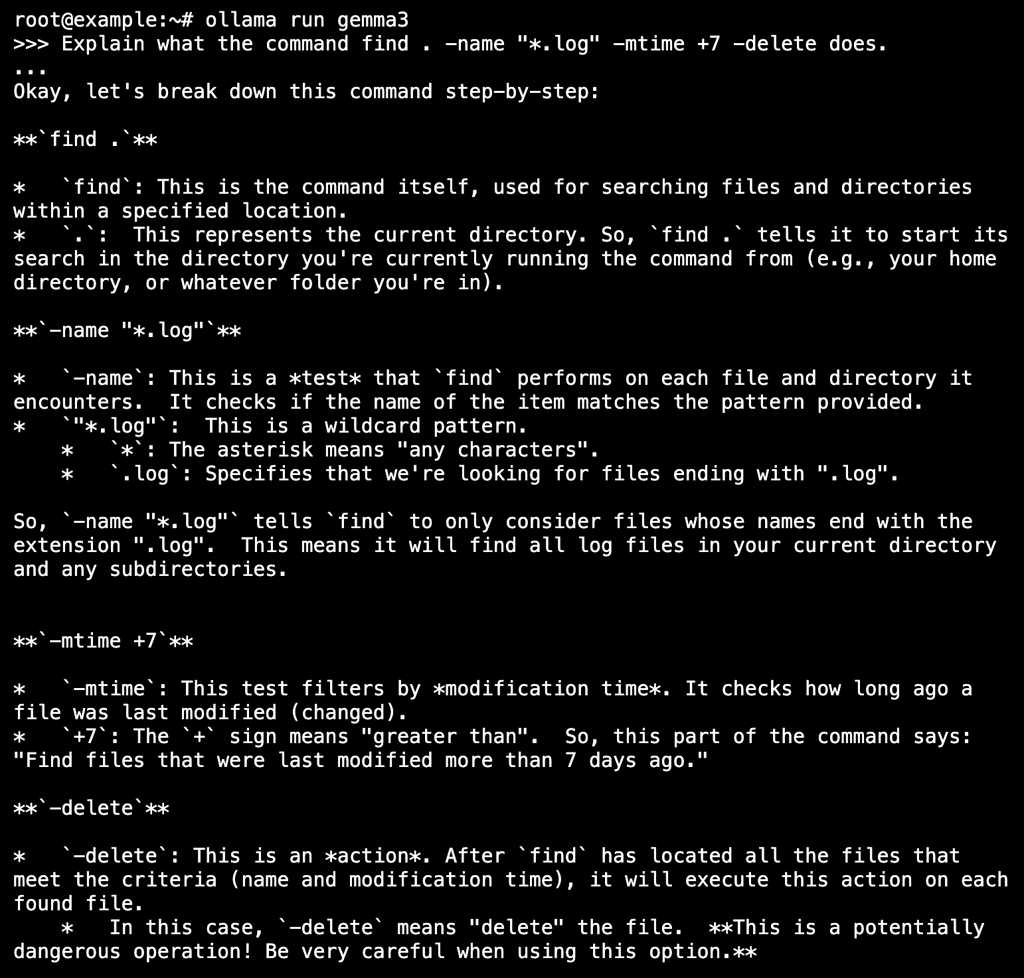
ollama run gemma3
Inside the session, type a prompt and press Enter. For example, you can ask the model to explain a command before you run it:
Explain what the command find . -name "*.log" -mtime +7 -delete does.
A few slash commands help you manage the session:
- /bye ends the session and returns you to the terminal.
- /clear clears the current context, so the model forgets the conversation so far.
- /help lists the available session commands.
The model remembers the conversation only while the session is open. If you exit then start a new session, it has no memory of the previous chat.
If you want consistent behavior across sessions, define it in a Modelfile instead of relying on chat history.
How to use multiline prompts
Multiline prompts let you send long or structured input at once, such as a pasted log, a configuration block, or multi-step instructions. Inside a session, wrap the text in triple quotes:
>>> """
... Review this NGINX location block and flag any problem:
... location /api {
...    proxy_pass http://localhost:3000;
... }
... """
The model treats everything between the opening and closing triple quotes as a single prompt. This is cleaner than forcing a long instruction onto one line.
How to use multimodal models in Ollama CLI
The Ollama CLI supports multimodal prompts with vision-capable models, so you can ask about an image directly from the terminal. Add the image file path to the prompt, and the model reads it as input:
ollama run gemma3 “Describe what is shown in this screenshot: /home/user/screenshot.png”
The default gemma3 model handles images, while the smaller gemma3:1b model supports text only. Pull the 4B model or a larger version for visual tasks.
A graphical interface often works better for repeated image tasks, but the CLI handles one-off image prompts well.
How to manage local Ollama models
The Ollama CLI manages local models with commands that list, inspect, stop, and remove model files on your machine. You’ll use these commands after running a model when you need to check storage or free up memory.
Each command works with models already downloaded to your system.
How to list installed models
List installed models with ollama list or its shorter alias, ollama ls. Both commands print the same table:
ollama list

The output shows each model’s name, size on disk, and last modified date. Check the size column when disk space runs low because larger models can take up several gigabytes each.
How to inspect model details
Inspect a model’s details with ollama show. It prints the model’s architecture, parameters, context length, and license:
ollama show gemma3

To see the exact recipe behind a model, add the –modelfile flag:
ollama show --modelfile gemma3
Use this before customizing or deleting a model, so you know its template and parameters first. The –modelfile output also gives you a useful starting point when you build your own model.
How to stop or remove models
Stop a running model with ollama stop, and delete a downloaded model with ollama rm. Check what’s currently running first:
ollama ps
Stopping unloads the model from memory but keeps it on disk:
ollama stop gemma3
Removing deletes the model files from disk:
ollama rm gemma3
Deleting a model frees disk space, but you’ll need to download it again before the next run. Stop a model when you only want to free memory, and remove it when you no longer need the files.
How to use files, outputs, and embeddings in the Ollama CLI
The Ollama CLI reads prompt input from files, writes responses to files, and generates embeddings through standard terminal redirection and pipes.
The model reads from standard input and writes to standard output, so the usual shell operators work without extra setup.
Four shell features cover most file and output workflows:
- < input.txt sends a file’s contents to the model as input.
- > output.txt writes the response to a file and overwrites anything already there.
- >> output.txt appends the response to the end of an existing file.
- | pipes the output of another command straight into Ollama.
How to prompt Ollama with a local file
Prompt Ollama with a local file by redirecting the file into the command with <. The model reads the file and acts on it, so you don’t need to paste long text into the terminal:
ollama run gemma3 "Summarize this server log and list the three most frequent errors:" < error.log
This works well for long documents, configuration files, and log files. The instruction in quotes tells the model what to do, and the file after < supplies the content.
How to save Ollama responses to a file
Save Ollama responses to a file by redirecting the output with > or >>. The first operator overwrites the file, while the second appends to it:
ollama run gemma3 "List three common Linux server hardening steps." > hardening-notes.txt
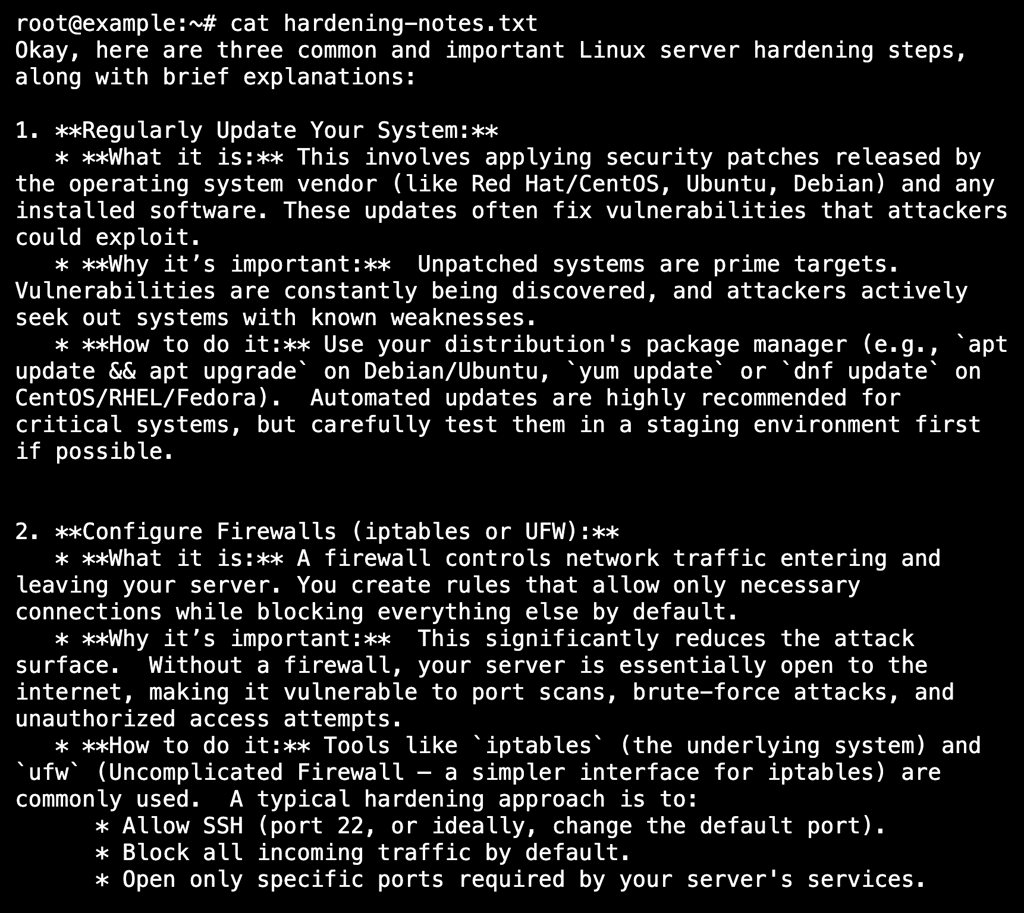
Use >> when you want to keep adding to the same file across several runs:
ollama run gemma3 "Add three more hardening steps for SSH." >> hardening-notes.txt
How to generate embeddings from the terminal
Generate embeddings from the terminal by running an embedding model, which returns a numerical vector instead of text.
Embeddings turn text into numbers that capture meaning. They power semantic search, clustering, and retrieval-augmented generation (RAG).
Run an embedding model and pass it some text. Ollama pulls the model automatically on the first run:
ollama run embeddinggemma "How do I reset a user password on Linux?"
The output is a JSON array of numbers instead of a sentence. For larger or repeated workloads, use the /api/embed endpoint or the Python library, which is faster than the interactive command.
How to customize Ollama models with a Modelfile
A Modelfile is the blueprint for building and sharing a customized Ollama model. It combines a base model with a system message, parameters, and a prompt template into a new model you can run by name.
A Modelfile customizes how a model behaves. It doesn’t train the model on new data. Real fine-tuning trains LoRA adapters with external tools such as llama.cpp or Unsloth.
The ADAPTER instruction in a Modelfile applies those pre-trained adapters to a base model. That’s a separate workflow beyond system prompts and parameters.
The value of a Modelfile is persistence. Settings you’d otherwise retype in every session become part of a reusable model instead.
What a Modelfile controls
A Modelfile controls the base model, behavior, runtime parameters, and prompt template. These four instructions cover most customizations:
| Instruction | Controls |
| FROM | The base model the custom model builds on. |
| PARAMETER | Runtime behavior, such as temperature, context window size, and stop sequences. |
| SYSTEM | The model’s role and default behavior. |
| TEMPLATE | How the prompt is structured before it reaches the model. |
Edit TEMPLATE only if you understand the target model’s prompt format, since the wrong template can break how the model responds.
How to create and run a custom Ollama model
Create a custom model by writing a Modelfile, then build it with ollama create. Open a text editor such as nano and create a file named modelfile:
nano modelfile
Add a base model, a parameter, and a system message:
FROM gemma3
PARAMETER temperature 0.5
SYSTEM """You are a Linux server administration assistant. Answer only questions about Linux and server management."""
Save and close the file by pressing Ctrl+X → Y → Enter.
Build the model from that file and give it a name, such as linux-admin:
ollama create linux-admin -f ./modelfile

Run the custom model the same way as any other model:
ollama run linux-admin
The new model applies your system message and parameters every time it runs. To copy and tweak an existing model’s setup, start from its recipe with ollama show –modelfile gemma3.
How to use Ollama as a local API server
Ollama runs as a local API server, so applications, scripts, and development tools can send requests to your models without using the interactive prompt. The server listens on http://localhost:11434.
Most API endpoints use /api, such as /api/generate and /api/chat. The root URL also responds, so you can use it for a basic connectivity check.
How to start the Ollama server
Start the Ollama server with ollama serve, but most installs already run it for you. The official installers on Linux, macOS, and Windows run Ollama as a background service, so on VPS hosting or a desktop the API is already listening on http://localhost:11434.
Run the command yourself only when no service is running, such as in a container or a minimal setup without systemd, or after you stop the service:
ollama serve
If it answers with address already in use, Ollama is already running.
How to test the Ollama API with curl
Test the Ollama API with a curl request to the /api/generate endpoint, which handles single-turn prompts:
curl http://localhost:11434/api/generate -d '{
   "model": "gemma3",
   "prompt": "Explain what a reverse proxy does in two sentences.",
   "stream": false
}'
The model field picks the model, prompt is the input, and stream set to false returns the full response in one object instead of a stream. For multi-turn conversations, send a messages array to the /api/chat endpoint instead.
How to call Ollama from Python
Call Ollama from Python with the official Ollama library, which wraps the API in a few lines. Install pip on Ubuntu first if Python and pip are not set up yet.
Create and activate a virtual environment, then install the library inside it:
sudo apt install python3-venv -y
python3 -m venv ollama-env
source ollama-env/bin/activate
pip install ollama
Open nano to create a new file:
nano chat.py
Paste the following lines. Use ollama.chat() for conversations and ollama.generate() for single prompts:
from ollama import chat
from ollama import ChatResponse

response: ChatResponse = chat(
    model="gemma3",
    messages=[{"role": "user", "content": "Explain what a reverse proxy does in two sentences."}],
)
print(response.message.content)
Save and exit nano, then run the file while the environment is active:
python3 chat.py

Type deactivate when you are done, and run the source line again next time you use the script.
Ollama also provides an official JavaScript library that works the same way. If you need to call the CLI from Python instead of the API, use subprocess:
import subprocess

result = subprocess.run(
    ["ollama", "run", "gemma3", "Explain what a reverse proxy does in two sentences."],
    capture_output=True,
    text=True,
)
print(result.stdout)
The library is the cleaner choice for real applications because it returns structured data and supports streaming. The subprocess approach only runs the same command you’d type by hand.
How to automate Ollama CLI workflows
Automating Ollama CLI workflows means running repeatable prompts, saving their output, and scheduling local model tasks from shell scripts.
Common use cases include generating a daily summary from a log file or classifying new files dropped into a folder.
Bash scripts handle the repeatable command, and cron handles the schedule. You can also connect Ollama to an automation platform like n8n.
How to create a Bash script for Ollama
Create a Bash script for Ollama by saving your commands in a .sh file. Bash scripting turns a repeated terminal command into a single file you can run on demand.
Create the script file with a text editor:
nano ollama-summary.sh
Add the shebang line, a comment, and the command:
#!/bin/bash
# Summarize today's error log and save the result with the date in the filename
ollama run gemma3 "Summarize the main errors in this log in five bullet points:" < /var/log/app/error.log > "summary-$(date +%F).txt"
Save and close the file.
Make the script executable, then run it:
chmod +x ollama-summary.sh
./ollama-summary.sh
The comment explains the command, and $(date +%F) adds the current date to the filename. More Bash script examples show patterns you can adapt for log parsing, file classification, and scheduled reports.
How to schedule Ollama commands with cron
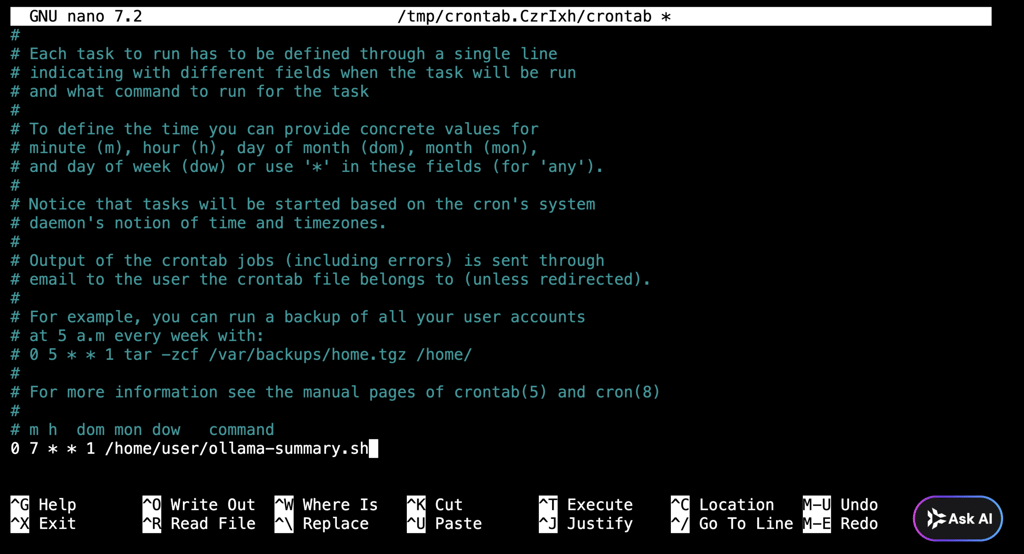
Schedule Ollama commands with a cron job by adding your script to the crontab. Open the editor with the command below, and choose nano if it asks which editor to use:
crontab -e
A cron line has five time fields followed by the command: minute, hour, day of the month, month, and day of the week. The example below runs the summary script at 7 AM every Monday:
0 7 * * 1 /home/user/ollama-summary.sh
Add that line to the bottom of the file, then save and close the editor.
This works well for recurring jobs, such as a weekly report or daily local digest.
How to use the Ollama CLI with integrations and cloud models
The Ollama CLI connects to external tools with ollama launch and to your account with ollama signin. Both workflows are optional and useful when you want to use Ollama inside a coding tool or need models that are too large for your hardware.
These commands build on the core CLI, so use them once the basics feel familiar.
How to launch coding tools with Ollama
Launch coding tools with ollama launch, which configures and opens a supported app with a local model. Running it with no arguments opens an interactive menu of tools:
ollama launch
Name a tool to launch it directly:
ollama launch claude
If you haven’t, install it first:
curl -fsSL https://claude.ai/install.sh | bash
echo 'export PATH="$HOME/.local/bin:$PATH"' >> ~/.bashrc && source ~/.bashrc
Add –model to choose which local model the tool uses:
ollama launch claude --model gemma3
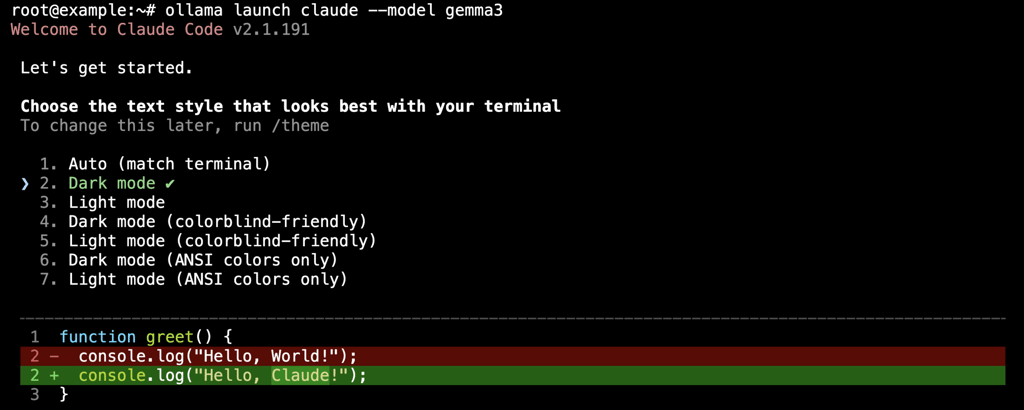
Supported tools include Claude Code, Codex, Copilot CLI, OpenClaw, and Droid. The command handles the setup, so you don’t need to configure each tool by hand.
How to sign in and run Ollama cloud models
Sign in to your account with ollama signin, and end the session with ollama signout. Signing in links your ollama.com account, which cloud models need:
ollama signin
To sign out:
ollama signout
Cloud models run on Ollama’s hosted hardware while you keep using the same commands locally. They’re useful when a model is too large to run on your own machine. For other tasks, the fully local workflow stays the default.
Common Ollama CLI issues and fixes
Most Ollama CLI problems come from installation issues, hardware limits, or the server not running. The fixes below resolve the three issues you’re most likely to hit.
Ollama command not found
The “command not found” error usually means Ollama isn’t installed correctly, or the terminal can’t find the executable. Close and reopen the terminal so it picks up the updated path, since the installer adds ollama to the path during setup.
If the error continues, try reinstalling Ollama again. A fresh install can repair a broken or incomplete setup.
Ollama model runs slowly
A slow model usually means the model is too large for your available RAM, CPU, or GPU. If the model doesn’t fit your hardware, it may fall back to the CPU, which is much slower than a GPU.
Try a smaller model before changing any system settings. Switching from a large model to gemma3:1b, which is about 815 MB, often restores usable speed on modest hardware.
Ollama server is not responding
An unresponsive server usually means the Ollama service isn’t running. On Linux, check the service status with systemctl status ollama. If it’s stopped, start it with sudo systemctl start ollama.
If you’re running Ollama manually instead of as a service, start it with:
ollama serve
Once the server is running, verify it’s working with:
ollama ps
This command lists the models currently loaded in memory. If ollama ps returns model information, the server is running.
If the server still won’t start, another process or background service may already be using port 11434. Stop the conflicting process or service to free the port.
Next steps after learning Ollama CLI
The next step after learning the Ollama CLI is to use these commands in real projects, from scripted prompts and scheduled jobs to a local API your own apps can call.
The terminal is the fastest way to pull models, automate tasks, and connect Ollama to your code. That makes it a natural fit for developers and server workflows.
A graphical interface suits the opposite preference: working in a visual dashboard instead of typing commands.
Our Ollama GUI tutorial walks through a browser-based setup that handles tasks the terminal doesn’t, including running several models at once, comparing answers side by side, keeping a searchable chat history, uploading documents for the model to reference, and turning on web search.
That said, the CLI stays the better tool for scripting and servers, while the GUI works better for visual, shared, day-to-day use.

All of the tutorial content on this website is subject to Hostinger's rigorous editorial standards and values.


Ariffud is a Technical Content Writer with an educational background in Informatics. He has extensive expertise in Linux and VPS, authoring over 200 articles on server management and web development. Follow him on LinkedIn.