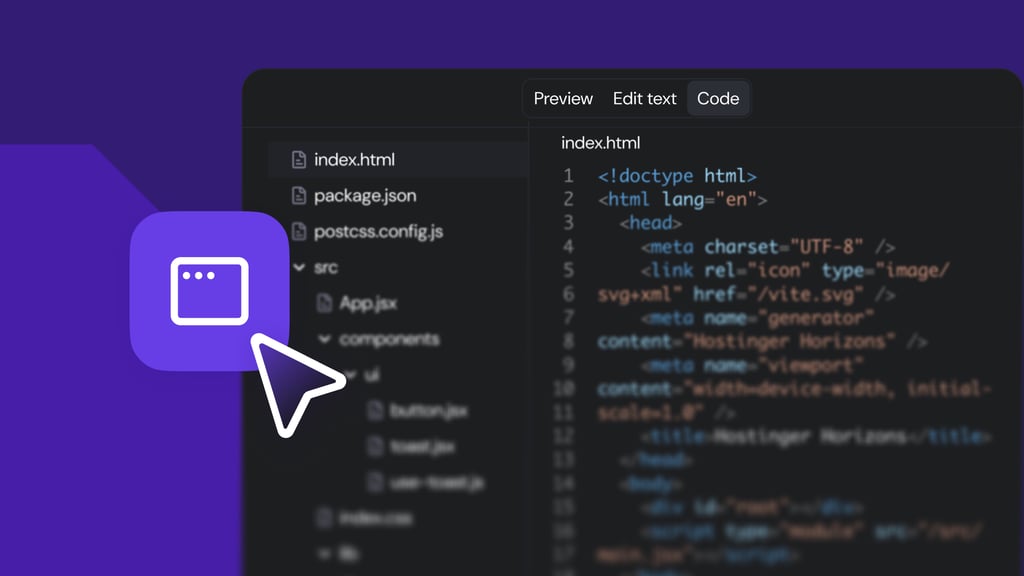
How to host a web application: A step-by-step guide to launch your web app
Mar 10, 2026
/
Aris S.
/
12 min Read
Hosting a web application involves making your app’s files, databases, and content accessible on the internet. You can achieve this using a pre-configured, managed hosting solution or opt for platforms that offer greater control over the environment, like a virtual private server (VPS).
Complete control is necessary when your application requires specific database setup, a custom operating system, or particular performance tuning that managed platforms don’t support. Regardless of your platform, the steps to host a web application are:
- Define your app’s requirements. Evaluate the technical specifications and resources your app requires to run efficiently, including its technology stack and expected traffic volume.
- Select a hosting provider. Select a reputable provider and the hosting type, such as a VPS or managed cloud hosting, that aligns with your app’s requirements and budget.
- Configure the server. Set up the necessary software, databases, and security settings on your server to ensure your application runs properly within the hosting environment.
- Register a domain. Purchase a unique domain name to help users find your app online easily.
- Test the application. Run thorough tests in the development or staging environment to identify bugs, verify workflows, and ensure all features function correctly before going live.
- Deploy the project. Move your application’s code from your local machine to the production server using a method like FTP, rsync, Git, or an automated CI/CD pipeline.
- Launch the application. Make your application public so users can access it via your domain name.
- Monitor performance. Continuously track your app’s uptime, speed, and resource usage to identify and resolve issues quickly.
While the overall process is similar, launching an app on a managed hosting solution is generally simpler because several settings are already pre-configured. Let’s explore the procedure in more detail and see the deployment differences between VPS and a managed platform.
1. Determine your web app’s hosting requirements
Defining your application’s technical specifications helps you determine your hosting needs to ensure optimal performance and a clear path for future scalability.
Understanding your application requirements prevents under-provisioning resources, which can lead to problems like downtime and memory shortages. Conversely, it helps avoid over-provisioning, which wastes money on unused computing power. Here are key factors to consider:
- Application type. Determine whether your app serves static or dynamic content that changes based on user interaction. Dynamic apps are more complex because they process data and database queries in real-time, thereby consuming more CPU and RAM than static ones.
- Technology stack. Identify the programming languages, frameworks, and databases used in the web app development process. Your host must be compatible with them to ensure your application functions properly.
- Traffic expectations. Estimate your potential user load by simulating load on the development environment using a tool like Grafana k6. A high-traffic app requires more resources, such as CPU, RAM, and bandwidth, to maintain optimal performance.
- Scalability. Consider how your app will grow to ensure the hosting provider can accommodate it. Planning for this before you launch is crucial, as migrating to another provider can be complex and result in downtime.
- Budget. Define your budget by listing your app’s hosting requirements and paid software licenses, then research the average cost for them. You should also factor in potential scaling costs, including for upgrading or provisioning new tools.
- Technical expertise. Ensure your team is capable of utilizing the platform and software required to deploy your application. For example, a VPS offers full control but requires you to be comfortable in managing all security, updates, and maintenance.
After determining your web app hosting requirements, you can now choose a hosting provider and plan that fits your needs.
2. Choose a hosting provider
Selecting the right hosting provider is crucial, as one with a poor reputation or unreliable infrastructure may cause frequent downtime. If your app is slow, unusable, or even offline, it can negatively impact the user experience.
If you are familiar with website hosting, the concept is similar to a custom application. However, given the differences between a web app and a website, their hosting requirements differ.
Compared to a website, hosting a dynamic web application requires a more robust environment because it involves more interconnected services and complex data processing.
These are the three most recommended web application hosting types:
| VPS (Virtual Private Server) | PaaS (Platform as a Service) | Dedicated Hosting | |
| Definition | A slice of a physical server that provides an isolated and private virtual hosting environment. | A managed platform that provides pre-configured tools and services to deploy apps. | An entire physical server dedicated exclusively to your application. |
| Level of control | Total control. You get root access and can install any OS or custom software. | Limited control. You control your application code, but the hosting provider manages the underlying environment. | Total control. You control all hardware and software. |
| Maintenance | Your responsibility. You handle all OS updates, security patches, and monitoring. | Managed by the provider. The provider handles patches, restarts, monitoring, and backups. | Your responsibility. You are responsible for all hardware and software maintenance. |
| Best for | Developers who need a custom environment, specific software, or want to host multiple apps. | Developers who want to focus on code, not the server. Ideal for rapid deployment and automatic scaling. | Enterprises looking to deploy large-scale, high-traffic applications with high performance and security demands. |
If you want complete control and flexibility, Hostinger’s Linux VPS hosting solution is an excellent option. You have full access to your hosting environment and can install any applications compatible with Linux.

Alternatively, we also offer a PaaS-like environment called Front-end Web App Cloud Hosting. It’s fully managed, comes with a built-in monitoring tool, and provides one-click deployment via GitHub, making it excellent for those seeking a simpler hosting solution.
While less flexible than our VPS, our front-end hosting is compatible with Node.js applications and various frameworks, such as React and Vue.js. Moreover, we continuously add support for other tech stacks to cater to more specific needs.
3. Set up the server enviroment
After choosing the hosting service, proceed with the server setup. This process is vital because an improperly configured environment can lead to security vulnerabilities, poor performance, or crashes. It involves installing and configuring all the software your application needs to run correctly.
The setup process depends on your hosting choice. If you are using a managed platform like PaaS, the environment should already be pre-configured. However, if you choose a VPS, you are responsible for setting up the environment from scratch.
For a typical VPS setup, you will need to:
- Install the operating system (OS). Choose between different Linux distributions and Windows, depending on your app’s requirements and host compatibility. This choice is foundational, as all other software depends on it.
- Set up security. Configure firewall rules using tools like iptables, manage user permissions, and apply security patches to ensure a safe hosting environment. Refer to our VPS security article for additional important practices.
- Install the web server. Install and configure web server software, like NGINX or Apache. This software handles HTTP requests from users and serves your project files to the visitor’s browser, making your app accessible online.
- Install the application runtime. Install the programming languages and other technologies that build your application, like frameworks. This enables your application code to run properly on the production server.
- Install the database. Set up a database, such as MySQL or MongoDB, and create the necessary tables and users. This is where your app will store data and retrieve data to serve content dynamically.
- Configure a reverse proxy. Set up a reverse proxy, such as NGINX. This intermediary server handles SSL/TLS certificates, provides caching, and safely forwards traffic to your app via HTTPS.
4. Purchase a domain name
You need to buy a domain name for your web app so users can access it with an easy-to-remember address, like myapplication.com, instead of a complex server IP address. A custom domain also establishes your brand identity and credibility.
Depending on your registrar, the steps for purchasing a domain name may vary. Here’s how to do it at Hostinger:
- Go to our domain name checker page.
- Check the availability of your desired domain name with its top-level domain, like your-domain.com. If you don’t have a name, you can generate one with our AI domain generator.
- Click Make it yours to purchase the domain name. If the domain name you searched isn’t available, scroll down to check other options and click Buy now.
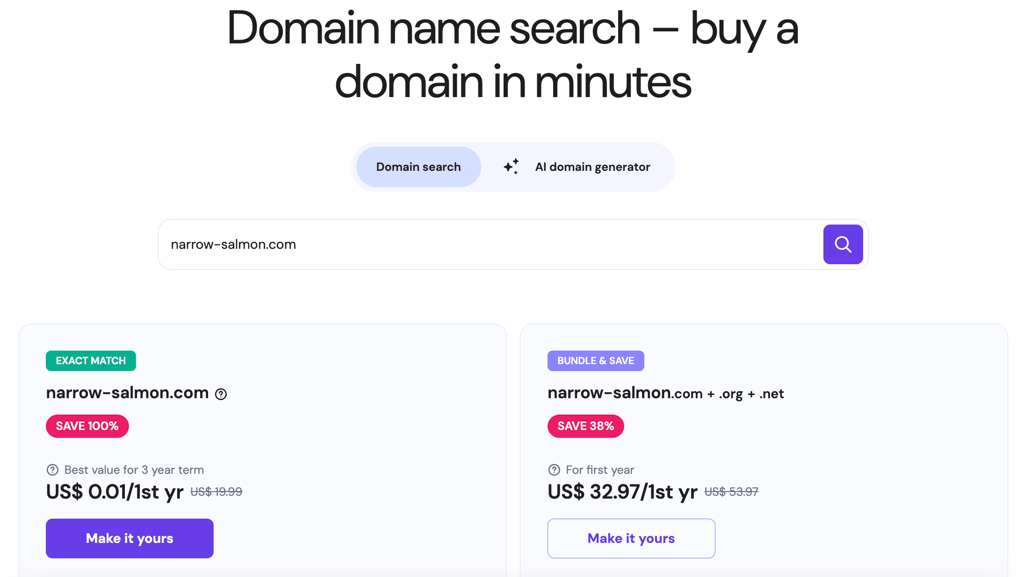
- On the shopping cart window, pick a registration period, then hit Continue. Register your domain for at least two years for the best deal.
- Enter your billing address and pick a payment method. Once you’re done, click Submit payment.
👉 No need to buy a domain separately!
Our Cloud front-end hosting solution includes a free domain valid for one year. This means you don’t need to purchase one separately and can immediately proceed with the application setup.
5. Test your web application
Evaluating your application before deployment is crucial for catching bugs, ensuring stability, and verifying that all features work as expected.
Importantly, conduct this web app testing in a staging or local development environment, rather than on your live server. A staging site is a private clone of your hosting environment, allowing you to test changes safely without affecting your production server.
Although you can block traffic to the hosting environment during testing, it remains risky because you may generate test data, such as logs or caches, that could disrupt the live web app later.
When performing web app testing, here are important scenarios you should consider:
- Unit testing. Checks individual functions or components to detect logic errors before they affect other parts of your app. You do this by writing small, focused test cases that mock external dependencies using tools like Jest, Mocha, pytest, JUnit, or PHPUnit.
- Integration testing. Ensures that multiple components work correctly together. Perform these tests by running components of your application against other services, like a database or an API, using tools like Supertest, pytest, RSpec, JUnit, or Testcontainers.
- End-to-End (E2E) testing. Validates complete user workflows to check if the entire system behaves as expected in real scenarios. You run these tests by automating real browser or app interactions with tools such as Cypress, Playwright, Selenium, or WebdriverIO.
To avoid missing testing essential aspects of your application, use the following simple launch checklist to review everything before deployment:
- Check for sensitive information. You should store sensitive data like API keys or database passwords in a separate environment variable file. Storing this information in your application code poses a significant security risk, as it can be exposed in your repository or even in browser logs.
- Test all user workflows. Simulate key user actions, such as signing up, logging in, and using core features. This verifies that components are working together properly and that the app is functional from a user’s perspective.
- Verify responsive design. Check that your application displays correctly on various screen sizes, including desktop, tablet, and mobile devices. The easiest way to do this is by using the Device mode on your web browser.
- Test error handling. Submit invalid data, such as text in number fields, to ensure the app displays a helpful message rather than crashing. This helps with debugging and ensures the end-user gets context for errors, which improves their experience.
- Check database connections. Ensure your application can successfully connect to the production database to read and write data. If not, check if your production configuration uses the valid credentials and points to the correct database.
6. Deploy your web application
Deploying your project to the hosting environment involves moving your application’s code and assets from your local machine to the production server.
Depending on the hosting environment, there are different ways to deploy your web app. If you use a VPS, here are some of the most common methods:
- File Transfer Protocol (FTP). This method involves using an FTP client, such as FileZilla, to upload your files to the server manually. This method is simple but slow, prone to human error, and unsuitable for modern applications that require continuous updates.
- rsync. A method that uses the rsync command to copy all your application files and data from the development environment to the production server. Although the required tool is pre-installed on the terminal, the deployment process is tedious and unreliable because it requires manual execution of the command.
- Git via secure shell (SSH). To deploy an application using Git, push your project from the local development computer to a remote repository like GitHub or GitLab. Connect to the host server and pull the repo, then build your app components.
- Continuous Integration/Continuous Delivery (CI/CD). This is the most reliable deployment method that automates testing and file transfer. To do CI/CD deployment, define automated build-test-deploy steps in a config file and run them with a tool like GitHub Actions every time you want to push your code to the server.
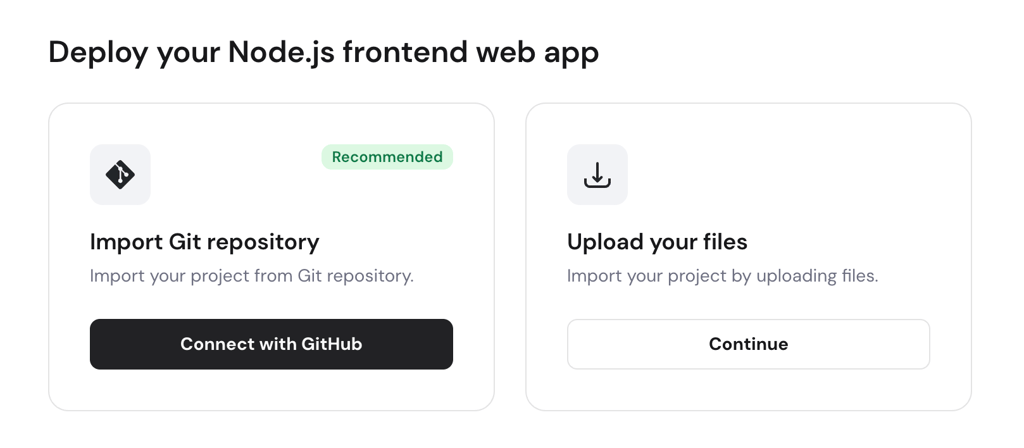
If you use a PaaS solution, your provider may offer built-in deployment features. For example, Hostinger’s front-end Node.js hosting allows you to deploy your project from a GitHub repository or by uploading the files directly into hPanel.
7. Launch your web application
After pushing your project files and code to the production server, launch the application by starting it. Then, your application will be accessible online and usable by visitors.
Depending on your application, you may need to do more steps. However, production deployment typically involves:
- Starting the application process. Start your app using a process manager that your application supports, like PM2, Gunicorn, or Node.js. This enables the application to run persistently and restarts automatically upon encountering errors.
- Configuring the reverse proxy. Update your NGINX or Apache configuration to forward public traffic from your domain to the local port of your application.
- Open the port. Set up your firewall to allow connections to the port that your application and reverse proxy use, such as port 443 if you utilize HTTPS.
- Connect your domain. Connect the domain name to your server by updating the DNS setup on your registrar, which will allow your application to be accessed using a custom name.
- Set up SSL/TLS. Obtain an SSL/TLS certificate from a provider like Let’s Encrypt and issue it for your domain to make your application properly accessible via HTTPS.
On Hostinger’s Node.js front-end hosting solution, the process is much more straightforward because our system handles network configuration and provides a free SSL/TLS certificate. You can also easily connect your custom domain to your application directly from hPanel.
🤔 Why is VPS more complicated?
Deploying an app on a VPS involves additional steps compared to using a PaaS, such as Hostinger’s Cloud front-end hosting. However, this complexity comes with the benefit of having a fully customizable environment that supports tools and technologies not available on PaaS platforms.
8. Monitor the web application’s performance
Monitoring your web application’s performance after deployment is a vital task that helps identify problems before they affect more users or cause bigger issues.
Regular web app monitoring provides critical insights into your app’s health, enabling you to prevent downtime, quickly resolve bugs, and understand resource usage to plan for scaling. Key performance metrics to track include:
- Uptime or availability. This metric indicates whether your server is online and responding to requests. You can use external services that periodically send requests to your site and alert you if it’s down, or use a tool like Sentry.
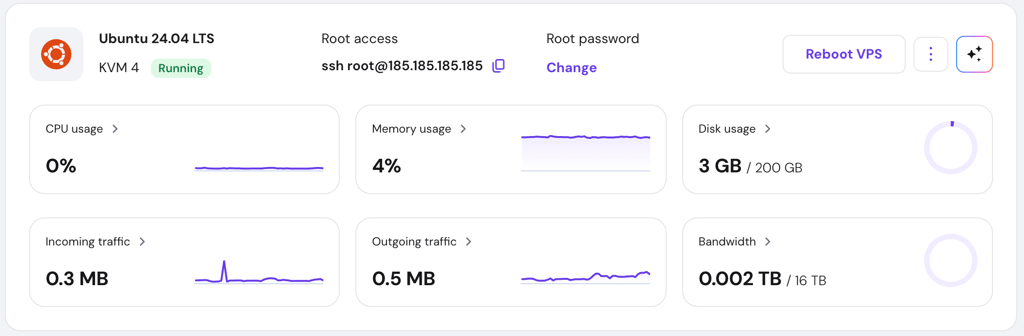
- Resource usage. Monitor your server’s CPU load, RAM usage, and disk space using a tool like Grafana or the built-in graph on your hosting provider’s dashboard. These metrics indicate whether your project runs efficiently with enough computing resources.
- Error monitoring. Track the frequency and type of errors your application produces by analyzing your application and server logs. You can do it manually by inspecting the log files in your server, or use an alerting tool like DataDog.
- Database performance. Check database response times and memory usage to identify bottlenecks. To automate this process, set up a monitoring platform like New Relic.
- Security events. Watch for unusual system or user activity that could signal a malware infection or attack. This involves reviewing event logs for repeated failed logins or suspicious requests.
Typically, your hosting provider includes a built-in monitoring tool that helps you track these metrics easily. For example, Hostinger users can check their server resource usage, error logs, and activity directly from the hPanel. You can also set up notifications to alert you of errors via email.
If you use a VPS, you can set up any tool, including Grafana, DataDog, Sentry, or Elasticsearch, to help track important metrics. This provides you with more insights into your server performance and allows you to import the scan result for more in-depth analysis, which built-in tools may not offer.
How to troubleshoot common web app hosting issues
Various issues may arise when deploying a web application. This is a normal part of the development process, and identifying the issue quickly is the key to resolving it.
Moreover, most common deployment problems can be fixed with straightforward troubleshooting. Here are some issues that often arise:
- 500 Internal Server Error. This generic error means something went wrong on the server, but it can’t identify the specific issue. To fix it, check your application logs for a detailed error message that points to the bug in your code or a failed database connection.
- DNS issues. If your domain isn’t working, the problem is often with your DNS records. Ensure the propagation process is finished, double-check that all of your DNS records point to the correct address, and verify that there are no conflicting DNS settings.
- Port conflicts. Your application may fail to start if it uses the same port as another service. Use commands like netstat to identify the conflicting port, and then change the configuration in your application’s code as well as the web server’s settings.
- Misconfigurations. A simple typo in a config file or an incorrect environment variable can cause your application to fail. Carefully review your server configuration files, including your NGINX reverse proxy setup and app’s environment variables.
- Permission errors. Your web server or application might not have sufficient permissions to read the project files or write to a log directory. To fix this, adjust the file permissions using the chmod command, but only give access to permitted users for security reasons.
For our Cloud-based front-end hosting users, you can ask our Kodee AI assistant or Customer Success team to help troubleshoot the problem.
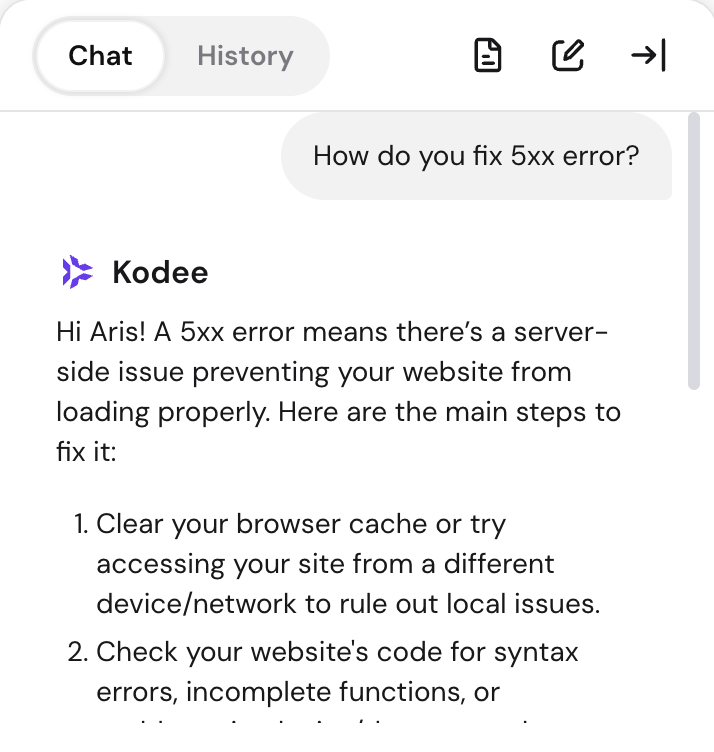
Meanwhile, VPS users need to resolve the issue manually. At Hostinger, however, you can also use our Kodee AI assistant to help identify the root cause and guide you in fixing the error.
Security best practices for hosting a web app
Following security best practices when hosting a web application is crucial for protecting your app from threats, building trust with your users, and safeguarding sensitive information. If your app is compromised, it will negatively affect your users and reputation.
Here are some of the most essential security practices when hosting an application:
- Use a Web Application Firewall (WAF). A WAF filters, monitors, and blocks traffic that contains malicious code before it reaches your server. Your hosting provider typically provides this feature by default, but if not, you can set it up using Cloudflare or ModSecurity + NGINX.
- Enforce HTTPS with SSL/TLS. Always use SSL/TLS certificates to encrypt all data transmitted between your users and your server. This is crucial for preventing attackers from intercepting sensitive information, such as login credentials or payment details.
- Keep all software updated. Regularly apply security patches to your server’s OS, your web server, your application runtimes, and any dependencies. Outdated software typically has known vulnerabilities that are widely exploited.
- Implement strong access control. Use multi-factor authentication (MFA) for all accounts to help prevent brute-force attacks. Also, avoid granting users excessive permissions to ensure sensitive data is accessible only to authorized parties.
- Monitor and log activity. Continuously monitor network and system logs for suspicious activity. This allows you to detect threats promptly and review events during an incident.
- Don’t disclose implementation details. Avoid announcing web stacks you use to prevent attackers from exploiting known vulnerabilities of that specific software. To do this, modify your web server configuration to remove watermarks like “404 Not Found NGINX” from the error pages and delete its name from the request header.
- Audit and adjust your security settings. Regularly update WAF rules as needed, review server logs, check user permissions, and install the newest software patch. As cyber threats continue to evolve, your security practice must adapt accordingly.
- Set up automatic backup. Use your hosting provider’s built-in feature or create a cron job to automatically back up your application’s database tables, user-submitted data, logs, and persistent volumes. This ensures you can restore data easily in case of incidents.
How to promote your web application
After hosting your web application, promote it so that users will come and use your online platform. This is an ongoing process that involves a series of marketing efforts.
To get started, identify your target audience by conducting a survey and competitor analysis. Then, set up an early access campaign for selected users to test your application. Preferably, choose technical experts, such as developers, to help identify areas for improvement and incentivize them to encourage participation.
Once your application is ready, promote it to your target audience via social media, influencer collaboration, paid ads, content marketing, or a product listing platform like Product Hunt. Additionally, offer discounts or create a referral program to generate more interest.
Note that marketing your application is a long-term process that requires patience and continuous effort to see significant results. Check out our article on how to promote your web app to learn more about the steps in more detail.
All of the tutorial content on this website is subject to Hostinger's rigorous editorial standards and values.

Aris is a Content Writer specializing in Linux and WordPress development. He has a passion for networking, front-end web development, and server administration. By combining his IT and writing experience, Aris creates content that helps people easily understand complex technical topics to start their online journey. Follow him on LinkedIn.

Comments
0 responses