How to deploy a React app in 6 steps
Jul 06, 2026
/
Ariffud M.
/
10 min Read
To deploy a React app, create a production build, connect the project to a host, configure the build settings, and publish it to a live domain.
A deployed React app runs on a server with a public URL, not just on the computer you used to build it.
Managed React hosting typically handles most of the deployment process each time you push your code to GitHub.
React app deployment takes six steps:
- Develop your React project.
- Push the React app to GitHub.
- Connect the host to your repository.
- Set the build command and output directory.
- Configure environment variables.
- Deploy and test the live React app.
What do you need before deploying a React app?
Before deploying a React app, you need a working project, the tools to build and push it, and a host that supports React. A deployable React project should build without errors on your computer.
Here are the complete prerequisites:
- A working React project built with Vite or Create React App.
- Node.js and npm installed on your computer to run the build.
- Git installed to track changes and push the code to GitHub.
- A GitHub account to store the project in a repository.
- A hosting platform that supports React apps, preferably with built-in GitHub integration for easier deployment.
- Optionally, a custom domain and any environment variables the app needs, such as an API URL.
Vite is the currently supported build tool for developing new React projects. It replaces Create React App, which the React team deprecated for new apps in February 2025.
If you’re starting a new project, use Vite. If you already have one built with Create React App, you can still deploy it the same way. The main differences are the build folder name and environment variable prefix.
Where can you deploy a React app?
You can deploy a React app on managed React hosting, static hosting, virtual private server (VPS) hosting, a cloud platform, or even a free service like GitHub Pages.
The right choice depends on how much server control you want and how much setup you’re willing to handle.
| Deployment option | Best for | Key trade-off |
| Managed React hosting | Beginners to mid-level users who want push-to-deploy | Less low-level server control |
| Static hosting | Simple static or single-page application (SPA) builds | No backend or server-side logic |
| VPS hosting | Developers who need full server control | Manual setup and maintenance |
| Cloud platforms, like AWS and Google Cloud | Large-scale or complex infrastructure | Steeper learning curve and variable costs |
| GitHub Pages | Free static hosting for demos and portfolios | Static only, with limited features |
If you want a quick and easy deployment without handling server configuration and management yourself, choose a managed hosting service.
With Hostinger managed React hosting, for example, you only need to connect your plan to your GitHub account. The system then detects your build automatically and deploys your project in a few simple steps.
You’ll also get an SSL certificate, a content delivery network (CDN), daily backups, database integration, and a web application firewall (WAF). These are features you’d normally set up and manage yourself with unmanaged hosting options.
How to deploy a React app using Hostinger
On Hostinger, deploying a React app involves connecting your GitHub repository, confirming the detected build settings, and publishing your app directly from hPanel.
After your first deployment, the system automatically redeploys your app each time you push changes to GitHub. This keeps your live app updated without requiring a manual redeploy.

1. Prepare your React project for production
Your React project is ready to deploy when it runs on your computer and creates a clean production build.
Install the dependencies:
npm install
Run the app to confirm it works. The command depends on your setup:
# Vite
npm run dev
# Create React App
npm start
Next, open your package.json file and check that the scripts section has a build entry.
A Vite project looks like this:
"scripts": {
   "dev": "vite",
   "build": "vite build",
   "preview": "vite preview"
}
A Create React App project should show the following:
"scripts": {
   "start": "react-scripts start",
   "build": "react-scripts build",
   "test": "react-scripts test",
   "eject": "react-scripts eject"
}
If yours doesn’t have a build entry, add “build”: “vite build” for Vite or “build”: “react-scripts build” for Create React App.
Then, create the production build:
npm run build
If the build reports errors, fix them before deploying because what fails on your computer will also fail on the server.
The error message usually names the file and the problem, so you know where to look. For example:
error during build:
Could not resolve './components/Header' from src/App.jsx
This error points to a missing or misnamed import in src/App.jsx. Correct the path, then run npm run build again to confirm it passes.
2. Push your React app to GitHub
Pushing your React app to GitHub connects your local project to the deployment pipeline, since Hostinger deploys directly from your repository.
In your project folder, add a .gitignore file that lists node_modules and any .env files. This keeps your dependencies and secret keys out of the repository:
node_modules
.env
Initialize Git and commit the project:
git init
git add .
git commit -m "Initial commit"
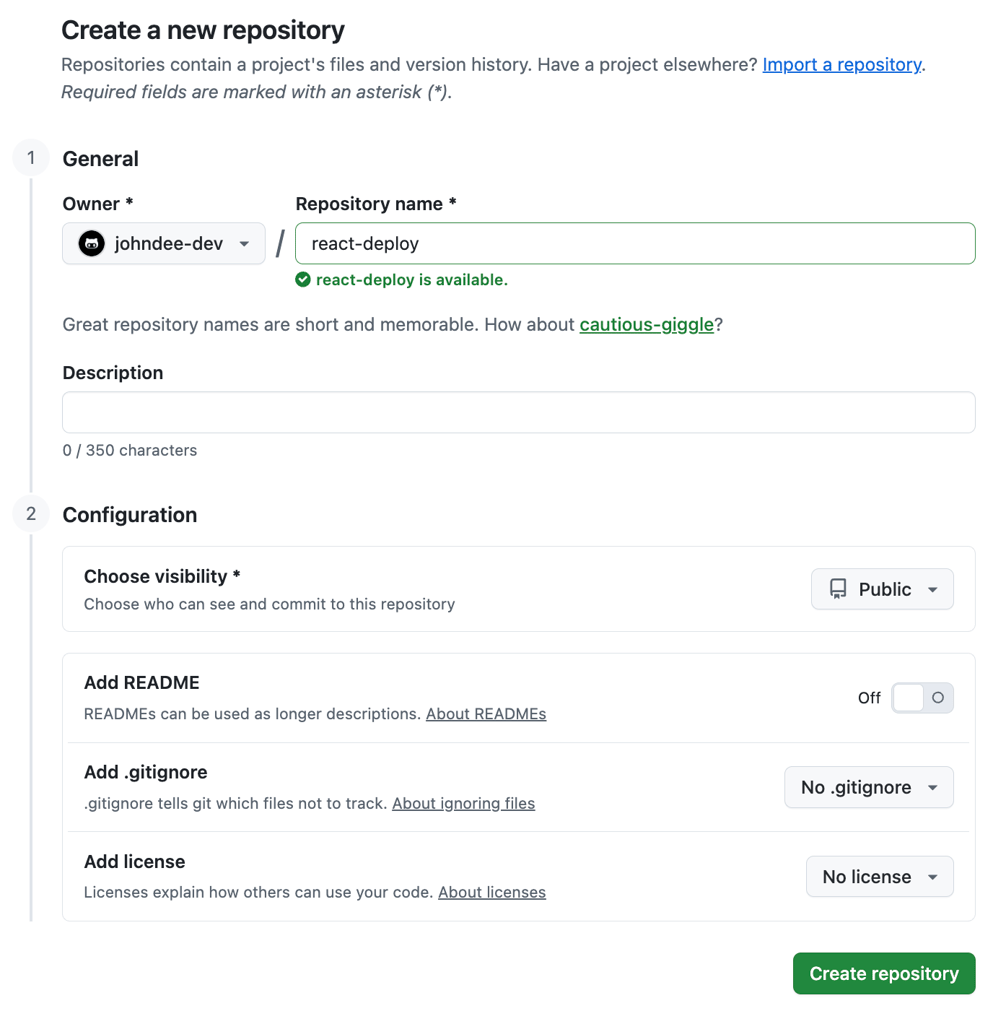
Next, create an empty repository on GitHub:
- Sign in to GitHub, or create a free account if you don’t have one.
- Click New, then name the repository, for example, react-deploy.
- Set the visibility to Public or Private. Hostinger can connect to either one.
- Leave README, .gitignore, and license unchecked so the repository stays empty.
- Click Create repository.
Link your project to that repository and push it to the main branch:
git remote add origin https://github.com/your-username/react-deploy.git
git push -u origin main
Replace your-username with your GitHub username and react-deploy with your repository name.
Alternatively, upload your project manually to GitHub. To do this, open your new repository and choose Add file → Upload files to drag the project in.
Keep in mind that most operating systems, including macOS, hide dotfiles like .gitignore, so drag-and-drop uploads can miss this file.
Create it directly on GitHub instead by choosing Add file → Create new file, typing .gitignore as the file name, and adding the following:
node_modules
.env
Git remains the better fit for a project you keep updating, since each push sends only the changes you made instead of uploading the whole project again.
3. Connect the GitHub repository
Once you’ve purchased a Business or Cloud Startup plan on Hostinger, log in to hPanel using the registered account. From the main page, go to Websites → Add website → Node.js Web App.
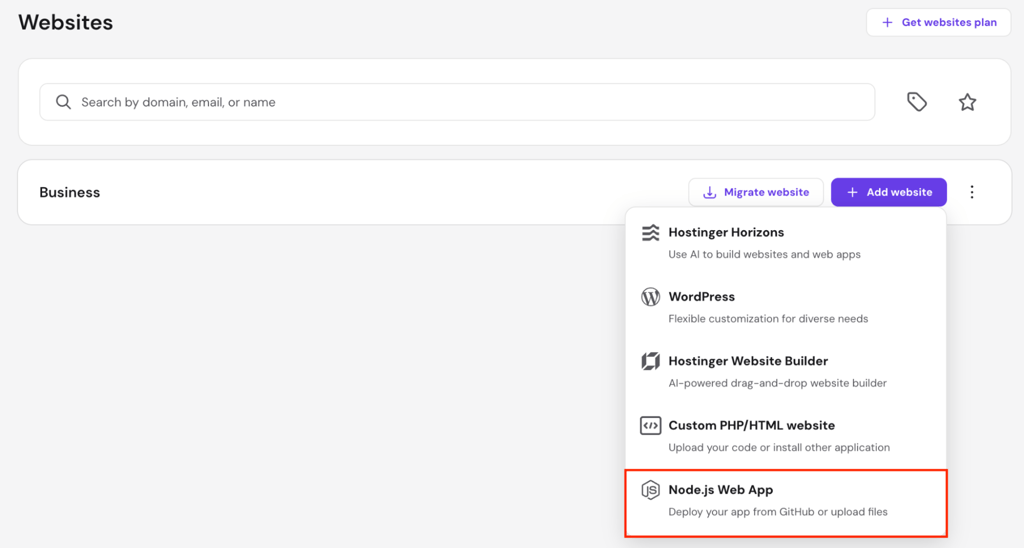
You’ll be prompted to add a custom domain for your React app. Alternatively, you can use a free temporary domain and add your own domain later.
Next, connect your GitHub repository in the setup screen:
- Choose Import Git repository as the source.
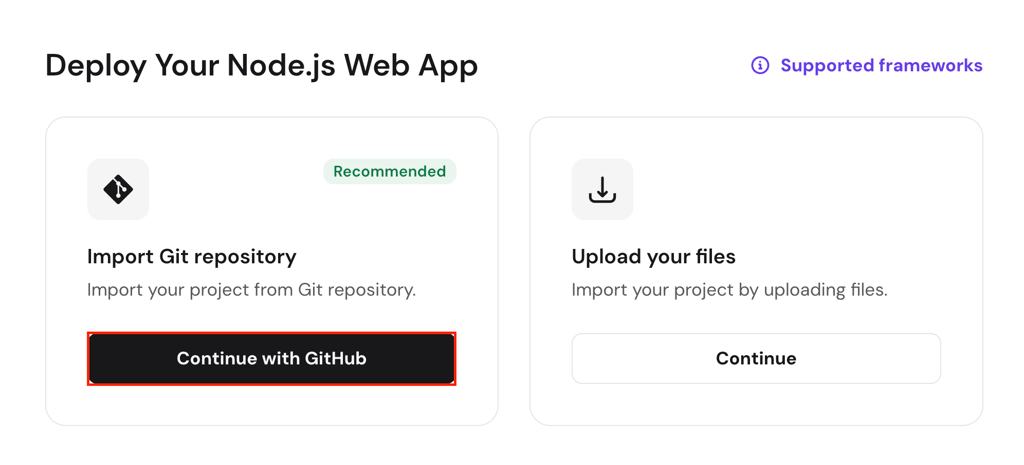
- GitHub redirects you to an authorization page. Click Authorize to grant Hostinger access.
- Select your repository from the list.
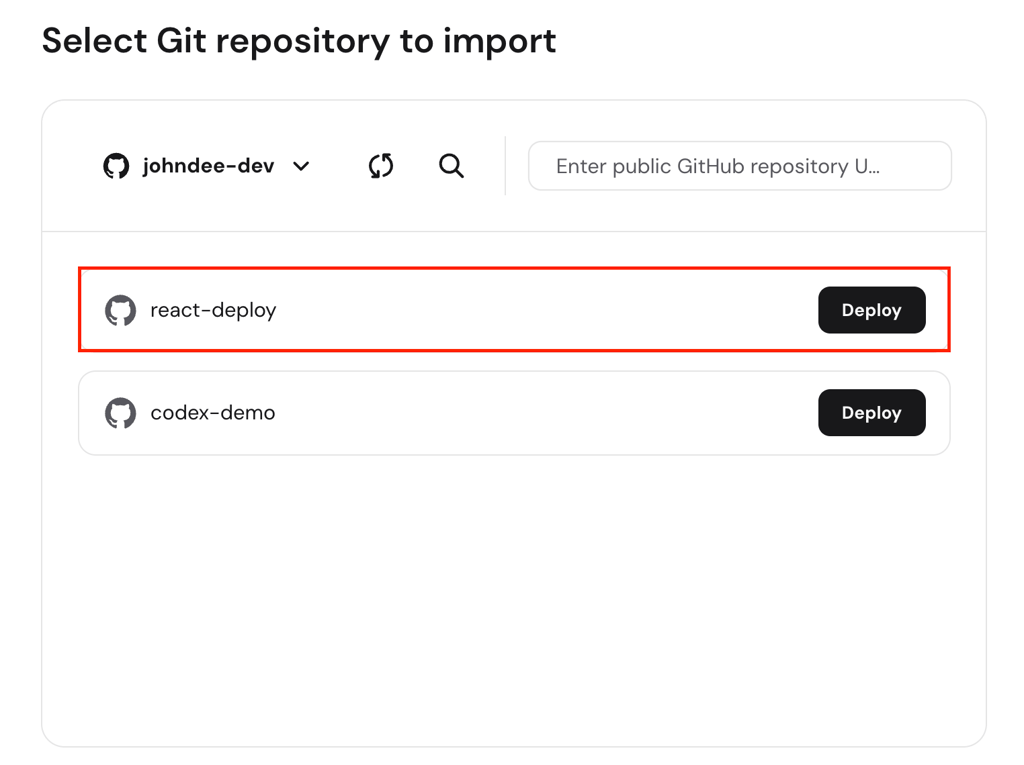
Keep in mind that each hosting plan can connect to only one GitHub account at a time. If you want to deploy another project later, store it in a repository under the same GitHub account. You can then select that repository during deployment.
4. Configure the build command and output directory
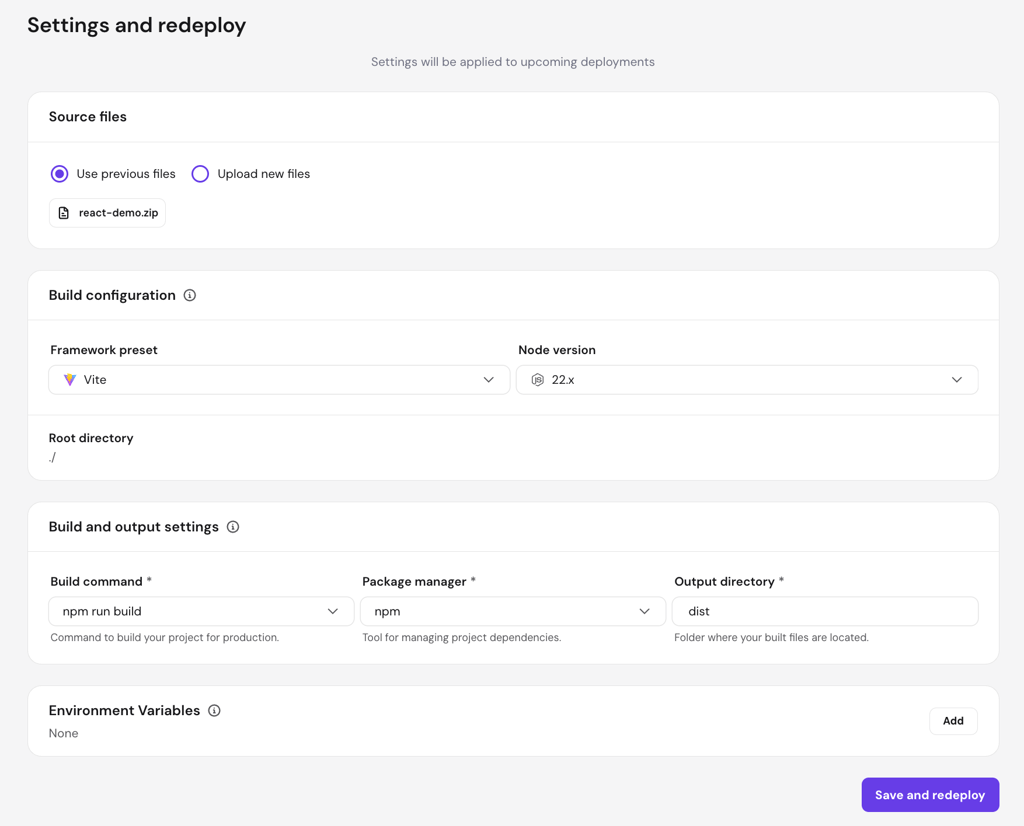
After you connect the repository, Hostinger auto-detects the framework and pre-fills the build command and output directory on the Review build settings screen. You can change either value if needed.
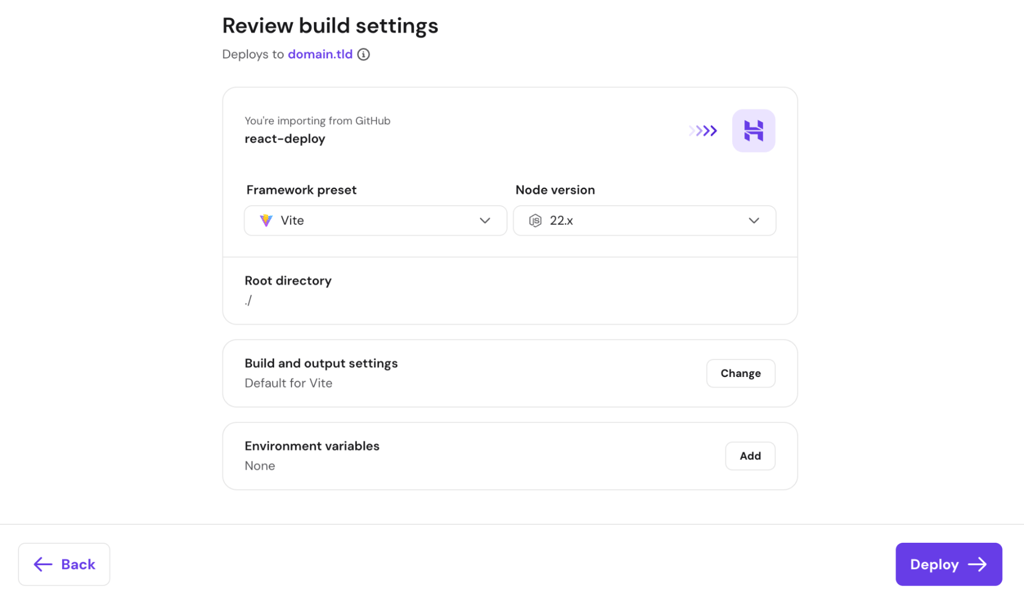
The build command tells the system how to compile your app, usually npm run build. The output directory is the build folder that command creates, and it’s what the system publishes.
Hostinger’s system matches both values to common React setups:
| Setup | Build command | Output directory |
| Vite React | npm run build | dist |
| Create React App | npm run build | build |
| Next.js static export | Project-specific command | out |
| Custom React setup | Project-specific command | Project-specific output folder |
Double-check the output directory value carefully. If it names a folder that doesn’t match your setup, the system can publish an empty folder and show a blank page when you check the URL later.
Set it to dist for Vite, build for Create React App, or out for a Next.js static export.
5. Add environment variables
Most production apps need configuration values, such as an API URL or an analytics key. Environment variables store these values so your React app can use them during the build.
On the same Review build settings screen, open the Environment variables option. Enter the variable name in Key, for instance, VITE_API_URL, and the value in Value, for example, your API URL.
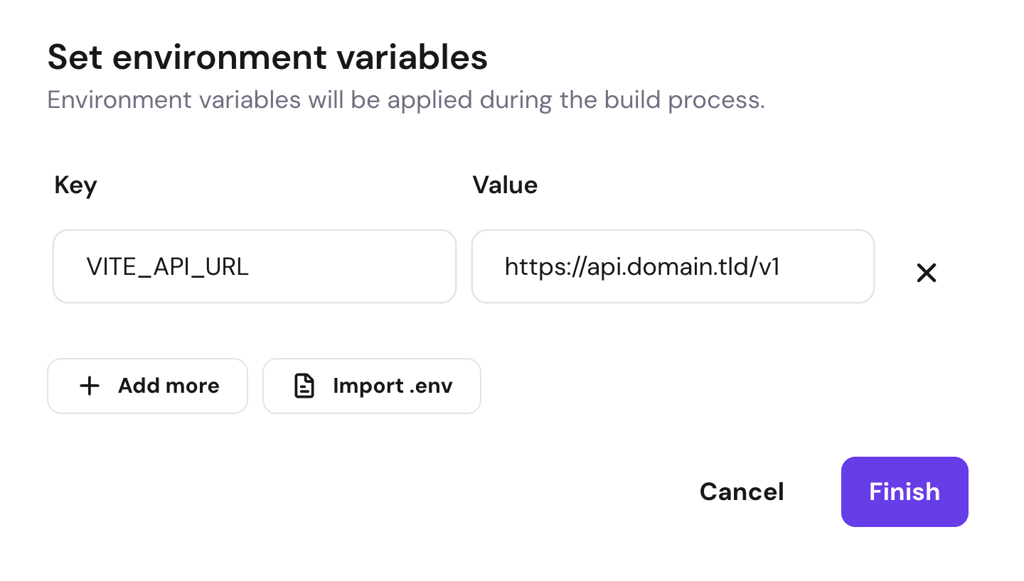
When naming environment variables, use the correct prefix for your React setup. Otherwise, the build will ignore them.
| React setup | Key prefix | Example |
| Vite | VITE_ | VITE_API_URL |
| Create React App | REACT_APP_ | REACT_APP_API_URL |
If you already have these values in a local .env file, click Import .env to import them all at once instead of adding each variable manually.
6. Deploy and test the live React app
After making sure that all build settings are correct, click Deploy to start the build. The system installs the dependencies, runs your build command, and publishes the files.
When the build finishes, a preview screenshot of the built site confirms that it worked. If the build fails, check the build log to see what went wrong.
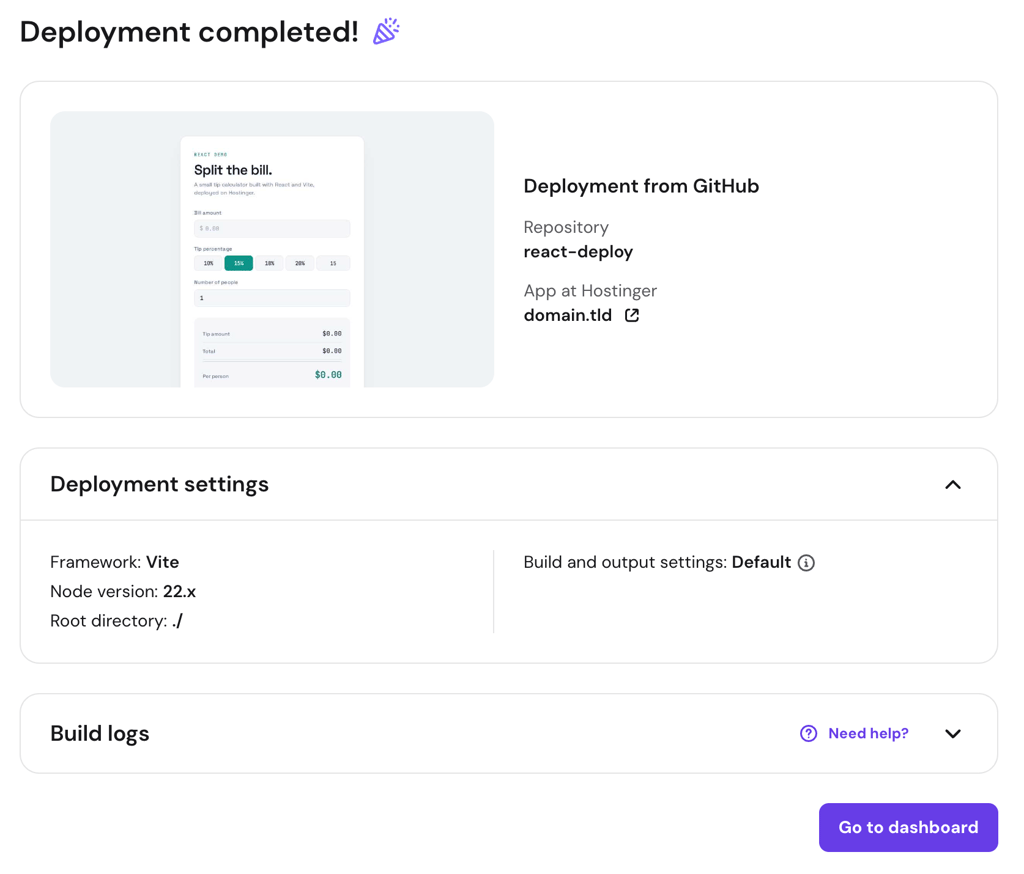
Deployment isn’t complete until you test the live React app. Click Go to dashboard, then open the app’s public URL. Depending on the type of app you built, run these tests:
- Refresh a nested route, such as /dashboard, to confirm that routing works.
- Create a new account or log in to an existing one. Also, test with incorrect data to check whether validation works.
- Trigger an API request to confirm that data still loads.
- Open the browser console and check for errors.
- Check the layout at different screen widths, including on a smartphone and a tablet.
How to deploy a React app manually
Manual React deployment means building the app on your computer and uploading the output files to the server. This replaces storing the project in a GitHub repository and letting your web host handle the deployment.
It’s a good option for hosting a web app that can’t connect to a Git repository or only needs a one-time deployment.
The steps are typically similar across different hosts:
- Run npm install to install the dependencies.
- Run npm run build to create the production files.
- Find the output folder: dist for Vite or build for Create React App.
- Upload the contents of that folder to the server.
- Configure fallback routing so any unknown URL serves index.html. This stops client-side routes from returning a 404.
- Open the live URL and test the app.
Hostinger supports manual deployment too. On the setup screen, choose Upload your website files instead of Import Git repository, then upload a .zip file of your project. The system then detects the framework, runs the build, and deploys it.
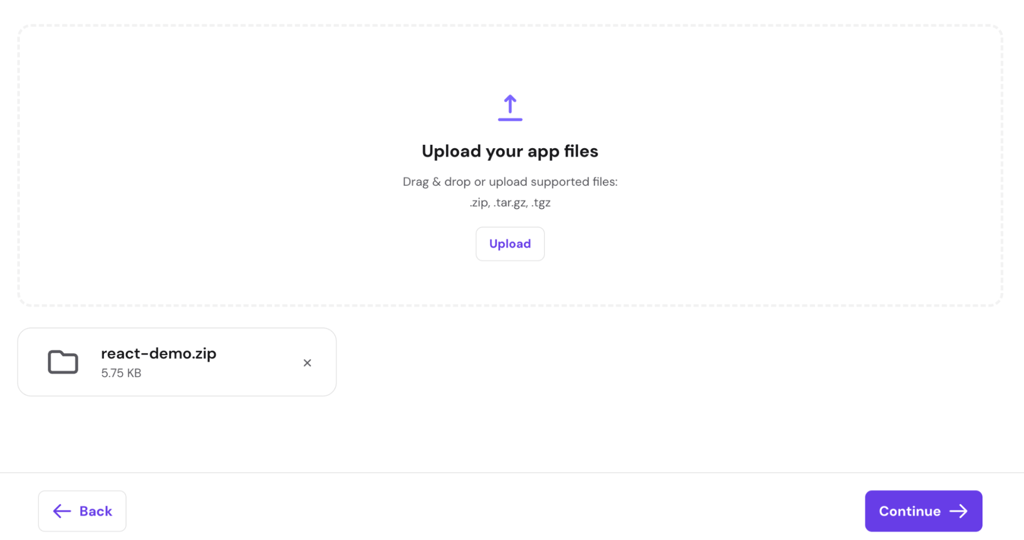
Keep in mind that manual uploads don’t support automatic redeployment. Every time you make changes, you must upload the .zip file again and redeploy the app.
How to fix common React deployment errors
To fix common React deployment errors, first identify whether the problem is a wrong output directory, missing routing rules, a failed build, or an environment variable the build didn’t pick up.
Each issue has a specific cause and fix, listed in the table below.
| Problem | Common cause | Fix |
| Blank page after deployment | Wrong output directory or base path | Change the output directory to dist (Vite) or build (CRA) in the build settings, then redeploy |
| 404 after refreshing a route | Server looks for a physical file instead of returning index.html | Configure SPA fallback routing to serve index.html for unknown paths |
| Build failure | Missing dependency or incorrect build script | Open the build log, find the error, and fix the affected file |
| API requests failing | Wrong API URL or missing environment variable | Add the correct environment variable with the required prefix in the dashboard, then rebuild |
| App works locally but not live | Environment or build configuration mismatch | Compare your local .env values and build settings with your production configuration |
| Old version still showing | Browser cache or skipped redeploy | Clear the browser cache, then push a new commit or trigger a manual redeploy |
Why does my React app show a 404 after refreshing a route?
A React app shows a 404 after refreshing because the route you’re on isn’t a real file on the server.
Libraries like React Router and its BrowserRouter component create routes such as /dashboard in the browser. They don’t generate a physical /dashboard file in your build folder.
Clicking a link works because React handles navigation without sending a request to the server.
When you refresh the page, though, the browser sends the full /dashboard path to the server. The server looks for a matching file, can’t find one, and returns a 404.
To fix this, configure your hosting environment to serve index.html for any route it doesn’t recognize. This setup is called SPA fallback routing. It sends every unknown path back to React, which then loads the correct page.
On Hostinger, a .htaccess file in public_html sets up this fallback automatically. If routing breaks after deployment, redeploy the app to regenerate the file.
Why is my React app blank after deployment?
A blank page after deployment usually means the browser loaded index.html but couldn’t find or run the JavaScript files the page depends on.
The most common causes are:
- A wrong output directory in the build settings.
- An incorrect base path in the build configuration.
- Missing asset files.
- A JavaScript error that stops the app from rendering.
- A missing environment variable the app expects at build time.
To find the cause, check two places.
First, open the browser console on the blank page. A 404 error for a .js or .css file usually means the output directory or base path is wrong. A runtime error usually points to an issue in your code or a missing environment variable.
Next, open the deployment log in hPanel. If the build failed, the log shows what caused the failure and where it happened.
For Vite projects, also check the base option in vite.config.js. This value must match the path your app is served from.
If your app runs from a subdirectory like /app, set base to /app/. If it runs from the root domain, set base to / or remove the option entirely, since / is the default.
Why do environment variables not work after deployment?
Environment variables usually stop working after deployment because the app wasn’t rebuilt after the variable was added or changed.
React injects environment variables at build time, not when the app runs. During npm run build, React writes the values into the JavaScript files. Adding or updating a variable in the dashboard won’t affect the deployed app unless you rebuild it.
To fix this, update the variable in the dashboard, then redeploy the app so the build includes the new value.
Another common cause is an incorrect or missing prefix. Vite only reads variables that start with VITE_, while Create React App only reads variables that start with REACT_APP_. If a variable doesn’t use the required prefix, React excludes it from the build.
Rename the variable with the correct prefix, then deploy the app again.
How to update a deployed React app
To update a deployed React app, commit your changes and push them to GitHub. On Hostinger, the system detects the push, rebuilds the app, and redeploys it automatically.
First, make your change in the code, then test it on your computer:
# Vite
npm run dev
# Create React App
npm start
Once the change works, commit and push it to GitHub:
git add .
git commit -m "Update component layout"
git push
Open the live URL to confirm the update is live. As long as the repository stays connected to your Hostinger plan, every future push triggers a new deployment.
Is Hostinger good for deploying React apps?
Hostinger is a good fit for deploying React apps that don’t need server-level control. Our React hosting plans support GitHub-based deployment, managed SSL, a CDN, daily backups, and simpler hosting management, so you don’t need to configure the server yourself.
It works well for projects like:
- Portfolio sites.
- Business websites.
- Dashboards and admin panels.
- SaaS frontends.
- Small to medium React apps.
If your app needs Docker containers, custom server software, or fine-grained scaling control, a VPS or cloud platform is a better fit.
These hosting options give you root access and full server configuration, but you’ll also handle the setup and maintenance that managed hosting covers for you.
Next steps after deploying your React app
After deploying your React app, connect your domain, secure it with SSL, and set up monitoring and maintenance to keep it running smoothly.
- Point a custom domain name to your app so visitors can reach it at your own address instead of the temporary one.
- Add an SSL certificate to serve the app over HTTPS. Most hosts, including Hostinger, bundle SSL with the hosting plan, so it activates automatically when you connect your domain.
- Monitor your app’s CPU, RAM, and I/O usage through the dashboard’s resource graphs.
- Add analytics to track page views, traffic sources, and where visitors drop off, so you know what to improve.
- Set up backups so you can restore your app if a deployment or update breaks something. Hostinger runs daily backups automatically.
- Monitor your dependencies for security vulnerabilities. Hostinger scans your deployed app automatically and flags affected packages.
- Switch to GitHub-based deployment for future updates if you started with manual uploads.
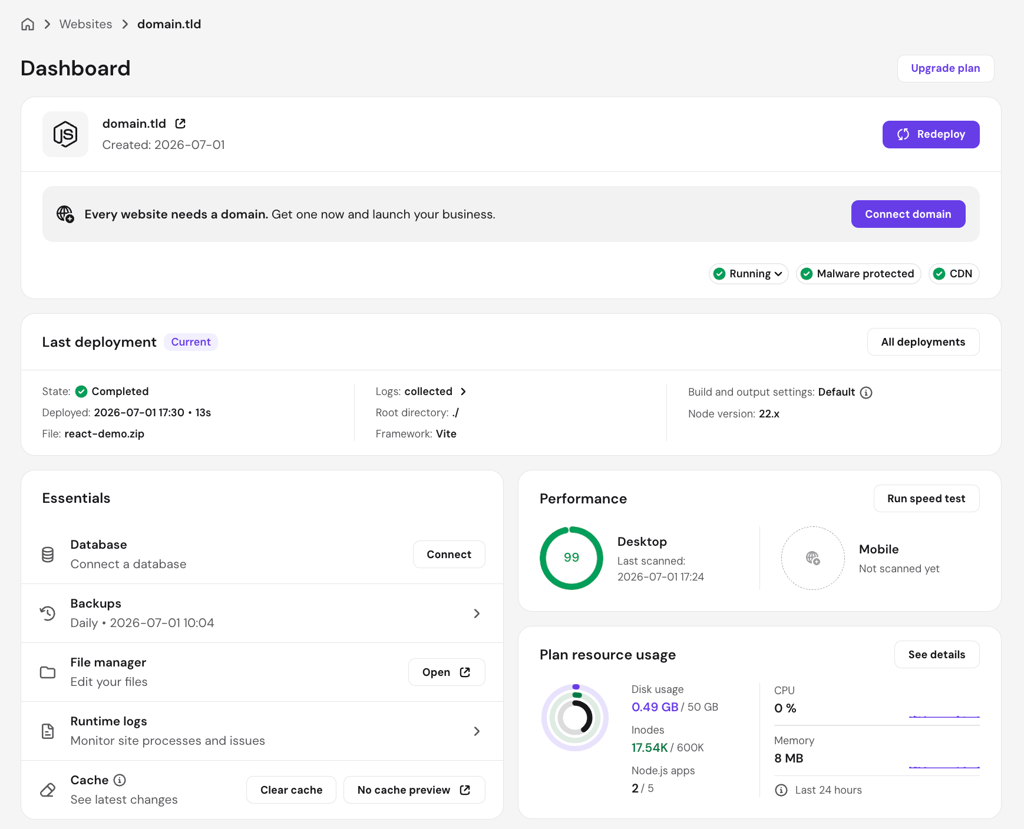
In Hostinger’s hPanel, the web app dashboard lets you manage your tasks in one place, from the first deployment to ongoing maintenance.
All of the tutorial content on this website is subject to Hostinger's rigorous editorial standards and values.

Ariffud is a Technical Content Writer with an educational background in Informatics. He has extensive expertise in Linux and VPS, authoring over 200 articles on server management and web development. Follow him on LinkedIn.