WordPress 6.3 Update: A Detailed Overview
WordPress 6.3 “Lionel” is finally released as the second major update of the year.
This release merges 10 Gutenberg versions into WordPress core, bringing features like synced patterns and style revision. These new features enhance the block editor’s workflow and expand its customization possibilities.
Furthermore, WordPress 6.3 brings performance improvements and developers-focused updates, including a new database query caching implementation and the introduction of the command palette API.
Let’s dive into what WordPress 6.3 has to offer.
WordPress 6.3 – Video Tutorial
Watch this Hostinger Academy video to find out what’s new in WordPress 6.3.
Site Editor Updates
WordPress contributors aim to finalize the Site Editor in this version by rolling out all necessary features for block-based customization. No wonder WordPress 6.3 is packed with updates for the editor. Let’s have a detailed look at them.
Synced and Unsynced Patterns
Reusable blocks are blocks or groups of blocks that can be saved and reused on other pages or posts. Any changes made to a reusable block in one place will apply globally on the website.
Meanwhile, block patterns are a premade group of blocks. You can add a block pattern to your content and customize it without affecting the same pattern elsewhere.
Previously, there was no method to create a block pattern on the Site Editor, as it requires a pattern management plugin or custom PHP files.
WordPress 6.3 combines the reusable block with the pattern system, opening up new customization possibilities. There are two types of patterns: synced patterns, which function like reusable blocks, and unsynced patterns, which work like regular block patterns.
The new pattern system should be a breakthrough in block pattern workflow. In WordPress 6.3, users can create patterns on the Site Editor, just like creating a reusable block.
Here’s how to create a synced or unsynced pattern:
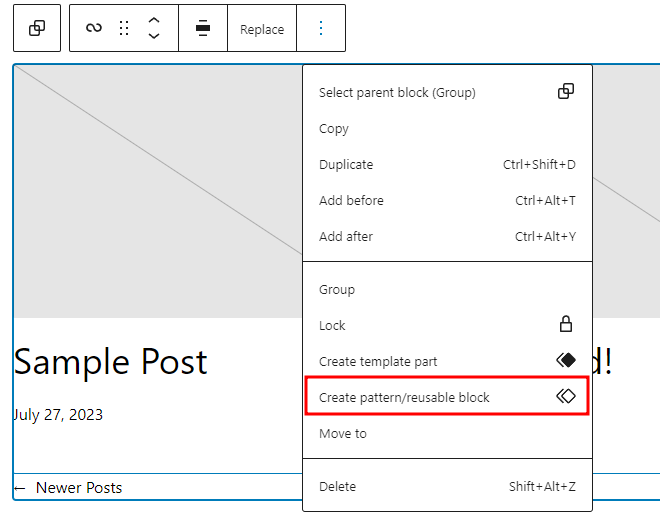
- Customize a block or group of blocks and select Create pattern/reusable block from the block toolbar menu.
- The pattern creation pop-up will appear. You can name the pattern.
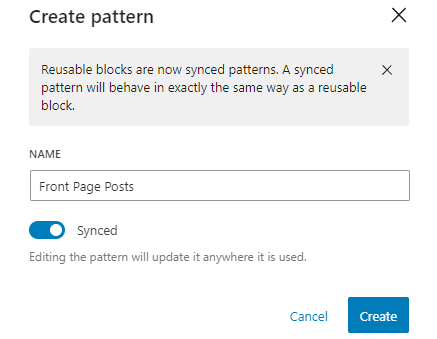
- The Synced toggle option determines whether the pattern will be synced or unsynced. Enable it if you want the pattern to behave like a reusable block, or leave it disabled to create a regular block pattern.
- Click Create to finish the process.
The editor saves synced and unsynced patterns in different locations. You can find synced patterns in the Synced patterns tab on the block inserter panel.
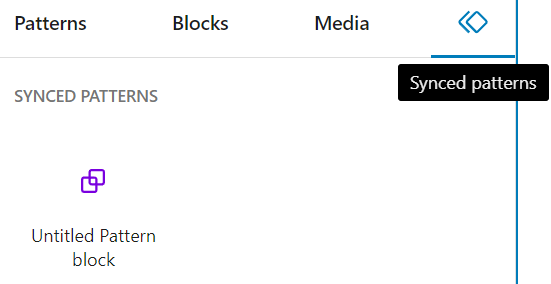
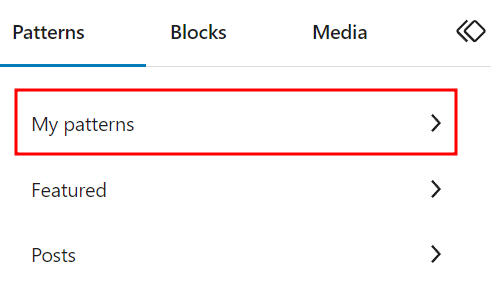
On the other hand, you’ll find unsynced patterns in the My patterns category on the block inserter panel.
Updated Navigation Sidebar
The navigation sidebar on the Site Editor will appear on the left side of the screen when you click the WordPress or site logo at the top-left corner.
In WordPress 6.3, the navigation sidebar offers more options. It allows better workflow as you can navigate and manage more components in the Site Editor.
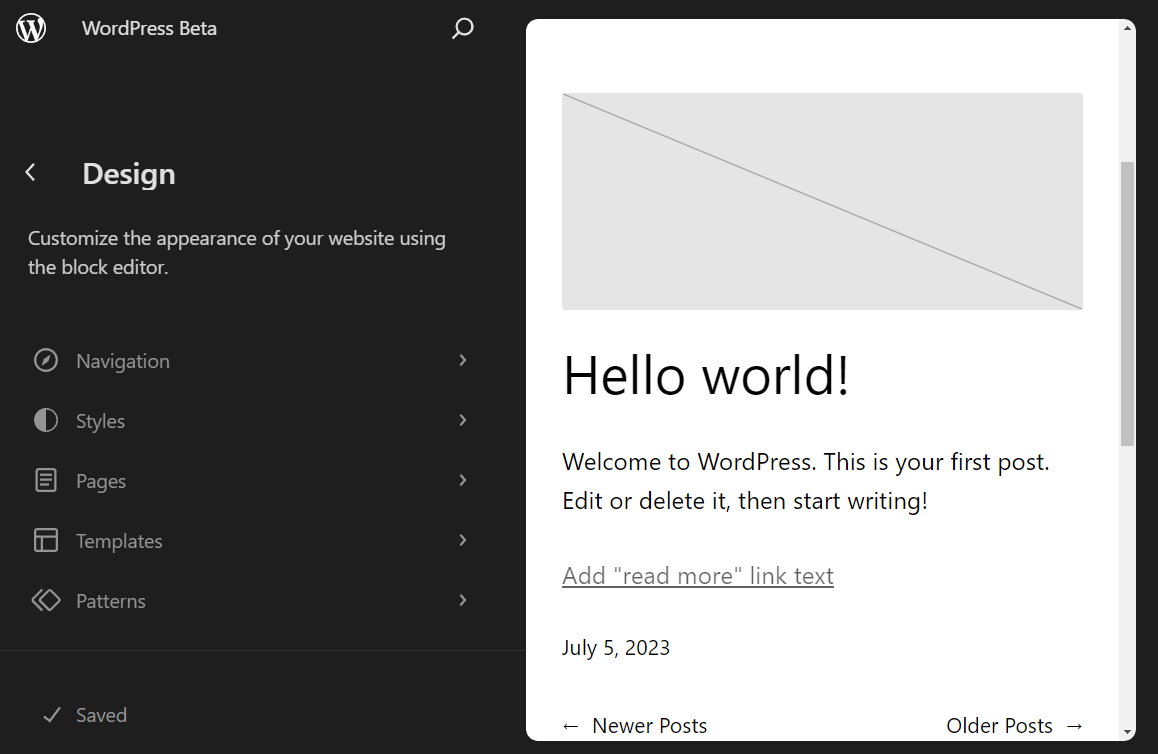
Here are the new menus on the navigation sidebar:
- Navigation. Use this menu to see and rearrange links available on your navigation block. This way, you don’t have to use the editor canvas to select the navigation block and open to block settings panel.
- Styles. Choose and preview your theme’s style variations from this menu. It also includes buttons to open the style book and the global styles panel.
- Pages. The pages menu lists all available pages on your website, including drafts. If you click on any of them, you can edit them via the Site Editor.
- Templates. This menu functions just like in the previous version – it displays all available templates and lets you create a new one.
- Patterns. This replaces the previous Template Parts menu. It now contains template parts and both synced and unsynced patterns.
Quick Switch to Template Editing
When editing a page on the Site Editor, you can easily switch to editing the template in a few clicks. This feature is convenient, as sometimes, when you’re editing a page, you may notice a layout-related change you must make.
You will find the Template drop-down section on the page settings panel and see the template used. Click the Edit template button to edit it.

Note that this feature is only available when using the Site Editor. You won’t find the option if you edit a page using the page editor.
Command Palette
The command palette offers a faster way to navigate between templates, open specific panels, or create a new post or page. It is a convenient tool to search for the panel you wish to open or the task you want to complete.
The command palette is located at the top of the Site Editor or accessed via the CTRL+K keyboard shortcut.
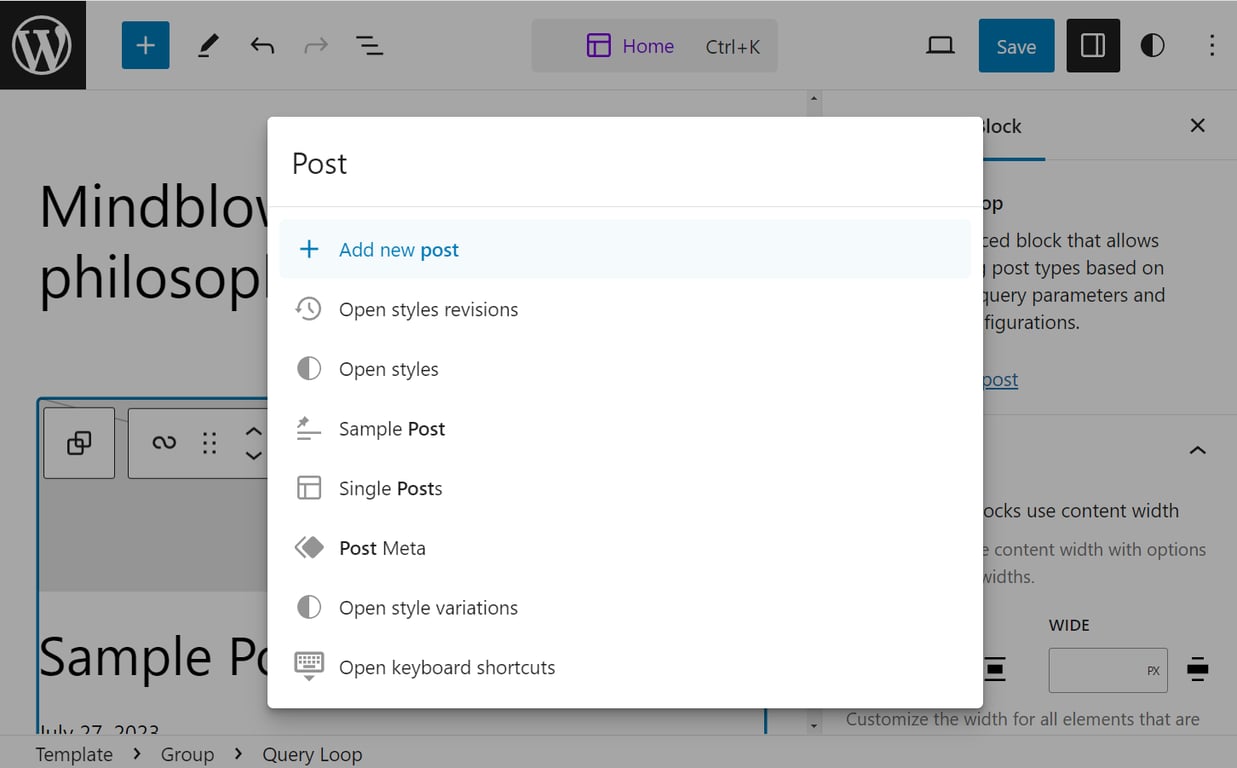
For instance, you wish to swiftly navigate from editing the home template to a page. Simply input the page name into the command palette and click on it. This will directly transport you to that page.
Style Revision
WordPress revision has always been a great collaboration feature. But in most cases, it’s useful for content editing only. Fortunately, the style revision adds the rollback feature to the design aspect of the website.
You will see the new Revisions icon on the global styles panel. Click it and select Revision history to see when style changes have been made, complete with the time stamps and users who made the changes.
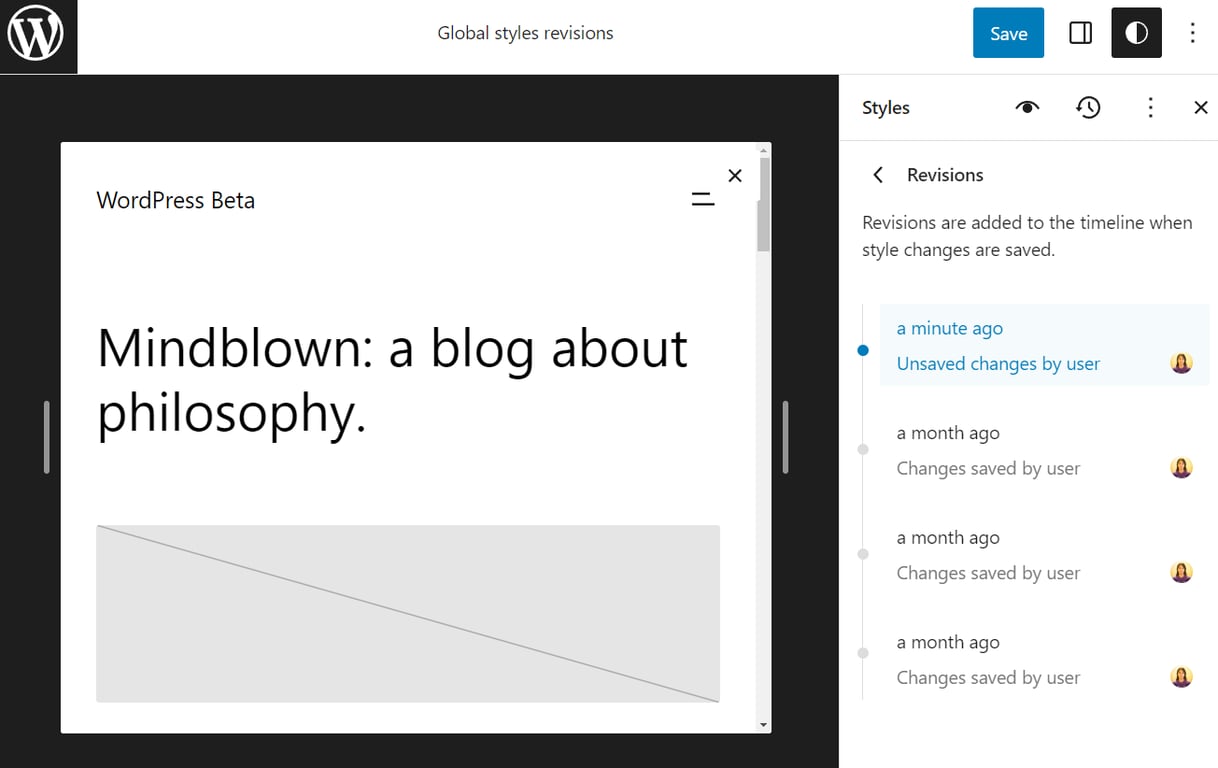
If you select any of the recorded style histories, you can preview it on the editor canvas. The Apply button at the bottom of the panel lets you revert to any of the selected styles.
Reducing Distractions in the Site Editor
The distraction-free mode is now available in the Site Editor. It’s a well-known feature to keep you focused while editing your content. Initially available on the page and post editor, it hides the sidebar, top panel, and block toolbar to reduce distraction and make the interface cleaner.
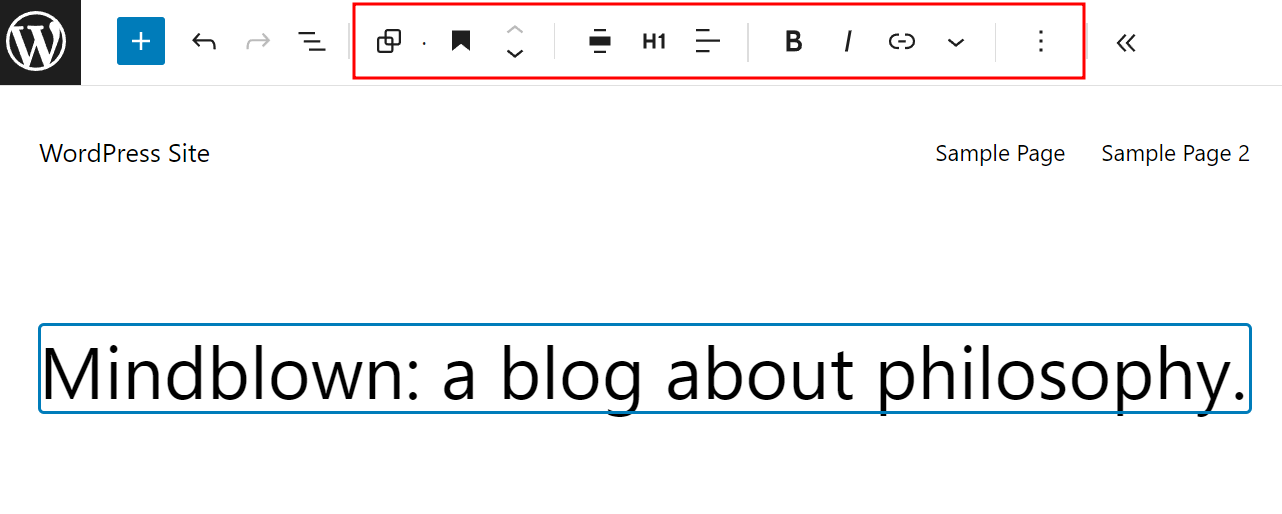
If you still need the panels, you can reduce distractions by enabling the top toolbar feature. It moves the block toolbar to the top panel of the editor.
Previously, enabling this feature will add another layer on the top panel to accommodate the toolbar. However, in WordPress 6.3, the block toolbar will be embedded in the top panel so that it won’t take more space on your editor canvas.
New Blocks
WordPress always improves its customizability by introducing new native blocks to help you add engaging content. In WordPress 6.3, we have these new blocks:
Details
This block comprises a header at the top and a collapsible nested block portion beneath it. It’s highly beneficial for efficiently showcasing lengthy material such as code snippets, product details, and spoiler information.
When you add the details block, you will have two spaces – the detail title and the hidden block content.
The title only accepts text, but you can still customize the design. On the other hand, the collapsible section allows you to add various blocks, including image, code, or list blocks.

Footnotes
If you have any part of the text that requires a footnote, such as a citation or further information, you can now add a footnote in WordPress 6.3.
Select the text you want to annotate and click More on the block toolbar. Select Footnote, and its block will appear at the end of your content. Then, you can add the citation or information on the footnote block.
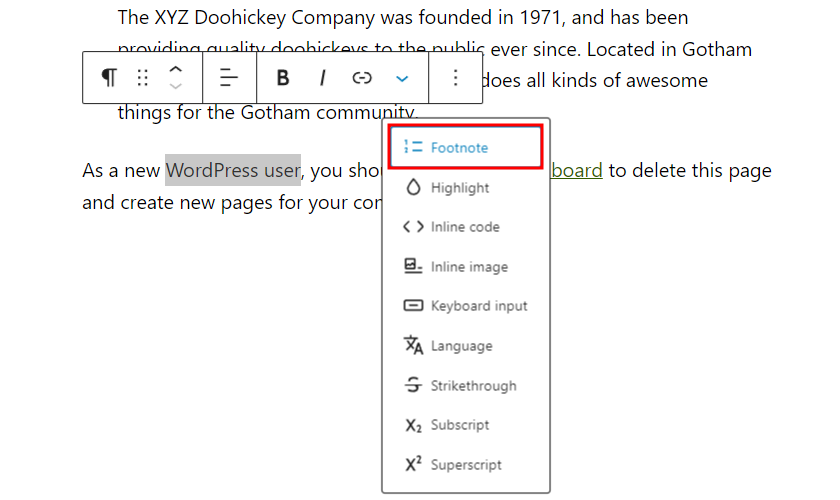
Note that this is the only way to add the footnote block. You can’t currently add one via the block inserter panel.
Block Improvements
Improving the block editing experience is not limited to adding new blocks. WordPress 6.3 also adds plenty of block enhancements.
Featured Image Aspect Ratio
The post featured image block now has an aspect ratio control as part of its design tools. Whether you add this block to a post or a template, you have eight options, including portrait and landscape orientation:
- Original aspect ratio
- Square (1:1)
- 16:9
- 4:3
- 3:2
- 9:16
- 3:4
- 2:3

Post Modified Date Variation
The post date block now offers various ways to display the last modified date. You can configure the block from the settings panel and enable the Display last modified date toggle option.
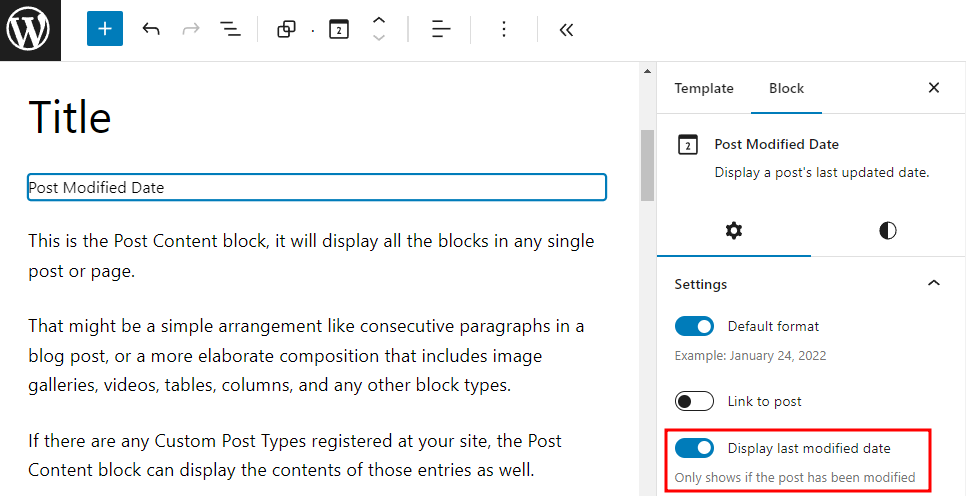
The post date block placeholder will show Post Modified Date when enabled.
You can also add two post date blocks on a template – one that displays the original display post and another that displays the last modified date. This way, you can tell your reader that although the post was originally published a while ago, it was updated recently.
Cover Block Enhancements
Some users put several texts on the cover block. To streamline the workflow, WordPress 6.3 introduces text design tools to change the color and typography of all text on the cover block. This way, users don’t have to manually change individual text block one by one.
Another improvement is the seamless transformation of the cover block into a media & text block and vice versa. When you transform the block, all design customization is transferred, eliminating the need for redesigning.
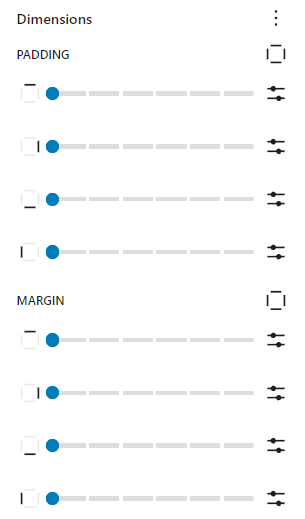
Dimensions Control
The dimensions control receives a UI revamp in WordPress 6.3. Instead of using text to describe the sides for the settings – top, bottom, left, and right – it now uses small icons to control the dimensions.
Performance Improvements and Updates for Developers
Moving on from new user-facing features, we will look into the back-end improvements. All major WordPress updates bring performance enhancements and updates tailored for developers, and WordPress 6.3 is no exception.
Dropped Support for PHP 5
As only 3.8% of all monitored installations use PHP 5.6, the WordPress core team dropped the support for PHP 5 and raised the minimum supported version to 7.0.0. For the record, the team usually uses a 5% baseline to determine the minimum PHP version.
That said, websites that run on PHP and WordPress 6.2 will continue receiving security updates.
If you still use PHP version 5.6 or lower, we recommend updating to version 7.4 for better performance and security. Read our tutorials on how to easily change the PHP version via hPanel.
Command Palette API
The WordPress core team introduced the command palette API for this release, which allows developers to add or remove commands.
There are two types of commands for the API – static and dynamic. In addition, you can add contextual properties to the commands.
Static Commands
The static command is the simplest type to add to the command palette list. It uses the wp.data.dispatch( wp.commands.store ).registerCommand action or the wp.commands.useCommand React hook.
Here’s an example of a static command registered using the wp.commands.useCommand hook:
wp.commands.useCommand( {
	name: 'myplugin/my-command-name',
	label: __( 'Add new post' ),
	icon: plus,
	callback: ({ close }) => {
		document.location.href = 'post-new.php';
		close();
	},
} );
Dynamic Commands
Dynamic commands only appear on the Command Palette list depending on the search term input from the users. As such, dynamics commands use command loaders to register, including useCommandLoader and usePageSearchCommandLoader.
For example, here’s a snippet to register a command for a page search. It consists of two parts – the first is for retrieving the pages based on the search term, and the second is for creating the command.
function usePageSearchCommandLoader( { search } ) {
	// Retrieving the pages for the "search" term
	const { records, isLoading } = useSelect(
		( select ) => {
			const { getEntityRecords } = select( coreStore );
			const query = {
				search: !! search ? search : undefined,
				per_page: 10,
				orderby: search ? 'relevance' : 'date',
			};
			return {
				records: getEntityRecords( 'postType', 'page', query ),
				isLoading: ! select( coreStore ).hasFinishedResolution(
					'getEntityRecords',
					[ 'postType', 'page', query ]
				),
			};
		},
		[ search ]
	);

	// Creating the command
	const commands = useMemo( () => {
		return ( records ?? [] ).slice( 0, 10 ).map( ( record ) => {
			return {
				name: record.title?.rendered + ' ' + record.id,
				label: record.title?.rendered
					? record.title?.rendered
					: __( '(no title)' ),
				icon: icons[ postType ],
				callback: ( { close } ) => {
					const args = {
						postType,
						postId: record.id,
						...extraArgs,
					};
					document.location = addQueryArgs( 'site-editor.php', args );
					close();
				},
			};
		} );
	}, [ records, history ] );

	return {
		commands,
		isLoading,
	};
}

useCommandLoader( {
	name: 'myplugin/page-search',
	hook: usePageSearchCommandLoader,
} );
Contextual Commands
Contextual commands have a higher priority and they always appear on the command palette list in a given context. For example, you can set a static command with the Site Editor context property, and it will always be visible when you’re in the Site Editor.
In WordPress 6.3, there are only two contexts available:
- site-editor. Makes the commands available when users browse the Site Editor with an open navigation sidebar.
- site-editor-edit. Makes the commands available when users edit any content on the Site Editor.
To make a command contextual, simply add the context property when registering the command. For example, here’s the same static command example we had before, but with the site-editor context applied:
wp.commands.useCommand( {
	name: 'myplugin/my-command-name',
	label: __( 'Add new post' ),
	icon: plus,
	callback: ({ close }) => {
		document.location.href = 'post-new.php';
		close();
	},
	context: ‘site-editor’,
} );
Caching Improvements
The WordPress Performance team made some enhancements to the core WordPress caching system. The notable ones are improvements in WP_User_Query caching and cache group changes.
WP_User_Query Caching
WP_User_Query was the remaining class lacking database caching capabilities. Thankfully, the WordPress performance team has implemented the update in WordPress 6.3.
The implementation for WP_User_Query is similar to the other query classes – when a user sends a query, the cache stores the results from the database, and the same queries will get data from the cache. This update will reduce the overall database query load, improving the site’s performance.
For the record, WordPress already implements query caching in other classes like WP_Comment_Query, WP_Site_Query, WP_Network_Query, and WP_Term_Query.
New Groups in Cache API
Since WordPress 6.3 implements query caching for WP_User_Query, the Performance must change the cache storing approach. As a result, the WordPress team introduced six new cache groups specific to the queries. Here are the new cache groups:
- post-queries
- term-queries
- comment-queries
- network-queries (global cache group)
- site-queries (global cache group)
- user-queries (global cache group)
This update also provides greater control over cache objects, enabling you to specify expiration times for any cache group. You can also clear a specific cache group using the wp_cache_flush_group() function.
Update Your Website to WordPress 6.3 Now
Now that you know the nitty-gritty of WordPress 6.3, it’s time to prepare your website for the update.
Create a backup and use a staging environment to test WordPress 6.3 with a copy of your site. This will ensure that no compatibility issues that may affect your live site. If you find any critical error, be sure to troubleshoot it in the staging site.
Suggested Reading
Learn how to set up a WordPress staging environment and deploy the update to the live site.
Once you’re sure your website runs smoothly with the new version, implement the update to your live site.

Leo is a Content SEO Specialist and WordPress contributor. Armed with his experience as a WordPress Release Co-Lead and Documentation Team Representative, he loves sharing his knowledge to help people build successful websites. Follow him on LinkedIn.