How to install node.js on Ubuntu automatically and manually
Dec 22, 2025
/
Aris S.
/
8 min Read
Node.js is a runtime environment that provides software components and interfaces to allow JavaScript code to run properly. Setting it up in the host server is essential if your web application uses the programming language.
In this tutorial, you will learn how to install Node.js on Ubuntu virtual private server (VPS). We will cover two ways to do so — automatically by using the Hostinger operating system template and manually via command input.
We will also explore three methods for manual installation – using the Ubuntu repository, NodeSource, and Node Version Manager. These are helpful if you want to set up a specific Node.js version.

Prerequisites for Installing Node.js on Ubuntu
Before installing Node.js, ensure your VPS supports Ubuntu since the installation commands might differ on other distributions. Preferably, use a newer version like 22.04 or later to ensure proper compatibility.
Moreover, make sure you can connect to your server remotely via a secure shell (SSH) or other protocols. Your local computer must also have the PuTTY SSH client installed to access the VPS. Alternatively, MacOS and Linux users can use Terminal.
If you don’t have a hosting plan, we recommend purchasing Hostinger VPS. It supports numerous software solutions and offers remote access via SSH. Our Browser terminal also lets users connect to their server easily via their web browsers.

Before getting into the steps, we will create a new account for your Ubuntu server since using the default root user during the installation can be risky if you are not careful. After connecting to your VPS using an SSH client like PuTTY or Terminal, run the following:
adduser your-preferred-username
Enter the new user’s password and other details. Then, grant the account sudo privileges to allow it to run administrative commands:
usermod -a -G sudo your-preferred-username
Now, use this new user whenever you connect to the server via SSH. If you access the VPS as root, switch to the account using this command before doing any management task:
su your-preferred-username
How to Install Node.js on Ubuntu Automatically
Hostinger users can easily install Node.js using our VPS operating system template. They can configure Ubuntu, the JavaScript runtime, and dependencies in one click via their web browsers.
Important! Before installing an operating system template, back up your VPS files since the process will wipe your data permanently.
In addition to simplifying the process, this template makes the installation safer since you won’t run the wrong commands that might cause issues. Here’s how to do so:
- Log in to hPanel and select VPS from the top menu.
- Click Manage next to the VPS you want to install Node.js.
- Navigate to the sidebar → Settings → OS & Panel → Operating System.
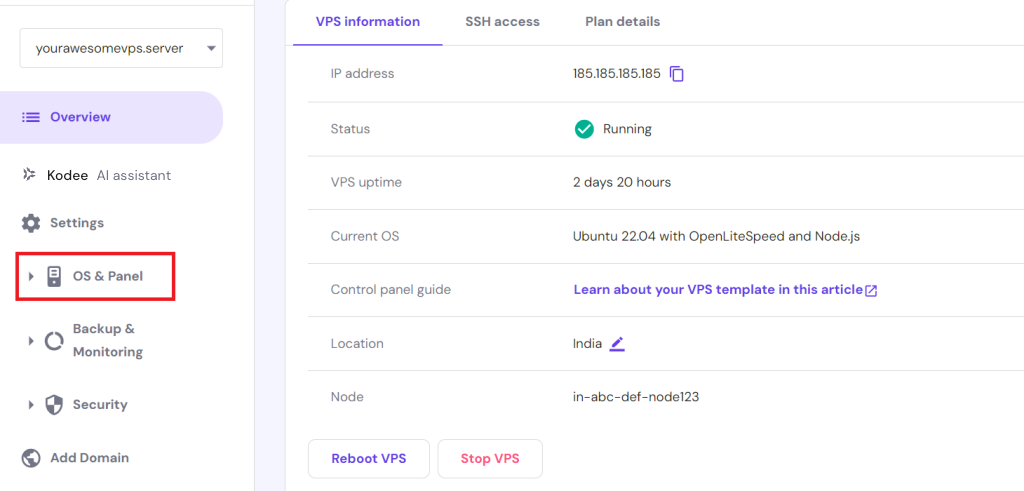
- On the operating system configuration page, click Applications
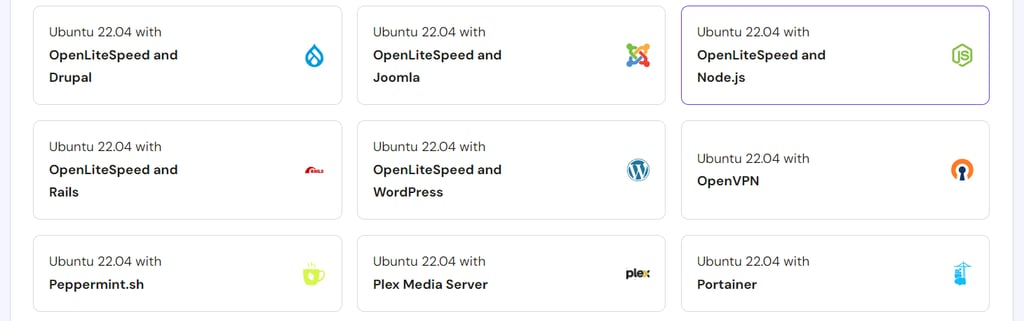
- Select the OpenLiteSpeed and Node.js template.
- Scroll down and click Change OS.
- Check the confirmation box to acknowledge the data deletion. Click Next.
- Enter a new Root password and click Confirm.
Wait a few minutes until the installation process is complete. That’s it! Now, you can start deploying JavaScript applications on your VPS.
If you need other software in addition to Node.js, use the MEAN or MEVN templates instead. They will also automatically install the Mongo.DB database and a framework like Angular or Vue.js, depending on the stack.
We also have other OS templates that come with Node.js. To list them, you can ask Kodee, our AI assistant, “List available OS templates with Node.js for my VPS.”
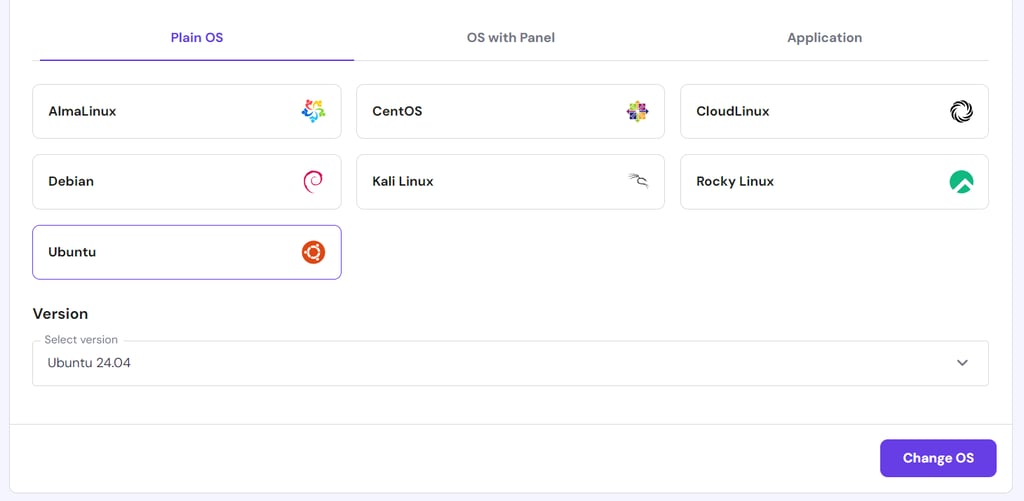
Note that you can’t install a specific Node.js version or another web server when using the operating system template. If you need to do so, select Plain OS and configure Node.js manually, which we will cover later.
How to Install Node.js on Ubuntu Manually
In this section, we will explain three methods of installing Node.js on Ubuntu using Linux commands, each suitable for configuring different versions. Before proceeding, ensure you have connected to your VPS using a superuser account.
How to Install Node.js from Ubuntu Repository
The simplest way to install Node.js manually is to use your system’s default repository. However, you can’t install a particular version and are limited only to the one your Ubuntu operating system offers.
You might also not get the newest Node.js since package availability in the Ubuntu repository depends on the developer’s update cycle. It can be a problem for an older Ubuntu installation since it might have outdated ones.
Since we will use Ubuntu 22.04, we should be able to install a more recent version of Node.js. Here are the steps:
- Update your Ubuntu’s repository to ensure you get the latest available version:
sudo apt update
- Install Node.js from the local Ubuntu repository using this command. Confirm installation by pressing Y and Enter:
sudo apt install nodejs
- Configure the Node Package Manager (NMP), which you will use to manage Node.js and JavaScript dependencies:
sudo apt install npm
- Check Node.js and NPM version numbers to verify that both are installed correctly by running these commands subsequently:
sudo nodejs -v

sudo npm -v

How to Install Node.js from NodeSource
To install a specific version of Node.js, use a third-party personal package archive (PPA) repository like NodeSource. It offers more package variations and frequent updates than the official Ubuntu repo to ensure you get the latest release.
The setup process is similar to using the Ubuntu repository, but you must add the PPA source before installing. Here are the steps:
- Install the cURL utility, which we will use to download the PPA repository. Skip this step if you have it installed:
sudo apt install curl
- Run the following to download the Node.js package. Replace 22.x with your desired version number:
sudo curl -fsSL https://deb.nodesource.com/setup_22.x | sudo -E bash -
- Update your system repository to synchronize the package:
sudo apt update
- Install Node.js and NPM by running these commands subsequently:
sudo apt install nodejs

sudo apt install npm
- Verify that Node.js and NPM are successfully installed by querying their version numbers with these commands:
sudo nodejs -v

sudo npm -v
To learn more about the supported versions and Node.js release calendar, check out the NodeSource GitHub page.
How to Install Node.js using Node Version Manager
In some cases, you might need to switch between different Node.js installations based on your project requirements. Since the previous steps configured a packaged version from a repository, you don’t have such flexibility.
The best Node.js installation method for this use case is with the Node Version Manager (NVM). This bash script lets you easily configure and manage multiple versions of the JavaScript runtime.
To set up Node.js using this method, download the NVM installation script using the following cURL command:
sudo curl -o- https://raw.githubusercontent.com/nvm-sh/nvm/v0.39.7/install.sh | bash
Replace 0.39.7 with another value if you want to download a different installation script version. Check the NVM GitHub repository to learn more about the available options.
Now, allow the NVM script to run on your current user’s bash shell:
source ~/.profile
Check whether you install NVM correctly by querying its version number:
nvm -–version

After installing NVM, follow these steps to set up Node.js:
- List all the available Node.js versions in NVM using this command. Since the output will be rather long, press Ctrl + C to terminate the process once you feel the list is sufficient:
nvm ls-remote
- Run the following command to install your desired Node.js version using the NVM script. Replace the version number with the actual value:
nvm install 22.1.0
- Query the Node.js version number to verify its installation:
node -v
If you want to install more versions of Node.js, simply rerun the nvm install command. To switch between them, use the following:
nvm use 22.0.0
Replace the number with the Node.js release you want to use. The nvm command also lets you manage multiple installations of the runtime environment. For example, run the following to list all the installed versions in your Ubuntu system:
nvm ls
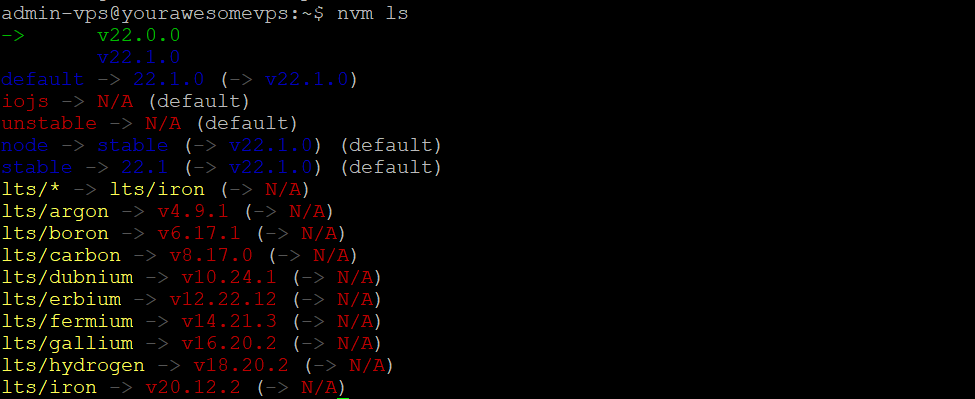
The arrow symbol indicates your currently active Node.js installation. Meanwhile, the default version shows the one that will automatically apply to a new shell. You can change it by entering:
sudo nvm alias default 22.15.0
Since keeping too many Node.js installed in your VPS might cause performance issues, we recommend removing the unused ones using the following command:
nvm uninstall 22.15
Note that NVM will remove the newer version if you have two major releases installed, like 22.15.0 and 22.15.1. If you want to uninstall both, run the command twice.
Important! NVM can’t uninstall a currently active version. Before removing an installation, ensure to switch to another release.
Node.js on Ubuntu Best Practices
As an integral part of your JavaScript application’s functionality, maintain Node.js properly after installing it. In this section, we will explain several best practices when using the runtime environment.
Utilize Package.json
Node.js and NPM let users create package.json in their project directory to define the application’s dependency list, configuration, and metadata. It helps simplify management tasks since you will only use a single file.
To create it, navigate to your project’s folder using the cd command. Then, run the following:
npm init
Open the new file using the nano text editor to add the dependency list. Here’s the command:
sudo nano package.json
You can also specify custom scripts that automate various tasks, like starting the Node.js server or running the test commands. Once finished, save the changes by pressing Ctrl + X → Y → Enter.
If you are unsure how to write the JSON configuration, use Kodee to generate it. For example, ask “Generate a package.json configuration for a Node.js application that uses the latest version of Express, Mongoose, body-parser, and dotenv as its dependencies.”

Then, simply copy and paste the configuration into your VPS. Remember that since AI updates its information slowly, double-check the version to ensure you have the latest release.
After specifying the dependencies, you can easily install them simultaneously using a single command:
npm install
To run a script, simply specify its name after npm. For instance, the following will execute the test script:
npm test
Update Node.js Regularly
Keep Node.js and NPM up to date to maintain optimal security and functionality. While you can use the APT package manager, it might not offer the newest version.
Instead, use NPM to update both software. To update the Node package manager, run the following command:
sudo npm install -g rpm@latest
To update the Node.js runtime, you need to install the n version management tool first using this command:
sudo npm install -g n
Then, download the latest Node.js version from NPM by entering the following:
sudo n latest
Query both software versions to verify the installation. We recommend regularly checking the Node.js release note page to get notified about a new version as soon as possible. Also, use long-term support (LTS) releases since they are more stable and have longer update guarantees.
In addition, periodically check for outdated packages in your package.json file. You can do so using this npm command:
npm outdated
Then, install all the available updates simultaneously using this command:
npm update
Important! Before installing a new version of Node.js, ensure your application supports it to avoid incompatibility issues.
Secure Node.js
Securing Node.js and its components is crucial since this runtime environment is susceptible to various injection attacks like cross-site scripting (XSS). In addition to updating, there are additional measures to consider.
If you use the package.json file, run the following command to list all security vulnerabilities in your application’s dependencies:
npm audit
You can then take necessary precautions to safeguard your project based on these insights. Also, run the following to remove unnecessary packages that are not dependencies, which can present security risks:
npm prune
Moreover, conduct regular log audits to catch unauthorized events, which can indicate security incidents. Since Node.js doesn’t offer such a feature by default, configure a third-party tool like Winston.
In addition, implement other basic VPS security measures like installing a secure sockets layer (SSL) certificate, setting up Fail2Ban, and enforcing firewall rules for your network interfaces.
We also recommend checking the Node.js security best practices documentation to learn more about the software’s current threat models and their recommended solutions.
Conclusion
Installing the Node.js runtime environment is crucial for your JavaScript application’s functionality. Hostinger users can easily do so by choosing the Ubuntu 22.04 with Node.js template in hPanel.
Alternatively, users who prefer another version of Node.js can install it manually using commands. After connecting to the VPS via SSH, configure it from the Ubuntu repository using the APT package manager.
If you want to select a specific version, download the NodeSource PPA and configure Node.js from the repo. Should you need to install multiple Node.js versions, use the NVM method. After downloading the script, run the nvm install command to configure the runtime environment.
How to Install Node.js on Ubuntu FAQ
To deepen your understanding, this section will answer several questions about installing Node.js on an Ubuntu machine.
What Version of Node.js Will Be Installed by Default on Ubuntu?
It depends on the Ubuntu version and the developer update cycle. For example, currently installing Node.js from the Ubuntu 22.04 default repository will configure version 12.22.9.
How Do I Uninstall Node.js From My Ubuntu System?
Use the apt remove or apt purge command if you want to delete the configuration file as well. If you use nvm, run nvm uninstall followed by the version number.
In Which Directory Is Node.js Installed on Ubuntu?
It depends on the installation method. If you configure the runtime via the NodeSource repository, Node.js is under /usr/local/bin/node. However, installing it via APT will put it under /usr/bin/node. To check the location, you can run the which node command.
All of the tutorial content on this website is subject to Hostinger's rigorous editorial standards and values.

Aris is a Content Writer specializing in Linux and WordPress development. He has a passion for networking, front-end web development, and server administration. By combining his IT and writing experience, Aris creates content that helps people easily understand complex technical topics to start their online journey. Follow him on LinkedIn.