WordPress missed schedule: possible causes and 5 steps to fix it
Jul 03, 2024
/
Domantas G. & Brian
/
5 min Read
Encountering a WordPress missed schedule error can be frustrating for any site owner. It prevents scheduled posts from being published on time, disrupting your content planning process.
This article will examine a few possible causes of the WordPress missed schedule error. Then, we will cover five debugging methods to fix the WordPress scheduled posts not publishing error and prevent it from happening again.
How to Fix the WordPress Missed Schedule Error
1. Check for server issues
2. Check for conflicts with other plugins and try disabling any that could be interfering with the scheduling feature
3. Install a missed schedule fix plugin like WP Missed Schedule or Missed Schedule Fixer
4. Replace WP-Cron with a server cron
5. Manually publish the missed post by editing the post’s publish date and time in the post editor
What is WordPress Missed Schedule
WordPress missed schedule error happens when the cron job that publishes your content fails to function properly. WordPress runs a system called WP-cron to help users automate repetitive tasks, such as publishing scheduled posts.
However, unlike a server-side cron job that executes tasks based on a set schedule, the WordPress version relies on page loads to trigger the events.
For example, you scheduled a blog post to publish at 10am. But if no one visits your site at that time, the cron won’t activate, leading to a missed scheduled post error.
Other reasons that might cause the WordPress missed schedule error:
- Incorrect settings. Selecting the wrong timezone can prevent WordPress from publishing scheduled posts at the right time.
- Expired cache. Outdated content might interfere with the cron processes, resulting in failed automated tasks.
- Limited memory. A low memory limit is a WordPress critical error that users might encounter when publishing scheduled posts.
Suggested Reading
Learn how to set up and manage a WordPress cron job for improved efficiency.
How to Fix the WordPress Missed Schedule Error
This section covers five possible solutions to fix the missed schedule error in WordPress, from checking the WordPress settings to using a server-side cron.
1. Check Your WordPress Settings
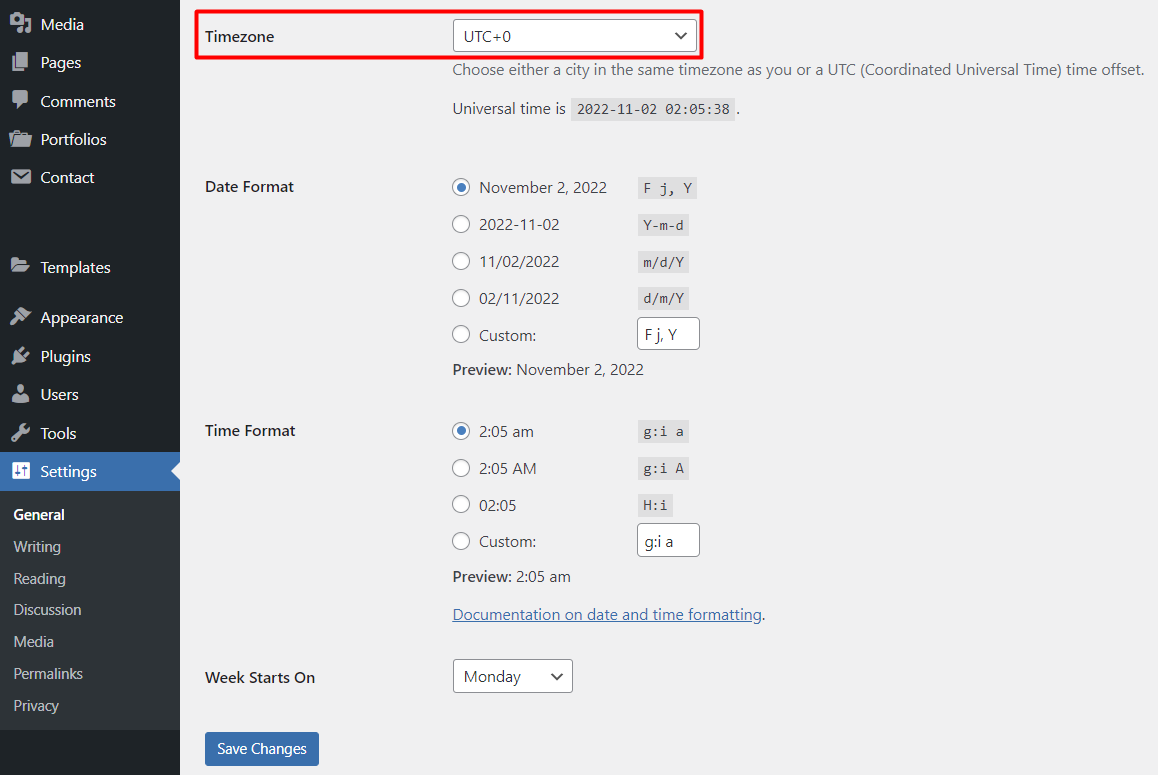
The first step is to inspect your WordPress timezone settings. Make sure it is properly configured to prevent scheduling mistakes:
- Open the WordPress dashboard.
- Go to Settings → General.
- Scroll down to Timezone.
- Select a city within your timezone or choose a Coordinated Universal Time (UTC) offset.
- Click Save Changes.
After setting the timezone correctly, create another scheduled WordPress post to see if it resolves the error.
Suggested Reading
Check out our guide on setting the PHP timezone and configuring the WordPress date format to make your website more accessible to a global audience.
2. Clear WordPress Cache
While the cache helps websites load faster, it may contain outdated content that interferes with WordPress cron jobs. As a result, they cannot properly execute scheduled tasks.
To clear cache in WordPress, use caching plugins like W3 Total Cache:
- Log in to your WordPress dashboard.
- On the left navigation menu, select Plugins → Add New.
- Search for “W3 Total Cache” and click Install Now.
- Once installed, press Activate.
- Head to Performance → Dashboard.
- Select empty all caches.

If this method works, clear your cache regularly to prevent the WordPress missed schedule error from occurring again.
For Hostinger users, the Cache Manager feature on hPanel can automate the process every 30 minutes. To enable this functionality, follow these steps:
- On hPanel, head to Hosting → Manage.
- Scroll down to Advanced on the left sidebar.
- Open Cache Manager.
- Activate the Automatic cache toggle.

Alternatively, Hostinger users can enable No-cache mode to bypass the cache. Navigate to your Dashboard on hPanel and click the toggle button under the No-cache mode section. This mode also disables server cache, browser cache, CDN and your active WordPress cache plugins for 24 hours.

3. Increase WordPress Memory Limit
The next troubleshooting method involves checking the web server’s memory limit.
Since WordPress uses Hypertext Preprocessor (PHP) as its core scripting language, you’ll need to inspect the current PHP memory limit:
- From the WordPress dashboard, access Tools → Site Health.
- Select Info and scroll down to Server.
- Locate the PHP memory limit section.

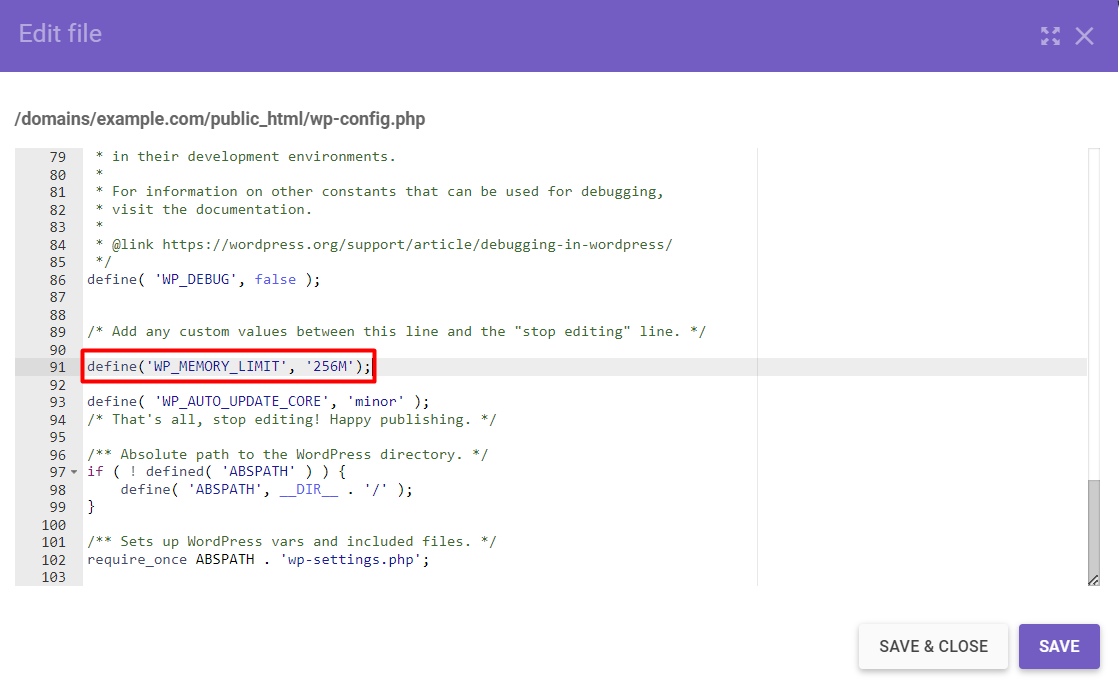
If your memory limit is under 256 MB, we recommend increasing it.
Here’s how to do it via hPanel:
- Go to Hosting → Manage → Files → File Manager.
- Open the public_html folder and locate the wp-config.php file.
- Copy the following code:
define('WP_MEMORY_LIMIT', '256M');- Paste it into the PHP file before the “That’s all, stop editing! Happy publishing” message.
- Click Save.
4. Use a WordPress Missed Schedule Plugin
If none of the previous solutions work, consider using plugins to fix the missed schedule error. Here are a couple of our recommendations:
- Scheduled Post Trigger. When a user visits your site, Scheduled Post Trigger will check if the WordPress cron jobs miss scheduled posts and immediately publish them. But since this plugin relies on web visitors to work, we only recommend it for high-traffic websites.
- Missed Scheduled Posts Publisher. For a new WordPress site with lower traffic, Missed Scheduled Posts Publisher is the best option. It will automatically review and publish missed posts every 15 minutes, regardless of traffic.
Install one of the plugins via the WordPress plugin directory. Once activated, no additional configurations are required. Simply create a new scheduling task to see if the WordPress missed schedule error disappears.
5. Replace WP-Cron With a Server Cron
If the problem persists, replace WP-cron with a server-side cron as a last resort.
Unlike the WordPress version, a server-side cron will automate tasks at a scheduled date or time, regardless of whether a user visits your site.
For instance, a user sets the interval to one month. Then, the server-side cron will check and automatically publish missed posts monthly, even if there are no visitors.
Fortunately, most hosting providers allow users to set up a server-side cron. To do it via hPanel, follow this guide:
1. Disable WP-Cron
Before setting up a server cron, disable the WP version first to avoid conflicts.
- Access File Manager.
- Open the wp-config.php file in your root folder.
- Add the following code before the “That’s all, stop editing!” line:
define('DISABLE_WP_CRON', true);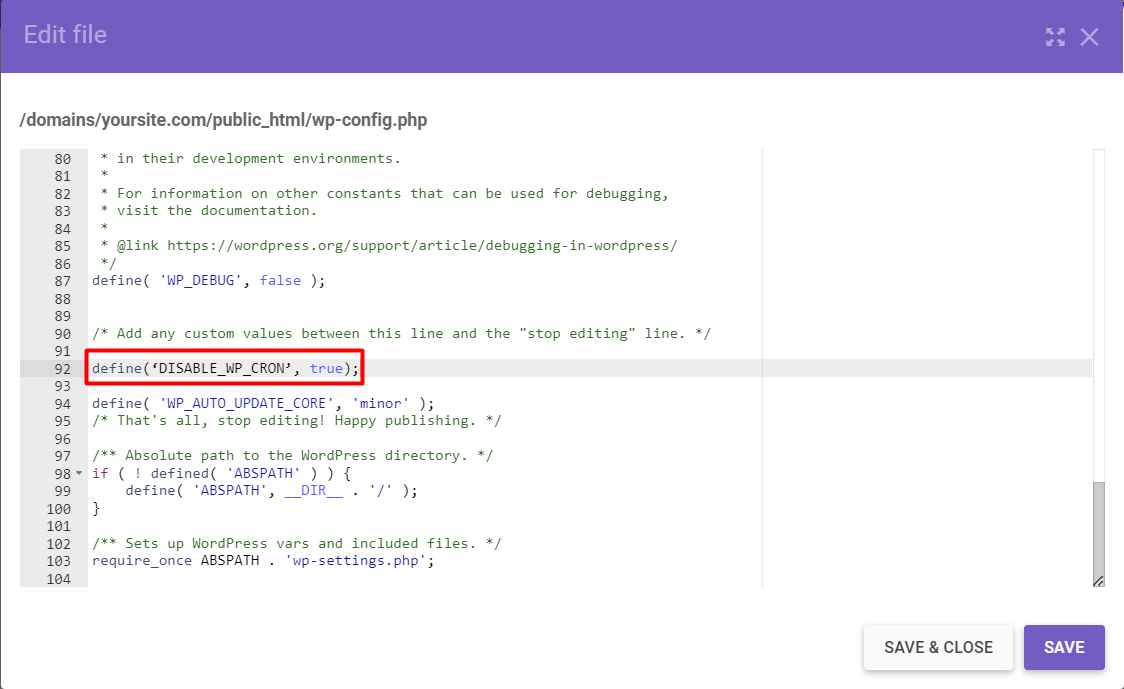
2. Set Up a Cron Command
Follow these steps to set up a real cron job via hPanel:
- Head to Advanced → Cron Jobs.
- Select Custom and enter the following line to the Command to run box:
wget -O /dev/null -o /dev/null https://yoursite.com/wp-cron.php?doing_wp_cron
Make sure to replace the yoursite.com placeholder with your site’s URL.
- Choose one of the Common options to specify the interval. We recommend Twice an hour.
- Click Save.
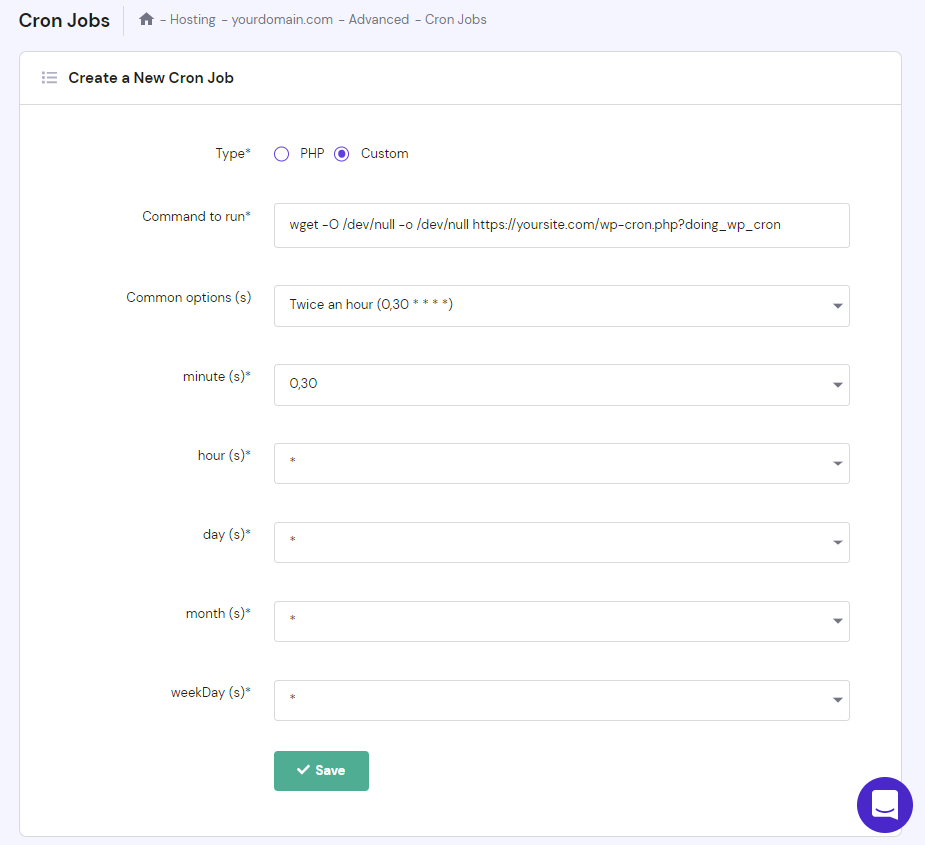
Once saved, the cron job will automatically check for a missed scheduled post every 30 minutes.
If your web hosting provider doesn’t allow users to create custom cron jobs, use tools like EasyCron or cron-job.org.

Conclusion
Posting blog posts consistently lets WordPress site owners establish a strong online presence and build a loyal reader base. Therefore, knowing how to schedule posts on WordPress will be useful in the long run.
Although WordPress has a feature to automate publishing, sometimes, you may encounter an error.
Fortunately, there are some methods to fix the WordPress missed schedule error:
- Select the correct timezone.
- Clear the cache on your WordPress website using a caching plugin or via the hosting account.
- Increase the site’s memory limit.
- Use a missed schedule plugin, like Scheduled Post Trigger.
- Disable WP-cron and set up a server-side one.
We hope this article can help you avoid WordPress missed schedule issues in the future. But if the problem still occurs, contact your web host to see if they have better solutions. Good luck.
Learn How to Solve Other WordPress Errors
How to Fix “Error Establishing A Database Connection” in WordPress
How to Fix HTTP Error 500 in WordPress
How to Fix WordPress HTTP Error When Uploading Images
WordPress Permalinks Not Working
How to Fix the upload_max_filesize Error
How to Solve “Parse Error: Syntax Error, Unexpected”
All of the tutorial content on this website is subject to Hostinger's rigorous editorial standards and values.

Domantas leads the content and SEO teams forward with fresh ideas and out of the box approaches. Armed with extensive SEO and marketing knowledge, he aims to spread the word of Hostinger to every corner of the world. During his free time, Domantas likes to hone his web development skills and travel to exotic places.

Brian is a Content Writer who loves telling complex stories in a simple way. He has written all types of content, including tutorials, blog posts, landing pages, social media posts, white papers, infographics, and YouTube scripts. Follow him on LinkedIn.


