How to connect PHP to MySQL database
Dec 22, 2025
/
Domantas G.
/
5 min Read
For beginners in website development, understanding how to use PHP scripts to connect to MySQL can be highly advantageous. This enables you to modify, view, or manage the tables within the MySQL database. In this article, we’ll guide you through the simplest methods to achieve this. Let’s get started!

Creating a MySQL Database (Optional)
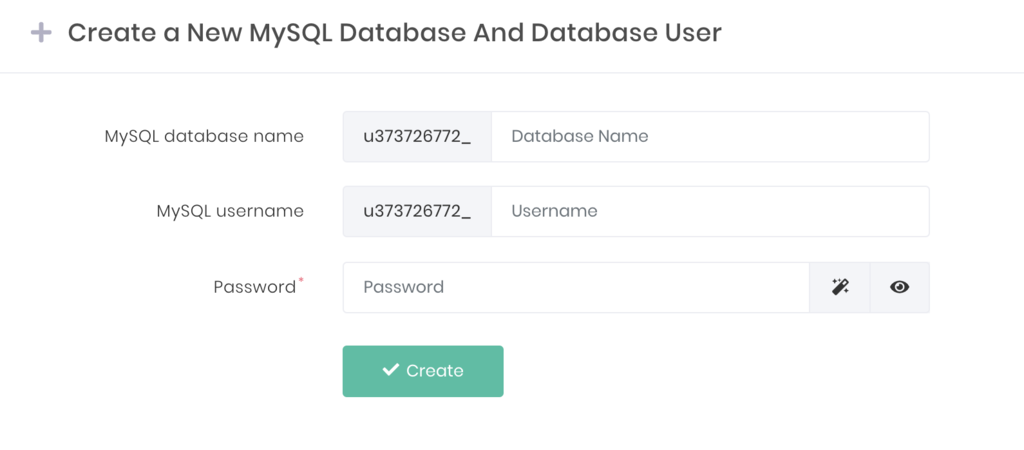
This step is required if you do not have a MySQL database. If you are a Hostinger user, you can easily make a new one via Hostinger’s hPanel in a few steps:
- Locate MySQL Databases menu under the Databases section.
- Fill in the necessary fields and hit Create.

Important! Write down the credentials of the MySQL database you just created for the next step. Don’t forget to remember the database username and username password as well!
Two Ways a PHP Script can Connect to MySQL
There are two methods to connect to a MySQL database using PHP: MySQLi and PDO.
MySQLi stands for MySQL Improved. It is a MySQL-exclusive extension that adds new features to a MySQL database’s interface. MySQLi is both procedural and object-oriented, with the former being the attribute inherited from the older version of MySQL.
The original MySQL breaks down a task into linear, step-by-step procedures, which makes it difficult to modify because you have to edit the code from the top. Meanwhile, MySQLi sees data as a set of interchangeable objects with functions, allowing users to add or remove data easily.
PDO stands for PHP Data Object. Unlike MySQLi, PDO is only object-oriented and supports a number of different database types that use PHP, such as MySQL, MSSQL, Informix, and PostgreSQL.
Important! The original mysql_ functions are deprecated and should not be used as they are unsafe and no longer being maintained or developed.
One of the most important features they both support is prepared statements, which accelerates the time needed for MySQL to execute the same query multiple times. It is also used to prevent SQL injection attacks when making changes to the database or inserting user-supplied input into a database query or statement.
Whichever method you use, you will need the correct information so you can connect to the MySQL database you have made. This is where the MySQL database details you have previously saved come in handy.
You also need the correct server name or hostname for the configuration. Hostinger uses “localhost” as its MySQL server’s hostname. In general, this is the name that you’ll want to use if you uploaded your PHP script to the same server as the database.
In contrast, if you’re using a MySQL remote connection to connect to a database, you will have to use the IP address of the MySQL server. For more details, contact your hosting provider so they could provide you with the correct information on what to use as the hostname.
Using MySQLi to Connect a PHP Script to MySQL
Follow these steps to use MySQLi to connect a PHP script to MySQL:
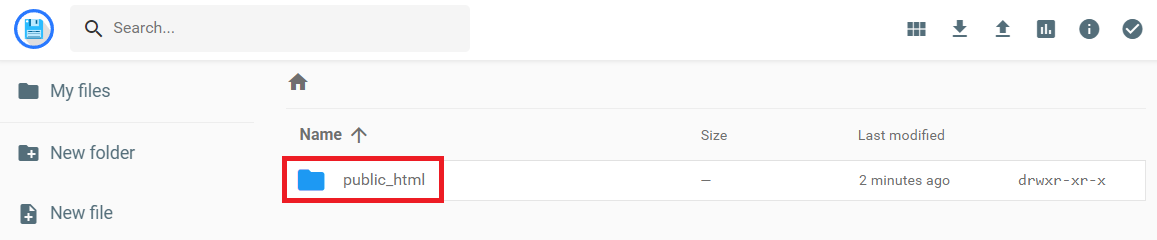
- Head over to File Manager -> public_html.
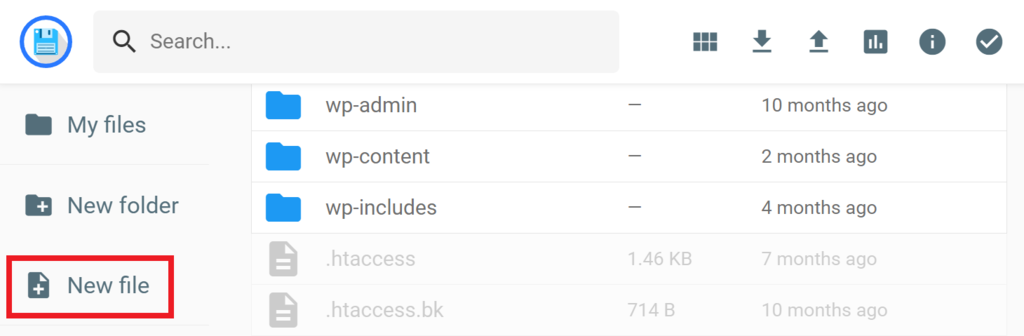
- Create a New File by clicking the icon from the sidebar menu.
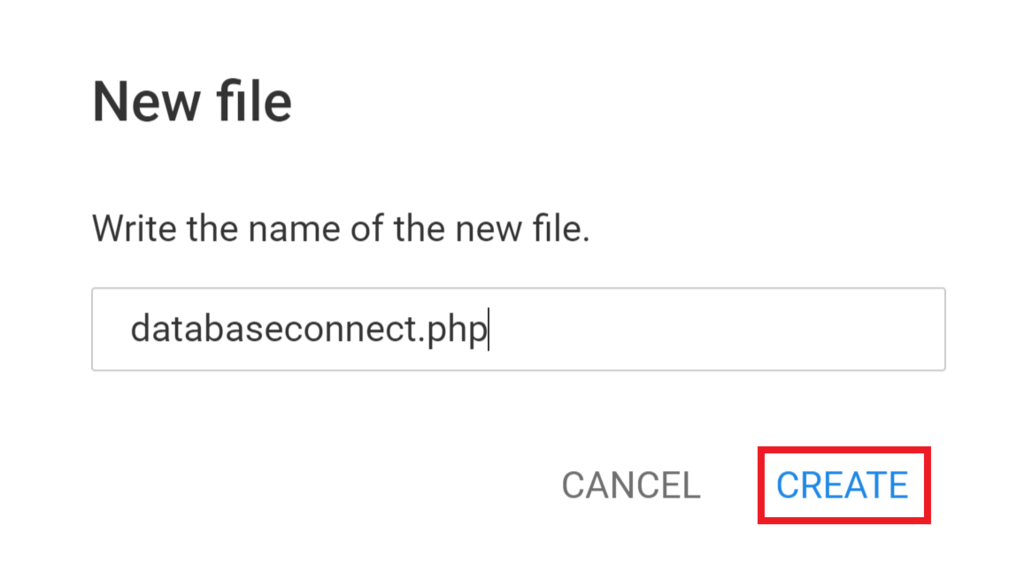
- Save the file as databaseconnect.php. You can replace the name with whatever you like, just make sure it is using php as the extension.
- Double-click to open the file and copy-paste the following lines of code into it. Change the first four values below <?php with the credentials you noted earlier:
<?php
$servername = "localhost";
$database = "u123456789_DatabaseName";
$username = "u123456789_User";
$password = "MyStr0ngPa$!";

// Create connection

$conn = mysqli_connect($servername, $username, $password, $database);

// Check connection

if (!$conn) {

    die("Connection failed: " . mysqli_connect_error());

}
echo "Connected successfully";
mysqli_close($conn);
?>
MySQLi Code Explained
The main method used in this script is mysqli_connect(). This is an internal PHP function to establish a new connection to a MySQL server.
At the beginning of our code, we see a few variable declarations and values assigned to those variables. Usually, we need four of them to establish a proper database connection: $servername, $database, $username, and $password. In the code, we set our database details as values for those variables, so they can be passed into the function.
If the connection is not successful, the die() function is executed. This basically kills our script and gives us a connect error message that we have set. By default, the MySQL connect error will say Connection failed followed by an exact error message describing the issue.
On the other hand, if the MySQL connection is successful, the code will print Connected successfully instead.
The last part of the code is mysqli_close, which will simply close the connection to the database manually. If not specified, the MySQL connections will close by itself once the script ends.
Using PDO to Connect a PHP Script to MySQL
The other method using PHP script to connect to MySQL is by using PDO. This is similar to the previous method, but with a slight variation:
- In the public_html, create a file named pdoconfig.php and insert the following code. As always, don’t forget to replace the placeholder values with your database information. Save and Close it once you’re done:
<?php
$host = "localhost";
$dbname = "u123456789_DatabaseName";
$username = "u123456789_User";
$password = "MyStr0ngPa$!";
- Create another file named databaseconnect.php in the same directory, but with the following code. If you named the previous file differently, make sure to change the value of require_once.
<?php
require_once 'pdoconfig.php';

try {
$conn = new PDO("mysql:host=$host;dbname=$dbname", $username, $password);
echo "Connected to $dbname at $host successfully.";
} catch (PDOException $pe) {
die ("Could not connect to the database $dbname :" . $pe->getMessage());
}
PDO Code Explained
A PDO database connection requires you to create a new PDO object with a Data Source Name (DSN), Username, and Password.
The DSN defines the type of database, the name of the database, and any other information related to the database if required. These are the variables and values we stated inside the dbconfig.php file, referenced one time by the line require_once in the databaseconnect.php.
In the latter, you will find the try…catch.. code. This means that the script will try to MySQL connect using the code provided, but if there is a problem, the code in the catch section will run. You can use the catch block to display connect error messages or run alternate code if the try block fails.
If the connection is successful, it will print out the message “Connected to $dbname at $host successfully.” However, if the attempt fails, the catch code will show a simple error message and kill the script.
Unlike when using MySQLi, after you’re finished using a PDO script, you don’t need to manually close the connection. It is automatically closed when the PDO object is destroyed, or your script ends.
Checking Connectivity and Troubleshooting Common Errors
To check whether the connection is successful, access your domain like so: yourdomain/databaseconnect.php. If you name the PHP file with something different, make sure to change it accordingly.
You will see “Connected successfully” or variants of this message if everything is running without any issue.
Now if the connection was not successful, you will see something different. The error messages look slightly different for MySQLi and PDO.
Incorrect Password Error
This error happens if we change the password or any credential in the PHP code (but do not change it in the actual database).
In case you see an “Access denied” or “Could not connect to database” message accompanied by “(using password: YES)” at the end, the first thing to do is to check the database details. There could be a typo or a part that’s missing.
Cannot Connect to MySQL Server
If you get “Can’t connect to MySQL server on ‘server’ (110)” in MySQLi, it means the script did not get a response from a server. This happens when we set “server” instead of “localhost” as the $servername, and this name is not recognized.
The error message in PDO will look like “Connection failed: SQLSTATE[Hy000] [2002]” followed by more details stating that the My SQL host was not found. But the way to troubleshoot it is the same as the above.
And of course, it is always important to remember one golden rule of troubleshooting an error: checking your site error log.
The log can be found in the same folder where the script is running. For example, if we are running a script in public_html, we will find the error_log in the same folder.
Conclusion
In this tutorial, we have learned the very basic knowledge about how to connect a PHP script to a MySQL database using MySQLi and PHP Data Objects (PDO).
Hopefully, this guide was helpful for those who are just starting out with web development. After all, connecting to a database is the first, most important step when working with more advanced scripts and configurations.
Let us know in the comments below if you face any issue following this guide.
All of the tutorial content on this website is subject to Hostinger's rigorous editorial standards and values.

Domantas leads the content and SEO teams forward with fresh ideas and out of the box approaches. Armed with extensive SEO and marketing knowledge, he aims to spread the word of Hostinger to every corner of the world. During his free time, Domantas likes to hone his web development skills and travel to exotic places.