How to set up 301 redirects in WordPress
Nov 19, 2025
/
Brian & Ariffud M.
/
6 min Read
When you move or delete WordPress content, broken links damage your SEO and frustrate users unless you set up 301 redirects in WordPress.
These redirects automatically route visitors from outdated URLs to the correct pages, preserving your search rankings and eliminating 404 errors.
Three of the most effective methods to set up 301 redirects in WordPress are:
- Using a plugin. Install a tool like AIOSEO or 301 Redirects and simply input the old and new URLs into a visual dashboard, letting the software handle the technical details.
- Editing the .htaccess file. Access your server’s root directory and manually add Apache rewrite rules to the configuration file to reroute traffic before WordPress loads.
- Writing a PHP script. Insert a specific code snippet into your theme’s header file to send a header response that forces the redirect programmatically.
What is a 301 redirect in WordPress?
A 301 redirect in WordPress is a permanent forwarding code that tells browsers and search engines that a web page has moved to a new URL.
When a user or search engine crawler tries to access the old URL, the server responds with a 301 Moved Permanently status code and automatically routes them to the new location.
This process is crucial for user experience and SEO because it prevents 404 Not Found errors and passes link equity (ranking power) from the old URL to the new one.
Why you should create 301 redirects
You should create 301 redirects to preserve SEO value, maintain a smooth user journey, and effectively manage your site’s architecture.
Specifically, these redirects help you:
- Preserve SEO value. A 301 redirect passes the majority of a page’s ranking authority to the new URL, so you don’t lose your hard-earned search positions.
- Improve user experience. Instead of hitting a dead end (404 error), visitors are automatically sent to the relevant content they were looking for.
- Maintain current content. The redirect allows you to update or remove outdated posts while still capturing the traffic intended for those pages.
- Handle permanent site changes. It is essential for structural changes, such as moving to a new domain or changing your URL slug structure.
- Consolidate content. If you have multiple pages competing for the same keywords, redirecting them to a single authoritative page eliminates keyword cannibalization.
When you should use 301 redirects
You should use 301 redirects when a page has moved permanently to a new URL to transfer link equity and preserve SEO value.
- Website migration. When moving to a new domain, 301s help Google index the new site while dropping the old one without losing rank.
- URL changes. If you optimize a slug, for example from /2023-post to /guide, a redirect links the old address to the new one.
- HTTP to HTTPS. To maintain security, you must redirect all insecure HTTP traffic to the encrypted HTTPS version.
- Site redesign. If your site structure changes significantly, redirects help map old categories or pages to their new locations.
- Content consolidation. When merging three short articles into one comprehensive guide, redirect the old URLs to the new master post.
- Broken or outdated links. Instead of leaving a 404 error for deleted pages, redirect users to the most relevant existing content. Only redirect to the homepage as a last resort.
- Fixing typos. If you accidentally published a URL with a typo, a redirect guarantees that anyone who bookmarked the bad link will still find the content.
How to set up a redirect with a WordPress plugin
Setting up a redirect using a WordPress plugin typically involves the following steps:
- Install and activate. Download a redirection plugin from the WordPress repository.
- Access settings. Locate the plugin in the dashboard, usually under Tools or a dedicated menu.
- Configure the rule. Enter the Source URL (old) and Target URL (new).
- Save and test. Save the redirect and visit the old link to verify it works.
Popular WordPress redirection plugins are AIOSEO and 301 Redirects. AIOSEO is a comprehensive SEO suite that includes redirection in its premium plans, while 301 Redirects is a dedicated, lightweight tool often used specifically for this one function.
How to set up 301 redirects using the AIOSEO plugin
Setting up a 301 redirect using AIOSEO requires purchasing the AIOSEO Pro or Elite version.
- Navigate to All in One SEO → Redirects in your WordPress dashboard.
- Click the Activate Redirects button if this is your first time using the feature.
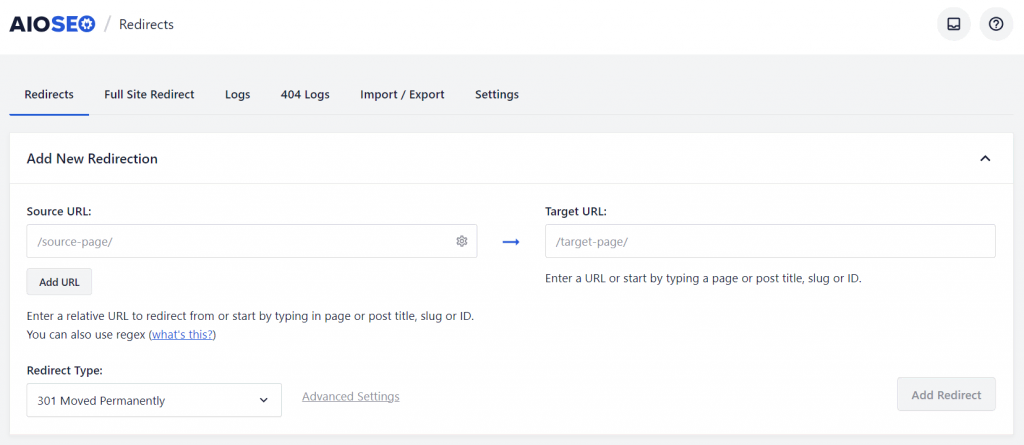
- In the Add New Redirection form, enter the old address in the Source URL field.
- Enter the new destination in the Target URL field.
- Verify that 301 Moved Permanently is selected in the Redirect Type dropdown.
- Click Add Redirect.
How to set up 301 redirects using the 301 Redirects plugin
To set up a 301 redirect using the 301 Redirects plugin, follow these steps:
- Install and activate the plugin from Plugins → Add New in your dashboard.
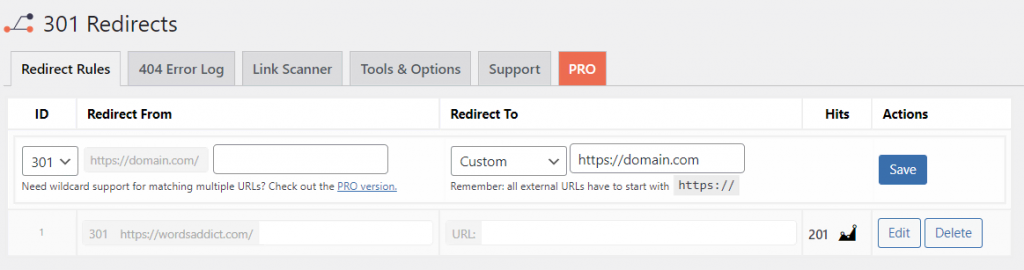
- Go to Settings → 301 Redirects.
- Enter the old URL in the Redirect From field.
- Enter the new URL in the Redirect To field.
- Check that the dropdown menu is set to 301.
- Click Save.
How to set up 301 redirects manually by editing the .htaccess file
To create a 301 redirect manually by editing the .htaccess file, you must access your server files directly. This method is faster for the server as it processes the redirect before loading WordPress.
Important! This method only works on Apache and LiteSpeed servers. Some WordPress hosting providers use NGINX servers, which don’t have .htaccess files. If you don’t see this file in your root directory, check your hosting control panel for built-in redirect tools instead.
- Access your website files using the File Manager in your hosting control panel or an FTP client like FileZilla.
- Open the public_html directory.
- Locate the .htaccess file. If you do not see it, verify your file manager is set to show hidden files.
- Create a backup of the .htaccess file before making any changes. A single syntax error can make your entire site inaccessible.
- Right-click the file and select Edit.
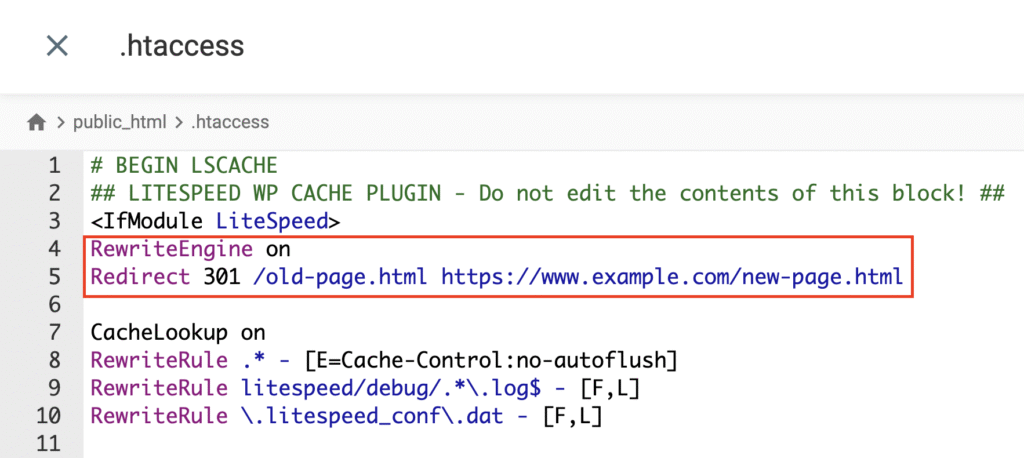
- Verify the rewrite engine is enabled by checking for the line RewriteEngine on.
- Add your redirect rules before the # BEGIN WordPress line so that they process correctly. Use the following format:
Redirect 301 /old-page.html https://www.example.com/new-page.html
- Save the file and test the redirect in your browser.
How to set up 301 redirects using a PHP script
To implement a 301 (permanent) redirect using a PHP script, use the header() function to send the correct HTTP status code and the new location.
The PHP redirect method is useful if you want to perform a redirect from a specific template file or logic within your theme.
- Access your theme files via File Manager or the WordPress Theme File Editor.
- Open the specific PHP file where the redirect should occur (or create a new one).
- Insert the following code at the very top of the file, before any HTML output:
<?php
    // Permanent 301 Redirect
    header("HTTP/1.1 301 Moved Permanently");
    header("Location: https://www.example.com/new-target-url");
    exit();
    ?>
Please note that the exit() function is critical. It stops script execution after the redirect, preventing any additional code from running that could interfere with the redirect.
How to set up 301 redirects using hPanel
For Hostinger WordPress hosting customers, you can set up a 301 redirect in hPanel safely without manual coding.
This server-level approach is simpler than editing .htaccess manually and includes error checking to prevent syntax issues.
For a detailed walkthrough, read our guide on how to set up a redirect in Hostinger.
What are other types of redirect codes?
Other types of redirect codes include HTTP 302 (Found), 303 (See Other), 307 (Temporary Redirect), and 308 (Permanent Redirect), as well as non-HTTP methods like meta refresh and JavaScript redirects.
These codes serve specific technical purposes distinct from the standard 301.
302 redirect
A 302 redirect is a temporary redirect that signals a web page has moved to a different URL for a short time.
Search engines follow 302 redirects but treat them differently than 301s – they may temporarily index both the old and new URLs and won’t transfer full link equity to the new location, since the move is expected to be reversed.
Use this when you are temporarily updating a page or running a brief A/B test.
303 redirect
A 303 redirect is an HTTP status code that means “See Other.” It instructs the browser to use a GET request to a new URL to retrieve the resource, rather than using the original method (like POST).
It is commonly used after a successful form submission (like a credit card payment) to prevent the browser from re-submitting sensitive data if the user refreshes the page.
307 redirect
A 307 Temporary Redirect is an HTTP status code that tells a browser to temporarily go to a different URL to find the requested resource, without changing the request method.
Unlike 302, a 307 redirect guarantees that the method (POST or GET) remains the same. This is intended for temporary alterations where you plan to return the content to its original URL soon.
308 redirect
A 308 redirect is a permanent redirect similar to 301, with one key difference: it preserves the HTTP request method.
If the original request was a POST, it remains a POST (unlike 301, which converts it to GET). This is useful for API endpoints and form submissions that have permanently moved to a new location.
Next steps: Strengthen your WordPress site’s SEO
Fixing broken links with 301 redirects is a critical first step in technical site maintenance. Once your URL structure is secure and users and search engines can see the right content without hitting dead ends, the next priority is improving your site’s visibility and rankings.
You should now focus on optimizing your content, page speed, and site architecture to drive more organic traffic.
To move forward, explore our complete guide on WordPress SEO tips, which shows you how to master basic SEO steps, optimize on-page elements like titles and images, improve technical factors like site speed, and maintain your site’s performance over time.
All of the tutorial content on this website is subject to Hostinger's rigorous editorial standards and values.

Brian is a Content Writer who loves telling complex stories in a simple way. He has written all types of content, including tutorials, blog posts, landing pages, social media posts, white papers, infographics, and YouTube scripts. Follow him on LinkedIn.

Ariffud is a Technical Content Writer with an educational background in Informatics. He has extensive expertise in Linux and VPS, authoring over 200 articles on server management and web development. Follow him on LinkedIn.


