How to install Docker on Ubuntu (Manual installation and VPS template)
Aug 08, 2025
/
Ariffud M.
/
8 min Read
Installing Docker on Ubuntu lets you run containers to build, test, and deploy applications in a clean, consistent environment.
To install Docker on Ubuntu, make sure your system is running a supported version like Ubuntu 22.04 LTS or 24.04 LTS. Then, follow the manual installation steps to set up required packages, add Docker’s official GPG key, and install Docker Engine.
If you’re a Hostinger customer, you can install Docker on your Ubuntu VPS in just a few clicks using our preconfigured template.
Scroll down as we walk you through both methods, share helpful Docker configuration tips after installation, and demonstrate how to troubleshoot common setup issues.
Download free docker cheat sheet
Prerequisites for installing Docker on Ubuntu
Before installing Docker on Ubuntu, make sure you meet the following prerequisites:
- Familiarity with Docker basics, which will help you understand what you’re setting up and why each step matters.
- Basic knowledge of Linux commands, especially if you’re following the manual installation approach, as you’ll be running several commands in the terminal.
- A supported Ubuntu version, like Ubuntu 22.04 LTS or Ubuntu 24.04 LTS. Always check Docker’s official documentation for the latest compatibility details.
- A system with at least 512 MB of RAM. For smoother performance and real-world usage, we recommend installing Docker on a system with at least 2 GB of RAM.
How to install Docker manually
If you prefer a hands-on approach, this section guides you through manually installing Docker on an Ubuntu 24.04 distribution. The same steps apply to other supported Ubuntu versions, such as 22.04.
1. Install all necessary packages
To start installing Docker, verify that your system is up to date and has all the required packages installed.
- Open your terminal and connect to your VPS using SSH. Replace username and your_server_ip with your credentials:
ssh username@your_server_ip
- Update your package list to ensure your server uses the newest versions of packages and their dependencies:
sudo apt update && sudo apt upgrade -y
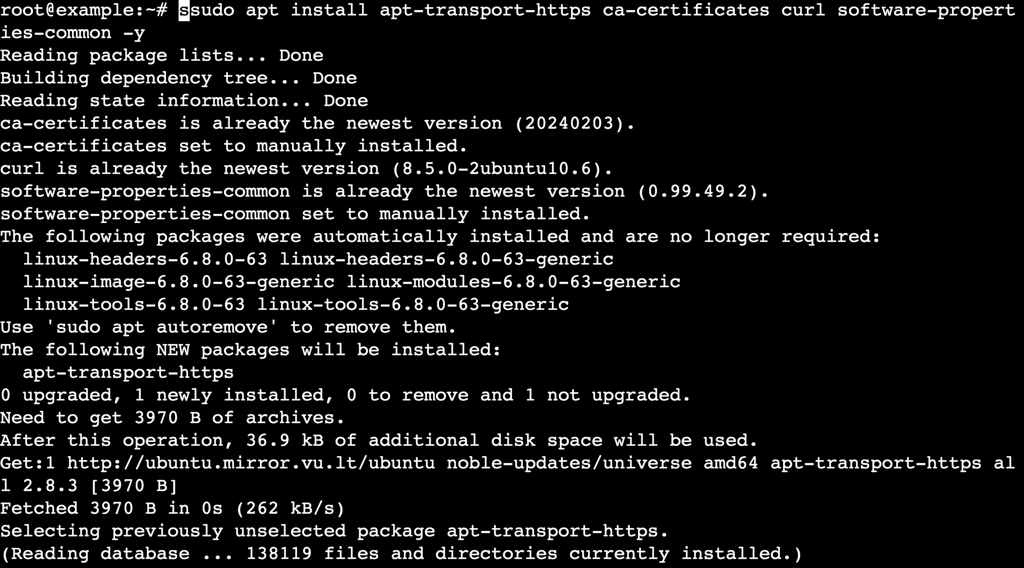
- Install the necessary packages to allow apt to use repositories over HTTPS:
sudo apt install apt-transport-https ca-certificates curl software-properties-common -y
2. Add Docker’s official GPG key
To ensure the authenticity and security of the Docker packages, you need to add Docker’s official GPG key and set up the Docker repository.
- Run the following cURL command to add Docker’s GPG key:
curl -fsSL https://download.docker.com/linux/ubuntu/gpg | sudo gpg --dearmor -o /usr/share/keyrings/docker-archive-keyring.gpg

- Add the official Docker repository to your APT sources:
echo "deb [arch=amd64 signed-by=/usr/share/keyrings/docker-archive-keyring.gpg] https://download.docker.com/linux/ubuntu $(lsb_release -cs) stable" | sudo tee /etc/apt/sources.list.d/docker.list > /dev/null
- Update your package list to include packages from the new repository:
sudo apt update
3. Install Docker Engine
With the necessary repositories set up, you can now proceed to install Docker Engine.
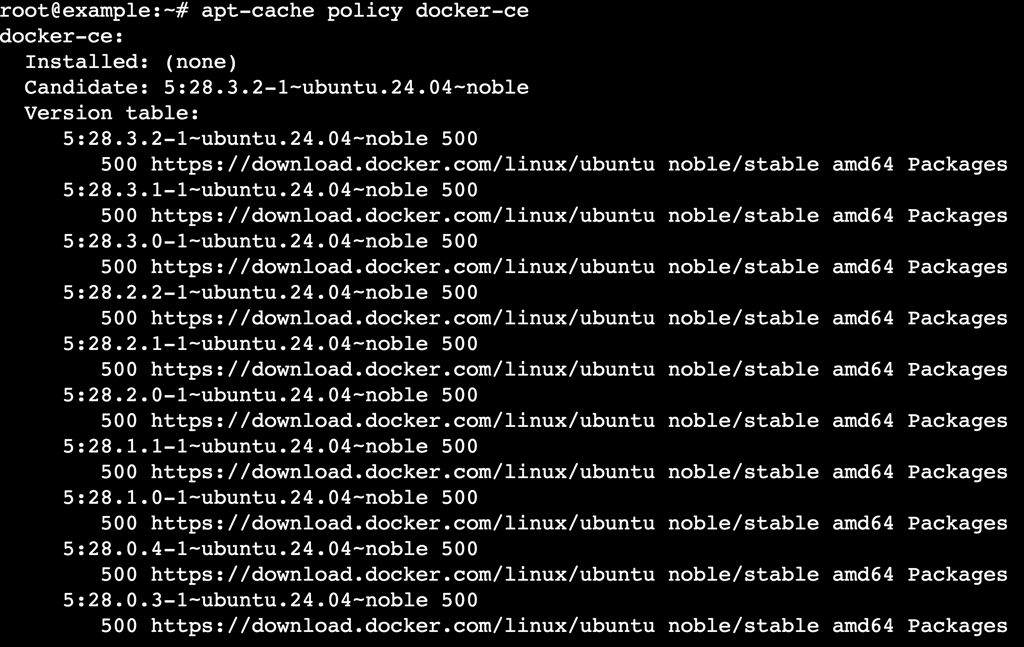
- Make sure you install Docker from its official repository instead of the default Ubuntu repository:
apt-cache policy docker-ce
- You’ll see the following output, indicating that Docker will be installed from the correct repository:
- Execute this command to install Docker Engine, Docker Community Edition, and containerd runtime, which are all necessary for running Docker containers:
sudo apt install docker-ce docker-ce-cli containerd.io -y
- Ensure Docker starts automatically when your system boots:
sudo systemctl enable docker
4. Verify Docker installation
After installing Docker, verify that the installation was successful and Docker is running correctly.
- Confirm the Docker version installed on your system:
docker --version
- Here’s the expected output:

- Use the following command to check Docker’s service status:
sudo systemctl status docker
- You should see an output indicating that Docker is active and running:
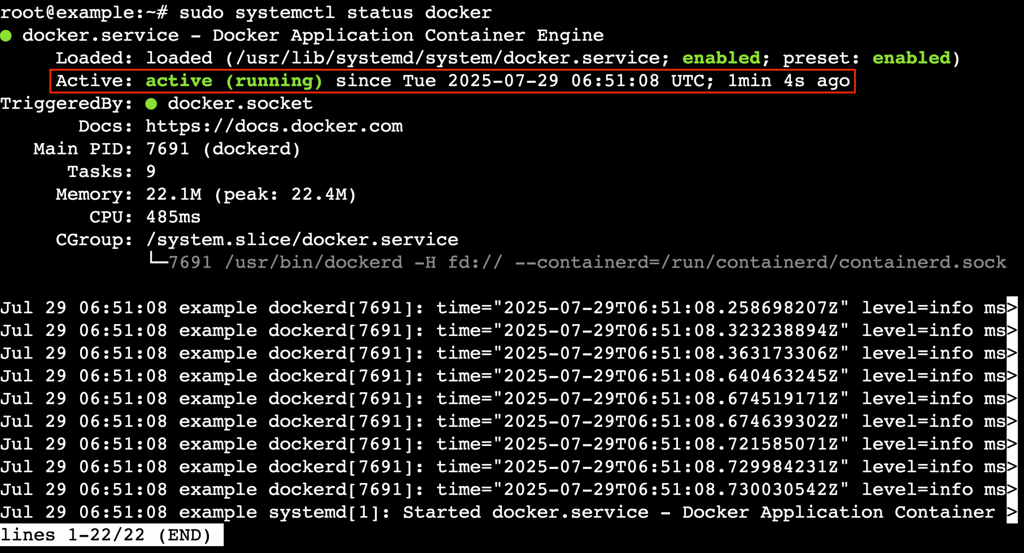
- Press Q on your keyboard to exit this status screen.
5. Run Docker without sudo (optional)
By default, Docker only lets you run its commands as the root user or with sudo privileges, which can be inconvenient and potentially less secure. If you attempt to run Docker commands as a non-root user, you’ll encounter this error:

However, running Docker without sudo is preferable because it’s faster and improves workflow efficiency. That’s why we suggest creating a dedicated user to run Docker without elevated privileges.
- Add a new user if you don’t have one. Here, we name it new_user:
sudo adduser new_user
- You’ll be prompted to set up a new password for this user.
- Run the following command to create the docker group:
sudo groupadd docker
- Add new_user to the docker group:
sudo usermod -aG docker new_user
- Switch to the recently created user:
su - new_user
- Verify that this user is part of the docker group:
groups
- Here’s the output:

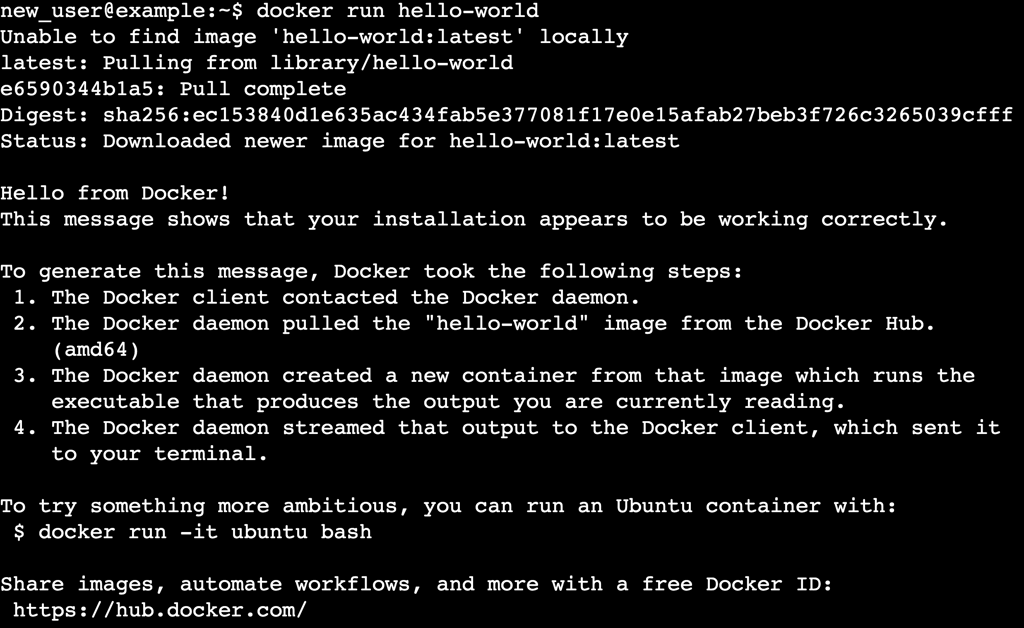
- Run a simple Docker command to verify that you can run commands without sudo:
docker run hello-world
- You should see an output showing that Docker is running correctly as a non-root user:
Congratulations! You’ve successfully set up Docker manually on an Ubuntu VPS using commands.
How to install Docker on Ubuntu using Hostinger’s VPS template
Using Hostinger’s preconfigured template is the easiest way to install Docker on your Ubuntu VPS. If you choose the Docker VPS hosting plan, the template will be automatically selected, so you can start deploying containerized apps right away.
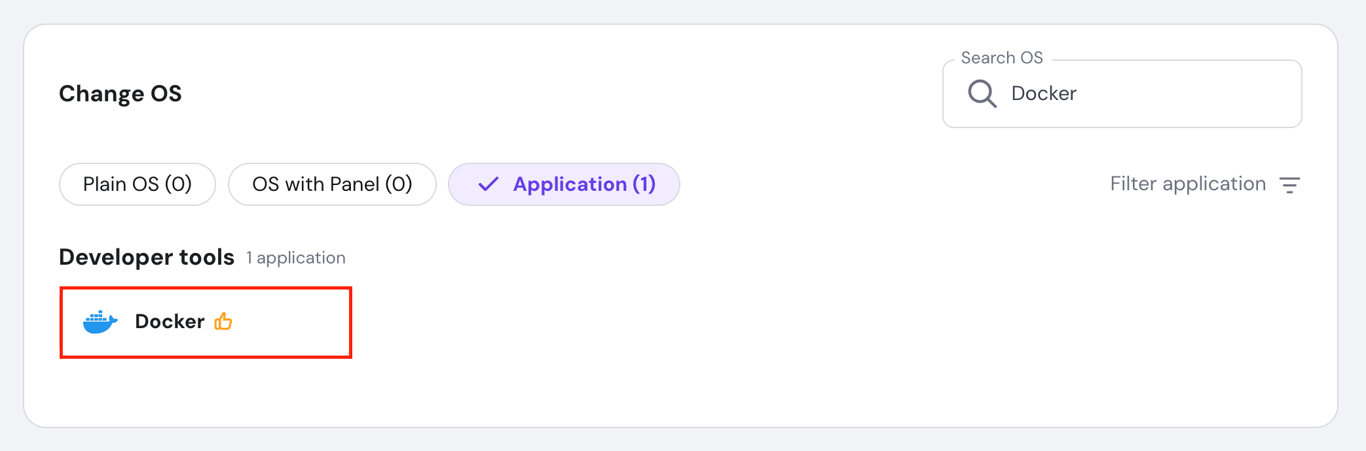
If you’re a regular VPS hosting customer, don’t worry. You can still install Docker with just a few clicks by selecting the template yourself. Here are the steps:
- Log in to hPanel and navigate to VPS → Manage next to your server.
- From the VPS dashboard, go to OS & Panel → Operating System in the left sidebar.
- Find the Change OS section, type Docker in the search bar, then select the Docker template.
- Follow the on-screen instructions and wait for the installation process to finish, which typically takes about 10 minutes.
That’s it! You have installed Docker on your VPS and are ready to deploy apps.

What are some Docker configuration tips?
After installing Docker on Ubuntu, take some time to learn the core commands and useful configurations below to get the most out of it.
1. Learn basic Docker commands
Start by mastering essential Docker commands to interact with images and containers. This way, you can search and pull prebuilt images like nginx, node, or mysql to quickly launch services without installing anything manually.
- List images:
docker images
- Search for images on Docker Hub:
docker search nginx
- Download an image:
docker pull nginx
2. Run and manage containers
Once you have an image, you can launch and control containers using the following commands. The example below runs a containerized NGINX server on port 8080. This is perfect for testing static websites locally or building reverse proxies for your apps.
- Run a container:
docker run -d --name webserver -p 8080:80 nginx
docker start webserver
- Stop a running container:
docker stop webserver
- List running containers:
docker ps
3. Build and share your own images
You can create your own images using a Dockerfile and share them with others. One use case is to package your Node.js, Python, or Go app into a reusable image and deploy it across different environments or share it with your team.
- Build an image from the current directory:
docker build -t my-app .
- Tag the image:
docker tag my-app yourusername/my-app:latest
- Push the image to Docker Hub:
docker push yourusername/my-app:latest
4. Clean up unused components
Clean up Docker resources you no longer need to avoid unnecessary disk usage. This helps free up space and reduce clutter from test runs or temporary builds.
docker image prune
- Delete stopped containers:
docker container prune
- Remove unused volumes and networks:
docker volume prune
docker network prune
5. Use Docker Compose for multi-container apps
Docker Compose lets you define and manage multi-service environments using a single docker-compose.yml file.
- Example: Quickly run WordPress as a Docker container for local testing:
version: '3.8'


services:
  db:
    image: mysql:5.7
    restart: always
    environment:
      MYSQL_DATABASE: wordpress
      MYSQL_USER: wp_user
      MYSQL_PASSWORD: wp_pass
      MYSQL_ROOT_PASSWORD: example
    volumes:
      - db_data:/var/lib/mysql


  web:
    image: wordpress
    restart: always
    ports:
      - "8080:80"
    environment:
      WORDPRESS_DB_HOST: db:3306
      WORDPRESS_DB_NAME: wordpress
      WORDPRESS_DB_USER: wp_user
      WORDPRESS_DB_PASSWORD: wp_pass
    depends_on:
      - db


volumes:
db_data:- Start all services:
docker-compose up -d
6. Create isolated development environments
Use Docker to avoid polluting your system with multiple language versions or dependencies. This is useful for testing packages, writing scripts, or building apps in an isolated container – all without changing your host setup.
- Example: Use Docker to run a Node.js environment without installing Node locally:
docker run -it --rm node:18 bash
7. Automate builds and tests in CI/CD
Docker is widely supported in CI tools like GitHub Actions, GitLab CI/CD, and Jenkins. You can containerize your app and run it consistently in development, staging, and production.
- Example: Use a Docker image in your GitHub Actions pipeline to automate testing:
jobs:
  build:
    runs-on: ubuntu-latest
    steps:
      - uses: actions/checkout@v3
      - run: docker build -t my-app .
      - run: docker run my-app npm test
8. Host web servers or APIs locally
You can run full web servers or APIs inside containers to test your apps without deploying them externally. This is ideal for front-end developers who need to serve static assets or test local domains without setting up a full development server.
- Example: Run a basic Apache server locally:
docker run -d -p 8080:80 httpd
Troubleshooting common Docker installation issues
Installing Docker on Ubuntu is usually smooth, but some errors can occur depending on your setup, system configuration, or user permissions. Below are common issues, along with actionable solutions and commands to help you debug quickly.
1. Docker daemon not running
An error message like “Cannot connect to the Docker daemon” usually indicates that the Docker service isn’t active.
- Start the service:
sudo systemctl start docker
- Enable it to start at boot:
sudo systemctl enable docker
- Check the daemon status:
sudo systemctl status docker
If Docker still doesn’t start, check the logs using journalctl:
journalctl -u docker.service
Look for errors such as missing configuration files, port conflicts, or storage driver issues.
2. Can’t connect to the Docker socket
If you see “Got permission denied while trying to connect to the Docker daemon socket,” it’s likely a user permission issue.
- Check if your user is in the docker group:
groups
- Add your user to the group:
sudo usermod -aG docker user
Then, log out and back in as that user.
- Restart the Docker service:
sudo systemctl restart docker
If the problem persists, check out our tutorial on how to fix Docker permission issues.
3. Repository and installation issues
If you encounter issues with adding the Docker APT repository or installing packages, it might be due to:
- Incorrect repository URL.
- Missing dependencies.
- Unsupported Ubuntu version.
Make sure you’ve added the correct repository:
curl -fsSL https://download.docker.com/linux/ubuntu/gpg | sudo gpg --dearmor -o /etc/apt/keyrings/docker.gpg
echo \
  "deb [arch=$(dpkg --print-architecture) signed-by=/etc/apt/keyrings/docker.gpg] \
  https://download.docker.com/linux/ubuntu $(lsb_release -cs) stable" | \
  sudo tee /etc/apt/sources.list.d/docker.list > /dev/null
sudo apt update
If apt update fails, check the output for malformed entries or GPG key errors.
4. Running containers are unresponsive
If your container starts but doesn’t behave as expected, try the following:
- View container logs:
docker logs container_name
- Check container health if defined:
docker inspect --format='{{json .State.Health}}' container_name- Restart the container:
docker restart container_name
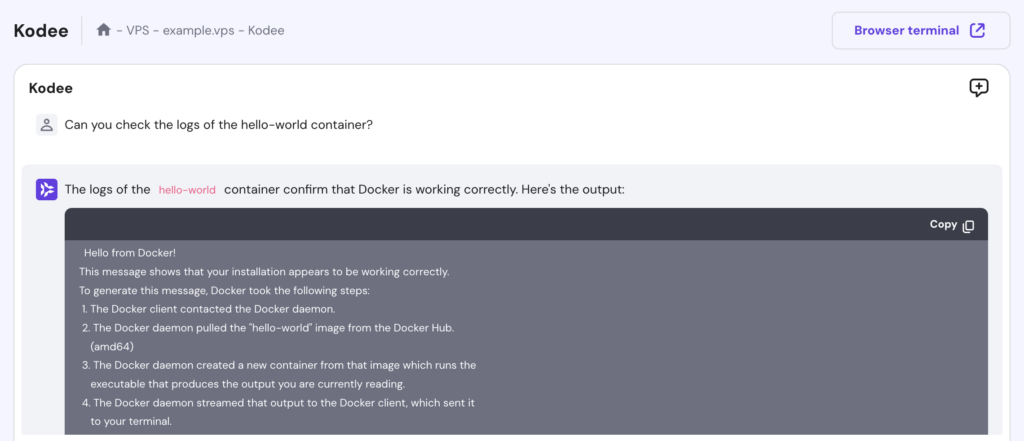
Alternatively, Hostinger VPS users can ask the Kodee AI Assistant to check their container logs. Simply type, “Can you check the logs of the [container_name] container?” like in this example:
5. Firewall and network issues
Docker uses several ports internally. If you have a firewall enabled, such as Uncomplicated Firewall (UFW), these ports might be blocked.
- Allow Docker-related traffic with UFW:
sudo ufw allow 2375/tcp
sudo ufw allow 2376/tcp
sudo ufw allow 2377/tcp
sudo ufw allow 7946/tcp
sudo ufw allow 7946/udp
sudo ufw allow 4789/udp
- Check if Docker can resolve DNS:
docker run busybox nslookup google.com
If this fails, your container network might be misconfigured.
- Recreate the default bridge network:
docker network rm bridge
docker network create --driver bridge bridge
Managing firewall with Kodee
You can also ask Kodee to set new firewall rules on your VPS. Simply type, "Set new firewall rules that open port 2375, 2376, 2377, 7946 TCP and 7946, 4789 UDP to any IP address."
6. Slow Docker performance
If Docker feels sluggish – for example, if image pulls are slow or containers are lagging – try these steps to troubleshoot the issue.
- Check disk space:
df -h
- Check Docker system usage:
docker system df
- List heavy containers or volumes:
docker ps -s
docker volume ls
If none of the above steps work, try cleaning up unused containers, networks, images, and build cache to improve performance:
docker system prune -a
7. Security or AppArmor errors
On some Ubuntu setups, Docker may fail to start containers due to conflicts with security modules, such as AppArmor.
- Check for AppArmor denials:
dmesg | grep apparmor
- Temporarily disable AppArmor for a container:
docker run --security-opt apparmor=unconfined your_image
Please note that disabling AppArmor is not recommended in a production environment. If you choose to do so, make sure you’re not unintentionally overriding important kernel security features.
If these errors persist, consider checking your system logs in /var/log/syslog.
What’s next?
Installing Docker on Ubuntu gives you the flexibility to deploy, test, and ship software with fewer headaches, whether you’re running apps locally or managing production workloads.
But installation is just the beginning. To truly benefit from Docker, explore how containers fit into your long-term workflow:
- Find real-world Docker use cases, such as running web apps, databases, or CI pipelines, and get ideas for applying them in your own projects.
- Use docker exec to interact with running containers by executing commands directly for debugging, configuration, or live updates – all without restarting anything.
- Handle Docker secrets securely by avoiding hardcoded passwords or tokens and passing sensitive data safely during build or runtime.
- Set up Docker Swarm for orchestration to scale your apps beyond single containers and manage a multi-node cluster efficiently with built-in load balancing.
All of the tutorial content on this website is subject to Hostinger's rigorous editorial standards and values.

Ariffud is a Technical Content Writer with an educational background in Informatics. He has extensive expertise in Linux and VPS, authoring over 200 articles on server management and web development. Follow him on LinkedIn.