How to back up a WordPress site: 4 WordPress backup methods
Sep 15, 2026
/
By Larassatti D. & Marco C.
/
6 min Read

You can back up a WordPress site using Hostinger dashboard, a WordPress backup plugin, WP-CLI, or a manual backup method. A complete WordPress backup should preserve both your site files – including themes, plugins, uploads, and configuration files – and the WordPress database that stores your posts, pages, users, comments, and settings.
There are four main ways to back up WordPress:
- Use Hostinger dashboard to create or download backups directly from your Hostinger hosting account.
- Use a WordPress backup plugin to create, schedule, and manage backups from the WordPress dashboard.
- Use WP-CLI to export your WordPress database and manage backups through the command line.
- Create a manual WordPress backup by saving your WordPress files and database separately.
The best method depends on how you manage your WordPress site. Hostinger dashboard is the most convenient option for Hostinger users, plugins are suitable for scheduled backups from the WordPress dashboard, and WP-CLI gives developers more control through SSH. Manual backups are useful when you need direct access to your WordPress files and database, or when you want an additional backup copy before making major changes to your site.
How to back up a WordPress site
A complete WordPress backup consists of two main components: your WordPress files and database. The files include your themes, plugins, media uploads, and configuration files such as wp-config.php, while the WordPress database stores content and site data such as posts, pages, comments, users, and settings.
To create a complete WordPress backup, save both the WordPress files and database so you can restore the full site if needed. You can do this using Hostinger dashboard, a WordPress backup plugin, WP-CLI, or a manual backup method.
How to back up a WordPress site using the Hostinger dashboard backup tool
Hostinger users can back up an entire WordPress site through Hostinger dashboard without installing a backup plugin. Hostinger dashboard creates backups of both your WordPress files and database, making it a convenient option for managing backups directly from your hosting account.
Hostinger’s Managed WordPress hosting plans include automatic backups, so you can restore your WordPress site without manually creating every backup. The Premium plan includes weekly automatic backups, while the Business and Cloud plans include daily automatic backups.

To create a new WordPress backup in Hostinger dashboard, follow these steps:
- Log in to Hostinger dashboard using your Hostinger account.
- Enter the Websites menu, find the website you want to back up, and click the Dashboard button.
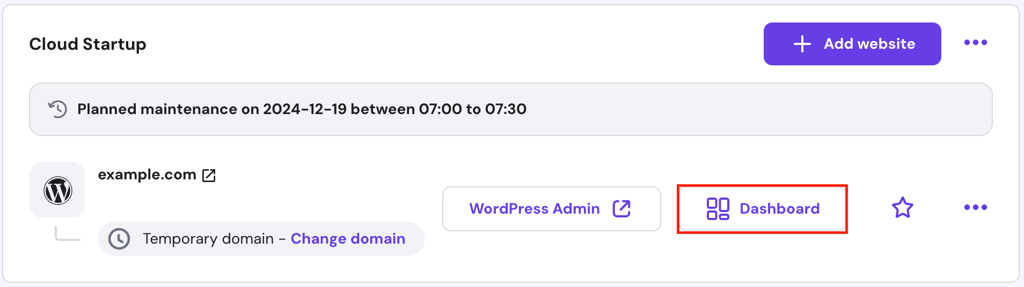
- Navigate to Files → Backups from the left sidebar.
- Select the Generate new backup option.
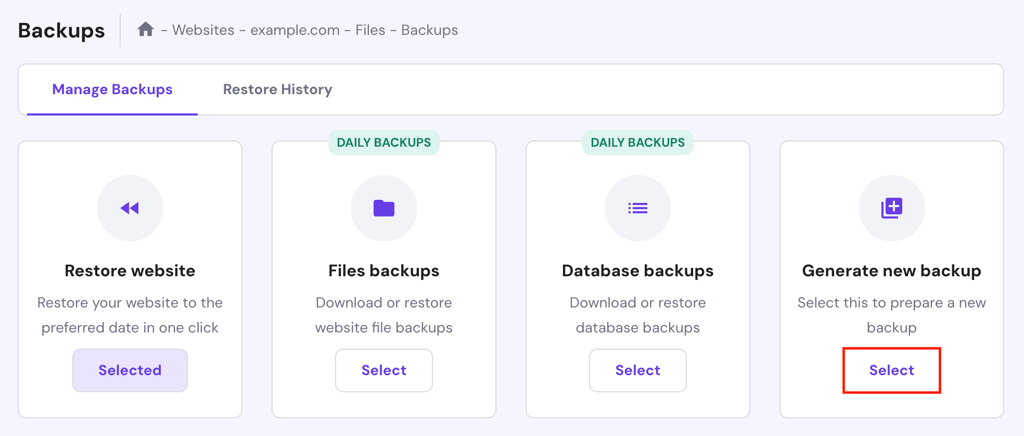
- Once you see a confirmation pop-up, click Proceed.
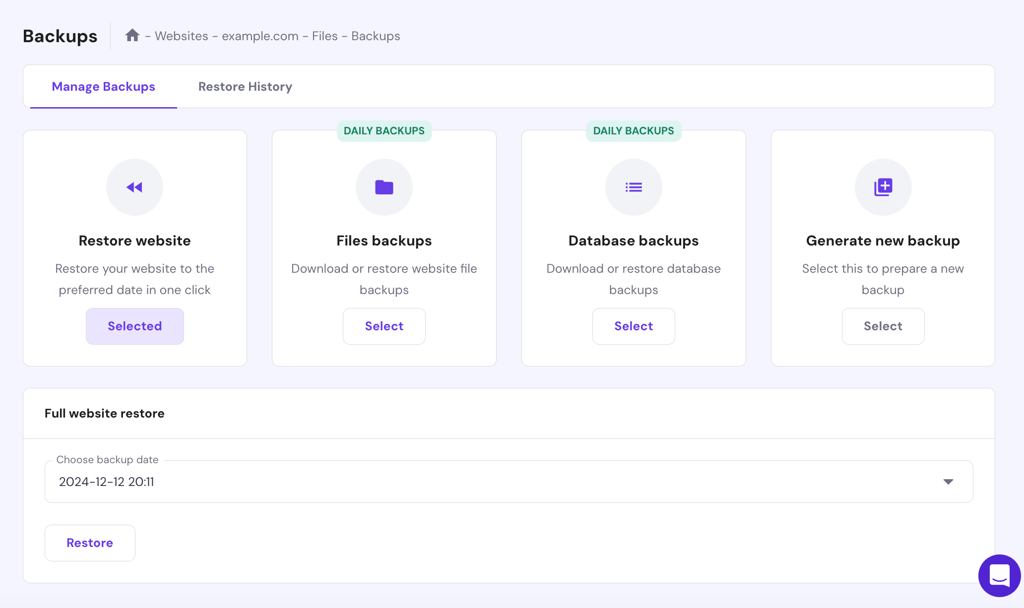
Depending on the size of your WordPress site, generating the backup can take up to a few hours. Once the process is complete, Hostinger dashboard creates a full backup containing your WordPress files and database. Check the latest backup timestamp under the Full website restore section to confirm that the backup was created successfully.
How to back up a WordPress site using a plugin
With a WordPress backup plugin, you can back up your WordPress files and database directly from the WordPress dashboard without accessing them manually through your hosting account.
Popular WordPress backup plugins include UpdraftPlus, Jetpack, and All-in-One WP Migration. Their interfaces differ, but they generally let you back up the same core WordPress components, including the site files and database.
We’ll use UpdraftPlus to demonstrate the WordPress plugin backup process. The plugin lets you back up your WordPress files and database from the dashboard, while its premium version supports remote storage options such as Google Drive and Dropbox.
To create a complete WordPress backup with UpdraftPlus, follow these steps:
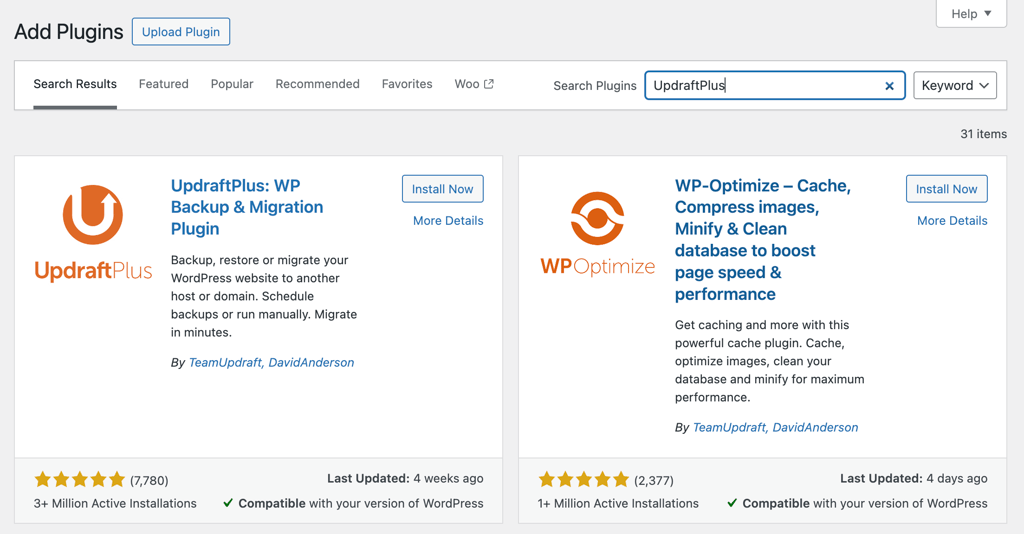
- Log in to your WordPress dashboard, then navigate to Plugins → Add New Plugin.
- Search for UpdraftPlus. Once you find the plugin, click Install Now, then Activate.
- Navigate to the UpdraftPlus menu on the left sidebar of your WordPress dashboard.
- Click the Backup Now button under the Backup / Restore tab.
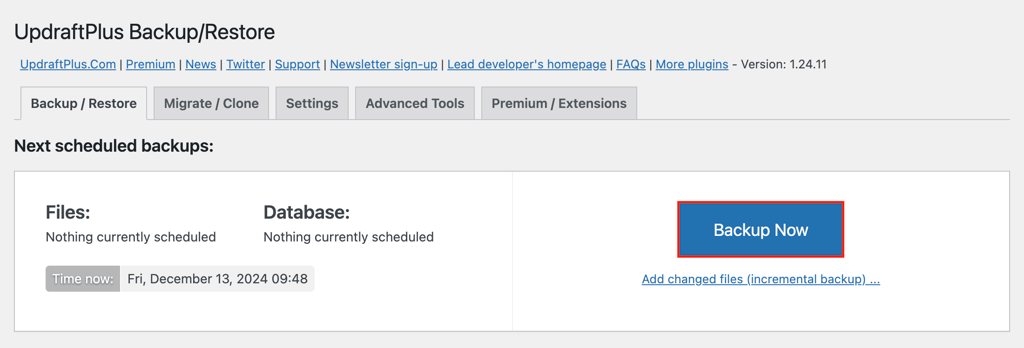
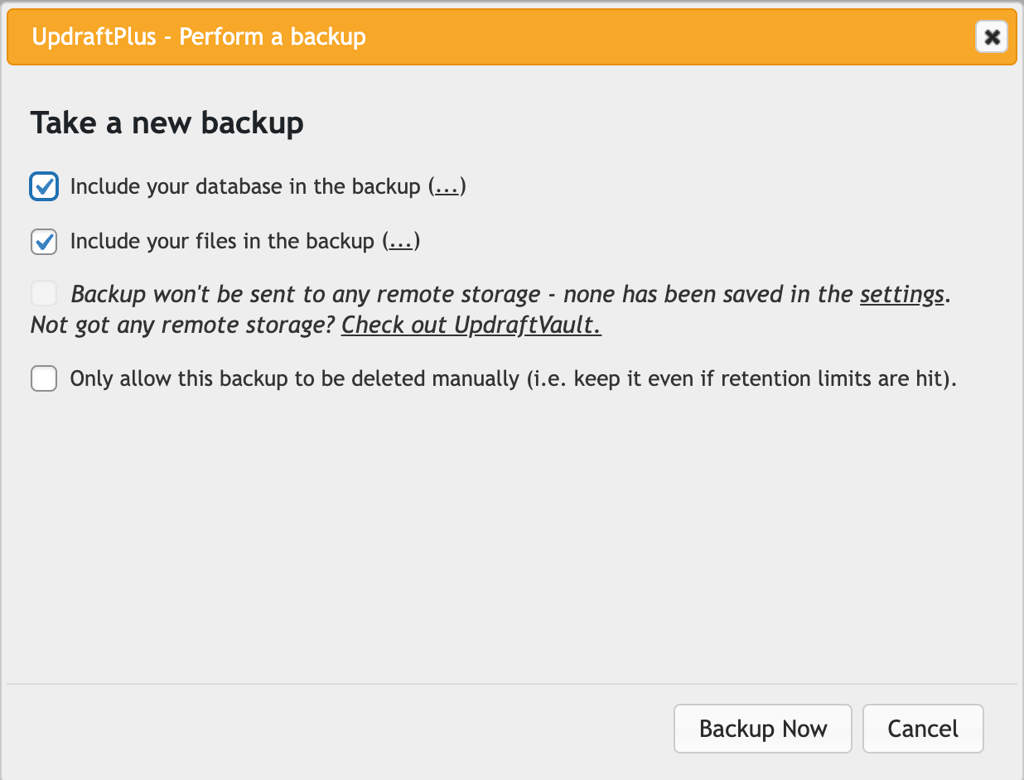
- In the pop-up, select both files and the database to create a complete WordPress backup, then click Backup Now.
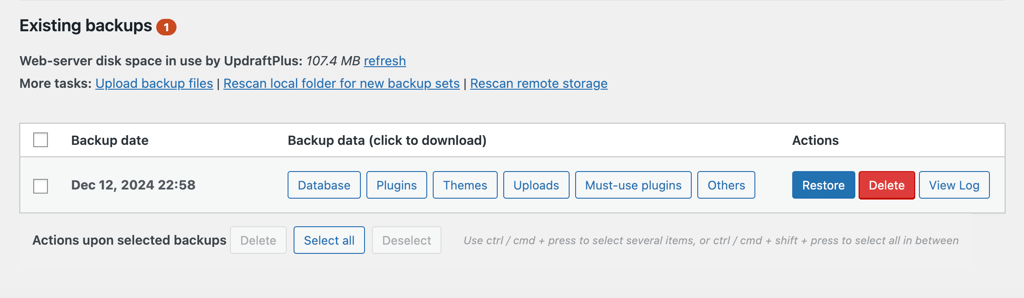
When the new backup appears under Existing backups, UpdraftPlus has successfully created your WordPress backup.
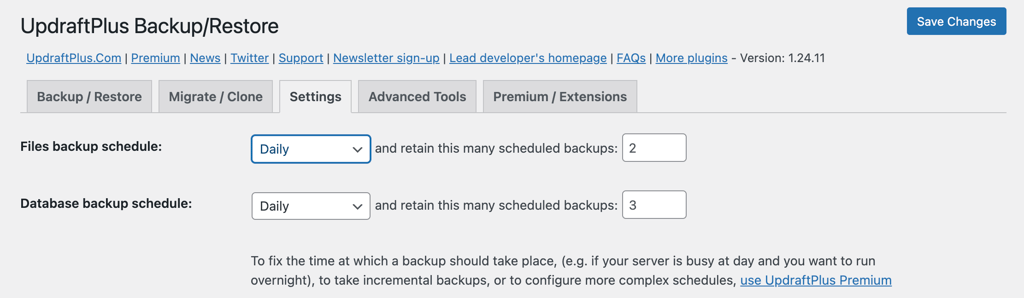
To automate your WordPress backups with UpdraftPlus, configure a recurring schedule for both the site files and database:
- Open the Settings tab from the UpdraftPlus plugin dashboard.
- Select how often UpdraftPlus should back up your WordPress files and database from their respective drop-down menus.
- Set how many scheduled backups UpdraftPlus should retain. For example, entering 2 keeps the two most recent backups and removes older copies.
- Hit Save Changes.
How to back up a WordPress site using WP-CLI
WP-CLI lets you manage and back up WordPress from the command line, making it useful for developers and users who work through SSH. You can use WP-CLI to export the WordPress database, then save the site files separately to create a complete backup.
To export the WordPress database, navigate to your WordPress installation directory and run:
wp db export
WP-CLI saves the database as an SQL file in the current directory. Store this database export together with a copy of your WordPress files, including wp-content and wp-config.php, in a secure location outside the live site.
For more control, you can specify a file name and destination for the database export, then incorporate the command into a scripted or scheduled backup workflow.
How to back up a WordPress site manually
A manual WordPress backup requires you to save both your WordPress files and database separately. Your WordPress files include themes, plugins, media uploads, and configuration files, while the database stores your site content and settings.
Start by backing up your WordPress files using your hosting provider’s file manager or an FTP client.
Back up WordPress files manually via Hostinger’s File Manager
Hostinger’s File Manager lets you download the files in your WordPress installation directly from Hostinger dashboard. To create the file portion of a manual WordPress backup, download the contents of your WordPress directory, including wp-content and wp-config.php.
- Enter the Websites menu after logging in to Hostinger dashboard.
- Find the website you want to back up, and click the Dashboard button.
- Open File manager.
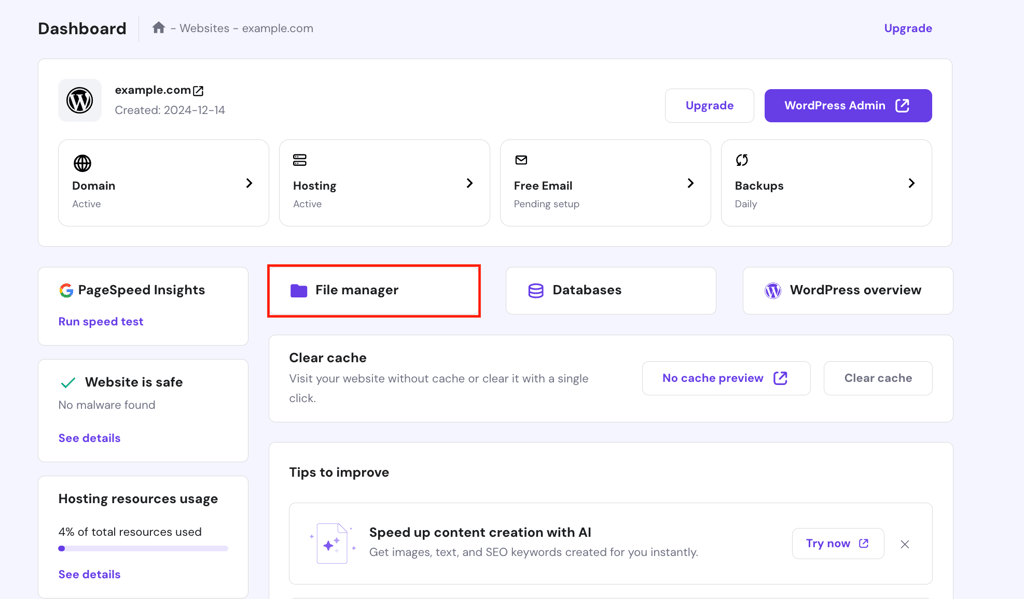
- Enter the public_html directory, and select all the files there.
- Click the download icon at the top toolbar.
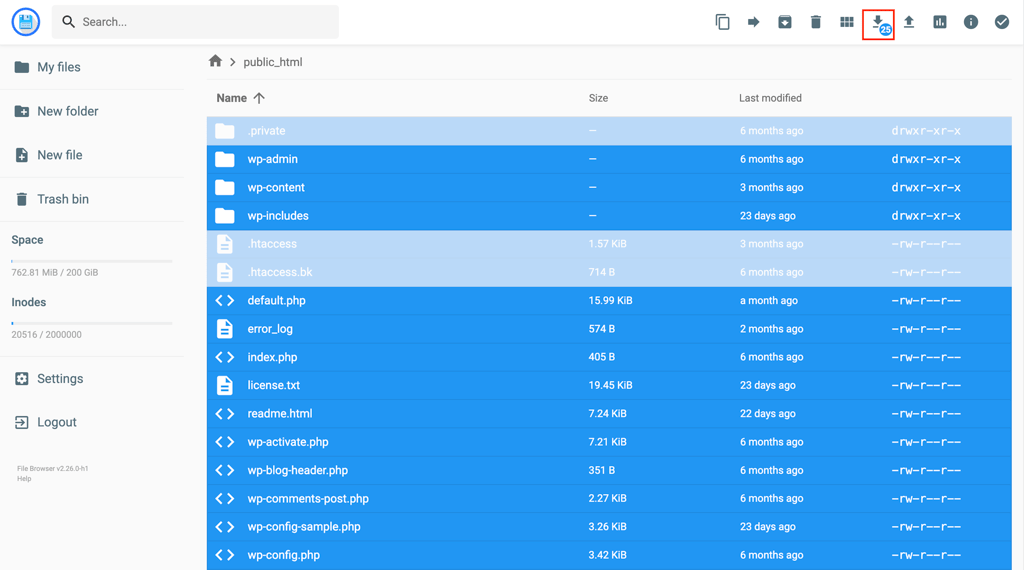
- Select the file format you prefer, and the download will start automatically.
Back up WordPress files manually via FileZilla
You can also download your WordPress files with an FTP client. In this example, we’ll use FileZilla to access the WordPress installation hosted on Hostinger.
Important! Download and configure FileZilla before you proceed.
Follow these steps to download your WordPress installation files with FileZilla:
- Log in to your Hostinger account. Go to Websites, find the website you want to back up, and click Dashboard.
- Navigate to Files → FTP Accounts from the left sidebar to see the necessary details to connect with your site, such as the FTP hostname, username, and password.
- Launch the FileZilla application on your computer.
- Enter the FTP information you have retrieved from Hostinger dashboard into the respective fields in FileZilla. Click Quickconnect.

- Find the folder in the Local site panel where you want to save the WordPress backup files.
- In the Remote site panel, select all the files in your WordPress directory, right-click, and choose Download to copy them to your local computer.
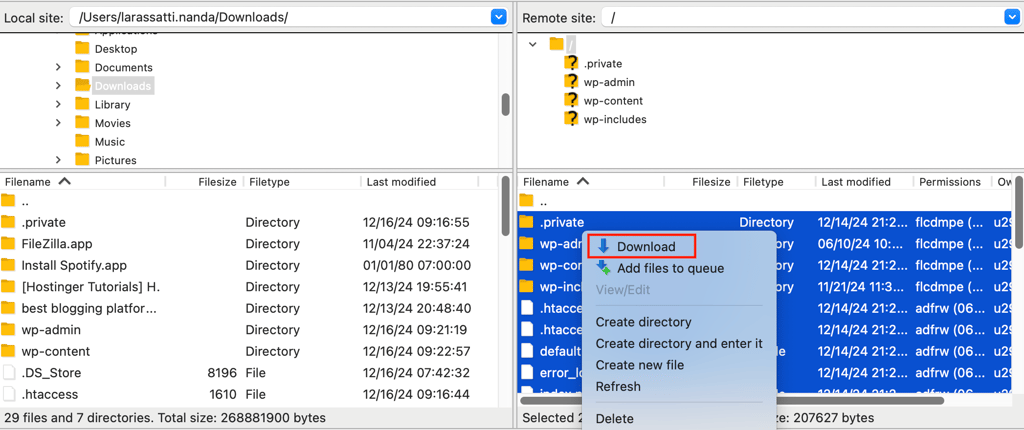
- Monitor the Queued files tab at the bottom of FileZilla. When all files appear under Successful transfers, the file portion of your WordPress backup is complete.
How to back up a WordPress database via phpMyAdmin
After saving your WordPress files, export the WordPress database to complete the manual backup.
To export your WordPress database with phpMyAdmin, follow these steps:
- Navigate to the Websites menu in Hostinger dashboard, and click the Dashboard button on the website you want to back up.
- Choose the Databases menu and scroll to the List of Current MySQL Databases and Users section.
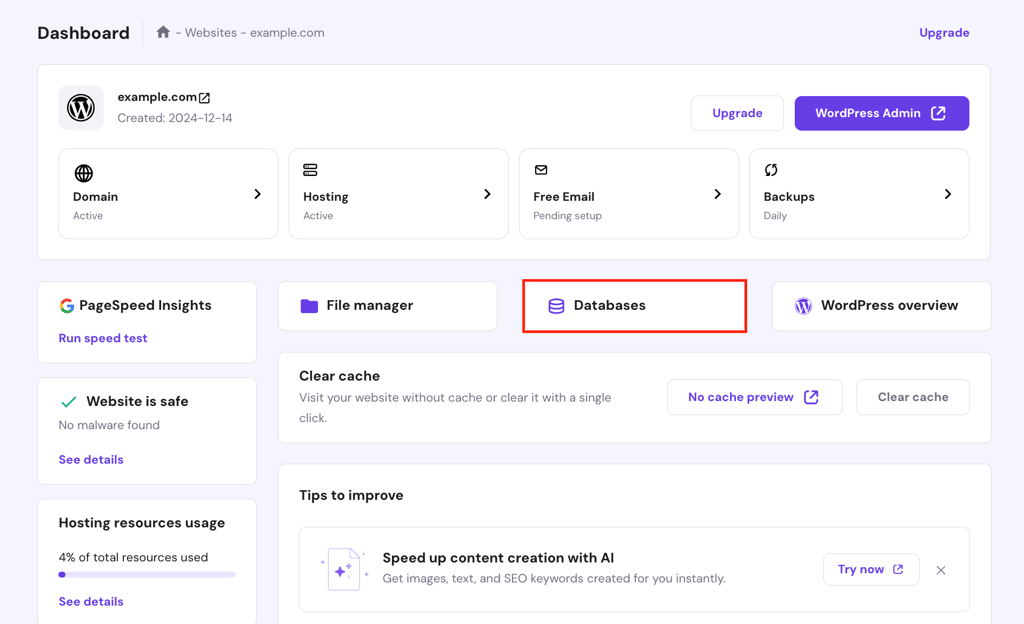
- Find your WordPress database and click Enter phpMyAdmin. If you’re unsure which database belongs to the site, check the
DB_NAMEvalue in thewp-config.phpfile.
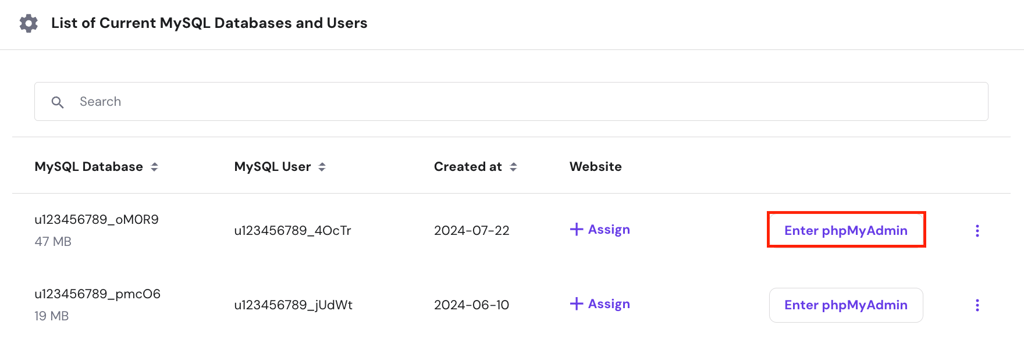
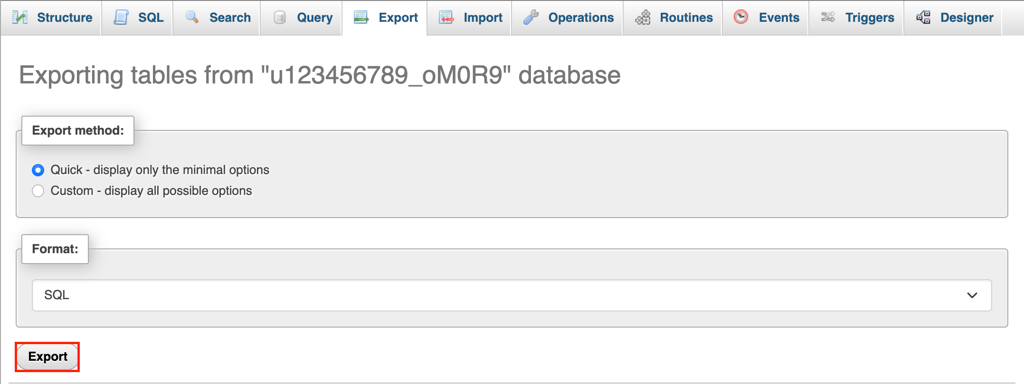
- Once you enter phpMyAdmin, go to the Export tab.
- Keep the default export settings and click Export to download the WordPress database as a backup file.
For a broader walkthrough of downloading website files and exporting databases outside the WordPress-specific context, see our guide on how to back up a website manually.
Best practices for backing up your WordPress site
A reliable WordPress backup strategy should account for how often your site changes, where backup copies are stored, and whether they can be restored successfully. Follow these practices to keep your WordPress backups current and usable.
Do regular backups
Your WordPress backup frequency should match how often the site changes. Use daily backups for active sites that frequently publish content, receive comments, or process new data. Weekly or bi-weekly backups may be sufficient for WordPress sites that change less often.
Use automatic backups to maintain a consistent schedule, and create an additional backup before major WordPress changes such as updating the core software, plugins, or themes.
Store your backup files in multiple locations
Store WordPress backups in more than one location so a server failure, compromised hosting account, or damaged local device does not leave you without a usable copy.
For example, if you download a WordPress backup to your computer, keep an additional copy in remote cloud storage. Storing backups outside the live WordPress installation gives you another restore source if the hosting environment or local copy becomes unavailable.
Secure sensitive backup data with passwords
WordPress backups can contain sensitive data from your site files and database, including user information, configuration details, and credentials. Protect stored backup copies with encryption and strong access controls.
Use a WordPress backup solution that supports secure backup storage, and enable two-factor authentication (2FA) for any cloud storage account that contains your backups.
Make sure the backup files are restorable
Regularly test your WordPress backups to confirm that they can restore the site successfully. Upload the backup to a staging environment or local WordPress installation and verify that the site content, plugins, themes, media, and settings are restored correctly. Testing backups in advance helps identify incomplete or corrupted copies before you need them for recovery.
Learn how to back up a WordPress website with Hostinger Academy
If you prefer a visual walkthrough, watch our Hostinger Academy tutorial to see how to back up a WordPress site step by step.


Next steps for protecting your WordPress site
Choose a WordPress backup method that matches how you manage your site. Hostinger users can rely on Hostinger dashboard for automatic backups, while WordPress plugins offer dashboard-based scheduling, WP-CLI provides command-line control, and manual backups give you direct access to your site files and database.
Whichever method you use, maintain a regular backup schedule and create an additional backup before updating WordPress core, plugins, themes, or making other major site changes. Store at least one copy outside your live WordPress installation, and test your backups periodically to ensure they can restore the site successfully.
Ang artikulong ito ay isang lokal na bersyon ng How to back up a WordPress site: 4 WordPress backup methods, orihinal na inilathala sa Ingles.
All of the tutorial content on this website is subject to Hostinger's rigorous editorial standards and values.

Larassatti Dharma is a content writer with 5+ years of experience in the web hosting industry. She has populated the internet with over 100 YouTube scripts and articles around web hosting, digital marketing, and email marketing. When she's not writing, Laras enjoys solo traveling around the globe or trying new recipes in her kitchen. Follow her on LinkedIn

Marco Chiesi is the Head of WordPress at Hostinger, with over 20 years of experience as a software engineer in the web industry. He specializes in open-source technologies and the WordPress ecosystem, where he has contributed in different areas: Plugin Developer (with over 10 million downloads), WordCamp speaker and organizer, Meetup organizer, Translator, and Core Contributor. He is passionate about leading his team to create innovative solutions for Hostinger's web hosting product, which hosts over 5 million WordPress installations. Follow him on LinkedIn.