What is a DKIM record?
Sep 15, 2026
/
By Ksenija & Ariffud M.
/
8 min Read

A DKIM (DomainKeys Identified Mail) record is a DNS TXT record that stores a public cryptographic key used to verify outgoing emails from your domain.
Receiving mail servers use the key to confirm that an email was sent by an authorized mail server and that its contents weren’t modified after it was sent.
DKIM is one of the core email authentication standards used to prevent email spoofing and improve email deliverability.
When your mail server sends an email, it creates a unique digital signature using a private key.
The receiving mail server retrieves the corresponding public key from your domain’s DKIM record to verify the signature before deciding whether to trust the message.
DKIM works alongside SPF (Sender Policy Framework) and DMARC (Domain-based Message Authentication, Reporting, and Conformance) to help protect your domain from impersonation attacks.
Together, these authentication methods make it easier for mailbox providers like Gmail and Outlook to distinguish legitimate emails from forged ones, helping more of your messages reach recipients’ inboxes.
How does DKIM work?
DKIM authentication helps protect messages sent from a professional email address. Once you get a business email, DKIM uses a pair of cryptographic keys: a private key that signs outgoing emails and a public key, published in your DKIM record, that the receiving server uses to verify them.
Because the keys work together, receiving mail servers can validate the email without accessing the private key.
The diagram below illustrates the DKIM authentication process from the moment an email is sent to the point where the receiving mail server verifies its authenticity:
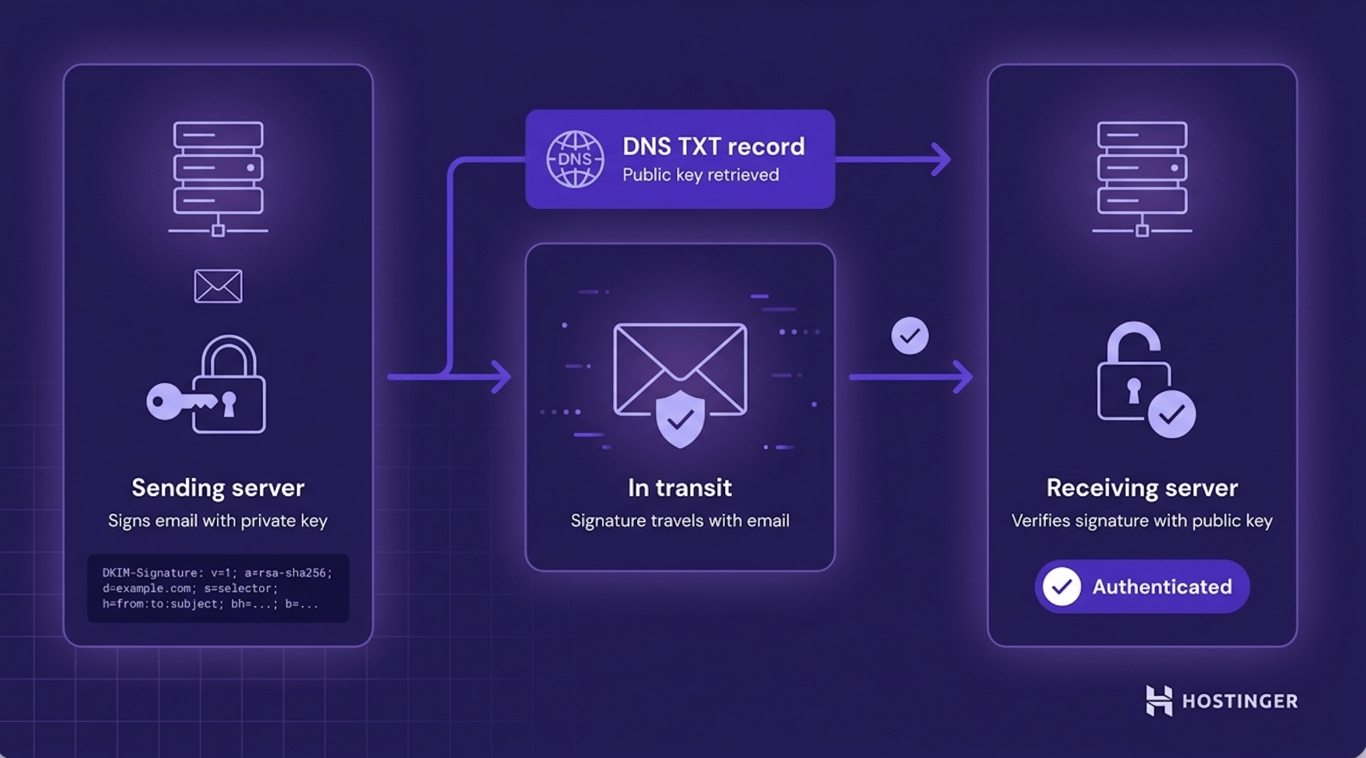
DKIM authentication consists of two main stages. First, the sending mail server generates a DKIM-Signature header and attaches it to the email before delivery.
Then, the receiving mail server retrieves the public key from the sender’s DKIM record and verifies the signature.
DKIM-Signature header
Before an email leaves the sending mail server, the server uses the domain’s private key to create a unique digital signature based on selected email headers and the message body.
The signature is then added to the email as a DKIM-Signature header.
The header stores the information that receiving mail servers need to verify the email. Instead of containing the public key itself, it includes details about the signing domain, the cryptographic algorithm used, and the location of the corresponding public key in DNS.
The receiving mail server combines this information with the public key published in your DKIM record to verify the signature.
A DKIM-Signature header consists of a series of tag=value pairs. The most important tags include:
Tag | Purpose |
d= | Identifies the domain that signed the email. |
s= | Specifies the selector used to locate the correct DKIM record in the domain’s DNS zone. |
a= | Indicates the cryptographic algorithm used to generate the signature, such as rsa-sha256. |
b= | Contains the digital signature created with the domain’s private key. |
bh= | Contains a hash of the email body, allowing the receiving server to detect whether the message was modified after it was signed. |
Some DKIM signatures also include optional tags, such as t= for the signing timestamp and x= for the signature’s expiration time.
Mail servers generate these values automatically, so you don’t need to configure them manually.
DKIM verification
The verification process confirms two things: the email was authorized by the sending domain, and the signed parts of the message weren’t modified during transit.
The verification process typically follows these steps:
- Reading the DKIM-Signature header. The receiving mail server identifies the signing domain (d=) and selector (s=), which indicate where to find the public key.
- Retrieving the public key from DNS. Using the domain and selector, the server looks up the corresponding DKIM record. The record contains the public key needed to verify the signature.
- Recalculating the message hash. The server uses the same email headers and body referenced in the DKIM-Signature header to generate a new hash.
- Verifying the digital signature. The server uses the public key to verify that the signature was created with the matching private key. If the newly calculated hash matches the signed hash, the verification succeeds.
If the signature is valid, the receiving mail server knows the sending domain signed the email was signedand that the signed content hasn’t changed since it left the sender’s mail server.
A successful DKIM check improves the message’s credibility and contributes to spam filtering decisions.
If verification fails, the email isn’t automatically rejected. The receiving mail server evaluates the result alongside other authentication methods, such as SPF and DMARC, and applies the sending domain’s DMARC policy to determine whether to deliver, quarantine, or reject the message.
Is DKIM really important?
Yes. DKIM matters because it protects your domain from email spoofing by allowing receiving mail servers to verify that emails were authorized by your domain and weren’t modified after they were sent.
Without DKIM, attackers can more easily impersonate your domain to send phishing emails, scams, or other malicious messages.
For businesses, protecting a domain also means protecting the brand behind it. A valid DKIM signature makes it more difficult for attackers to impersonate your domain because they can’t generate a matching signature without access to your private key. As a result, customers and email providers are more likely to trust messages sent from your domain.
DKIM can also improve email deliverability. Mailbox providers like Gmail and Outlook use email authentication as one of many signals when deciding whether to deliver a message to the inbox or mark it as spam.
Consistently sending authenticated emails helps build your domain’s reputation over time, making legitimate messages more likely to reach recipients’ inboxes.
This is especially important for marketing campaigns, transactional emails, such as password resets and order confirmations, and other business communications that depend on timely delivery.
Is DKIM related to SPF and DMARC?
Yes. DKIM, SPF, and DMARC are complementary email authentication standards that work together to verify the authenticity of email messages and help prevent spoofing and phishing.
SPF specifies which mail servers are allowed to send emails on behalf of your domain. If an email comes from an unauthorized server, the receiving mail server can treat it as suspicious.
DMARC builds on SPF and DKIM. It tells receiving mail servers what to do if an email fails authentication – deliver it, send it to spam, or reject it.
DMARC can also send reports to domain owners, helping them monitor authentication failures and identify potential spoofing attempts.
DKIM, SPF, and DMARC complement one another by verifying different parts of an email. Using all three standards strengthens your domain’s reputation and email deliverability.
How to add a DKIM record for emails
There are three basic steps to set up DKIM: generate the DKIM keys, add the public key to the DNS server, and add the private key to the sending email server.
Most email providers that support DKIM will generate the public key to add to the domain’s DNS record. For this, it’s essential to have access to your DNS record.
Some email services, such as Google Workspace, generate the private key automatically and handle the signing for you; with others, you might need to generate and manage the private key yourself.
Adding DKIM records from another email provider
The main setup for DKIM is more or less the same with any email service provider (ESP).
Popular ESPs, such as Hostinger Mail or Google Workspace, have made it easy and fast for users to add DKIM records. For this section, we will set up DKIM using Google Workspace as an example.
Even though Gmail signs all email messages with the default DKIM domain key, it is better to manually authenticate your email domain for an additional layer of security.
Here are the steps to set up DKIM in Google Workspace:
- Sign in to the Google Admin console at admin.google.com with a super administrator account. You need the Gmail Settings administrator privilege to access the DKIM configuration page.
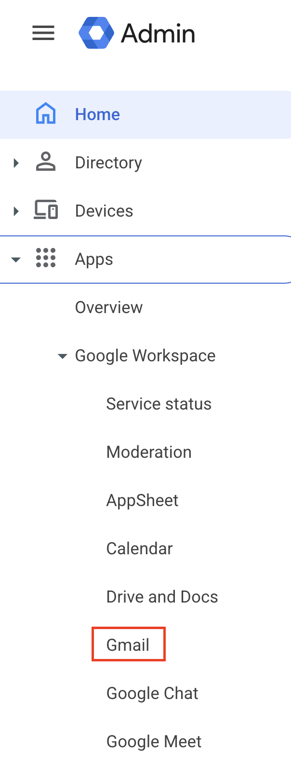
- Navigate to Menu → Apps → Google Workspace → Gmail.
- Click Authenticate email.
- In the Selected domain menu, select the domain where you want to set up DKIM. Then hit GENERATE NEW RECORD.
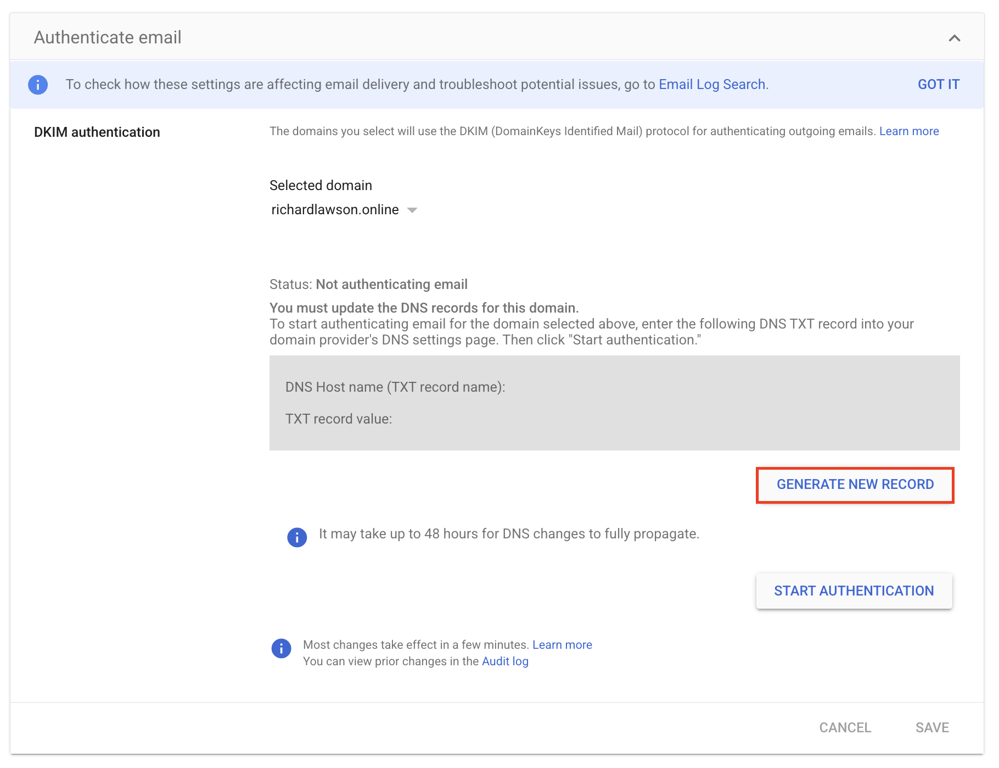
- Select the DKIM key bit length. We recommend selecting 2048 for a more secure option. Some domains only support a 1024-bit key, so check with your domain host. The Prefix selector can stay as google. Click Generate to proceed.
Important! After you turn on Gmail for your organization, you must wait 24–72 hours before you can generate the DKIM key in the Admin console. Attempting to generate a key before this window may result in an error.
- This will generate the TXT record value for the public key. Copy both the DNS Host name (TXT record name) and the TXT record value. Do not click START AUTHENTICATION yet.
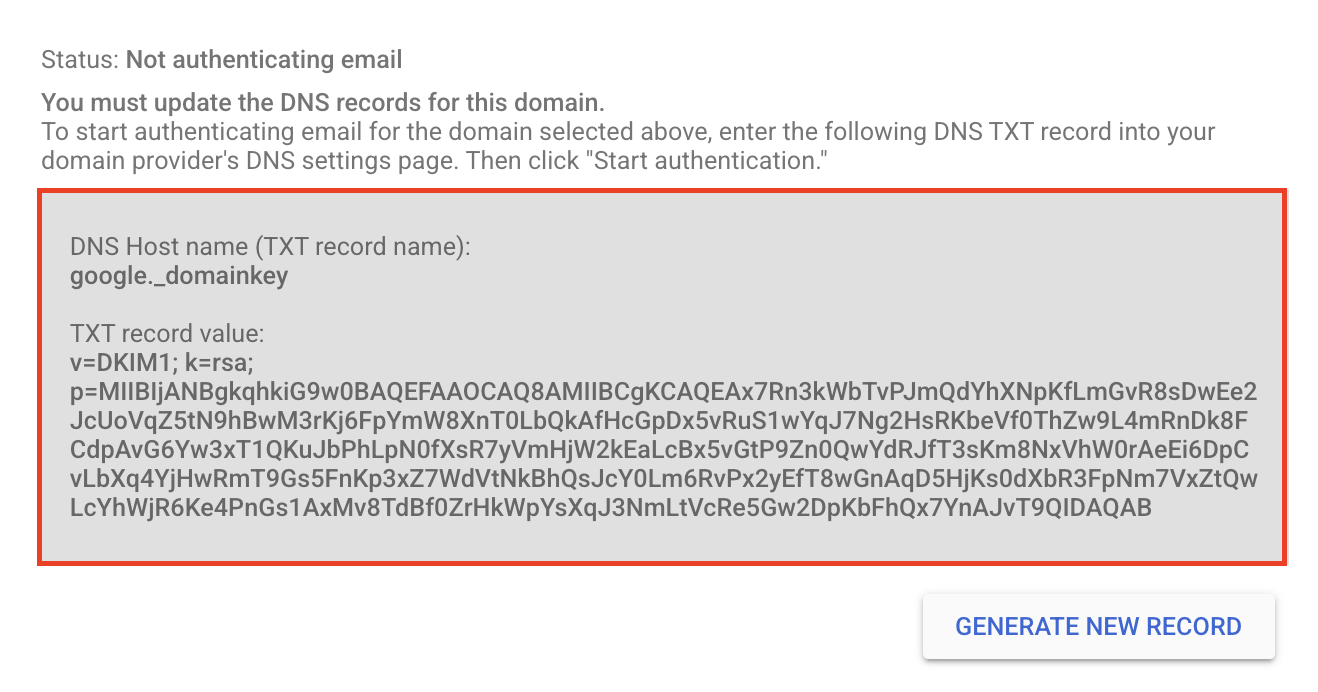
- Sign in to your domain host and go to the page where you update DNS TXT records. Add a new TXT record with the DNS Host name as the record name and the TXT record value as the record content.
- Head back to the Google Admin console. Navigate to Menu → Apps → Google Workspace → Gmail, then click Authenticate email again. Hit START AUTHENTICATION to turn on DKIM signing.
After adding a DKIM key, it can take up to 48 hours for DKIM authentication to start working.
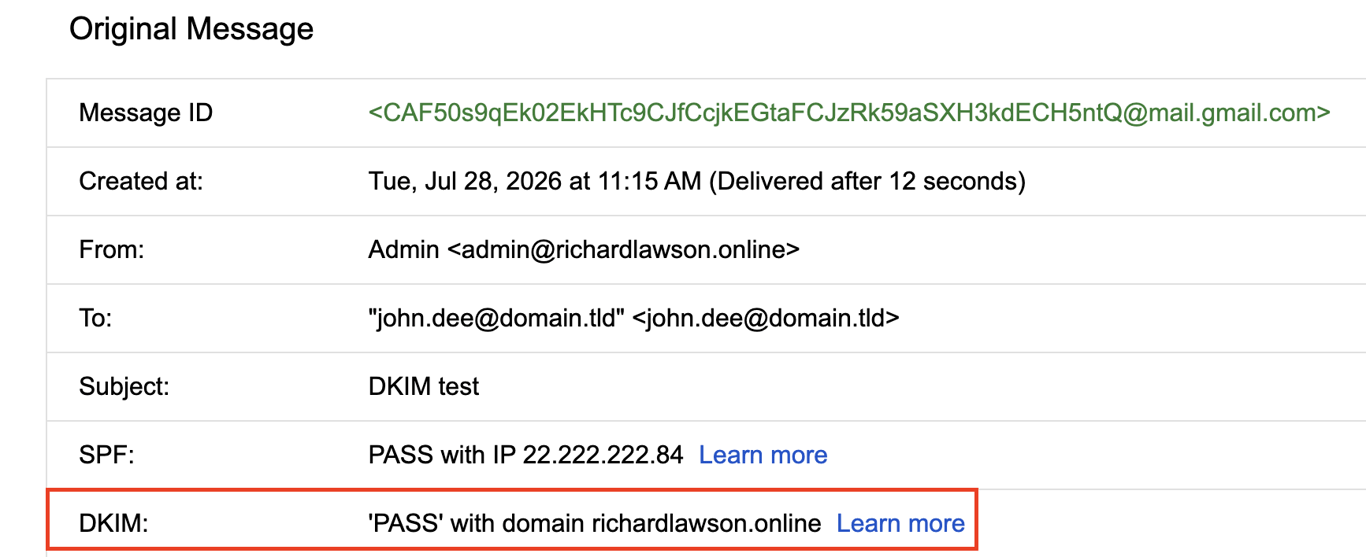
- To verify that the DKIM security standard works, send an email message to someone who uses Gmail or Google Workspace. You cannot verify DKIM by sending yourself a test message.
- Access the receiving email’s inbox and open the message. Next to Reply, click the three-dot menu icon on the upper right and select Show original.
- The DKIM result should display PASS next to your domain name, which means the domain is secure.
Adding DKIM records when running a private mail server
Running your own mail server means you generate and manage DKIM keys yourself. The standard approach uses OpenSSL or opendkim-genkey on the command line to create the key pair locally, keeping the private key off any third-party service.
Generate a 2048-bit RSA key pair with OpenSSL by running:
openssl genrsa -out dkim-private.pem 2048
openssl rsa -in dkim-private.pem -pubout -outform PEM -out dkim-public.pem
The first command creates the private key file (dkim-private.pem). The second extracts the matching public key (dkim-public.pem).
If your mail server uses OpenDKIM (common with Postfix), you can generate both the key and a ready-to-use DNS record in one step:
opendkim-genkey -b 2048 -d domain.tld -s selector-name -D /etc/opendkim/keys/
Replace domain.tld with your domain and selector-name with a selector of your choice, such as mail or default.
This creates two files: selector-name.private (the private key) and selector-name.txt (the DNS TXT record you can paste directly into your DNS zone).
Online DKIM key generators, such as the Port25 DKIM Wizard or EasyDMARC’s DKIM Record Generator, are also available for quick key generation. These tools let you enter a domain name, choose a selector, and generate a key pair through a browser form.
They are useful for testing, but for production servers, generating keys locally with OpenSSL or opendkim-genkey is more secure because the private key never leaves your server.
Once the keys have been generated, add the public key to your domain’s DNS records:
- Log in to your DNS management panel and create a new TXT record.
- Set the record name to selector-name._domainkey (for example, default._domainkey).
- Paste the public key as the record value. The value follows this format:
v=DKIM1; k=rsa; p=MIIBIjANBgkq...
- Configure your mail server to sign outgoing emails with the private key. The exact location and configuration depend on which mail transfer agent (MTA) you are running:
- Postfix with OpenDKIM. Store the private key in /etc/opendkim/keys/ and reference it in /etc/opendkim.conf using the KeyFile directive. Connect OpenDKIM to Postfix by adding smtpd_milters = inet:localhost:8891 to /etc/postfix/main.cf.
- Exim. Add a DKIM transport configuration block in the Exim config pointing to the private key file.
- PowerMTA. Store the private key in /etc/pmta/ (Linux) or C:pmta (Windows) and reference it using the domain-key directive in the PowerMTA config.
- Set restrictive file permissions on the private key so only the mail server process can read it:
chmod 600 /etc/opendkim/keys/selector-name.private
- Send a test email and inspect the message headers to verify the DKIM-Signature header is present and the receiving server reports dkim=pass.

DNS changes may take up to 48 hours to propagate.
Adding DKIM Record Using Hostinger Mail
Using an email service provided by your web host can make DKIM setup simpler because much of the configuration is handled for you. With Hostinger Email, the required DKIM records are managed through Hostinger dashboard, reducing the need to create DNS records from scratch.
If your domain uses Hostinger nameservers, you can connect it automatically and Hostinger will add the required email DNS records, including DKIM. If you use external nameservers, Hostinger dashboard shows the DKIM records you need to add at your DNS provider instead.
For setups that require a custom DKIM record, you can generate one in Emails → Mailboxes → Custom DKIM. For the full process, including DNS configuration and verification, see our guide to adding a custom DKIM record for Hostinger Email.

What else can I do to secure my email?
Several email security practices fill in what DKIM doesn’t cover: pairing it with SPF and DMARC, using strong authentication, staying alert to phishing, keeping your DNS records accurate, and keeping your software up to date.
In practice, that means you should:
- Enable SPF and DMARC. Together with DKIM, these authentication standards help verify your emails and protect your domain from spoofing.
- Use strong passwords and enable multi-factor authentication (MFA). A unique password and MFA add an extra layer of protection, making it much harder for attackers to access your email accounts.
- Review your DNS records regularly. Whenever you switch email providers or add a new email service, check that your DKIM, SPF, and DMARC records are still correct. Outdated DNS records can cause authentication failures and reduce email deliverability.
- Keep your email software up to date. If you manage your own mail server or email applications, install security updates promptly to patch known vulnerabilities.
- Be cautious with suspicious emails. Even with authentication in place, phishing emails can still reach inboxes. Avoid opening unexpected attachments, clicking unfamiliar links, or sharing sensitive information without verifying the sender.

Ksenija is a digital marketing enthusiast with extensive expertise in content creation and website optimization. Specializing in WordPress, she enjoys writing about the platform’s nuances, from design to functionality, and sharing her insights with others. When she’s not perfecting her trade, you’ll find her on the local basketball court or at home enjoying a crime story. Follow her on LinkedIn.

Ariffud is a Technical Content Writer with an educational background in Informatics. He has extensive expertise in Linux and VPS, authoring over 200 articles on server management and web development. Follow him on LinkedIn.