How to use tmux for terminal multitasking
Dec 23, 2025
/
Ariffud M. & Aris S.
/
10 min Read
A terminal multiplexer, or tmux, is a command-line tool that lets you manage multiple terminal sessions in a single window. With tmux, you can split panes, create multiple windows, and keep sessions active in the background.
The primary benefit of tmux is persistence. If your SSH connection drops or you accidentally close your terminal emulator, the processes running inside tmux continue on the server. You can reconnect and resume work exactly where you left off.
The essential steps to mastering tmux include:
- Installation. Set up tmux on your Linux system and verify the installed version.
- Session management. Start named sessions, detach without stopping processes, and reattach later.
- Window organization. Create, rename, and navigate multiple windows to keep tasks separate.
- Pane control. Split a single window into multiple visible sections for simultaneous monitoring.
- Customization. Modify keybindings and behavior through the .tmux.conf file.
How to use tmux
To use tmux, first install the utility on your server, then start a session using the tmux command.
Once inside a session, you use a specific prefix key (Ctrl + B by default) combined with other keys to perform actions such as splitting the screen or creating new windows.
When you finish working but want to keep processes running, you detach from the session. tmux keeps it active in the background until you attach to it again later.
Install tmux
Most Linux distributions do not include tmux by default, so you usually need to install it manually. You need superuser or root privileges to install packages.
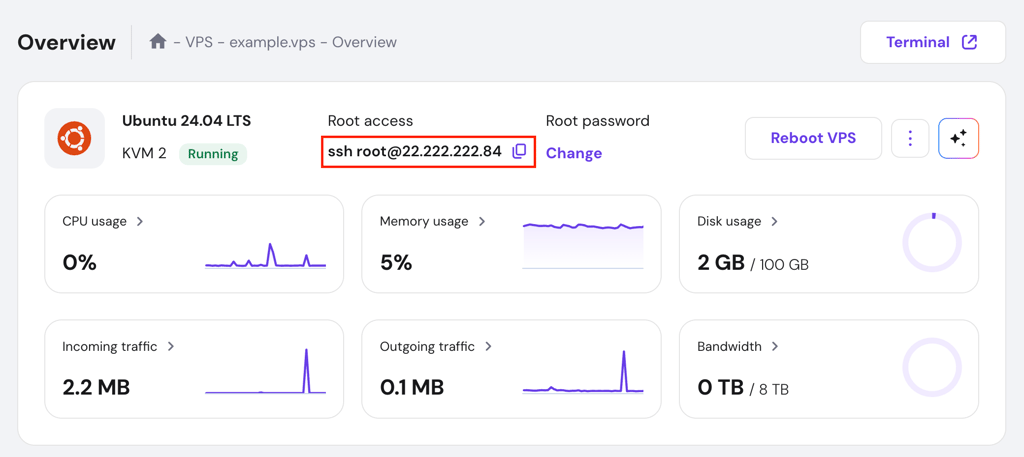
- Log in to your remote system using an SSH client such as PuTTY or your local terminal. Hostinger VPS users can find their login credentials in the VPS Overview section of hPanel.
- Before installing tmux, update your system’s package repository to make sure you download the latest stable version. Run one of the following commands, depending on your distribution:
sudo apt update # Debian and Ubuntu
sudo dnf makecache # RHEL, CentOS, and Fedora
- Once the update completes, run the appropriate installation command:
sudo apt install tmux # Debian and Ubuntu
sudo yum install tmux # RHEL and CentOS
sudo dnf install tmux # Fedora
- After the installation finishes, confirm that tmux is installed by checking the version:
tmux -V
If the terminal returns a version number, such as tmux 3.4 or later, the installation succeeded. If you see a “command not found” error, verify your PATH or try reinstalling tmux.


Start a new session
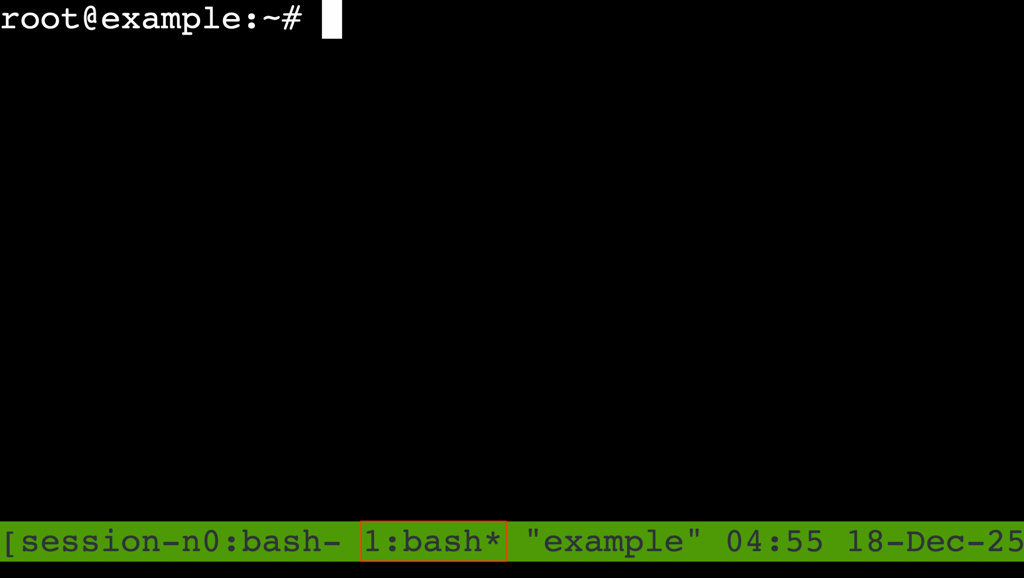
You can start a tmux session by typing tmux in your main terminal window. By default, tmux assigns each session a numeric ID starting at 0.
This approach works for quick tasks but becomes hard to manage when you run multiple sessions at the same time.
We recommend starting each session with a custom name. When you run tmux ls to list sessions, numeric IDs such as 0, 1, or 2 provide little context. Descriptive names like backend-deployment or server-logs make each session’s purpose clear at a glance.
To start a named session, use the -s flag followed by your chosen name:
tmux new -s session-name
After you run this command, tmux clears the terminal and displays a status bar at the bottom of the screen. By default, the bar appears green, but you can customize it.
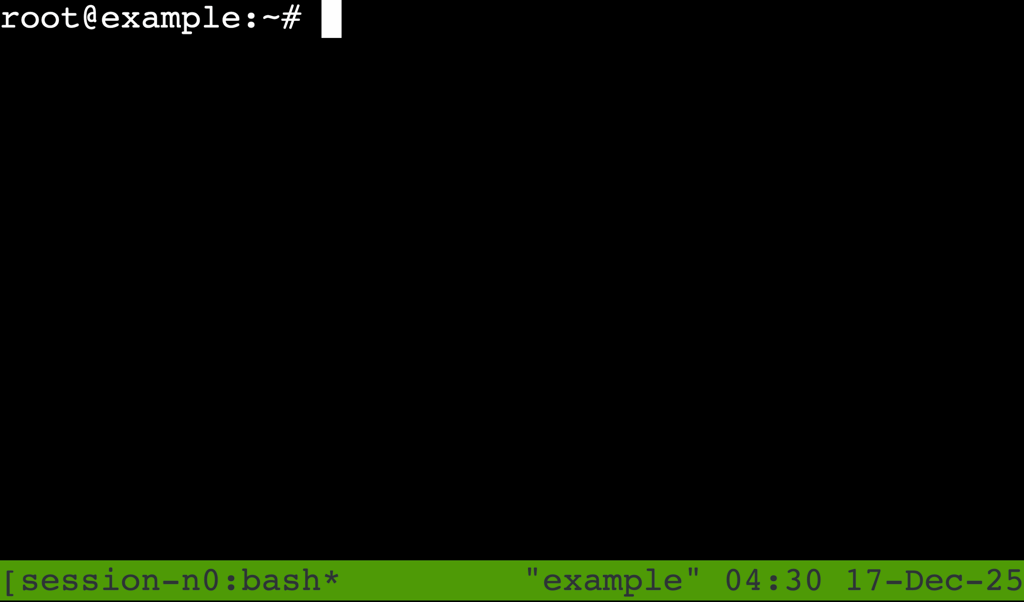
The status bar confirms that you are inside a tmux session. It shows the current shell (usually bash or zsh), the session name, and the current time.
Detach and attach sessions
One of tmux’s most important features is the ability to detach from a session. Detaching sends the session to the background and keeps all running programs active, while returning you to the main shell prompt.
This feature helps when you run long processes, such as database migrations, and need to disconnect your SSH client, or when your internet connection is unstable.
If the connection drops unexpectedly, tmux detaches the session instead of terminating it.
To detach from a session, press the prefix key Ctrl + B, release both keys, then immediately press D. The terminal will display a [detached] message.

To resume work, reattach to the session. If only one session is running, use:
tmux attach
If multiple sessions are active, specify the target session with the -t flag:
tmux attach -t session-name
You can also use a numeric session ID if you did not name the session, for example, tmux attach -t 0. But descriptive names are easier to remember than numbers.
Manage sessions
Effective session management prevents your server from filling up with unused background processes or “zombie” sessions. Check active sessions regularly to stay organized.
To list all active tmux sessions, run the following command in your main terminal:
tmux ls
The output includes the following details:
- Session name. The identifier you assigned or the default numeric ID.
- Windows. The number of open windows in the session.
- Created. The date and time when the session started.
- Attached. Whether the session is currently in use.

If you are currently inside a tmux session, you can switch to another one using the following command. As with reattaching, specify the session name or ID:
tmux switch -t session-name
When you finish a task and no longer need the background processes, kill the session to free system resources.
To terminate the current session, type exit or press Ctrl + D. To kill a specific session without attaching to it, use the kill-session command:
tmux kill-session -t session-name
Warning! Use kill-session with caution. This command immediately stops all processes running in the session. If you have unsaved data in a text editor or an active database operation, you will lose it permanently.
Create and navigate windows
A single tmux session can contain multiple windows, similar to tabs in a web browser or a GUI terminal application. This setup lets you keep different contexts separate within the same project without starting a new session.
For example, a typical workflow might include:
- Window 0 (editor). Running a text editor such as vim or nano.
- Window 1 (server). Running the web server or application.
- Window 2 (git). Executing Git commands.
To create a new window, press Ctrl + B → C. The new window appears in the status bar at the bottom of the screen, marked with a new number and an asterisk (*) to indicate that it is active.
To navigate between windows:
- Next window. Press Ctrl + B → N.
- Previous window. Press Ctrl + B → P.
- Jump to a specific window. Press Ctrl + B, then a number key from 0–9 that matches the window ID.
Rename and organize windows
By default, tmux names each new window after the active process, usually bash, sh, or zsh.
In a complex session with several windows, names like “bash” make it hard to tell which window contains logs and which one holds your editor.
Rename windows to reflect their purpose and make navigation easier:
- Navigate to the window you want to rename.
- Press Ctrl + B → , (comma).
- The status bar changes color and prompts you to edit the name.
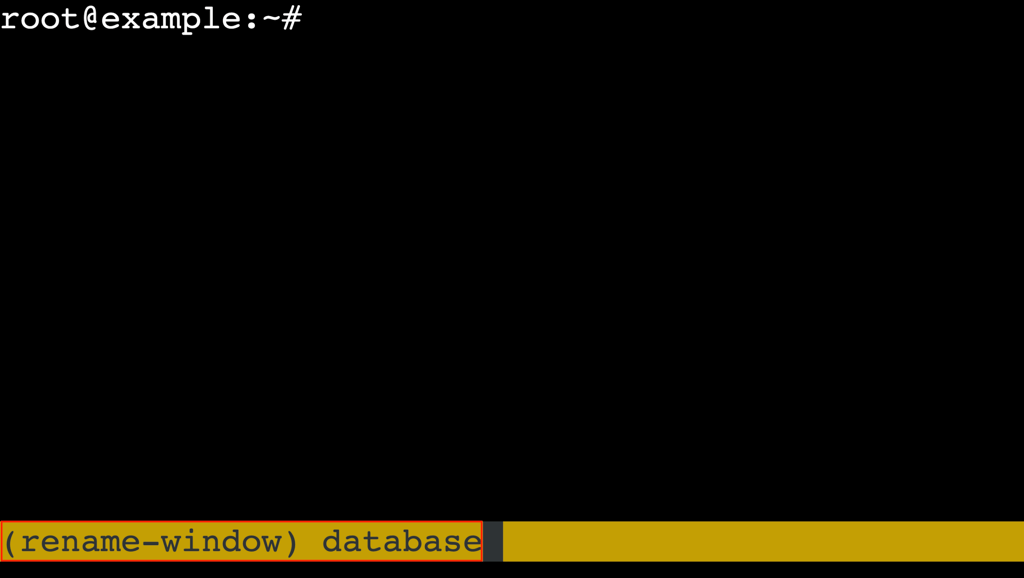
- Delete the existing name, type a new one – for example, database – and press Enter.
The updated name appears immediately in the status bar, making window navigation faster.
Split windows into panes
Windows work well for separating distinct tasks, while panes let you divide a single window into multiple visible sections. This setup is ideal for multitasking when you need to cross-reference information.
For example, you might view real-time server error logs on the left side of the screen while triggering those errors by running commands on the right.
Use the following keybindings to split the current pane:
- Split into left and right panes. Press Ctrl + B → Shift + 5 (the % key).
- Split into top and bottom panes. Press Ctrl + B → Shift + ‘ (the “ key).
You can combine these commands to build complex layouts. For example, split the window left and right first, then split the right pane into top and bottom sections.
This creates one large pane on the left and two smaller panes on the right.
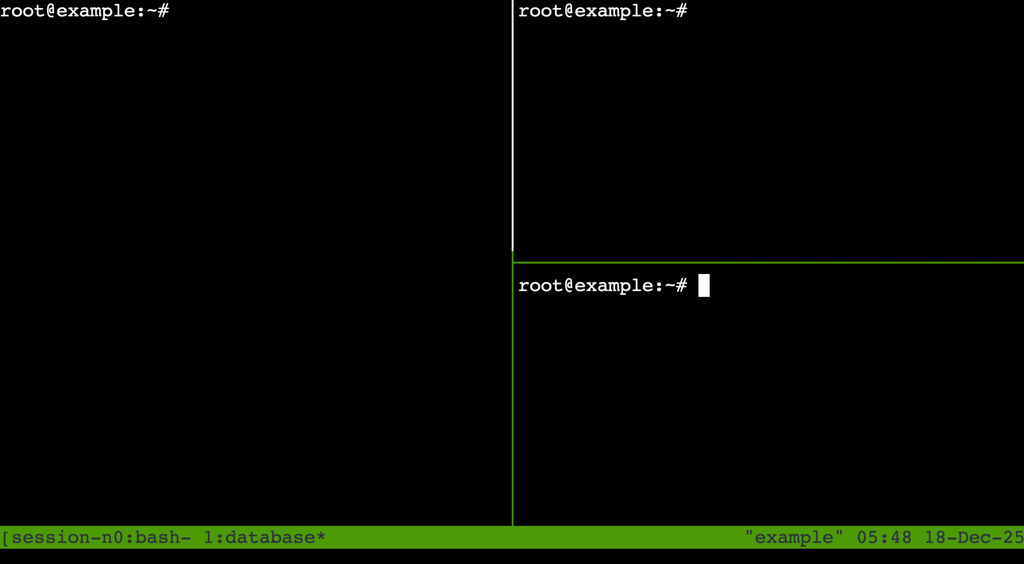
Important! tmux terminology can be counterintuitive. The % key creates a vertical divider, resulting in side-by-side panes. Meanwhile, “ creates a horizontal divider, resulting in stacked panes.
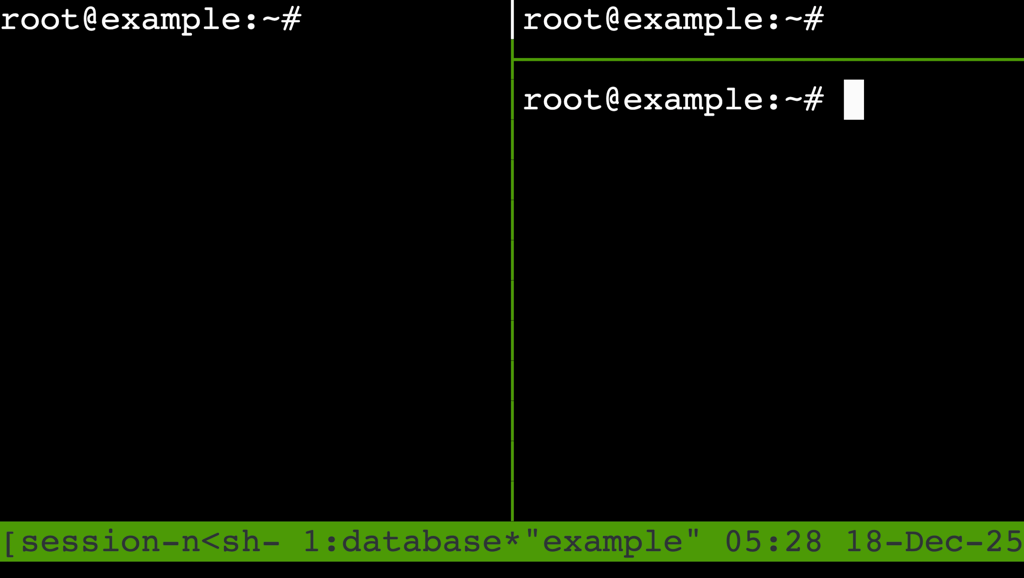
Navigate and resize panes
Once you split a window, typed commands affect only the currently active pane, which has a colored border. You need to move the focus to interact with other panes.
To switch between panes, press Ctrl + B, then use the arrow keys (Up, Down, Left, Right) to move in that direction. Alternatively, press Ctrl + B → O to cycle through panes sequentially.
Also, in some cases, the default 50/50 split is not efficient. You might prefer a large coding pane and a smaller terminal output pane.
To resize panes, press Ctrl + B, then use Ctrl + arrow keys, such as Ctrl + Up or Ctrl + Down, to resize in steps of one cell. Use Meta + arrow keys, like Alt + Up, to resize in steps of five cells.
Close panes
When you finish working in a pane, you can close it without affecting the rest of the window or session. There are three ways to do this, ranging from safe to forceful.
- The shell method (recommended). Type exit or press Ctrl + D in the command line. This safely ends the shell session, similar to logging out. If it is the last pane in the window, tmux closes the window.
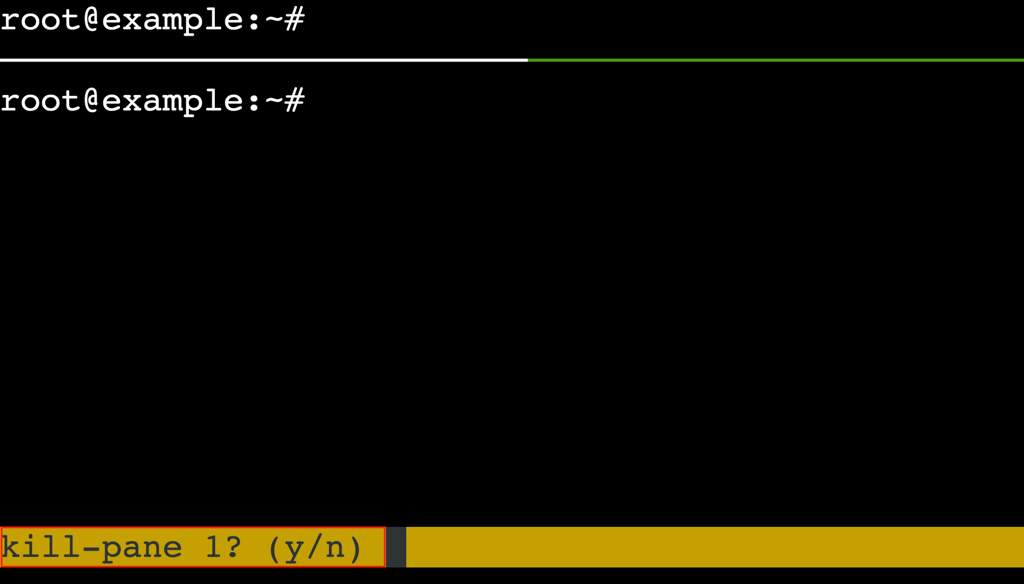
- The fast method. Press Ctrl + B → X. tmux displays a confirmation prompt at the bottom: kill-pane? y/n. Press Y to confirm.
- The forced method. Press Ctrl + B → Shift + 7 (the & key). This kills the entire window and all panes inside it. Use this method only when you are sure you want to close everything in that view, as it can cause accidental data loss.
Tmux keybindings and shortcuts
| Shortcut | Action | Description | Use case |
| Ctrl + B → D | Detach session | Disconnects you from the session while keeping it running. | Log off SSH while a script continues to run. |
| Ctrl + B → C | Create window | Opens a new shell in a separate tab. | Separate a new task, such as database management, from your current task. |
| Ctrl + B → Shift + 5 (%) | Split left and right | Divides the screen into left and right panes. | Read code on one side and logs on the other. |
| Ctrl + B → Shift + ‘ (“) | Split top and bottom | Divides the screen into top and bottom panes. | Keep a monitoring tool, like top, visible below your work. |
| Ctrl + B → X | Kill pane | Closes the active pane after confirmation. | Remove a split pane you no longer need. |
| Ctrl + B → , | Rename window | Changes the window name shown in the status bar. | Organize complex sessions with many windows. |
| Ctrl + B → Z | Zoom pane | Toggles the active pane between full screen and normal view. | Temporarily focus on a specific log file without closing other panes. |
| Ctrl + B → [ | Copy mode | Enters copy mode to scroll through terminal history. Press Q to exit. | Review previous output or copy text. |
| Ctrl + B → W | List windows | Shows an interactive list of all windows in the session. | Navigate sessions when you have too many windows to remember by number. |
| Ctrl + B → Shift + / (?) | List key bindings | Displays a help screen with all configured keybindings. | Quickly look up a shortcut you have forgotten. |
How to customize tmux
To customize tmux, create or edit the .tmux.conf configuration file, then add your custom settings. After saving the file, apply the changes by running tmux source-file ~/.tmux.conf inside a tmux session.
The configuration file can be local (applying only to your user) or global (applying to all users on the server). We recommend using a local configuration file to avoid disrupting other users.
1. Create the configuration file
The local configuration file is named .tmux.conf and resides in your home directory. Starting with version 3.2, tmux also checks $XDG_CONFIG_HOME/tmux/tmux.conf (typically ~/.config/tmux/tmux.conf).
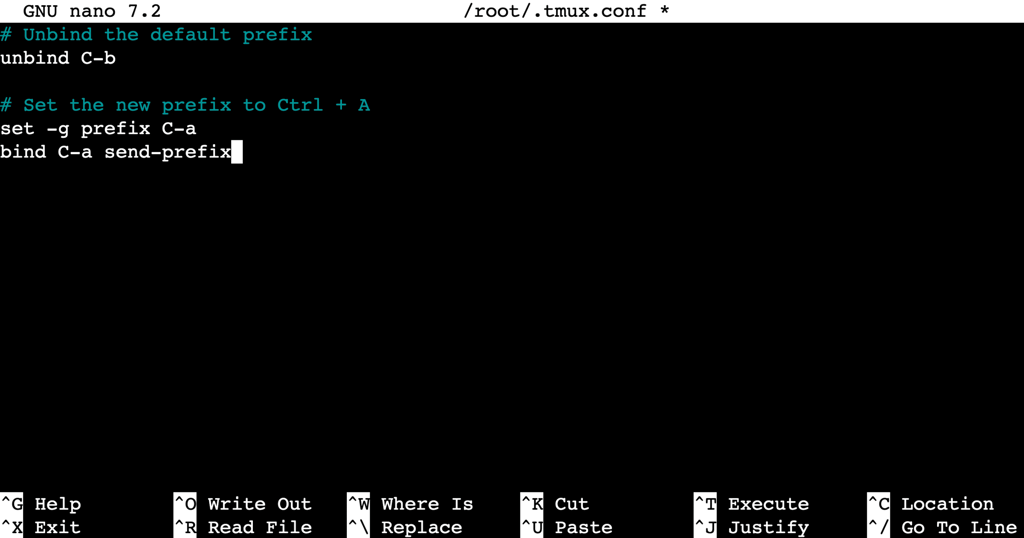
Create or edit the file using the nano text editor:
nano ~/.tmux.conf
2. Add configuration options
You can add commands to change tmux behavior. Below are two common and recommended tmux customizations.
- Change the prefix key. The default Ctrl + B shortcut can feel awkward to reach with one hand. Many users prefer Ctrl + A, similar to GNU Screen. Add the following lines to rebind it:
# Unbind the default prefix
unbind C-b

# Set the new prefix to Ctrl + A
set -g prefix C-a
bind C-a send-prefix
- Enable mouse support. Modern versions of tmux support mouse input. This lets you resize panes and scroll through history by clicking and dragging instead of relying only on keyboard shortcuts.
set -g mouse on
After making your changes, save the file and exit nano by pressing Ctrl + X → Y → Enter.
3. Apply the changes
Saving the file does not apply changes to the running tmux server. tmux reads .tmux.conf only when the server starts, not when you create new sessions.
To apply the new configuration immediately without restarting the server, run the following command inside a tmux session:
tmux source-file ~/.tmux.conf
What are the best practices for using tmux?
Best practices for using tmux include creating a structured workspace, keeping sessions persistent and secure, and avoiding configuration bloat.
By treating tmux as a workspace manager rather than just a window splitter, you can significantly improve your command-line efficiency.
Organize workflows with tmux
Effective use of tmux starts with understanding its hierarchy: session → window → pane.
- Sessions are for projects. Create a separate session for each major project, for example, client-website or server-maintenance. This approach prevents environment variables or command history from leaking between projects.
- Windows are for tasks. Within a session, use windows for distinct tasks, like vim, database, or server-logs. Avoid cramming unrelated tasks into a single window.
- Panes are for views. Use panes for immediate, side-by-side views, such as checking an error log while editing the code that caused it.
💡 Pro tip
Avoid running everything in a single window with many split panes. This makes the terminal hard to read and navigate. If a window becomes too cluttered, move a pane to its own window by pressing Ctrl + B → ! (exclamation point).
Recover from SSH disconnects
The most important function of tmux is session recovery. In a standard SSH session, if your Wi-Fi drops or your computer goes to sleep, the SSH connection breaks and sends a SIGHUP signal that terminates running commands.
tmux prevents this behavior. If your SSH connection times out:
- Log back into the server via SSH.
- Run tmux ls to find your previous session.
- Run tmux attach -t session-name to re-enter the environment.
Your cursor returns to the exact position where you left off, with command history and running processes intact.
Avoid common mistakes
Common tmux mistakes often come from treating it like a simple terminal tool rather than a session manager. Below are the most frequent issues and how to avoid them.
- Nesting sessions. A common beginner mistake is running tmux inside an existing tmux session. This creates an “Inception-like” setup, where one tmux session runs inside another. It quickly becomes confusing because Ctrl + B commands affect only the inner session. To send the prefix to the inner session, you must press Ctrl + B twice. Avoid nesting unless you have a specific reason.
- Forgetting to name sessions. While tmux new works, identifying the correct session from a list like 0, 1, or 2 is frustrating and error-prone. Always start sessions with a name using tmux new -s session-name.
- Leaving unused sessions open. Each tmux session consumes memory. Idle sessions typically use only a few megabytes, but usage grows with the scrollback buffer size, which the history-limit option controls and defaults to 2000 lines per pane. Review active sessions regularly with tmux ls and remove unused ones with kill-session.
What’s the next step in your terminal workflow?
After learning how to use tmux, the next step in your terminal workflow is to integrate it with secure remote management practices to build a more robust server environment.
To get more value from remote sessions, check our guide on essential SSH commands.
It covers core tasks such as navigating directories, managing files, and editing configuration files, all of which you will perform regularly inside tmux sessions.
All of the tutorial content on this website is subject to Hostinger's rigorous editorial standards and values.

Ariffud is a Technical Content Writer with an educational background in Informatics. He has extensive expertise in Linux and VPS, authoring over 200 articles on server management and web development. Follow him on LinkedIn.

Aris is a Content Writer specializing in Linux and WordPress development. He has a passion for networking, front-end web development, and server administration. By combining his IT and writing experience, Aris creates content that helps people easily understand complex technical topics to start their online journey. Follow him on LinkedIn.