How to use Linux screen for effective terminal management
Dec 22, 2025
/
Aris S.
/
9 min Read

Linux Screen is a Terminal multiplexer that lets users create multiple virtual shell sessions in their system. It saves the current process in Terminal, keeping it running even after the user disconnects from the server.
Also known as GNU Screen, this tool is especially useful when managing remote systems like a virtual private server (VPS) hosting via SSH. Its capability to create multiple Terminal sessions helps users multitask and collaborate easily.
In this article, we will explain how to install Linux Screen and its command examples. You will also learn several tips for using and pairing it with our AI assistant, Kodee, to improve Linux terminal productivity.

What Is Linux Screen?
Linux Screen is a command-line utility for creating and managing multiple Terminal sessions. It lets you create a virtual shell whose process remains running even after the user disconnects from the server.
With Screen, VPS users can leave an SSH session and continue where they left off. It is available in most Linux distributions, including Debian and RHEL-based operating systems.
How to Install The Linux Screen Command
After setting up your VPS, connect to the remote server via SSH using PuTTY or Terminal. If you use Hostinger, use our Browser Terminal on hPanel to run Linux commands directly from your web browser.
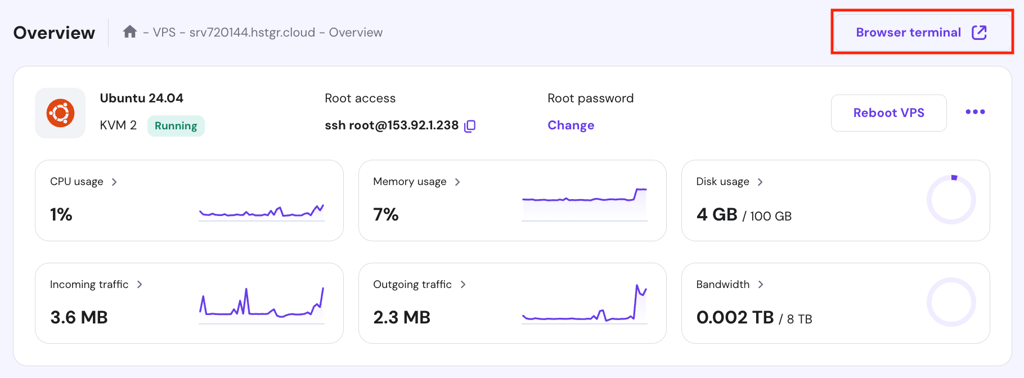
Enter the SSH login credentials. In hPanel, this information is located in the VPS overview menu. Once connected, run the following command to check whether your system has the GNU Screen utility installed:
screen --version

If Terminal returns the version number, your system already has Screen installed. Otherwise, run these commands to install Screen in Ubuntu 22.04 or other Debian derivatives:
sudo apt update
sudo apt install screen
To install Screen in RHEL derivatives like CentOS, use dnf or yum. For newer versions like CentOS 8 or later, use the following dnf commands:
sudo dnf update
sudo dnf install screen
Suggested Reading
Learn more about the best Linux Distributions for your VPS.
Alternatively, install Screen from its repository. Here’s how to do so in Ubuntu 22.04:
- Run these commands to install GCC and the ncurses library. If you already have them, skip this step.
sudo apt -y install gcc
sudo apt -y install libncurses-dev
- Fetch the Screen installation file from the repository using the wget command:
wget https://ftp.gnu.org/gnu/screen/screen-4.9.1.tar.gz
- Unpack the file using the tar command.
tar -xvf screen-4.9.1.tar.gz
- Navigate to the unpacked directory using cd:
cd screen-4.9.1
- Run the installation using this command:
./configure
- Enter this command to build and compile GNU Screen:
make
- Install Screen on your system with the following command:
sudo make install
- Check the Linux Screen version to verify if the installation is successful.
Linux Screen Usage Examples
In this section, we will explore some Linux Screen commands for various usages to help you understand the tool.
Launch a New Screen Session
To start a session, enter the screen command and hit space to close the welcome message. If you don’t specify the session name, Screen will automatically set it as tty1.hostname.
For easier identification, give your session a custom name using the -S option. For instance, use this Screen command to start a new session named session1:
screen -S session1
To quit Screen, enter the exit command. Terminal will output the following message, indicating you have returned to the original shell:

Create a New Terminal Window
Press Ctrl-a + c in a session to create a new Screen window with a shell. This separate command prompt helps streamline Linux Terminal multitasking and improves process isolation.
To create more Terminal instances, repeat the shortcut as needed. Enter the exit command or press the Ctrl-a + k shortcut to close the current window.
Important! To use Linux Screen shortcuts, release Ctrl + a before pressing the next key. The commands are case-sensitive, so ensure you correctly enter the uppercase or lowercase character letters.
Switch Between Windows
Use keyboard shortcuts to switch between windows in a session:
- Ctrl-a + n – cycle to the next screen window.
- Ctrl-a + p – move to the previous window.
- Ctrl-a + ID number – switch to any Screen window.
- Ctrl-a + 1 – switch to the second Terminal. The numbering starts from zero.
- Ctrl-a – press it twice to quickly toggle between the current and previous windows. It will move you directly to the last accessed Terminal window.
View and Select From a List of All Active Windows
Instead of switching back and forth between multiple Screen windows, press Ctrl-a + “ to list all of them. Navigate the list using the arrow keys and press Enter to access the highlighted one.

Linux Screen also lets you move between Screen windows using their name. To do so, press Ctrl-a + ‘ and enter its name.
To change a window’s name, navigate to the Terminal instance in question and press Ctrl-a + : to enable the command mode. Enter the following to change its name:
title "Screen Window Name"
Detach From a Screen Session
To detach from a Screen session and return to the original Terminal shell, press the Ctrl-a + d shortcut. You can do so from any screen window within that session.
The detached session keeps its processes and windows running in the background. If you run an application in this session, it will remain active even after disconnecting from the server.
List All Active Screen Sessions
To list all active sessions, run the following Screen command in your original Terminal shell:
screen -ls
It will show all the running Screen sessions, their detachment statuses, names, and process IDs. This information is used for reattaching to the Screen session.

Reattach to a Detached Screen Session
To reattach to a running Screen session, run the following command in your main system Terminal:
screen -r ID-name
Replace ID-name with the actual Screen session ID or name. For example, you can run either Screen command to reattach to the 1268.session1 session:
screen -r 1268
screen -r session1
Send Commands to a Detached Session
Linux Screen lets you run commands to a detached session without reattaching and opening it. To do so, use this syntax:
screen -S session-name-or-id -X -p 0 command
Replace 0 with the Terminal window number. For example, we’ll run the following command to echo a message in the hostinger session’s first Terminal window:
screen -S hostinger -X -p 0 echo "Test message"
The virtual Screen session won’t produce an output if the command runs properly. Rather, it will print error messages and bash script outputs.
Run Long-Running Processes
Screen keeps long-running processes in the background, allowing you to continue where you left off after disconnecting from the current SSH session. This feature is useful for executing bash scripts, which may take a long time to run.
To do so, create a new Screen session, run the script in the virtual Terminal, and detach from it. Alternatively, execute it via the main shell using the stuff command:
screen -S session -X -p 0 stuff "cd /script/directory/path; ./script.sh"$(printf \\r)
In addition to bash scripts, this feature keeps hosted applications active in the background. For example, it allows your Linux Minecraft server to remain accessible after you quit the session.
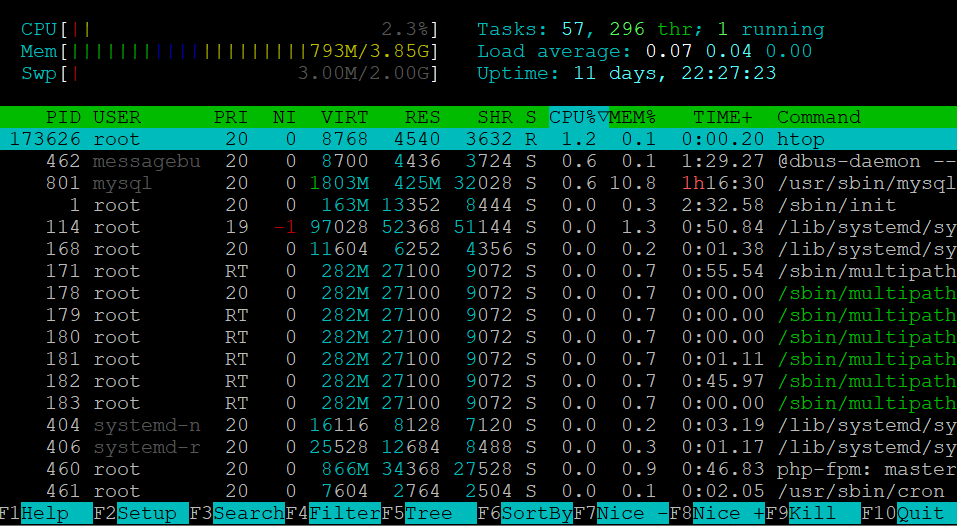
You can also run the tail command with an -f option. Since Screen outputs the new log entries in a virtual session, you can use the main Terminal shell for other tasks.
To monitor the task in the virtual session, install and enable a process tracker tool like htop. To do so, run the following commands sequentially:
sudo apt install htop
screen -r session-name
htop
Remote Collaboration and Pair Programming
Linux Screen lets users create a shared Terminal session to simplify collaboration and task management. An isolated session also makes the command-line interface less cluttered, so users can easily check the command history.
To connect to an existing shared Linux Screen session, access the server via SSH and attach using this command:
ssh user@vps-ip -t "screen -r session-name"
For an SSH client, run the screen command separately after logging in to the server. To simplify remote collaboration with Screen, create several separate Terminal instances in a window by pressing Ctrl-a + S.
Pro Tip
Enabling session sharing in Linux lets multiple users run commands in your server. To improve VPS security, enable the Screen password by entering Ctrl-a + :password in the session.
Run Multiple Tasks Simultaneously
You can create multiple Screen sessions and windows, each running a separate process. This simplifies multitasking and improves process isolation and resource efficiency.
Since each task runs independently, you can terminate unresponsive ones without affecting other processes. Disabling them also lets you reallocate server resources to run another hardware-intensive task.
Running tasks in isolated Terminals also simplifies the log data for easier troubleshooting and debugging. To create a logged Screen session, use the following command:
screen -L -S session-name
Linux Screen Tips for Effective Usage
In this section, we will explain several Linux Screen best practices to help you efficiently use it for VPS management.
Customize Screen Settings Through .screenrc
To modify Linux Screen settings, edit the user’s configuration file in the ~/.screenrc directory. Since Screen doesn’t provide this file by default, create it by entering this command as root:
cd ~; nano .screenrc
In the text editor, write the Screen configurations and press Ctrl-x + y to save the changes. You can tweak various settings, including:
- Escape – modifies the shortcut to send commands to Screen. The default one is Ctrl-a.
- Startup program – sets commands or scripts to automatically run when you start Screen.
- Keybindings – alters the keyboard combinations for Screen commands and actions.
- Number – changes the Terminal window’s numbering setting. You can set it off or start the window with another number.
- Startup message – disables or enables the welcome message shown after starting a Screen session.
Pro Tip
Since the .screenrc file is hidden, use the ls -a command in the directory to check whether it is successfully created.
For example, add the following snippet to disable the welcome message and change the default ctrl-a prefix key:
#Disable the welcome message
startup_message off
#Change prefix to alt-tab
escape ^Ii
Use Meaningful Window Titles for Easier Session Navigation
Having multiple screen sessions running complicates navigation, especially when they share the same name. To simplify the task, we recommend giving them a descriptive name, like the running process or script.
In addition to using the -S option to start a new session with a custom name, Screen lets you rename existing ones. To do so, attach to the session in question, press the Ctrl-A + : shortcut, and enter the new name.
If your Screen session has multiple windows, set their default name using the -t option. Here’s the command syntax:
screen -S Session-name -t Window-title
Running the command in the main Terminal will create a new session called Session-name. When you create a new window in it, the name will be set to Window-title by default.
Employ Split-Screen Functionality for Multitasking
GNU Screen lets users split a Terminal window manager into separate regions with independent shells. It makes multitasking easier as they can move between different Terminals while keeping all of them visible.
Press Ctrl-a + S to split the window horizontally and Ctrl-a + | to separate it vertically. Using the same commands, you can separate the new region further to create a smaller Terminal window.
By default, the new region is an unusable, blank window. To activate it, move to the new region using Ctrl-a + tab and create a new window by pressing Ctrl-a + C. Repeat this process for all regions.
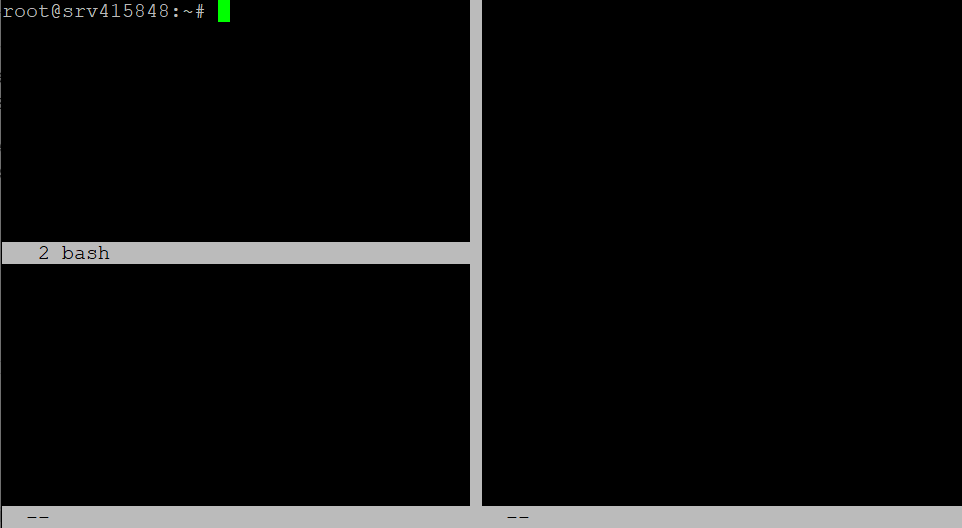
Alternatively, navigate by changing the input focus via the command mode. For example, enter Ctrl-a + :focus right to switch to the region on the right side of your current window.
You can also rebind the Terminal window navigation commands by editing the .screenrc file. For example, this snippet lets you switch regions by pressing Ctrl-a + navigation arrow:
#Rebind the split-window navigation shortcuts
bind ^[[A focus up
bind ^[[A focus up
bind ^[[B focus down
bind ^[[C focus left
bind ^[[D focus right
Use Keyboard Shortcuts
Understanding Linux Screen’s keyboard shortcuts is crucial for using and navigating the tool. Some of the essential key combinations are:
- Ctrl-a + c – create a new window.
- Ctrl-a + p and n – move to the previous and next window.
- Ctrl-a + w – display the Terminal window list.
- Ctrl-a + A – rename the current window.
- Ctrl-a + : – enter the command mode.
- Ctrl-a + x – close the current window.
- Ctrl-a + a – cancel the initial Ctrl-a shortcut.
Refer to the GNU Screen manual for the comprehensive command and shortcut list. To help you remember the combinations, change the default key bindings based on your preference by editing the .screenrc file.
Using Kodee with Linux Screen
Hostinger’s VPS AI integration simplifies server management with Linux Screen. Kodee, our AI Assistant, lets you enter simple prompts to generate Screen-related commands, scripts, and step-by-step instructions tailored to your server setup.
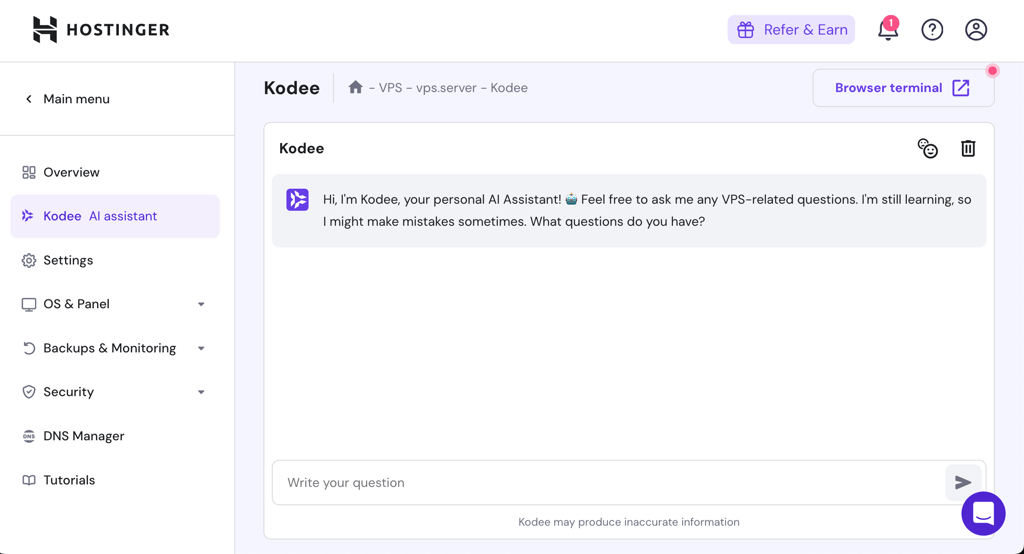
Kodee is available with all of Hostinger’s VPS packages. To access it, log in to hPanel and click VPS on the top menu. Select the server from the list and click Kodee from the sidebar.
Important! Due to AI’s limitations, the tool may give outdated or inaccurate information. Always double-check the outputs to make sure they are still accurate.
Enter your prompts or questions into the field and press Send. For example, you can ask how to install and use GNU Screen in your system:
- I am using an Ubuntu 22.04 VPS. Can you give me the steps to install Linux Screen?
- I have installed Linux Screen in my system. Can you explain how to use it?
- Can you give me a command to start a new Linux Screen session?
- Please generate a command to run a bash script in a detached session from my main Terminal.
- I want to change my Linux Screen’s keybindings. Can you generate configuration settings for the .screenrc file?
Ensure your AI prompts for VPS management are clear and specific to allow the assistant to generate accurate results. For instance, specify your VPS operating system since Linux commands vary depending on the distribution.

Conclusion
Linux Screen is a multiplexer that lets you create multiple virtual Terminal sessions in your system. It keeps the session’s process running in the background even when the user disconnects from the server.
To install this tool in your system, use the package manager command utility like apt, yum, or dnf. Alternatively, download it from the official repository using the wget command. Once installed, run the screen command to start a new session.
In the new session, press Ctrl-a + c to create new Screen windows and Ctrl-a + a to switch between them. Use the Ctrl-a + d shortcut to detach from Terminal sessions and the Screen -r command to reattach.
Screen lets you run commands remotely in the detached session using the -X option, which is commonly used for long processes like script execution. It also supports a split-screen Terminal, which simplifies multitasking and collaboration.
If you use Hostinger VPS, enter prompts into our AI assistant, Kodee, to help you navigate Screen.
Learn More About VPS
All of the tutorial content on this website is subject to Hostinger's rigorous editorial standards and values.

Aris is a Content Writer specializing in Linux and WordPress development. He has a passion for networking, front-end web development, and server administration. By combining his IT and writing experience, Aris creates content that helps people easily understand complex technical topics to start their online journey. Follow him on LinkedIn.