SSH connection refused: what it is, causes, and 6 effective methods to fix it
Dec 22, 2025
/
Nadia D.
/
6 min Read
When using an SSH (Secure Shell) protocol to access a remote server, you may encounter an SSH “Connection refused” error message. It is a common error indicating that your SSH server fails to accept connections.
In this tutorial, we will explain what the SSH “Connection refused” error is and its potential causes. Also, we will walk you through the six effective methods to resolve this SSH connection error.
Download ultimate SSH commands cheat sheet
What is SSH connection refused?
SSH “Connection refused” is a network communication protocol failure that occurs when connecting to an SSH server. When the SSH connection fails, you won’t be able to deploy secure encryption on your site and run more advanced tasks such as remote commands. Usually, this error is caused by a wrong SSH port, incorrect credentials, and a disabled SSH service.
What causes the SSH connection refused error
In this section, we will uncover the most common SSH “Connection refused” causes.
| Error code | Connection refused |
| Error type | Network communication protocol error |
| Error causes | Network problem Incorrect SSH installation Wrong credentials Security system configuration |
SSH port is wrong
The SSH port grants you access to a remote server. This is why it’s important to ensure you’re pointing at the right one when opening the SSH port. Otherwise, you will get the SSH “Connection refused” message when trying to perform a remote connection.
Credentials are incorrect
Typing in the wrong credentials a few times will result in failed login attempts, causing the SSH “Connection refused” error. Make sure you’re entering the correct username, password, hostname, and port to avoid an SSH connection failure.
SSH client is not installed
Another common issue that causes the SSH “Connection refused” error is not having SSH client software installed on your localhost. An SSH client enables a secure connection to SSH servers. In short, you won’t be able to initiate a connection request to an SSH server without the SSH client in the first place.
SSH Daemon is not installed on the server
Besides the SSH client, you also need to install SSH Daemon to access a remote server from your local device. SSH Daemon will accept authenticated requests made through an SSH Client. An SSH “Connection refused” issue may occur when the SSH Daemon is not properly configured.
SSH services are disabled
Traffic surges and DDoS attacks are possible reasons for a disabled SSH service. When your SSH service is down, SSH Daemon won’t be able to accept connections to a remote server. Therefore, you will face an SSH “Connection refused” message.
Firewall prevents SSH connection
When a firewall protects your server from unauthorized incoming connections, it may also block SSH connections. You will need to apply specific firewall rules to enable the SSH connection requests and avoid the SSH “Connection refused” error.
6 ways to fix the SSH connection refused error
After identifying what has caused the SSH “Connection refused” error, it’s time to fix it.
In this section, we will take a closer look at the six proven methods to do so.
1. Change the SSH port number
An SSH connection runs on port 22 by default, but the port may be closed when left unused for a while due to security reasons. Therefore, ensure the SSH port is open before connecting to a remote server.
Use the following command to check for ports listening to requests:
sudo lsof -i -n -P | grep LISTEN
However, the default open port 22 is more vulnerable to cyber attacks. We encourage you to use a different port to reduce security risks.
Here at Hostinger, we use the custom SSH Port 65002. Hence, you will see 65002 as the default port number when accessing SSH details on your hPanel.
Suggested Reading
For Hostinger’s VPS hosting users, we suggest checking out our tutorial on how to change the SSH port on VPS.
2. Double-check the credentials
Make sure you’re using the correct numbers and characters for the following information:
- Host name – this is your domain name or your server’s IP address.
- Username – enter your FTP username.
- Port – Hostinger users should use the custom port 65002, while others can opt for the default port 22.
- Password – type in your FTP account’s password.
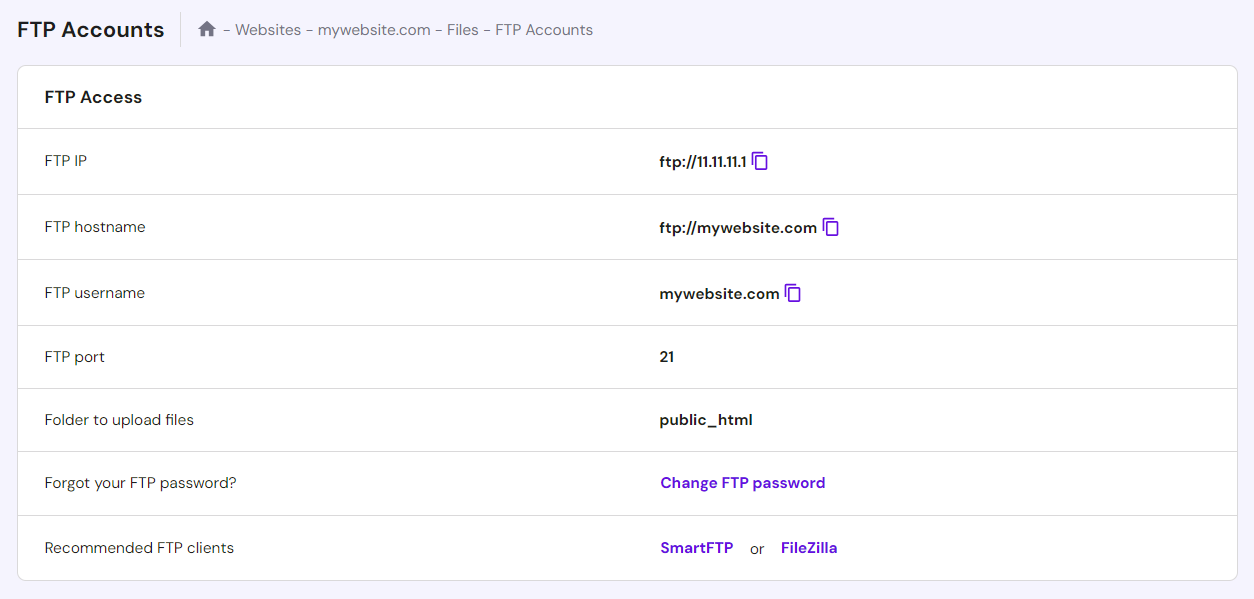
For Hostinger users, your SSH username and password will be the same as your FTP account. You can find these credentials on your hPanel.
To manage your password, navigate to the hPanel dashboard and access Files → FTP Accounts. You will see your FTP username details and an option to change your FTP password.
Note that if you’re using other web hosts, you may have to access these details in a different way.
3. Make sure SSH is enabled
SSH Daemons won’t be able to listen and accept requests if you don’t enable your SSH server.
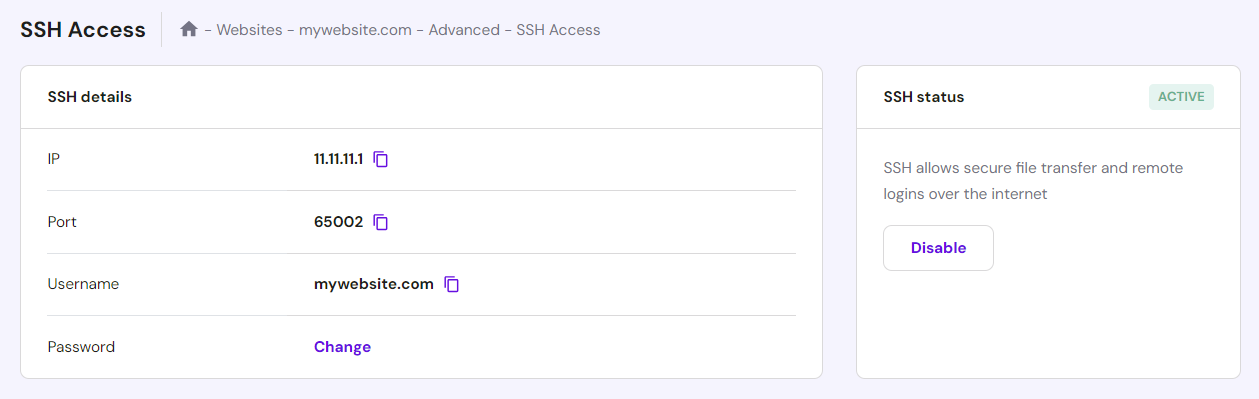
Hostinger users can manage SSH settings through the web control panel. Access Advanced → SSH Access on the sidebar of the hPanel dashboard. Check if your credentials are correct and click Enable to activate your SSH.

4. Make sure SSH client is installed
Setting up an SSH Client on your device will let you perform remote commands over your server. Firstly, check if you’ve installed one on your device by entering this on your terminal:
ssh
Hostinger users can copy the SSH command from hPanel. Go to the Advanced section, click SSH Access, and you will see the command text under the Log in to SSH part. Then, click the Copy icon.
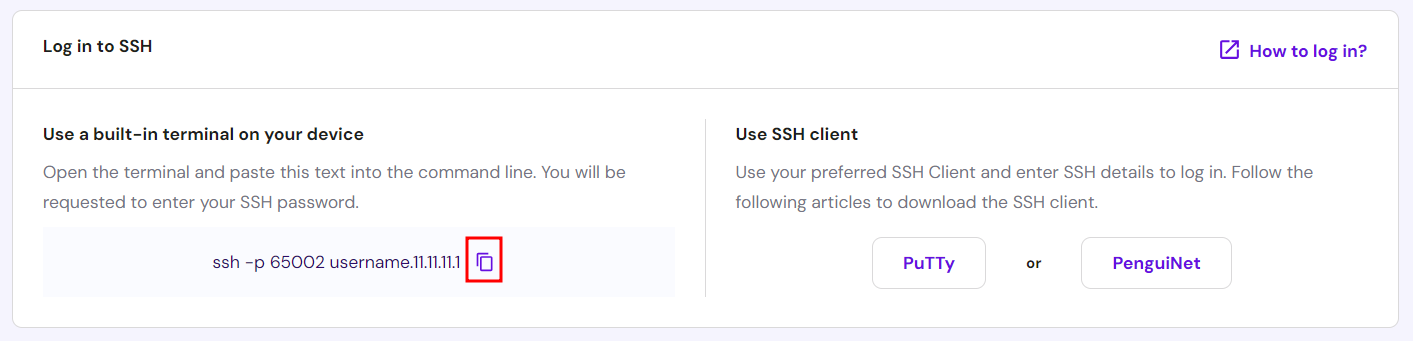
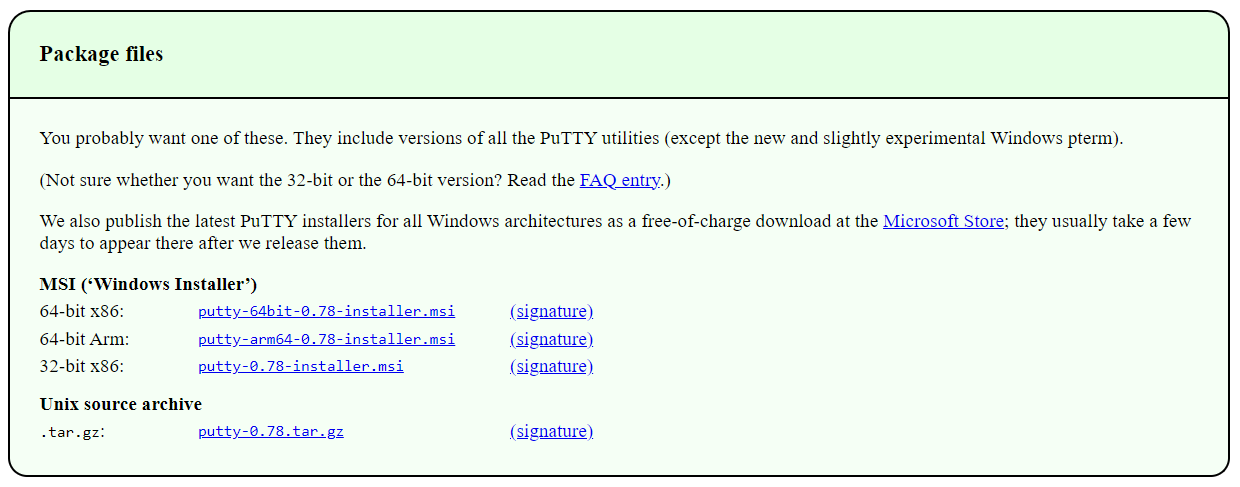
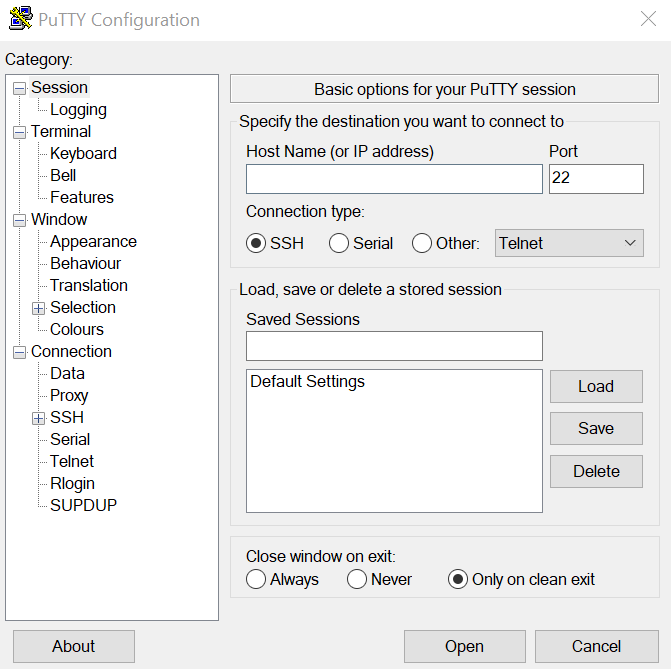
Linux and macOS users can use the built-in terminal to connect accounts via SSH. Meanwhile, Windows users should use an SSH client to establish a connection to their accounts, for instance, PuTTY.
On the same Log in to SSH window, click the PuTTY button, and you will see links to download the package files.
Use the SSH details on your hPanel, such as the server IP address, username, port, and password, to connect to PuTTY.
Suggested Reading
For more PuTTy configuration details, check our guide on how to use the PuTTY SSH terminal.
5. Ensure SSH Daemon is installed on the server
When a Daemon is unavailable, the SSH localhost may also block an incoming connection.
Most web hosting companies provide a pre-installed SSH Daemon on their server, but the SSH Daemon’s status might be “Down.” If that is the case, contact your hosting provider about this issue.
Alternatively, you can restart your SSH service using the following command:
command sudo service ssh restart
You can also check whether the service is working properly through PuTTY. To do so, use these commands:
- For Debian 12 and Ubuntu 24.04 users – sudo service ssh status
- For CentOS 9 users – sudo service sshd status
- For systemd users – sudo systemctl status sshd -l
If you can’t locate the SSH Daemon, you will need to set it up to start accepting connections.
Linux users can manually install an SSH tool like OpenSSH and enter this command:
sudo apt install openssh-server
6. Check your firewall settings
Manage your firewall settings to avoid it blocking SSH connections. Enable your iptables on the server and see if it shows a “REJECT” or “DROP” on your SSH port settings. Then, change it to “ACCEPT.”
You can use this command on your terminal to save the updated rules:
service iptables save
For Ubuntu or Debian users, allow your port on firewall settings using this command:
sudo ufw allow port /tcp
After that, you need to reload the firewall setting by entering this on your command line interface:
sudo ufw reload
Check if the status has changed to “ALLOW” by typing this command:
sudo ufw status
If none of these work, reset the firewall first before applying rules to allow SSH connections. If you use iptables, run the following commands:
sudo iptables -F
sudo iptables -X
sudo iptables -t nat -F
sudo iptables -t nat -X
sudo iptables -t mangle -F
sudo iptables -t mangle -X
For ufw, use this command instead:
sudo ufw reset
💡 Pro Tip
Hostinger VPS customers can use Kodee, our AI-powered assistant, to reset firewall rules with ease. Simply type a prompt like "Please reset the firewall rules on my VPS to the default state."
Conclusion
SSH “Connection refused” is a common type of network communication protocol issue you may face when trying to connect to a server remotely. Luckily, you can easily identify its cause and fix the problem by enabling specific settings.
Let’s recap the possible causes of SSH “Connection refused” and effective methods to solve them:
- Wrong port – change to Port 22 or 65002 for Hostinger users to securely connect to your SSH server.
- Wrong credentials – double-check for typos when writing your username, password, and IP address.
- SSH client is set incorrectly – ensure you enable a command prompt on your terminal window or use PuTTY.
- No SSH Daemon installed on the server side – make sure you have installed it to access the remote server.
- Disabled SSH – check whether your SSH service is down, and don’t forget to enable the SSH access setting on your hosting panel.
- Firewall settings – allow SSH connections by applying specific settings on your firewall.
We hope this article helps you understand the SSH “Connection refused” error message and how to fix the SSH connection. If you have any further questions, leave a comment below.
All of the tutorial content on this website is subject to Hostinger's rigorous editorial standards and values.

Nadia is a curious thinker that enjoys sharing her IT and digital marketing knowledge through written pieces and helping people success online. In her free time, she spends time in the streets or cafes learning about architecture and culture through urban sketching.