How to flush DNS: A step-by-step guide for Windows, macOS, Linux, and web browsers
Aug 22, 2025
/
Aris S.
/
5 min Read

The steps for flushing the domain name system (DNS) cache vary depending on your operating system and web browser. To clear your computer’s DNS, open your system’s command-line interface and run the appropriate commands with administrator privileges. For browsers, head to the DNS management page and select the option to delete the cache.
Flushing DNS removes corrupted or outdated data from your system, helping to resolve connectivity issues and boost security. Whether you’re an administrator or a regular user, knowing how to do this can save you time and frustration.
In a hurry? Check out this video tutorial for a quick and easy walkthrough on flushing your DNS cache.

We’ll cover the steps for each system and explore use cases where this process is helpful. But first, let’s take a quick look at what DNS cache actually is.
What is a DNS cache?
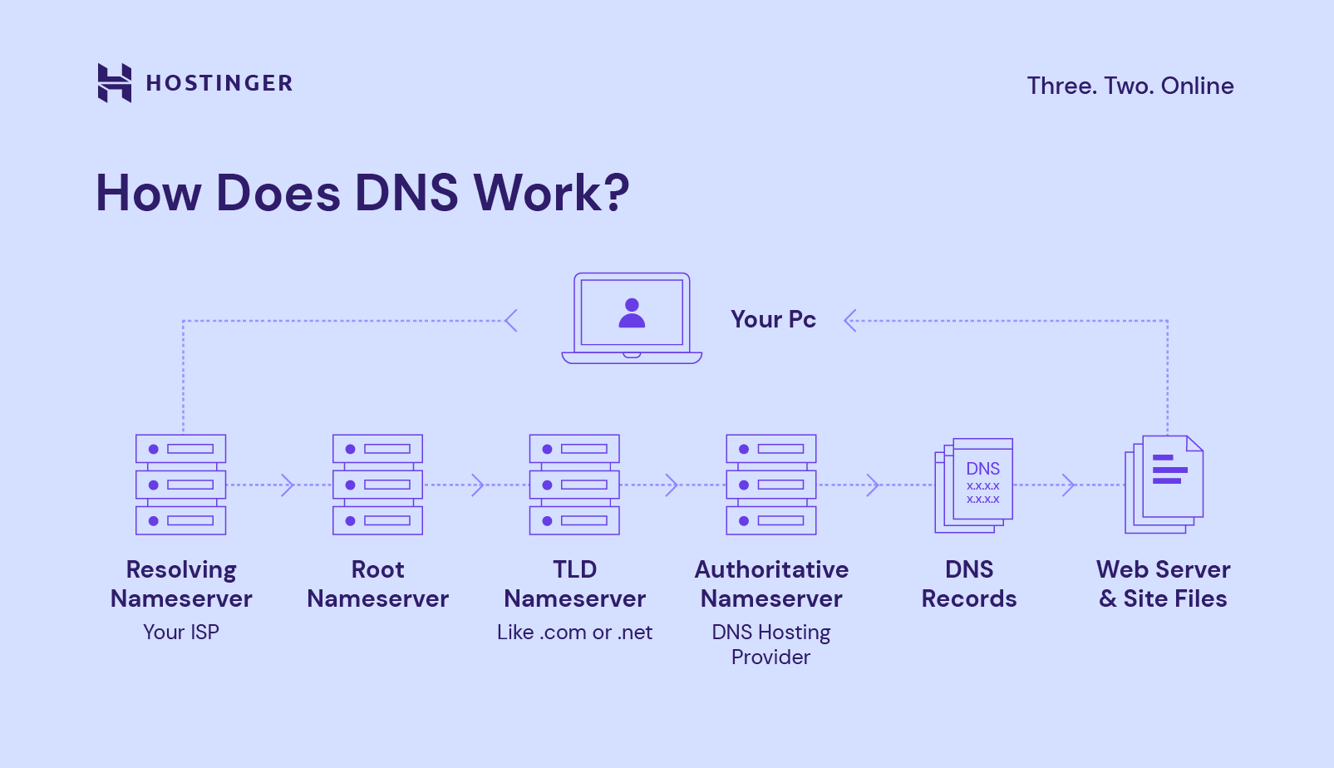
A DNS cache is a file your device creates to remember how to find websites. It stores information like a website’s IP address after you visit it, helping your browser load the site faster next time.
This data comes from a process called a DNS lookup, where your browser contacts a domain name system (DNS) server to retrieve the information.
However, the cache can sometimes become outdated or corrupted, which may prevent your browser from loading the site correctly. In such cases, clearing the DNS cache forces your browser to fetch fresh data.
How to flush DNS cache on different operating systems
The steps to flushing the DNS cache differ across operating systems. We’ll walk you through the process on Windows, macOS, and Linux.
How to flush DNS cache on Windows 10 and Windows 11
Flushing DNS on Windows is similar across most versions, especially newer ones. Here are the steps:
- Click the Start button and look for Command Prompt by entering cmd into the search bar.
- Right-click Command Prompt and select Run as administrator.
- Enter the following flush DNS command:
Ipconfig /flushdns
Your system will automatically delete the stored DNS cache and reset the resolver settings. Once the process is complete, you should see a confirmation message in Command Prompt.
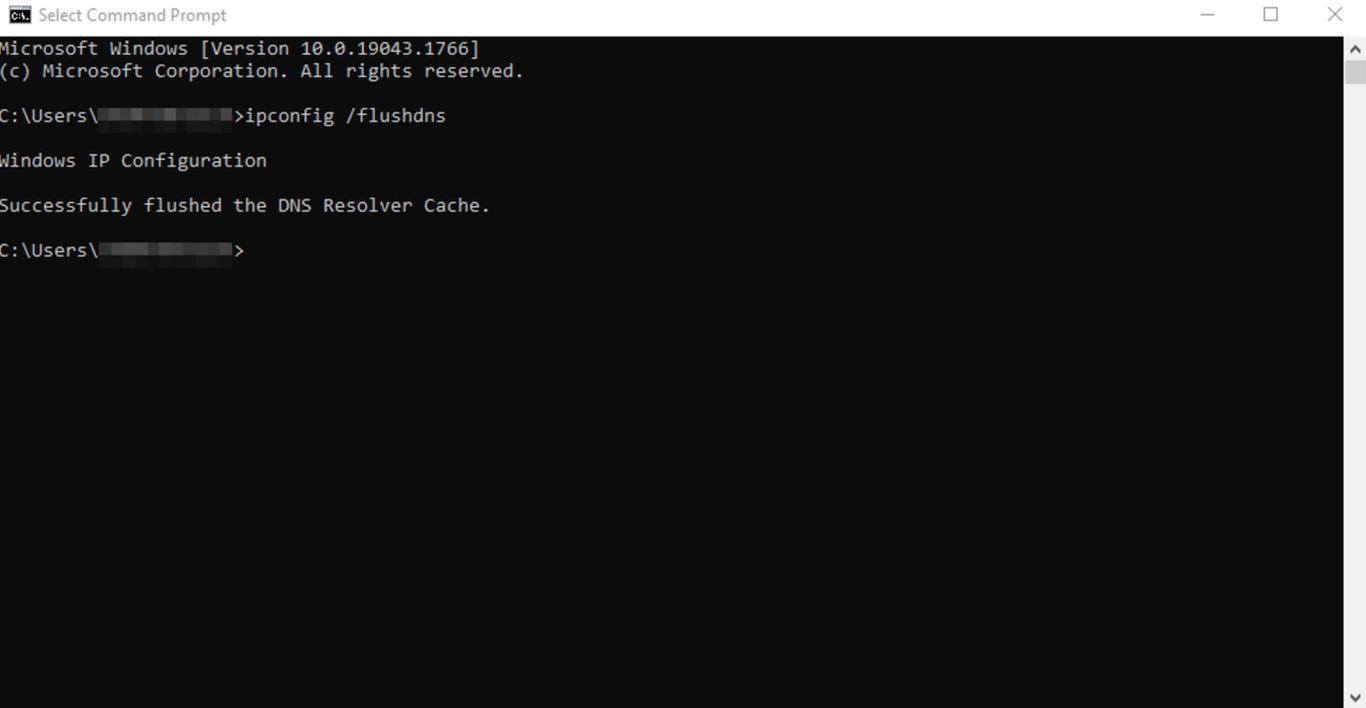
Important! Make sure to launch Command Prompt as an administrator. Otherwise, you won’t have the necessary permissions to flush the DNS cache.
How to flush DNS cache on macOS
Flushing the DNS cache on macOS requires different commands depending on the operating system version. Follow these steps:
- Click the magnifying glass icon on the top menu bar. Alternatively, press Command + spacebar.
- In the Spotlight Search menu, find Terminal. Hit Enter.
- Based on your macOS version, type the following command to flush the DNS cache:
- macOS Big Sur (11), Monterey (12), Ventura (13), Sonoma (14), and Sequoia (15):
sudo dscacheutil -flushcache; sudo killall -HUP mDNSResponder - macOS El Capitan (10.11), Sierra (10.12), High Sierra (10.13), Mojave (10.14), or Catalina (10.15):
sudo killall -HUP mDNSResponder - macOS Yosemite (10.10):
sudo discoveryutil udnsflushcaches - macOS Lion (10.7), Mountain Lion (10.8), or Mavericks (10.9):
sudo killall -HUP mDNSResponder - macOS Snow Leopard (10.6):
sudo dscacheutil -flushcache - macOS Leopard (10.5):
sudo lookupd -flushcache
- macOS Big Sur (11), Monterey (12), Ventura (13), Sonoma (14), and Sequoia (15):
- If Terminal asks for authorization, enter your user password. This will grant you the required admin privileges to run the command.
On macOS, most DNS flush commands don’t display a confirmation message, even when they work. If you run the command and don’t see an error, it likely completed successfully. To double-check, try visiting a website you recently accessed. If it takes a bit longer to load or the previous issue is resolved, the flush probably worked.
Pro tip
Still having issues? See our guide on DNS server not responding on Windows and macOS for more troubleshooting tips.
How to flush DNS cache on Linux
Commands to clear DNS cache on Linux vary by distribution since they might use different DNS services. For example, Ubuntu uses dnsmasq, while Red Hat Enterprise Linux typically utilizes NCSD.
If you’re unsure which DNS service your system uses, check it by running the following command in Terminal. Replace dns_service with dnsmasq, ncsd, or bind:
sudo systemctl status dns_service
Here’s the general procedure to flush DNS caches on a Linux system:
- Press Ctrl + Alt + T to open Terminal.
- Enter these commands according to the DNS service your distribution uses:
- Dnsmasq:
sudo /etc/init.d/dnsmasq restart - NCSD:
sudo /etc/init.d/nscd restart - BIND:
sudo /etc/init.d/named restart && sudo rndc restart && sudo rndc exec
- Dnsmasq:
- Enter your account password to authorize the command execution. If you log in as root, you can skip this step.
The DNS service will stop briefly and reboot. If systemctl can’t find any of the DNS services, use the following command to flush the cache:
sudo resolvectl flush-caches
How to flush DNS cache in web browsers
Web browsers typically store their own DNS cache, so you might need to flush them separately. Here’s how to do it in popular browsers:
- Open your web browser.
- In the address bar, enter the following address based on your browser:
- Google Chrome:
chrome://net-internals/#dns - Microsoft Edge:
edge://net-internals/#dns - Firefox:
about:networking#dns - Opera:
opera://net-internals/#dns
- Google Chrome:
- Press Enter to open the DNS management page.
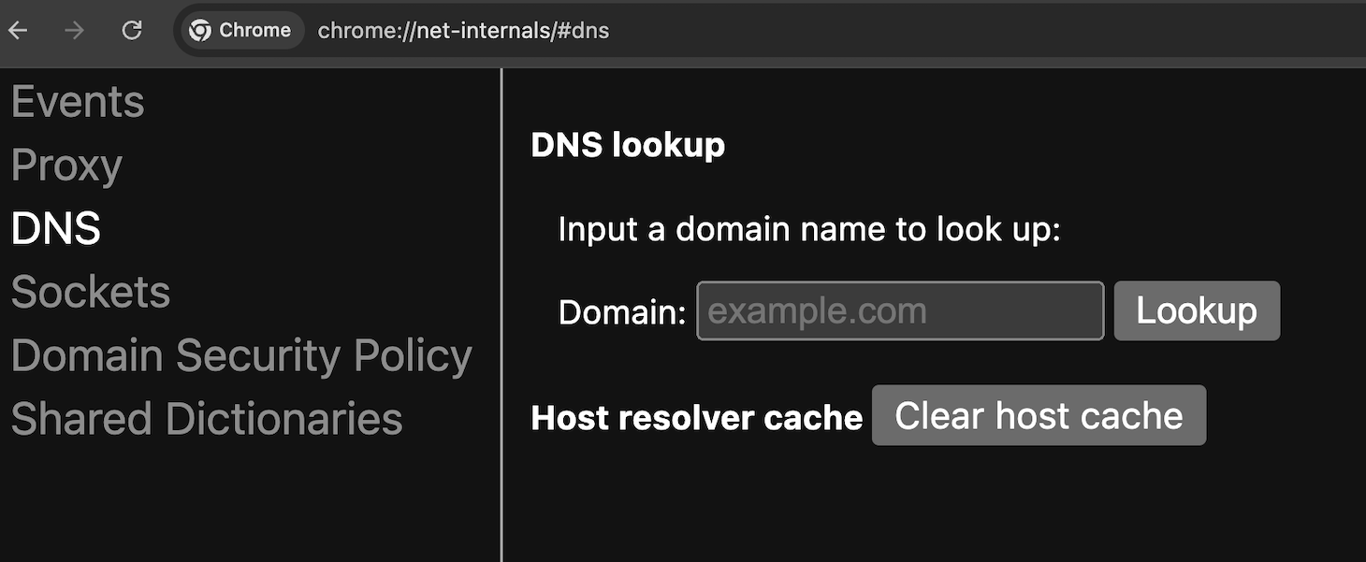
- Click on the button that says Clear host cache or Clear DNS cache. The name depends on your browser.
- Restart your web browser. It should redownload all the DNS details when you revisit a website.
Important! Safari doesn’t have a page for flushing the DNS cache and uses the system-level configuration instead. This means resetting your macOS system’s DNS will also flush the web browser’s data.
Why flush DNS?
Flushing your DNS cache removes outdated or incorrect data that can interfere with how websites load. While DNS records usually expire on their own (thanks to a setting called time-to-live, or TTL), some situations call for a manual refresh.
A common example is troubleshooting website issues. If a page isn’t loading properly, clearing your DNS cache forces your system to request fresh information from the DNS server, often resolving glitches caused by outdated or corrupted records.
Flushing the cache can also protect against DNS spoofing. In rare cases, attackers manipulate cached DNS data to redirect you to fake or malicious websites. Resetting the cache clears any tampered entries and helps restore accurate routing.
It’s also useful after DNS changes. If you’ve updated your domain’s DNS settings, like pointing it to a new hosting provider, your system might still rely on outdated information. Flushing the cache forces your device to request the latest records, helping your changes take effect faster and reducing delays during DNS propagation (the time it takes for updates to spread across the internet).
How often should I flush my DNS cache?
You don’t need to flush your DNS cache regularly since it clears itself automatically after a set period. However, it’s a helpful step when you’re troubleshooting website issues, switching DNS providers, or updating domain settings.

Is it safe to flush DNS cache?
Flushing your DNS cache is a safe and effective way to resolve common browsing issues. It clears outdated or corrupted data, allowing your system to fetch fresh DNS information and connect to websites more reliably.
Keep in mind that some browsers have their own DNS cache, so it’s worth clearing both your system and browser cache for best results. On most systems, flushing the DNS cache requires admin access, but browser-level clearing is often just a click away.
When done correctly, flushing your DNS cache helps websites load properly, protects against DNS spoofing, and speeds up the effects of changes like domain or hosting updates by reducing DNS propagation delays.
All of the tutorial content on this website is subject to Hostinger's rigorous editorial standards and values.

Aris is a Content Writer specializing in Linux and WordPress development. He has a passion for networking, front-end web development, and server administration. By combining his IT and writing experience, Aris creates content that helps people easily understand complex technical topics to start their online journey. Follow him on LinkedIn.