How to solve the “DNS server not responding” error on Windows and macOS?
Aug 22, 2025
/
Amanda B. & Brian
/
8 min Read
Encountering a “DNS server not responding” error can be frustrating, but it’s a fixable problem. The solutions range from simple steps to more advanced troubleshooting. Here’s what you can do to fix it:
- Use a different web browser to access the website
- Troubleshoot network issues using your computer’s built-in tool
- Disable unused connections
- Restart your internet router
- Flush your computer’s DNS cache
- Change your DNS server address
- Disable Internet Protocol version 6 (IPv6)
- Restart your computer and boot into safe mode
- Turn off your firewall and antivirus
- Update your network adapter driver (Windows).
The culprit of this error can be either on the server or the client side, so it’s best to try all the possible solutions starting from the top and moving on to the next if the issue persists.
Now, let’s explore in more detail how you can fix the issue.
How to solve DNS server not responding: A video tutorial
Prefer a visual walkthrough? Check out this step-by-step video on how to fix the “DNS server not responding” error.
How to solve the “DNS server not responding” error?
Here’s how to fix the “DNS server not responding” error on Windows and macOS:
1. Use a different browser
Using a different web browser to visit the site that’s experiencing the domain name system (DNS) issue is the easiest solution to the error.
For instance, if you primarily use Google Chrome, try to access the web page using Safari, Microsoft Edge, or Mozilla Firefox.
If this method works, then your default browser is the one causing the error. In most cases, clearing the browser cache and updating it to the latest version will solve network connection issues.
Here’s how to update Chrome:
- Click the three-dot icon at the top right corner of your browser window.
- Navigate to Help → About Google Chrome.
- If a new update is available, click the Update Google Chrome button.
If the “DNS server not responding” error appears across different browsers, try the second method.
2. Troubleshoot network issues
Troubleshooting network issues helps resolve DNS errors if they’re caused by connectivity issues. Try switching between different networks to check whether your internet connection is the problem.
Let’s say you encounter a DNS server error while connected to Wi-Fi. In that case, try using your mobile data instead. If you can access the web page just fine, it means the problem is with your Wi-Fi connection.
After identifying the problematic network, you can run the diagnostics tool on your computer to detect and fix internet connection problems:
Windows
- Make sure you’re connected to the troubled network.
- Go to Control Panel → Network and Internet → Network and Sharing Center.
- Under Change your networking settings, click Troubleshoot problems.

- Navigate to Additional troubleshooters → Internet Connections, then click Run the troubleshooter.

- Wait for the troubleshooting process to complete. If the system detects a network connection error, follow the instructions to fix it.
macOS
- Connect to the network you’re having the problem with.
- Hold the Option key, then click the Wi-Fi status icon at the top menu bar simultaneously.
- Choose Open Wireless Diagnostics.
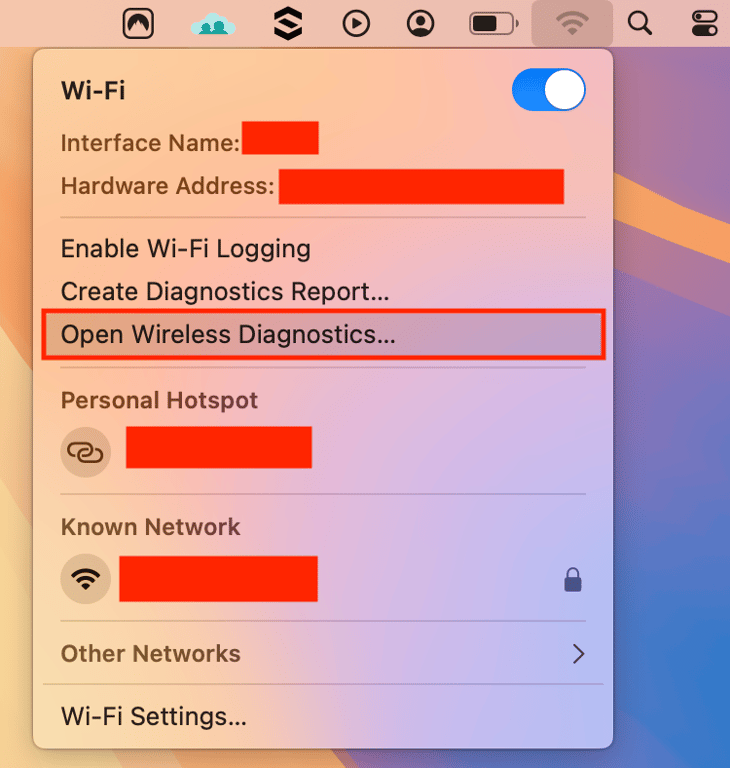
- Follow the on-screen instructions to examine your network connection.
- Once the scanning process is complete, click the Info icon in the Summary window to learn more about each detected issue and the suggested solution.
3. Disable unused connections
Disabling unused connections eliminates possible conflicts in your network, potentially fixing the DNS error. These include a virtual network, like a VPN, and a wired adapter, like an Ethernet connection.
Follow these steps to disconnect additional network connections on Windows:
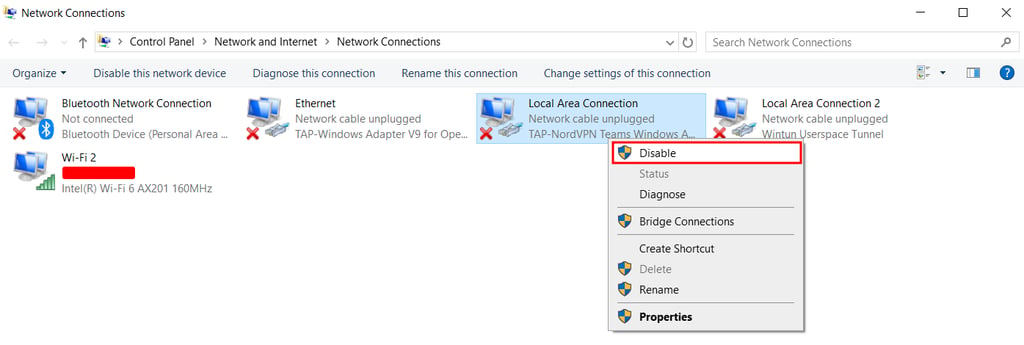
- Navigate to Control Panel → Network and Internet → Network and Sharing Center.
- Click Change adapter settings on the left column.
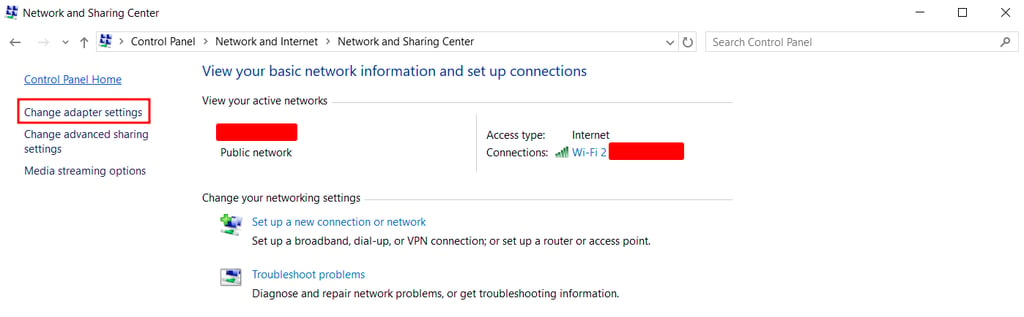
- Once the Network Connections page appears, right-click every secondary connection one by one, and select Disable.

Here’s how to disable other network connections on macOS:
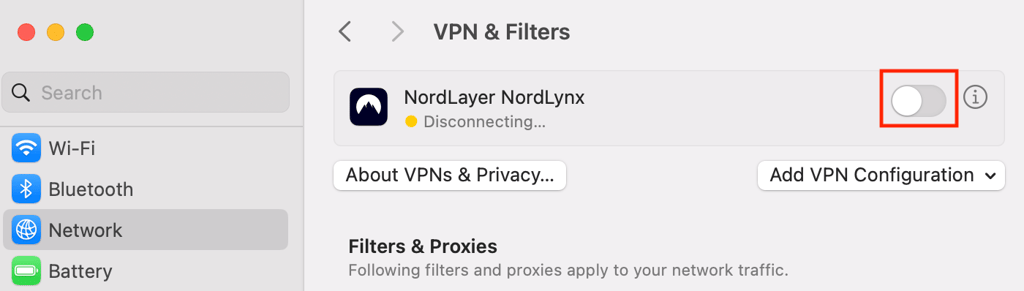
- Open the Apple menu → System Settings → Network.
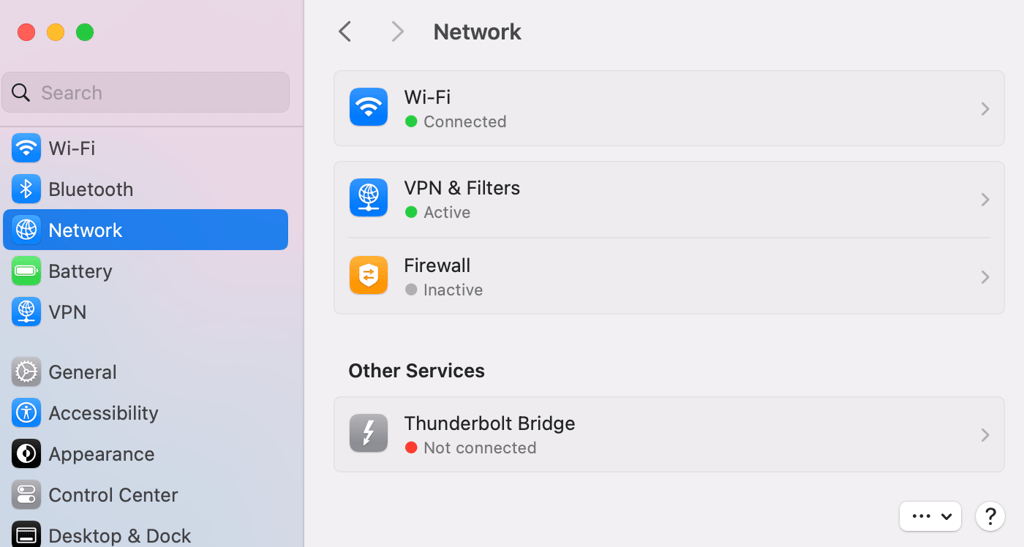
- Select each network you want to disable.
- Toggle off the button to disconnect the network.
After disabling all unused connections, reload the web page and see if the DNS error message has been solved.
4. Restart your internet router
Restarting your internet router or modem resets several network settings, like the cache. A faulty router or modem configuration can also be the leading cause of the DNS server not responding and the connection failing.
Luckily, fixing this issue can be as simple as restarting your router or modem. Turn off the power button and unplug the power cable. Wait for at least 30 seconds before pressing the power button again to restart it.
If restarting doesn’t work, try to reset the router or modem to its default settings. Check the instruction manual of the device for the complete steps.
5. Flush the DNS cache
Flushing your system’s DNS cache forces your computer to fetch new DNS records when visiting a website. These records contain information about the visited site, like its domain name and the corresponding IP address, which helps your browser access the web page more quickly.
The problem happens when the DNS cache becomes outdated. Maybe the site has changed its IP address, or the domain has expired. Whatever the reason, incorrect DNS records will result in DNS errors.
To fix this, try flushing the DNS cache on your device:
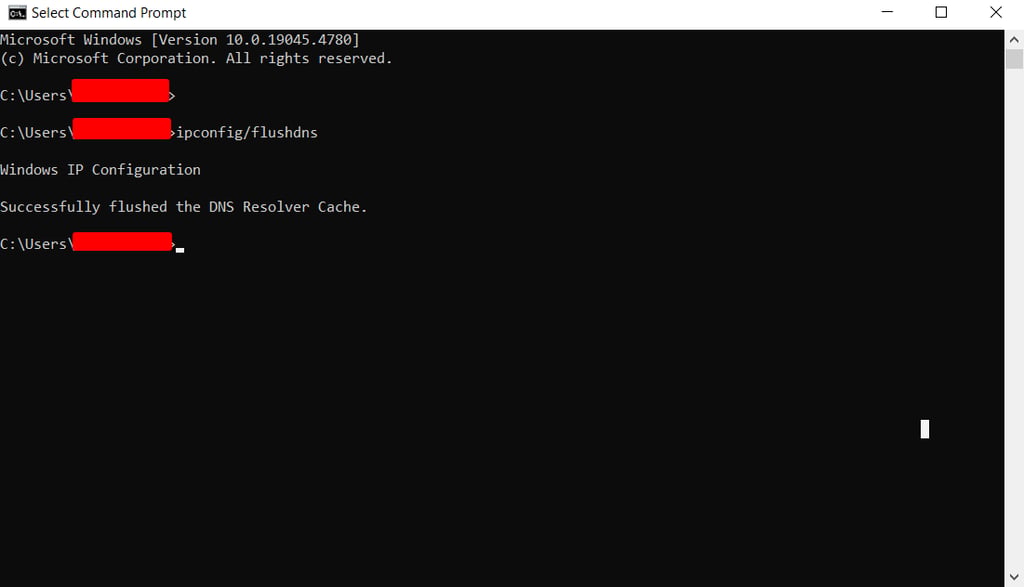
Windows
- Type in cmd in the Windows Search and press Enter to access the Windows command prompt console.
- On the command prompt, type in ipconfig/flushdns and press Enter.
- If the process is successful, a confirmation message will appear on the command prompt.
macOS
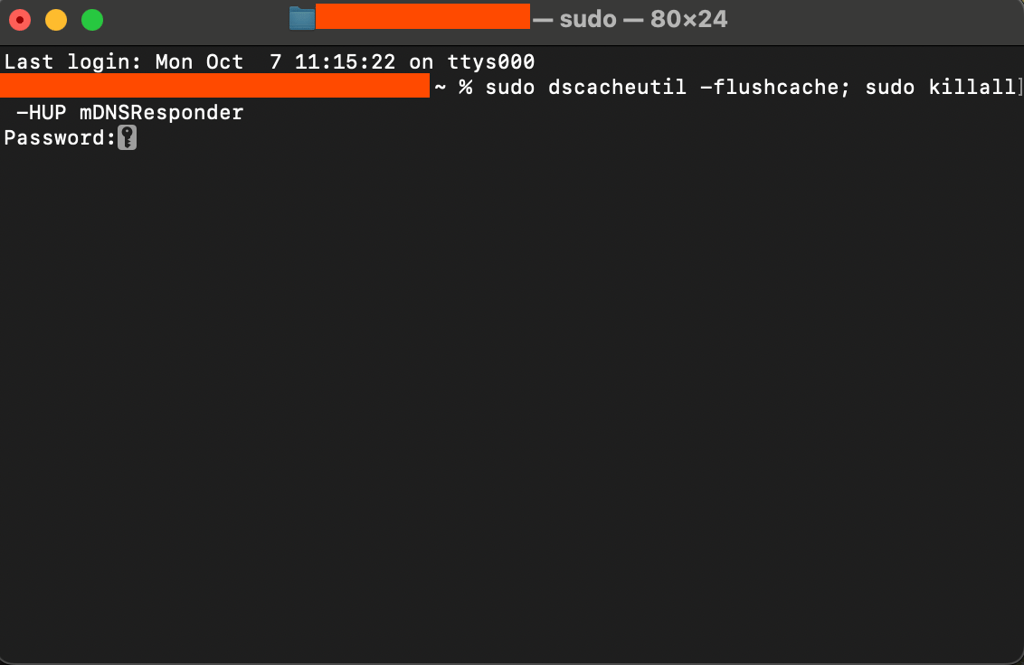
- Use the Spotlight Search to open the Terminal app.
- If you’re running macOS Big Sur or later versions, type in the following command:
sudo dscacheutil -flushcache; sudo killall -HUP mDNSResponder
- Enter your administrator password. Note that it will not be visible as you type.
Keep in mind that older macOS versions require different command prompts.
Here’s the full list:
macOS Catalina, Mojave, High Sierra, Sierra, El Capitan, Mavericks, Mountain Lion, and Lion:
sudo killall -HUP mDNSResponder
macOS 10.10 Yosemite:
sudo discoveryutil udnsflushcaches
macOS X Snow Leopard:
sudo dscacheutil -flushcache
macOS X Leopard and below:
sudo lookupd -flushcache
After running the commands above, the network adapter will refresh its DNS configuration.
6. Change your DNS server address
Changing your DNS server address enables you to use the non-default resolver. By default, your home network obtains a DNS server address from your internet service provider (ISP), which is very likely experiencing downtime when your internet service stops working.
You can temporarily solve this problem by switching to public DNS server addresses, such as:
- 8.8.8.8 or 8.8.4.4 (Google)
- 1.1.1.1 (Cloudflare)
Here’s how to change your DNS address on Windows:
- Type in ncpa.cpl in the search box to quickly access Network Connections.
- Right-click your current network and click Properties.
- Select Internet Protocol Version 4 (TCP/IPv4) → Properties.
- Under General, tick the boxes that say Obtain an IP address automatically and Use the following DNS server Addresses.
- In the Preferred DNS server and Alternate DNS server fields, enter the public DNS addresses from Google or Cloudflare.
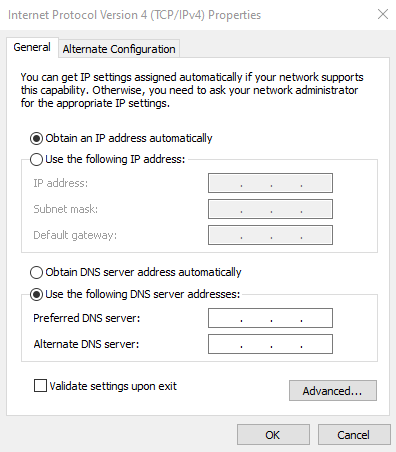
- Check the Validate settings upon exit box and click OK.
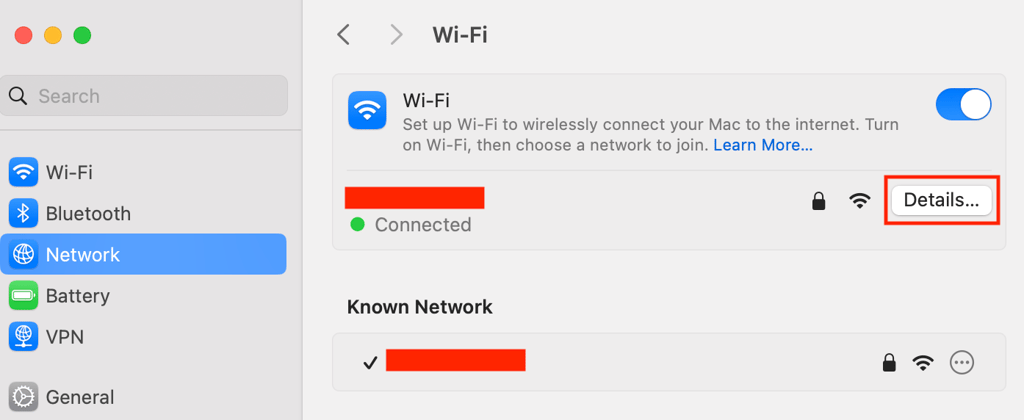
If you’re a Mac user, follow these steps:
- Open the Apple menu at the top left of your screen.
- Go to System Settings → Network.
- Click Details next to your primary network connection.
- Open the DNS tab on the left sidebar.
- Click the plus (+) button to add an alternative DNS server.

- Hit OK and then Apply.
After changing the DNS settings, restart your Windows or Mac computer, and see if your internet access has been restored.
7. Disable Internet Protocol version 6 (IPv6)
Disabling Internet Protocol version 6 (IPv6) forces your system to access websites using the older IPv4 address. This can resolve the DNS issue because some sites might not support the newer protocol.
Here’s how to disable IPv6 on your Windows computer:
- Enter ncpa.cpl in the search box to open Network Connections.
- Right-click your active connection and select Properties.
- Under the Networking tab, locate Internet Protocol Version 6 (TCP/IPv6) and unselect the box.
- Click OK.
For Mac users, do the following:
- Navigate to the Apple menu → System Settings → Network.
- Select the current network connection and go to Details → TCP/IP.
- Next to Configure IPv6, choose Link-Local Only from the menu.
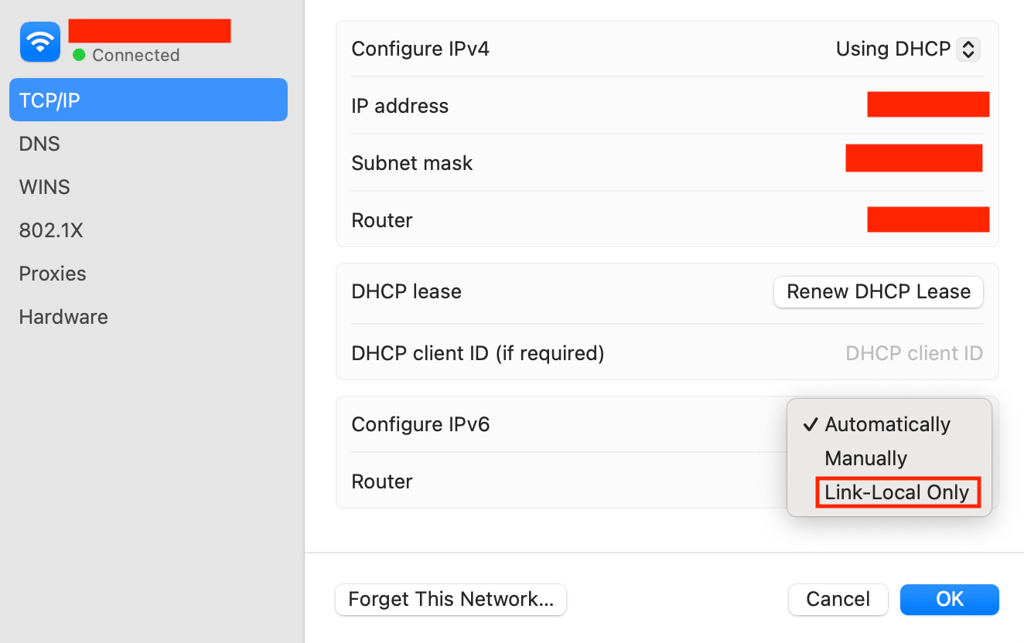
- Click OK.
However, with this method, IPv6 connections still work for local networks. If you want to deactivate IPv6 completely, open the Terminal app and run the following command:
networksetup -setv6off Ethernet && networksetup -setv6off Wi-Fi
This will disable IPv6 on both wireless (Wi-Fi) and wired (Ethernet) networks.
8. Restart your PC in safe mode
Restarting your PC in safe mode resolves the DNS issue if the problem lies within your operating system. Sometimes, certain software, files, or network drivers might block DNS connections.
To figure out whether that’s the case, run your PC in safe mode – a stripped-down version of your OS, where non-essential processes and components are disabled.
Here’s how to restart your Windows computer in safe mode:
- Open the Start menu.
- Hold the Shift key, then click the Power button → Restart.
- From the Choose an option window, select Troubleshoot → Advanced options.
- Under the Advanced options, choose Startup Settings and click Restart.
- Press F5 on your keyboard to select the Safe Mode with Networking option.
On a Mac device, the steps are a lot simpler:
- Access the Apple menu and click Shut Down.
- Wait around 10 seconds after your device shuts down.
- When turning your Mac back on, quickly press and hold the Shift key until you see the login screen.
If your network connection works in safe mode, it means third-party apps might be causing the DNS server isn’t responding error.
While there’s no way to know for sure which software is at fault, it’s most likely your firewall or antivirus program.
9. Turn off antivirus and firewall
Disabling antivirus and firewall apps ensures these tools aren’t interfering with your internet connection and causing issues. Try disabling them to see if they’re causing the issue.
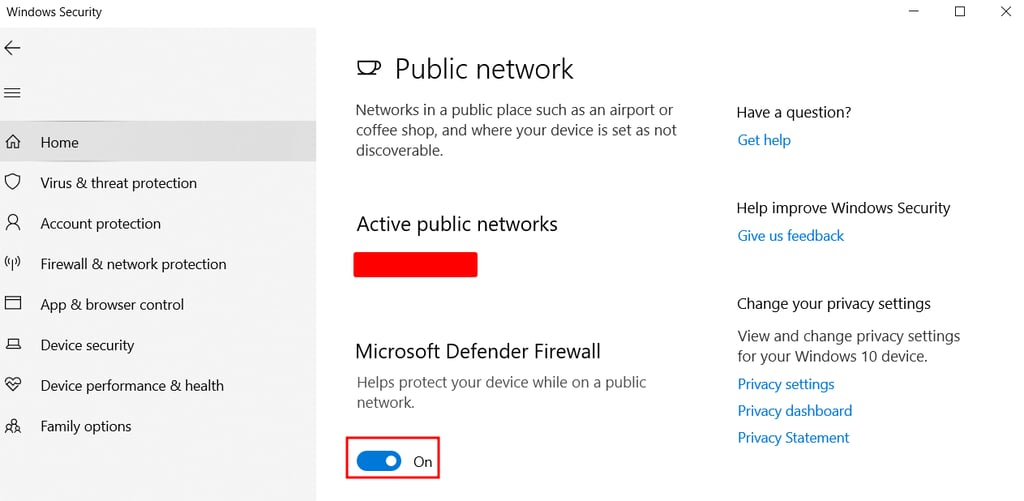
To deactivate Microsoft Firewall Defender, open the Start menu and click the Settings icon. Next, head to Update & Security → Windows Security → Firewall & network protection.
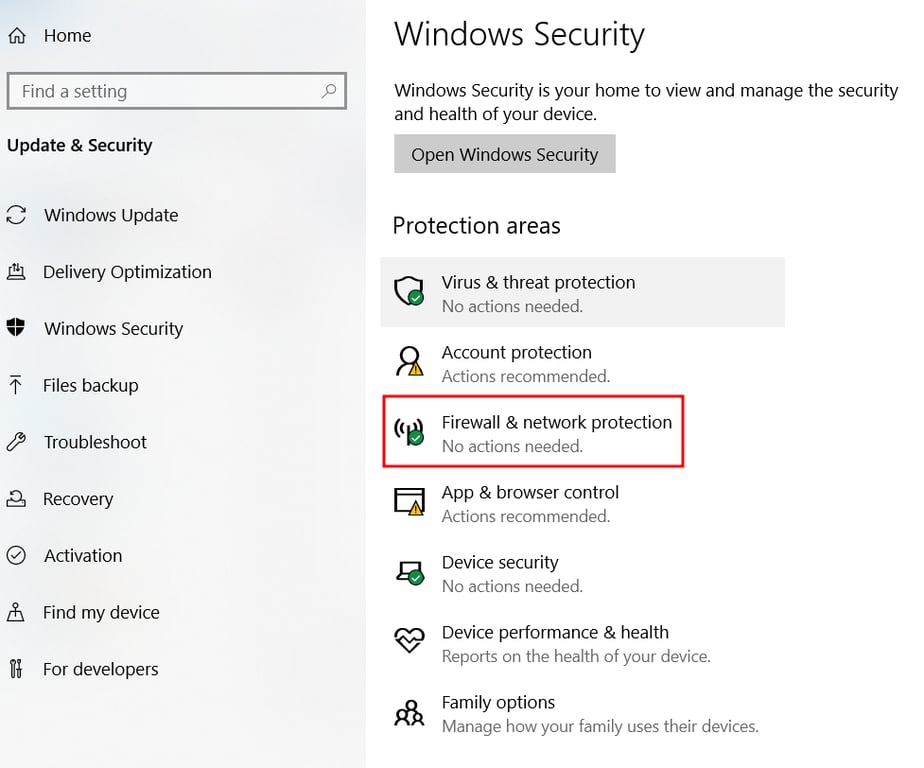
You will see three profiles: domain, private, and public network. Simply open each option one by one, and toggle off the button under Microsoft Defender Firewall.
If you want to disable third-party antivirus and firewall apps you’ve installed, head to Virus & threat protection from the left sidebar.
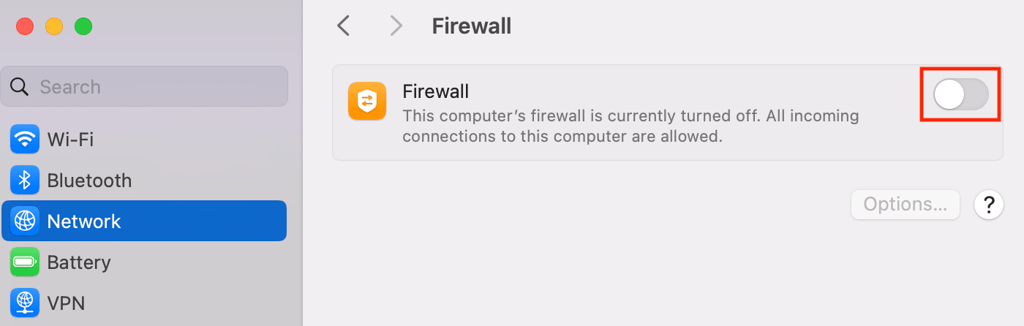
On a Mac computer, you can turn off the built-in firewall by accessing the Apple menu → System Settings → Network. Select Firewall, then toggle off the button.
For third-party antivirus and firewall programs, you will have to open each app and deactivate it manually.
10. Update your network adapter driver (Windows)
Updating network adapter drivers ensures that the devices connected to your computer’s network interface, such as routers, printers, and Ethernet cables, are using the latest and most tested settings.
When their drivers are outdated or corrupted, these devices won’t be able to communicate with the network adapter, leading to connectivity issues. Updating them will help fix the issue.
Here’s how to update the network adapter driver of your active connection (usually Wi-Fi):
- Use Windows Search to locate and access Device Manager.
- Right-click the adapter you want to update, go to the Driver tab, and click Update Driver.
- Scroll down to Network adapters and open the drop-down menu.
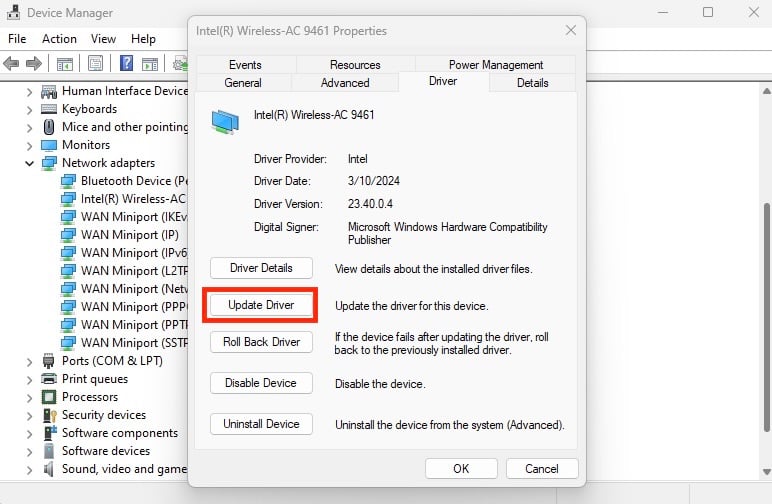
Not sure which one is the correct driver? Go ahead and update every network adapter on the list. If your network driver is already up-to-date, but you still see the DNS server error, try to uninstall it and then reinstall it again.
What causes the “DNS server not responding” error?
The cause of the “DNS server not responding” error message is that the DNS of the domain you want to reach is unavailable, or your browser cannot connect to the internet. It commonly happens for these reasons:
- Hardware and software issues. A malfunctioning router, incorrect network settings, outdated adapter drivers, and firewall software can cause network connectivity issues.
- Incorrect or missing DNS records. Your browser is unable to find the correct IP address due to an outdated DNS cache.
- The DNS server might be unavailable. The DNS service stops working because of traffic overload or server outage.
Next steps if the DNS issue persists
If the “DNS server not responding” error returns after trying all the solutions, consider alternative fixes. Bar in mind that these might not be applicable for all operating systems and may only work for as a temporary workaround. Here’s what you can try:
You can use another device to access the problematic website to see if the issue is related to your system. Another solution is to disable the peer-to-peer feature in your Windows computer that might conflict with the DNS.
If you are connected to your organization’s network, check with the administrator if it is experiencing an issue. This is because its configuration might override your system’s settings, potentially causing the error.
If none of these fixes work, ithe problem might be on the website’s end, typically related to the domain configuration. Notify the website owner and wait until the issue is resolved.
All of the tutorial content on this website is subject to Hostinger's rigorous editorial standards and values.

Amanda is a WordPress and digital marketing enthusiast with a passion for helping others grow their businesses and careers. She enjoys producing content that is both informative and helpful. When she's not working, Amanda loves hiking, reading books, and filling her bullet journal.

Brian is a Content Writer who loves telling complex stories in a simple way. He has written all types of content, including tutorials, blog posts, landing pages, social media posts, white papers, infographics, and YouTube scripts. Follow him on LinkedIn.