How to edit hosts file in Windows, macOS and Linux
Dec 16, 2024
/
Aris S.
/
4 min Read
Your computer’s hosts file maps a domain name to its IP address. If you experience an unreachable web page or want to block a specific website, editing the hosts file can be the solution.
In this article, you will learn how to edit the hosts file in Windows, macOS, and Linux. Before getting into the steps, we’ll explain what a hosts file is exactly so you understand why learning to modify it can be a useful skill.
What is a hosts file
A hosts file is a configuration in your operating system that maps a domain name to its corresponding internet protocol (IP) address.
It works similarly to a domain name system (DNS) server, which translates a website’s domain into its IP address so your web browser can access it.
The difference is that your operating system will prioritize the host file over the DNS server. If information about the corresponding IP address is unavailable locally, your internet service provider will use the DNS server.
Editing the hosts file means manually adding a domain or hostname and its IP address. It can be helpful in several scenarios:
- Resolving domains – when hosting a website, editing the hosts file allows your domain to become accessible immediately without waiting for DNS propagation. This is useful if you want to check the site quickly.
- Connecting hostnames – DNS servers often can’t resolve a hostname to its IP address. Modifying the hosts file enables you to explicitly specify the address.
- Blocking websites – for organizations or parents, editing the hosts file lets you block access to a specific website by assigning a custom IP address to its domain.
- Fixing errors – an unreachable website might occur when its domain doesn’t resolve properly due to DNS issues or incorrect entries. Editing the hosts file ensures the IP address is valid.
Remember that changes in the hosts file will only apply to your local computer. For example, you must wait for DNS propagation to finish before your website is accessible on other systems.
Steps to edit hosts file
Before editing your hosts file, make sure you have information about the website you want to add, including its domain name and IP address. Since the steps to obtain them differ depending on the web hosting provider, check their documentation or contact support.

How to edit hosts file in Windows
Here are the steps to edit the hosts file in a Windows system. The procedure should work for the newer versions of the operating system, like Windows 11 and 10:
- Open File Explorer from your taskbar. Alternatively, open the start menu and locate File Explorer.
- Navigate to C:\ → Windows → System32 → Drivers → etc.
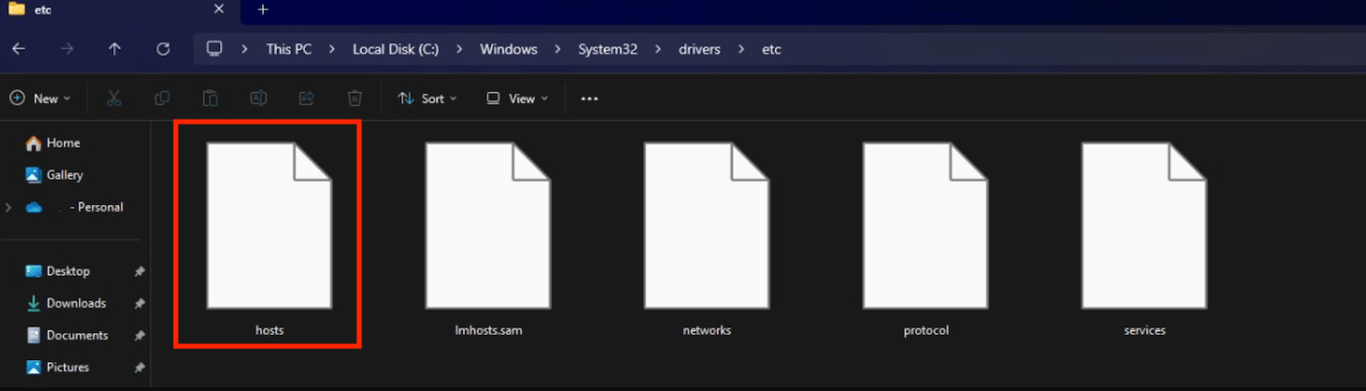
- Right-click the hosts file and click Open with.
- Select your preferred text or code editor. For this tutorial, we will use Notepad. Click Just Once.
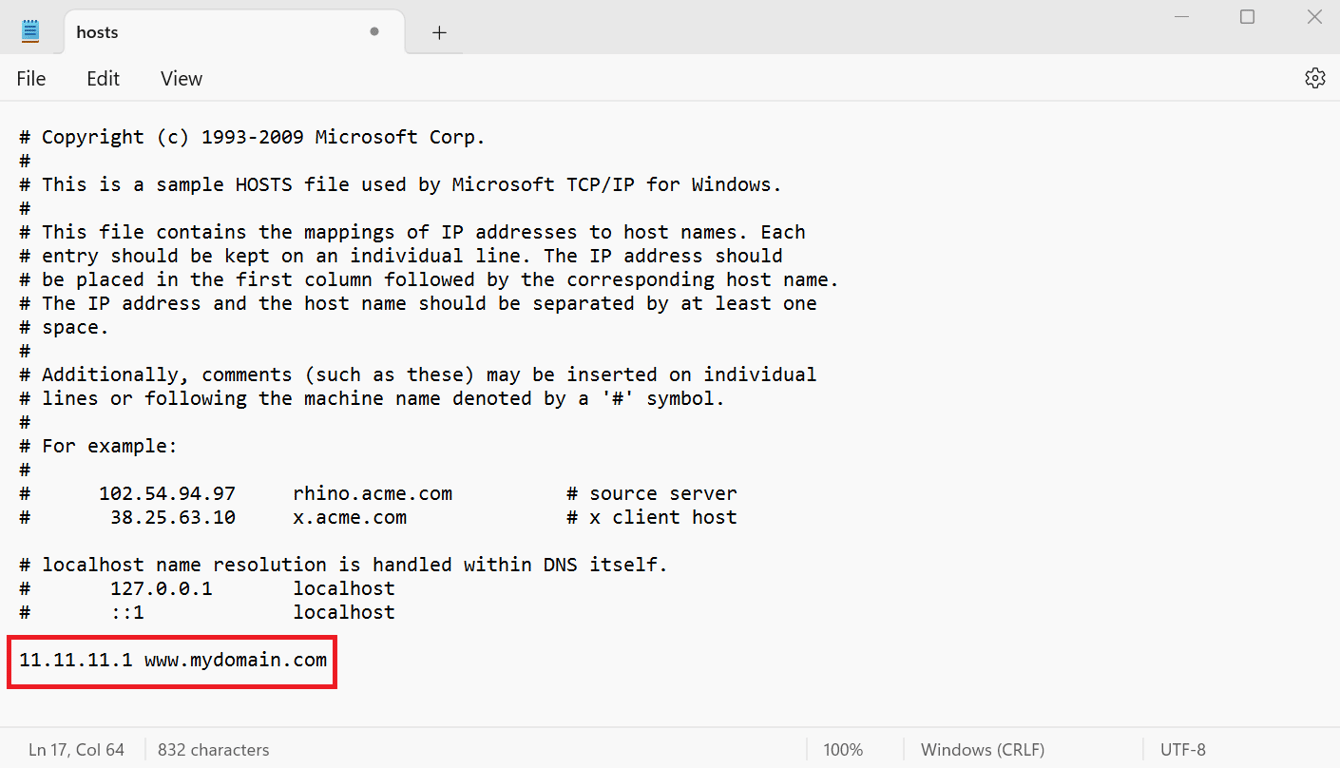
- At the bottom of the document, add a new line specifying the IP address-domain pair. The setting should look like this:
185.185.185.185 domain.com
- Hit Ctrl + S to save the changes.
Pro tip
To disable a setting, add a hash sign (#) at the beginning of the line, like # 185.185.185.185 domain.com. This is safer than deleting the entry since you can easily reactivate it by removing the symbol.
How to edit hosts file in macOS
The easiest way to edit the hosts file in macOS is using commands via Terminal. Here are the steps:
- Open Spotlight search by clicking the magnifying glass icon on the top menu or by pressing Command + Space.
- Search and enter Terminal.
- Run the following command to open the hosts file. We will use the Nano text editor as it is the simplest:
sudo nano /etc/hosts
- Enter your password to grant administrative privileges if Terminal asks for it.
- Scroll down to the bottom of the file and add your domain and its IP address:
185.185.185.185 domain.com
- Press Ctrl + X, Y, and Enter to save the changes.
If you prefer using a graphical user interface, follow these steps instead. Note that the interface might be different depending on your operating system version:
- Go to your application dock and click Finder.
- Navigate to the top menu bar → Go → Go to Folder.
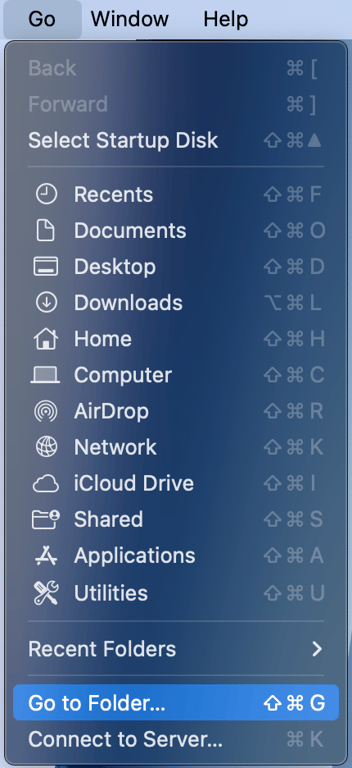
- Go to /etc and find the hosts file.
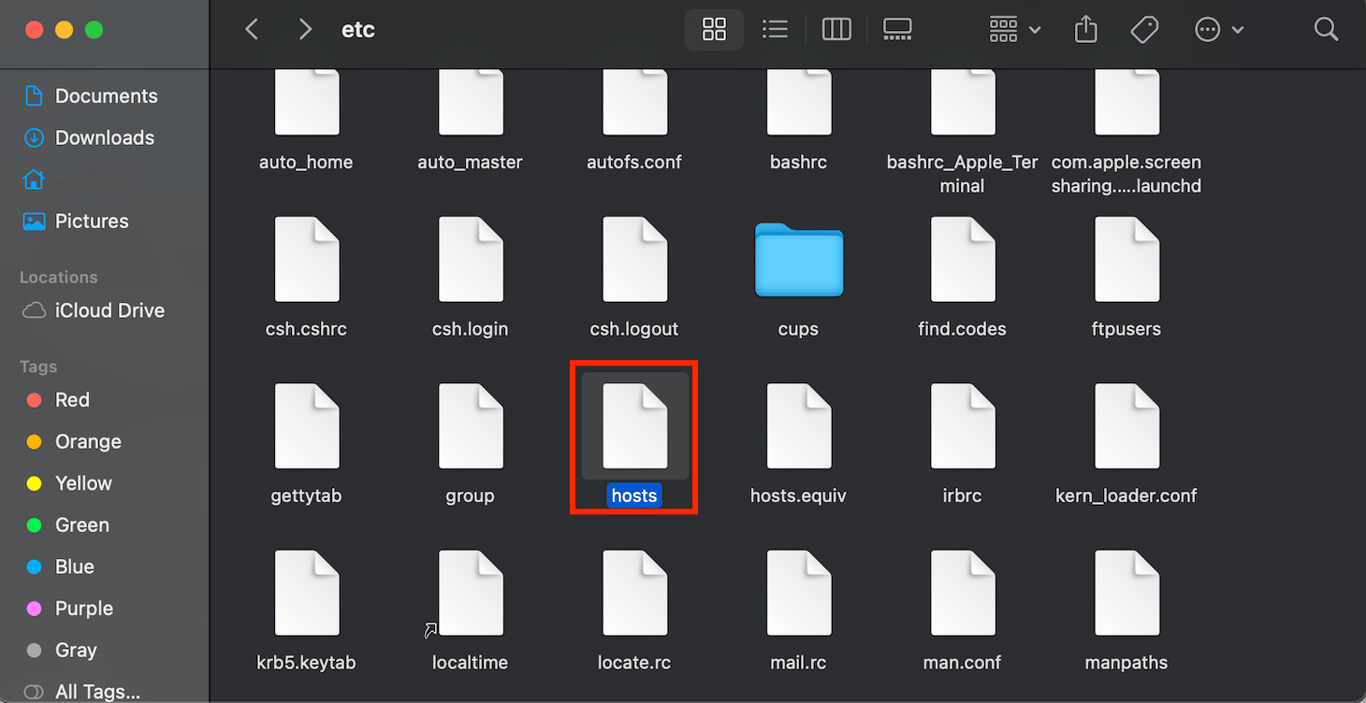
- Right-click the file and select your preferred text editor.
- Add your configuration at the bottom of the file.
- Save the changes by pressing Command + S.
How to edit hosts file in Linux
In Linux, you can edit the hosts file using the graphical interface or commands via Terminal. For this tutorial, we will use Terminal since it is more efficient and works the same way regardless of your distribution:
- Open Terminal by pressing Ctrl + Alt + T or accessing it from the application launcher menu.
- Then, open the file using your preferred text editor. For this tutorial, we’ll use Nano:
sudo nano /etc/hosts
- Enter your administrator password. If you log in as root, you can skip this step.
- Add the IP address and domain name at the bottom of the file:
185.185.185.185 domain.com
- Hit Ctrl + X, Y, and Enter to save the changes.
Conclusion
Your operating system’s hosts file resolves a domain or hostname to its IP address. Editing this file is helpful if you want to block a specific site or explicitly map a website to its address for accessibility on your local machine
In this article, we have explained how to edit the hosts file in popular operating systems. For Windows users, navigate to C:\Windows\System32\Drivers\etc using File Explorer and edit the file using Notepad.
Meanwhile, the steps to edit the hosts file in macOS and Linux are similar. Open Terminal and run sudo nano /etc/hosts to open the file. After adding the domain and its corresponding IP address, hit Ctrl + X, Y, and Enter to save the changes.
Edit hosts file FAQ
How do I locate the hosts file?
In Windows, you can find the hosts file by navigating to the C:\Windows\System32\Drivers\etc path using Explorer. For macOS and Linux, the file is located in the /etc/hosts directory. You can access it using Terminal or applications like Finder in macOS.
What operating systems use a hosts file?
The hosts file is an essential networking component of operating systems. Due to its importance, you can find this file in any modern operating system, including Windows, macOS, and Linux.
Why modify the hosts file?
Modifying the hosts file ensures your website is accessible since you explicitly add the IP address to its domain name or hostname. Moreover, you can block or redirect malicious websites by assigning other IP addresses to their domain names.
All of the tutorial content on this website is subject to Hostinger's rigorous editorial standards and values.

Aris is a Content Writer specializing in Linux and WordPress development. He has a passion for networking, front-end web development, and server administration. By combining his IT and writing experience, Aris creates content that helps people easily understand complex technical topics to start their online journey. Follow him on LinkedIn.