ERR_SSL_PROTOCOL_ERROR: What it means and 11 ways to fix it
Dec 10, 2025
/
Aris S.
/
12 min Read
ERR_SSL_PROTOCOL_ERROR is a browser error that prevents users from establishing a secure connection with a website. It typically occurs due to an expired or misconfigured SSL certificate, incorrect system time settings, outdated browser versions, or interference from security software like antivirus or VPNs.
This issue can affect all major browsers, including Chrome, Firefox, Edge, and Safari. When the connection fails, each displays slightly different error messages.
To fix ERR_SSL_PROTOCOL_ERROR, users can follow a step-by-step troubleshooting process that includes updating their browser, correcting system time, clearing browser cache, and adjusting SSL/TLS settings. Site owners may need to reconfigure their SSL certificate, fix mixed content issues, or update server protocols.
In this guide, you’ll learn:
- What causes ERR_SSL_PROTOCOL_ERROR
- How the error appears across different browsers
- 11 practical fixes tailored for users and developers
- Preventive measures to avoid future SSL errors
Let’s start by understanding what this error means and why it occurs.
Why Does ERR_SSL_PROTOCOL_ERROR Happen?
ERR_SSL_PROTOCOL_ERROR occurs when a browser fails to verify the SSL certificate of a website, breaking the secure connection. This typically results from issues related to outdated software, system misconfigurations, or invalid SSL/TLS certificates. Below are the most common causes that trigger this error:
Misconfigured SSL certificates
Your web browser can’t verify the SSL/TLS certificate if it is installed incorrectly. For example, its domain name doesn’t match that of the website, or it has an incomplete chain due to a missing certificate authority (CA).
Web browsers block access when an SSL/TLS certificate is expired, as it signals an insecure connection to the browser.
Incorrect date and time settings
SSL/TLS certificates have an expiration date to encourage users to update them regularly. This ensures optimal security and compliance with evolving security standards.
If your device’s date and time settings are incorrect, your browser may wrongly deem an SSL/TLS certificate expired and will not then initiate the handshake.
Outdated browser or operating system
Outdated web browsers and operating systems often lack support for the latest protocols or security standards, preventing them from verifying an SSL/TLS certificate and establishing a secure connection.
For example, your system will reject the connection if your browser only supports TLS 1.1 and the website uses TLS 3.1.
Pro tip
Incompatible SSL/TLS might also cause the ERR_SSL_VERSION_OR_CIPHER_MISMATCH error. Check our tutorial for solutions to the issue.
Mixed content issues
ERR_SSL_PROTOCOL_ERROR might show up when your website uses the HTTPS protocol but contains content served via HTTP. It occurs when you load content from sources other than your server or if there are outdated HTTP references in your code.
When you use both HTTP and HTTPS, your web browser can’t securely connect to the website and load its content.
Third-party software interference
ERR_SSL_PROTOCOL_ERROR might occur if third-party software falsely blocks the SSL/TLS certificate or interferes with the connection. Overly strict traffic filtering rules – either by design or due to misconfiguration – are commonly the cause in this instance.
Third-party software that may cause an SSL/TLS error includes your operating system’s firewall, an antivirus utility, or a browser extension.
Now that you understand the causes, let’s explore how this error appears across different browsers.
How does ERR_SSL_PROTOCOL_ERROR look on different browsers?
Each web browser displays ERR_SSL_PROTOCOL_ERROR differently. Here’s how this error appears across popular browsers:
Google Chrome
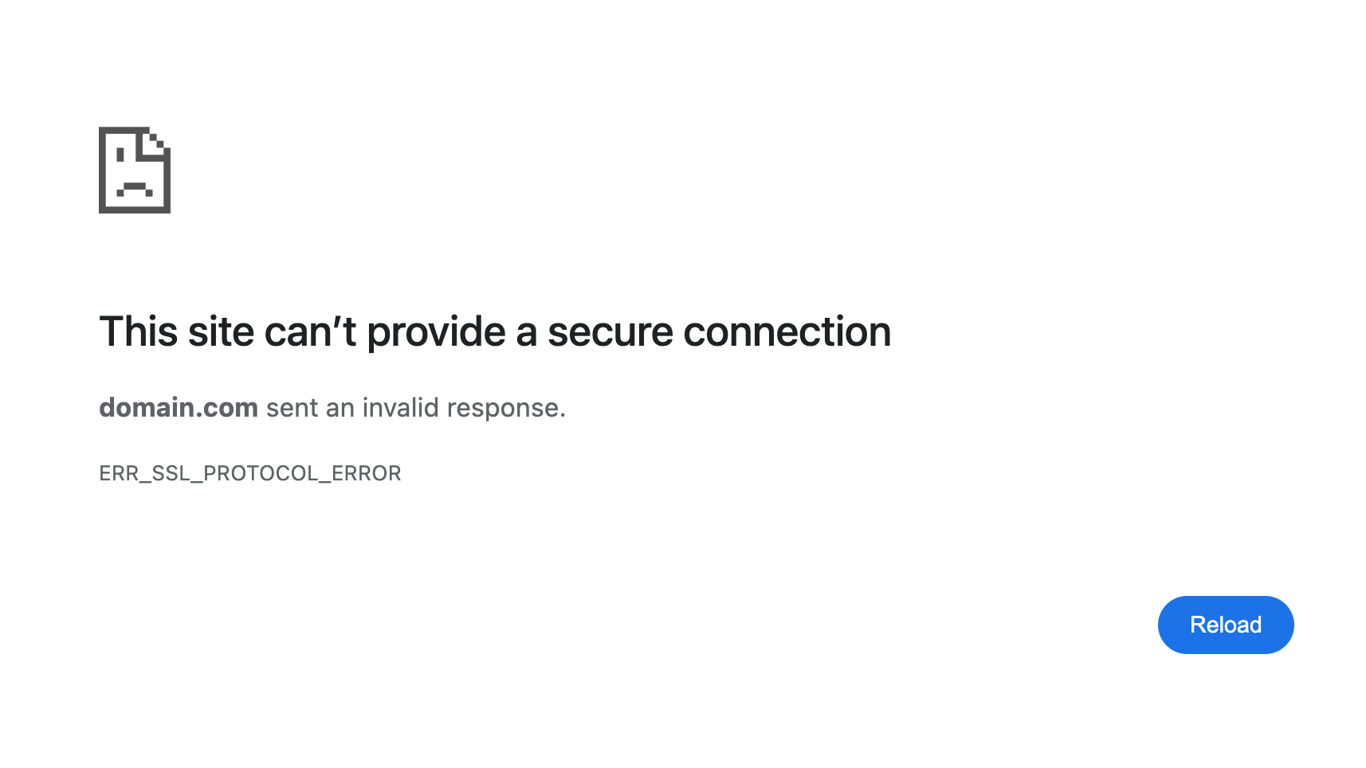
When encountering this SSL issue, Google Chrome displays a “This site can’t provide a secure connection” message and indicates that the website sent an invalid response. It also includes the ERR_SSL_PROTOCOL_ERROR error code.
Microsoft Edge

Microsoft Edge displays a “The connection for this site is not secure” message, with the ERR_SSL_PROTOCOL_ERROR code. It also provides a Diagnose issue button to help users troubleshoot the problem.
Mozilla Firefox
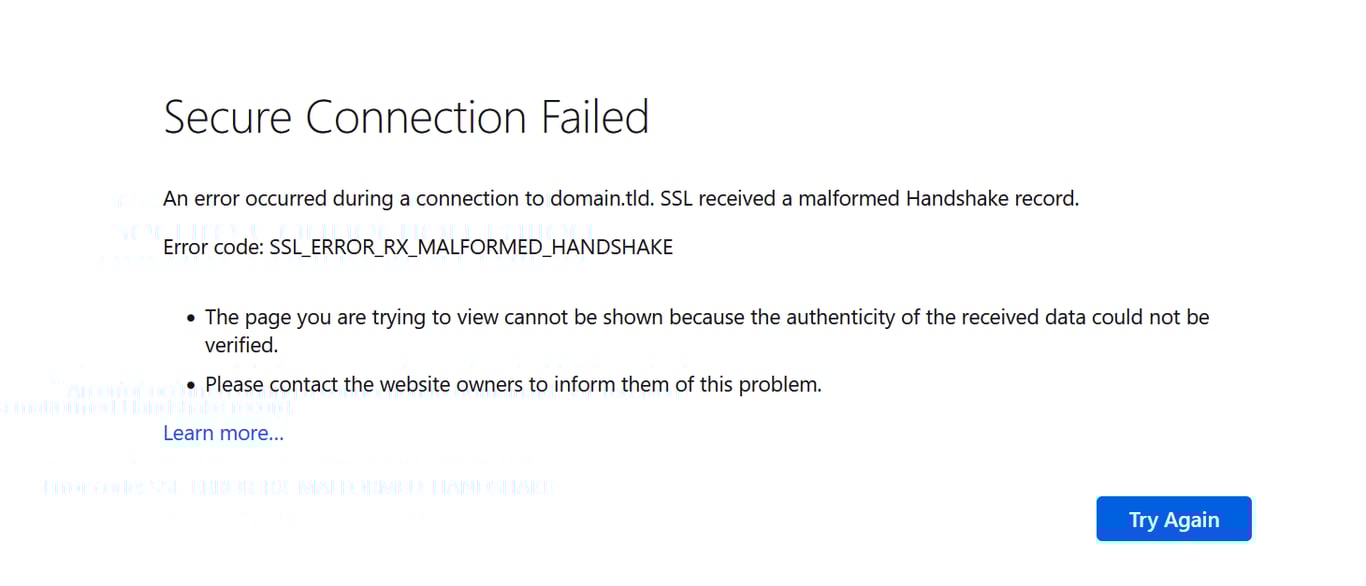
Firefox displays a “Secure Connection Failed” message and shows the error as SSL_ERROR_RX_MALFORMED_HANDSHAKE or SSL_ERROR_INTERNAL_ERROR_ALERT. It also lists potential causes for the error.
Safari
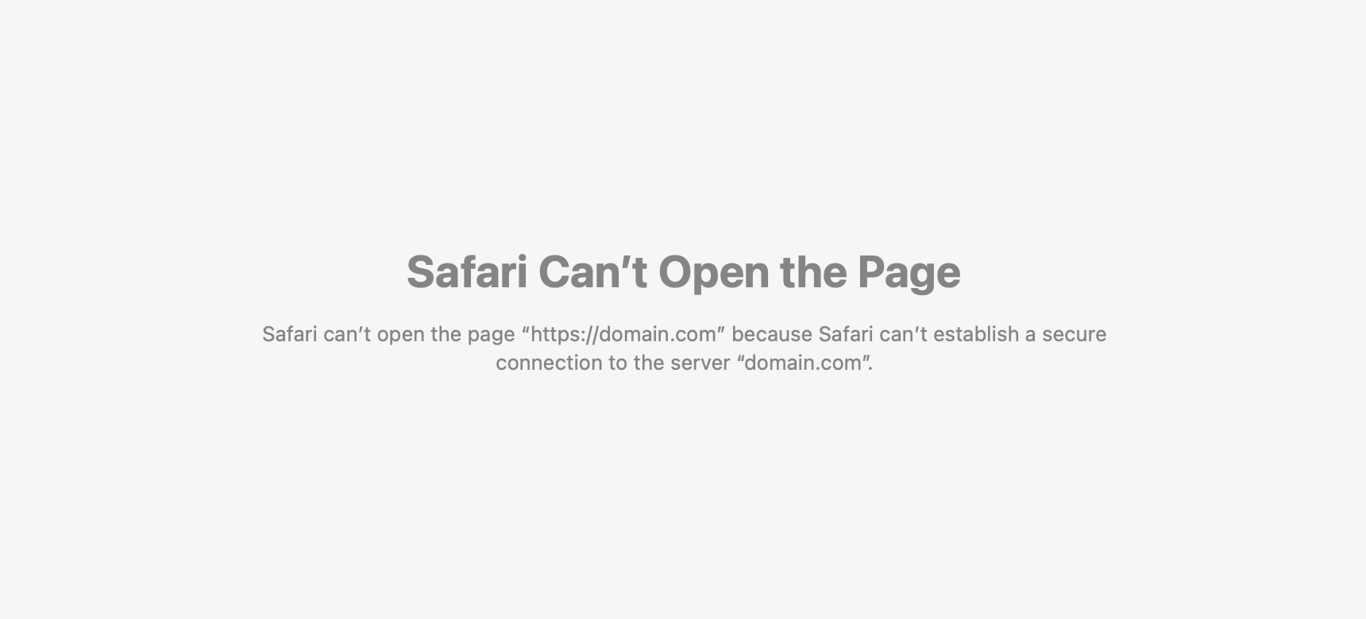
Unlike other browsers, Safari doesn’t display a formal error message for this SSL/TLS connection issue. Instead, it simply displays “Safari Can’t Open the Page,” and explains that it can’t establish a secure connection.
Once you recognize how the error appears, the next step is troubleshooting. Below are the most effective ways to fix ERR_SSL_PROTOCOL_ERROR based on its underlying causes.
How to fix ERR_SSL_PROTOCOL_ERROR
With so many possible causes, determining a solution for ERR_SSL_PROTOCOL_ERROR can be tricky. In this section, we will describe different methods for fixing this error.
Start with the first one, proceed to the next if the issue persists, and so on until you find the solution.
1. Check and correct your device’s date and time
As discussed earlier, incorrect system date and time settings can prevent your web browser from validating SSL/TLS certificates.
ERR_SSL_PROTOCOL_ERROR can occur if your system time is incorrect either before the certificate’s issue date or after it has expired.
Here’s how to readjust your system’s date and time settings on Windows and macOS. Note that the steps may vary depending on your operating system’s version.
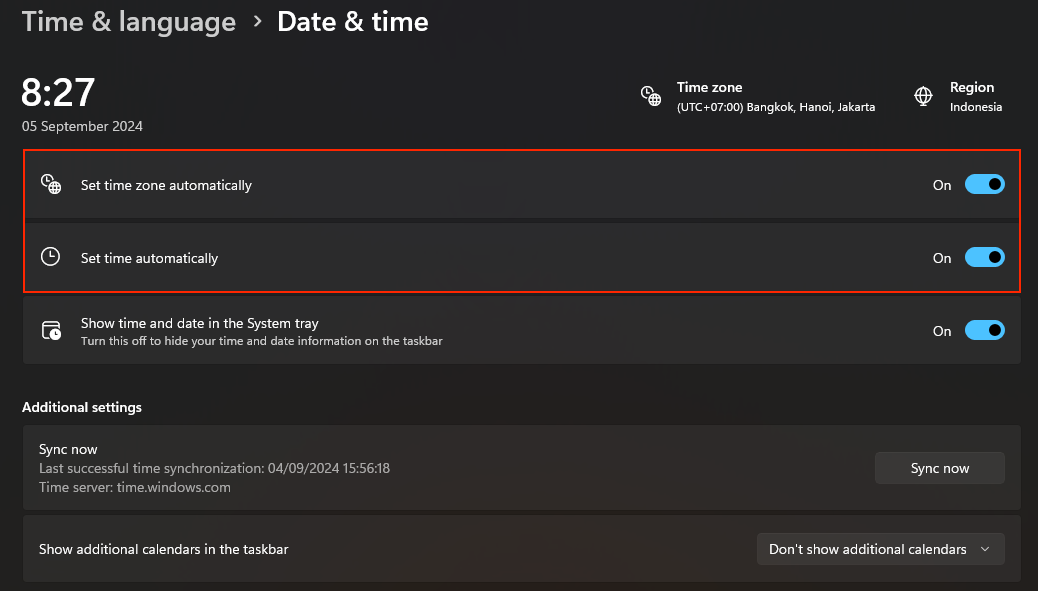
Windows
- Click the Start menu and select Settings.
- Go to Time & language → Date & time.
- Toggle Set time automatically and Set time zone automatically to On. If they are already on, retoggle them to reset the settings.
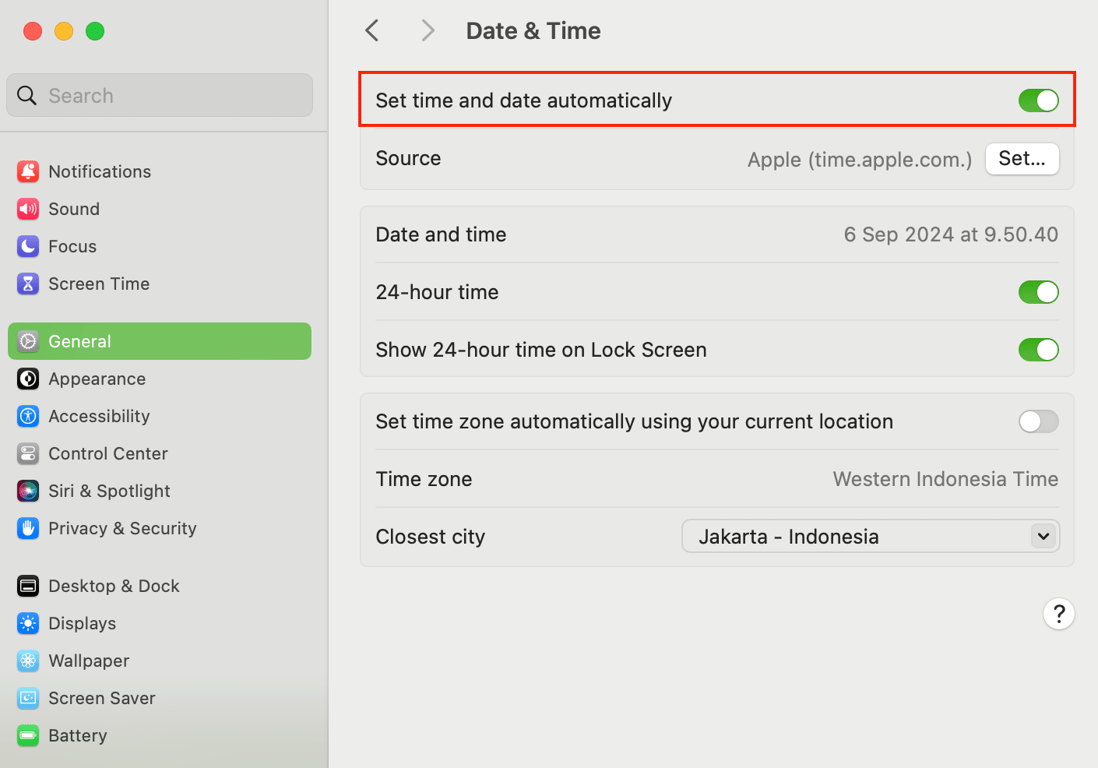
macOS
- Click the Apple icon from the menu bar and select System Settings.
- Navigate to General → Date & Time.
- Activate the Set date and time automatically setting.
2. Clear browser cache, cookies, and SSL state
Caches, cookies, and SSL states store data about certificates of previously visited websites. An error might arise if your browser tries to use stored data that is no longer valid.
Clearing caches forces your web browser to fetch new information from the server, potentially resolving the connection error. Here’s how to do it on the most popular web browsers.
Important! Deleting your browser’s cache and cookies will log you out of all previously visited websites.
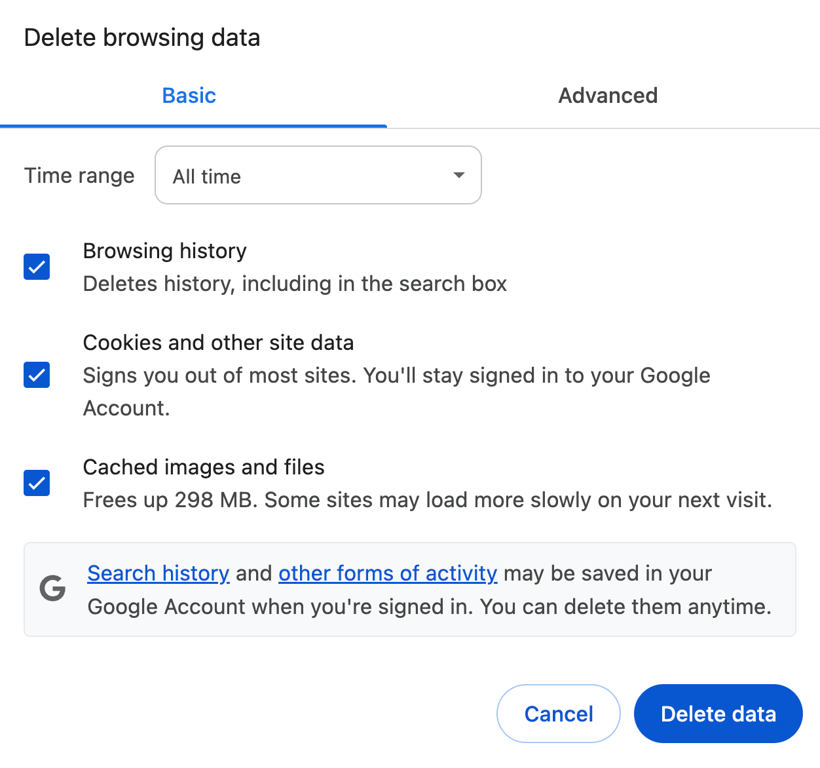
Google Chrome
- Click the three dots icon in the top-right corner and select Settings.
- Go to Privacy and security → Clear browsing data.
- Select the Advanced tab and choose a time frame for deletion.
- Choose the type of data you want to delete by checking the box. For the best chance of success, check all the boxes.
- Click Clear data.
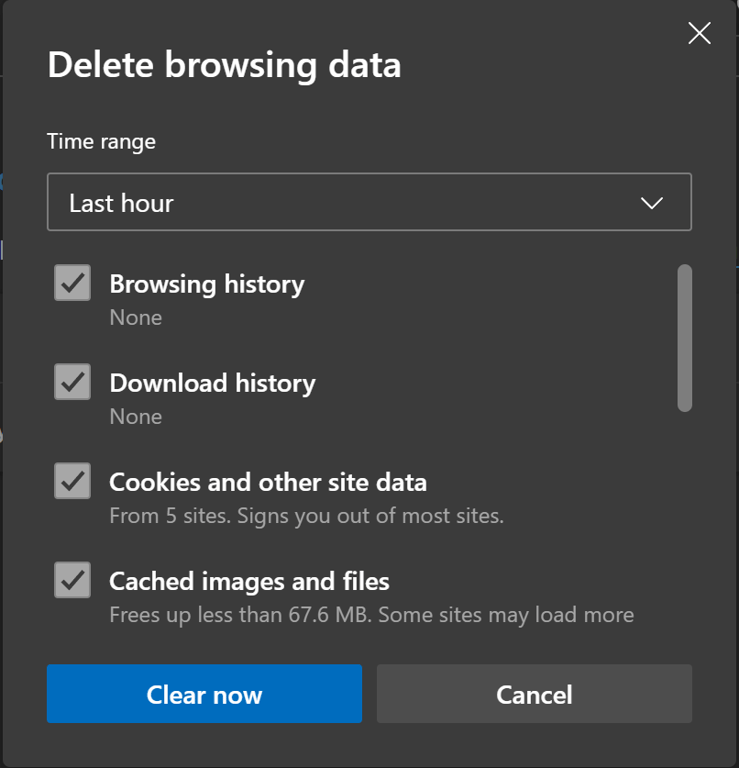
Microsoft Edge
- Click the three horizontal dots icon and go to Settings.
- Navigate to the sidebar → Privacy, search, and services → Clear browsing data.
- Click Choose what to clear.
- Expand the Time range drop-down menu and select your preferred time frame.
- Check the data type you wish to delete, preferably all.
- Click Clear now.
Mozilla Firefox
- Click the hamburger menu and go to History → Clear recent history.
- Select a time frame from the dropdown menu.
- Choose the data type you want to delete and click Clear.

Safari
- Go to the top menu bar → Safari → Settings.
- Select the Privacy tab and click Manage Website Data.
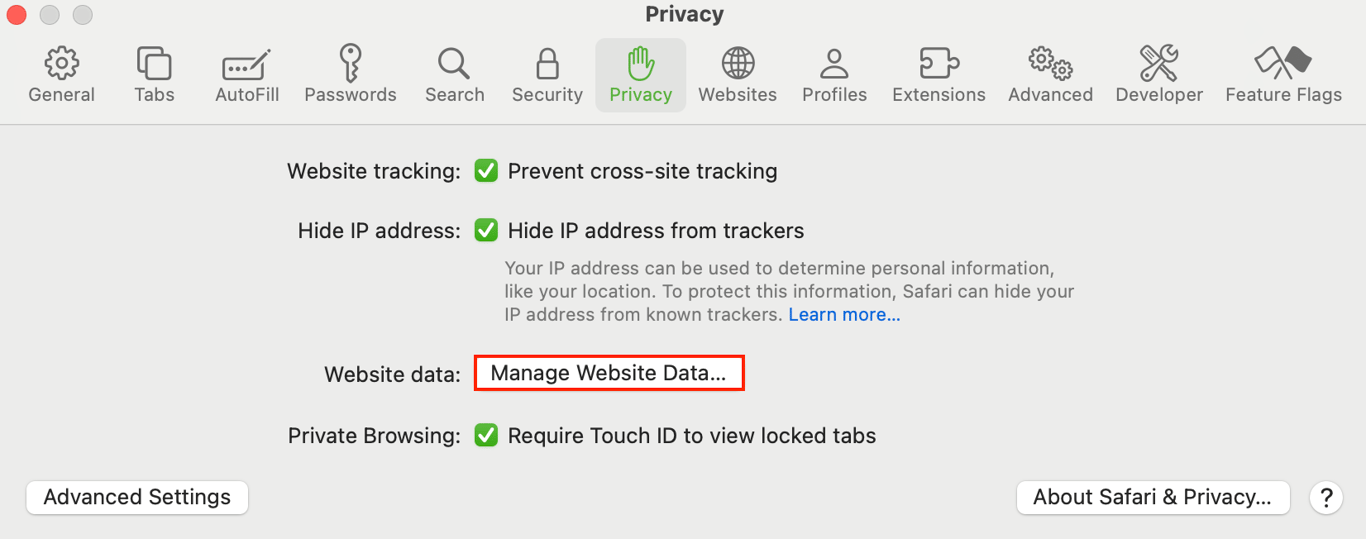
- Click Remove All and confirm your action.
Clearing SSL state
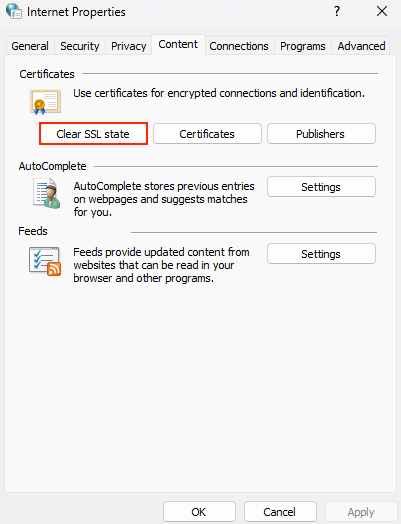
If you use Windows, you’ll also need to delete the SSL state via the operating system’s Control Panel because the browser cache may not store that data. Here’s how to do it:
- Go to Control Panel and select Network and Sharing Center.
- Navigate to the side menu and click Internet Properties.
- Under the Content tab, click Clear SSL state.
- Hit OK.
3. Update the web browser and operating system
Updating your web browser and operating system ensures this software has the new features to handle the latest security standards, potentially resolving SSL errors. Here’s how to update the most popular operating systems and web browsers.
Google Chrome
- Click the three dots icon and go to Settings → About Chrome.
- Chrome will automatically check for updates and install them if available.
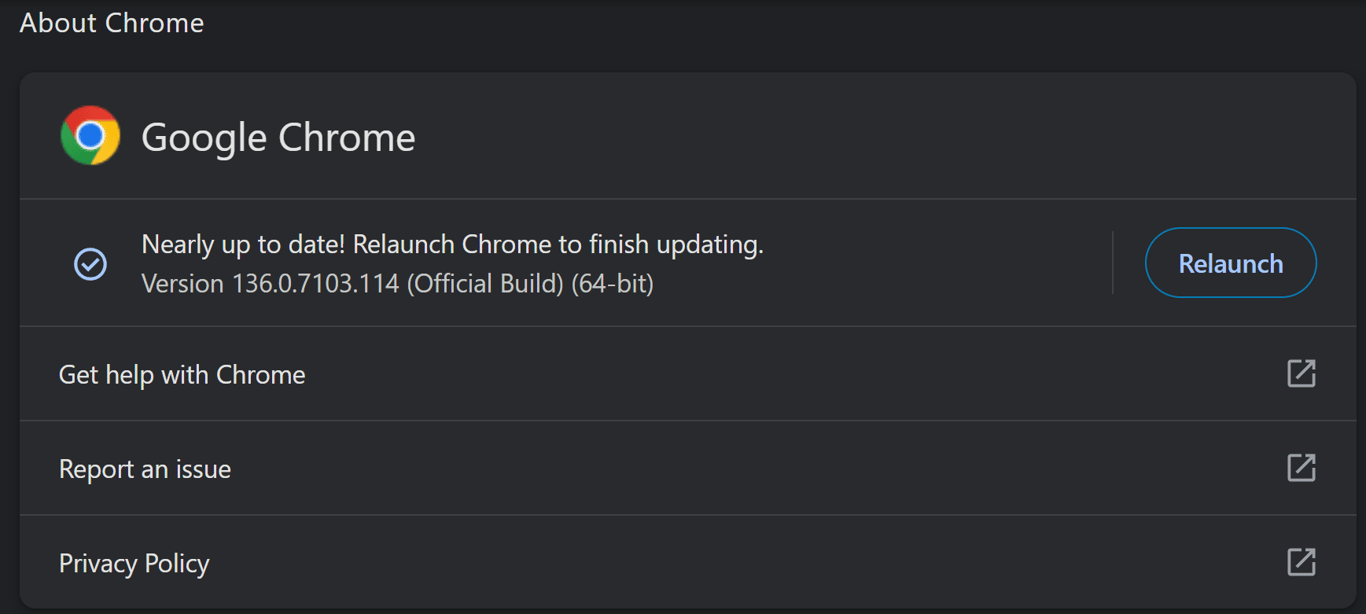
- Click Relaunch to complete the update process.
Microsoft Edge
- Click the three horizontal dots icon and head to Help and feedback → About Microsoft Edge.
- Edge will automatically check for updates and install them.
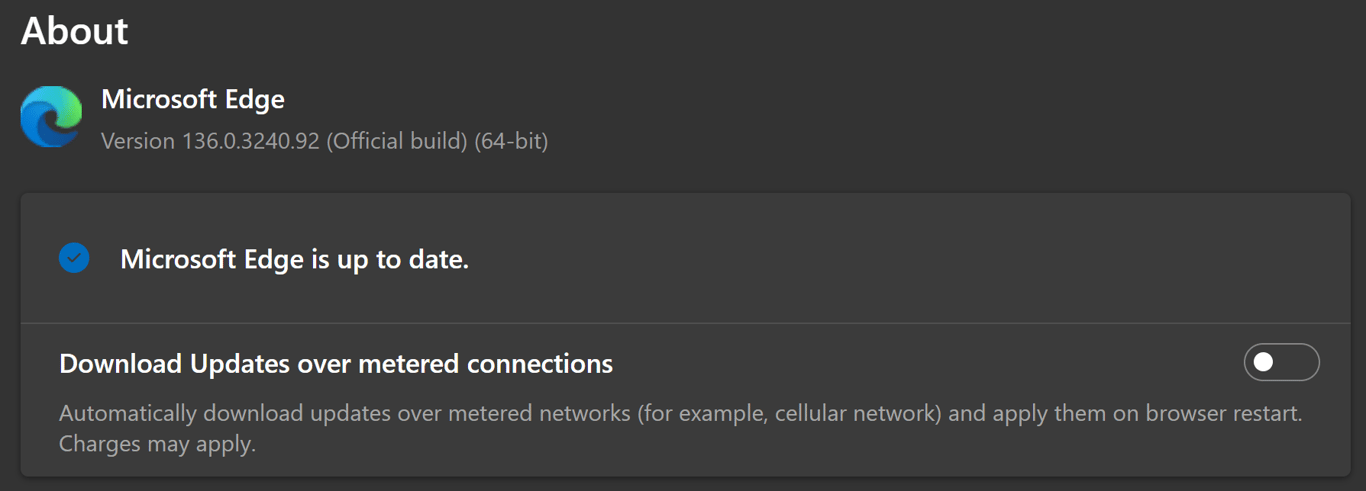
- Once done, restart the browser.
Mozilla Firefox
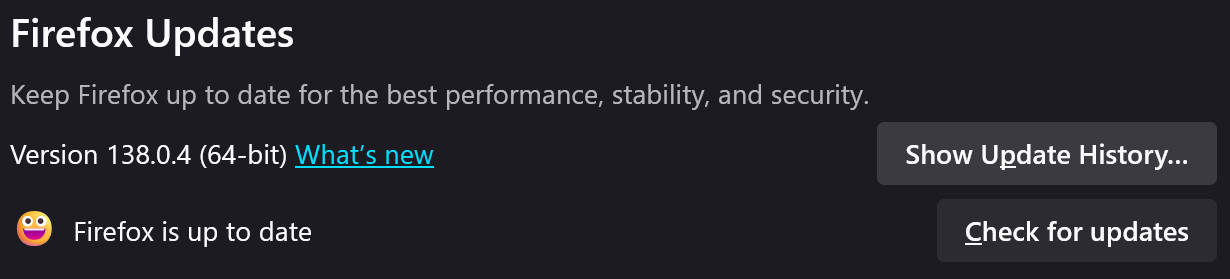
- Click the burger icon and hit Settings.
- Scroll down to the Firefox Updates section.
- Click Check for updates to see if there’s a new update available. If so, install it.
Updating Safari 🧭
Safari doesn’t have a dedicated updater. You can install newer patches by updating macOS, which we will explain in the following section.
Meanwhile, here’s a guide to updating your device’s OS:
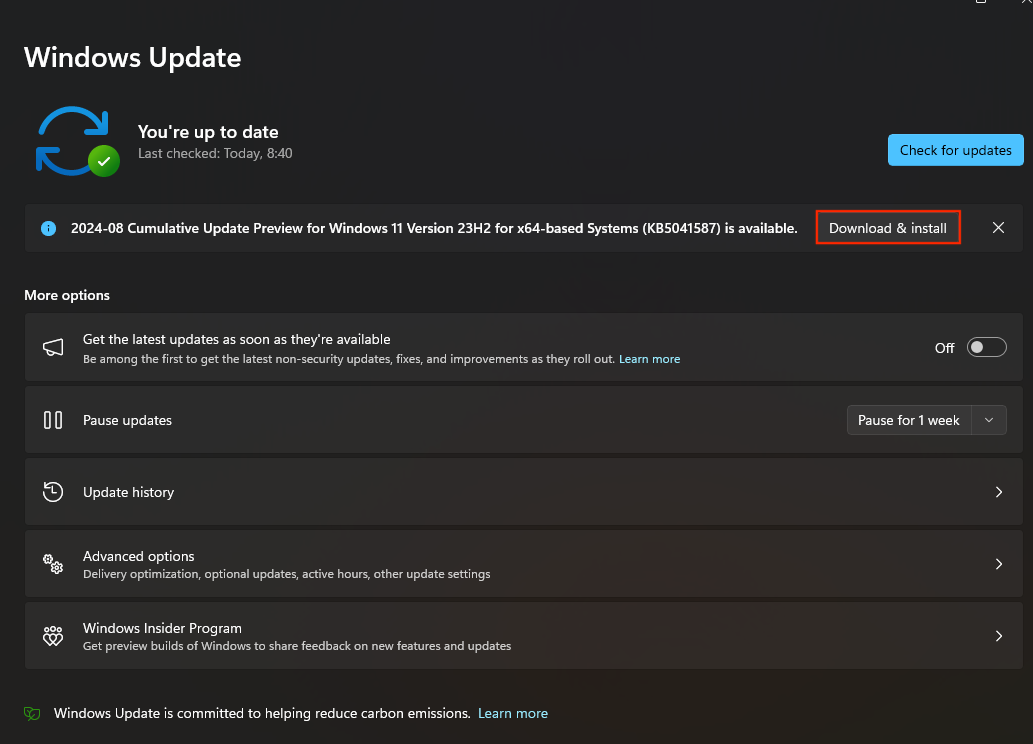
Windows
- Go to the Start menu → Settings → Windows Update.
- Click Check for updates.
- If updates are available, click Download & install.
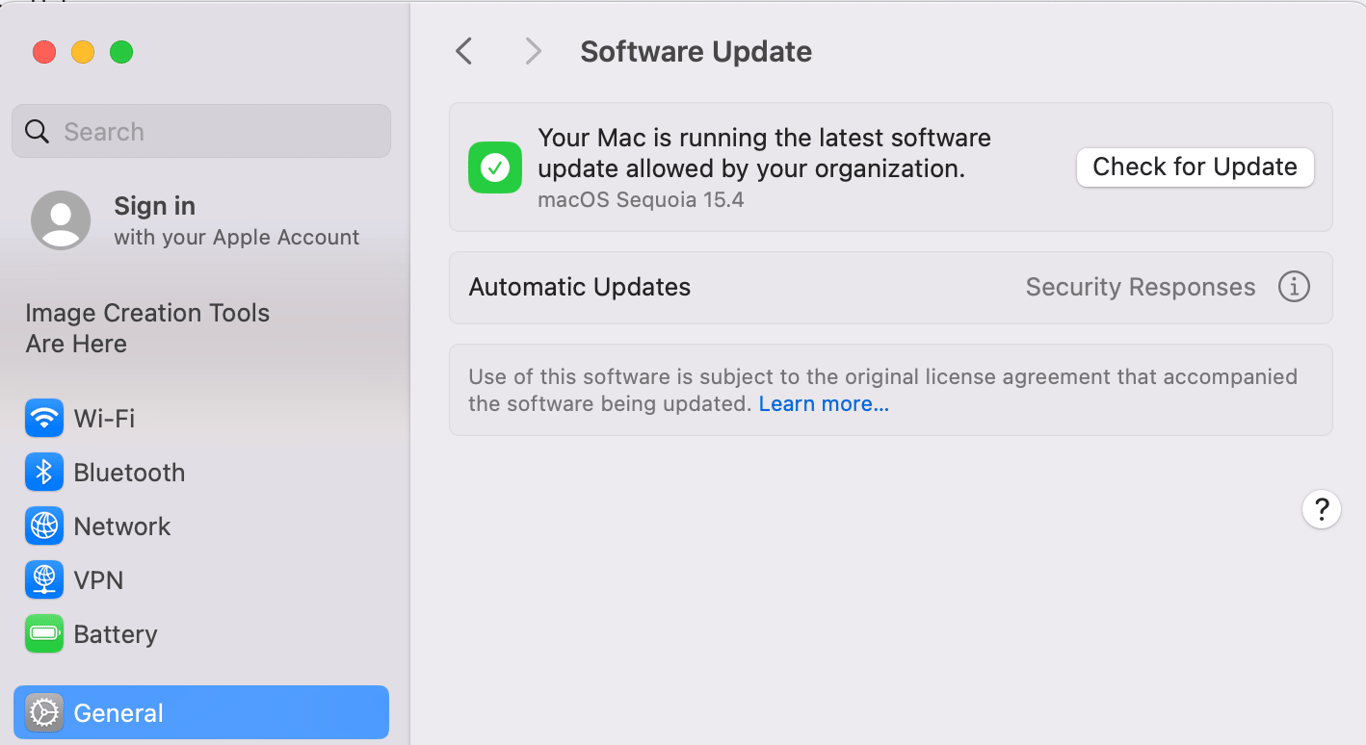
macOS
- Navigate to System Settings → General → Software Update.
- Wait for the system to check for updates.
- If updates are available, click Update Now or Upgrade Now for a new version.
4. Disable conflicting browser extensions
Some browser extensions, particularly those with content filtering features, may block SSL/TLS handshakes and cause ERR_SSL_PROTOCOL_ERROR. Disabling them may help resolve the issue. Here are the steps to do this on the most popular web browsers.
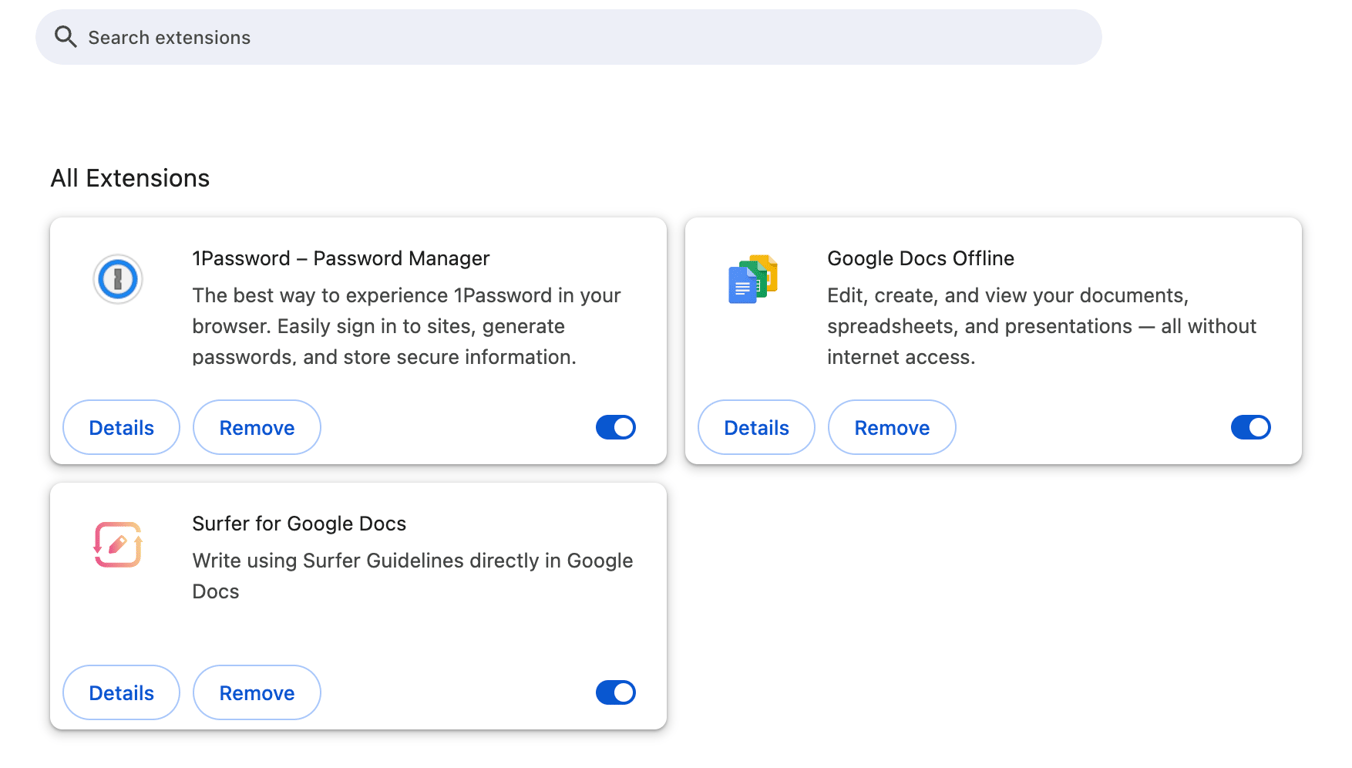
Google Chrome
- Click the puzzle icon next to the address bar. Select Manage Extensions.
- Deactivate the extension by clicking the toggle.
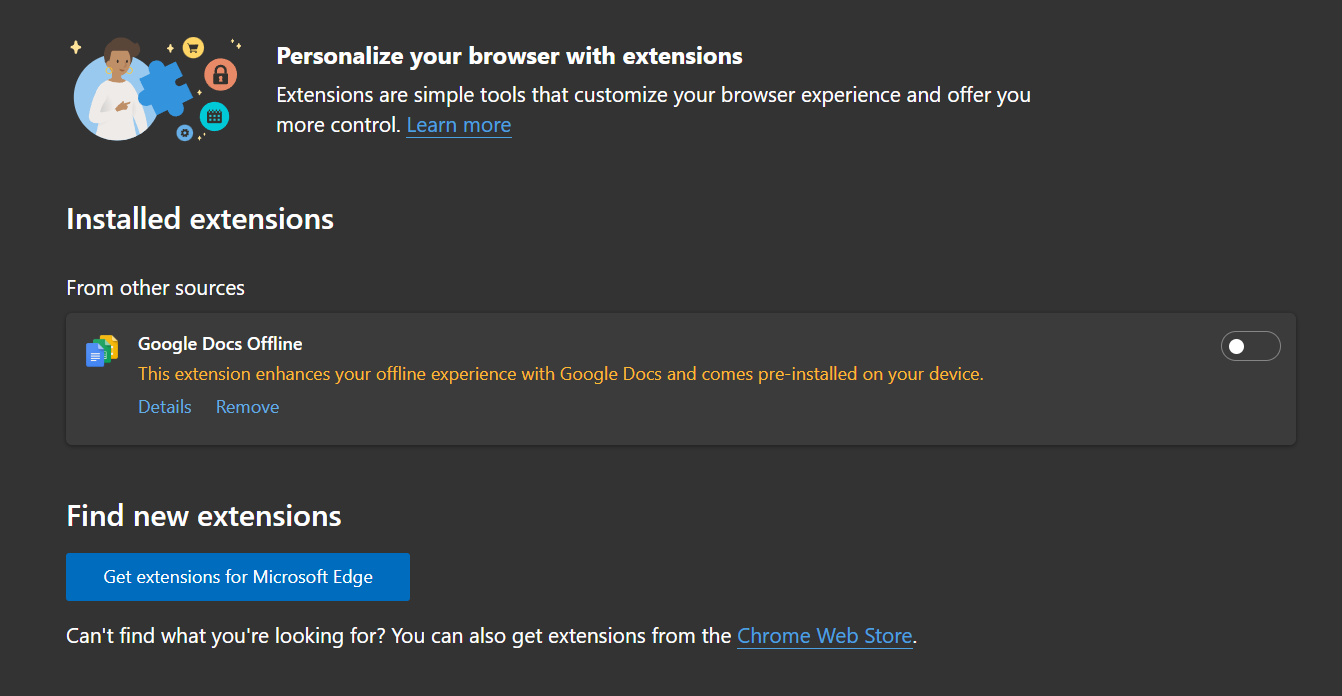
Microsoft Edge
- Click the three horizontal dots icon and select Extensions.
- A pop-up window will appear. Select Manage Extensions.
- Hit the toggle to deactivate the extension.
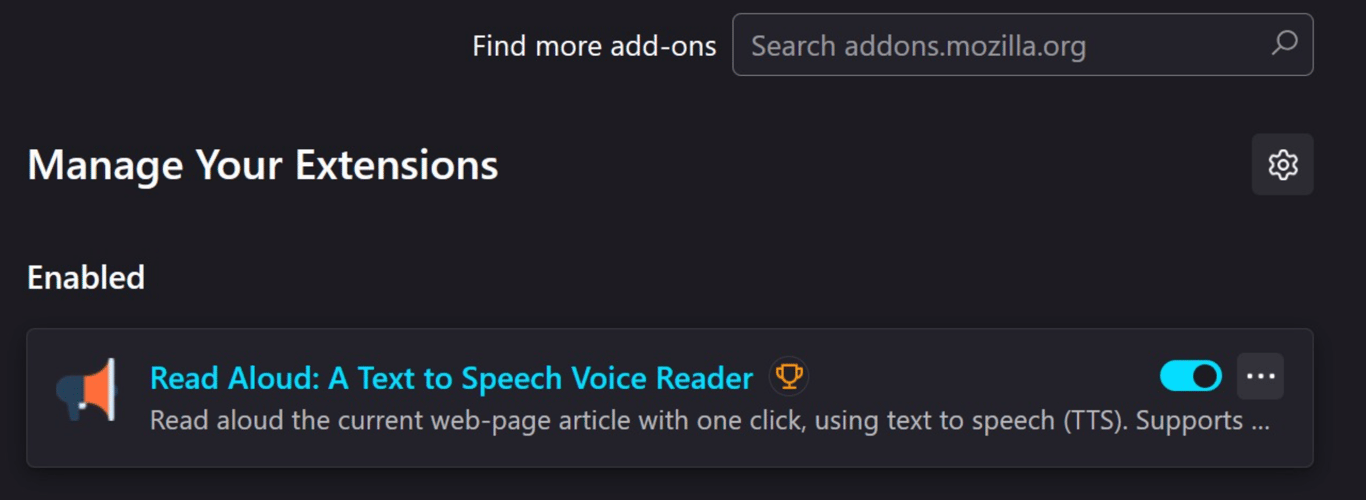
Mozilla Firefox
- Click the hamburger icon on the top bar. Go to Add-ons and themes → Extensions.
- Disable each extension by toggling its respective switch.
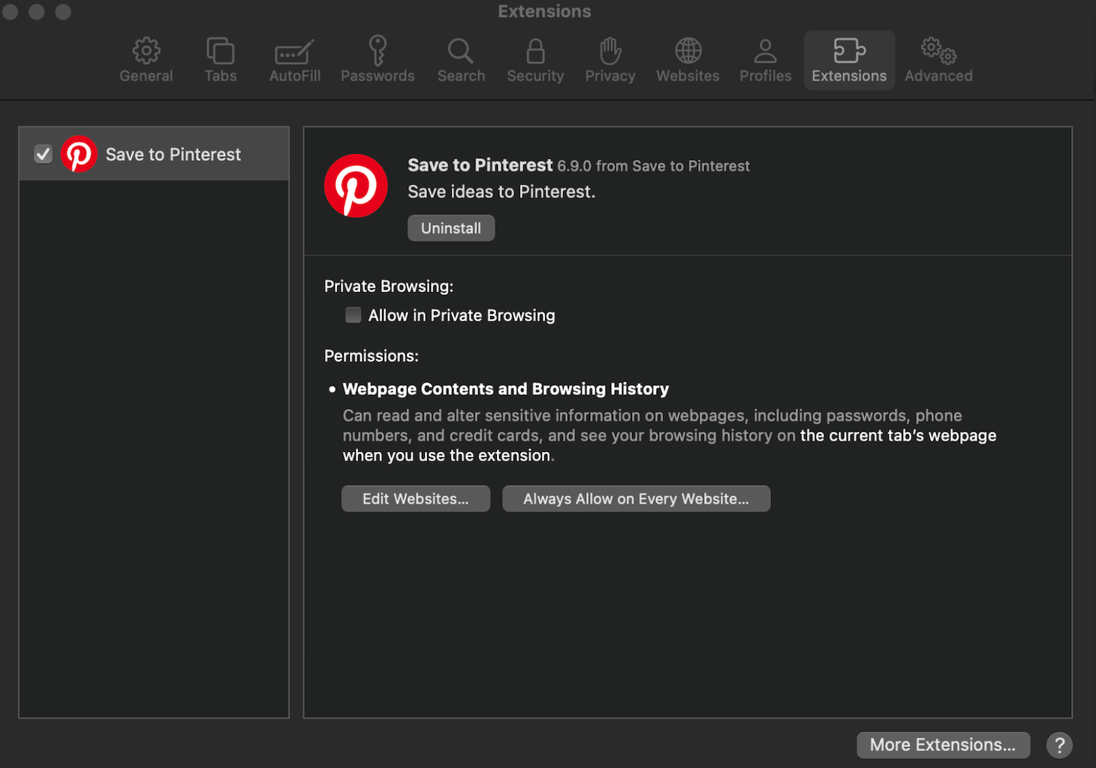
Safari
- Go to the menu bar at the top of your screen and navigate to Safari → Settings.
- Select the Extensions tab and uncheck the box to deactivate the extensions.
If you have multiple extensions, we recommend disabling all of them to see if this solves the problem, and if so, reenabling each of them one by one. After reactivating each extension, reload the website to determine whether that particular one is the culprit.
Once you identify the faulty extension, uninstall it from the management menu.
5. Try a VPN to bypass network restrictions
A virtual private network (VPN) can sometimes resolve ERR_SSL_PROTOCOL_ERROR by bypassing network restrictions, geo-blocks, or regional internet regulations.
You can use any VPN, but ensure it is reputable to avoid security and privacy risks. We recommend NordVPN if you have the budget to pay for a VPN.

If you prefer a free option, Opera’s built-in VPN may be a good alternative. While free VPNs are typically slow and unsuitable for long-term use, they may be sufficient for short-term troubleshooting.
Regardless of the VPN you’ve chosen, simply connect to any endpoint and try reaccessing the website.
6. Temporarily disable antivirus or firewall
Disabling your system’s firewall and antivirus software can resolve the SSL/TLS connection issue. This ensures that your device can communicate properly with the website without any interference.
However, the steps depend on your chosen software. Here’s how to do so on the system’s default firewall and antivirus.
Windows
- Navigate to the Start menu → Settings → Privacy & Security → Windows Security.
- Click Virus & threat protection → Manage settings.
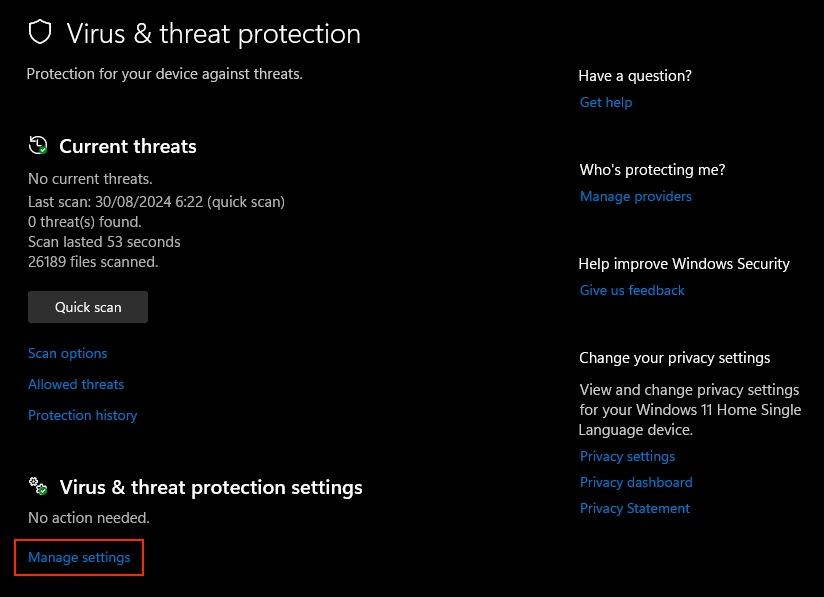
- Toggle Real-time protection to Off and click Yes to confirm.
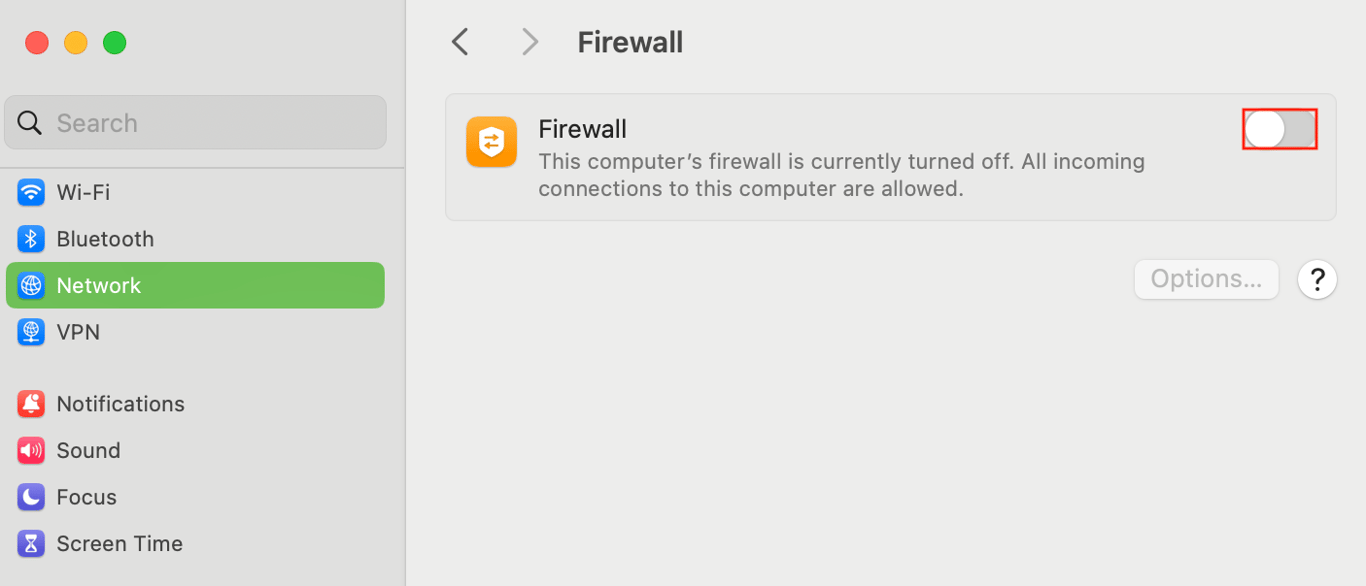
macOS
- Navigate to System Settings → Network → Firewall.
- Turn off the firewall by clicking the toggle.
Important! Immediately reactivate your firewall or antivirus software after confirming that the issue is or isn’t related to the software. If it is the issue, try changing the settings or updating to a newer version instead of switching them off just to access a specific website.
7. Adjust SSL/TLS and QUIC protocol settings
The ERR_SSL_PROTOCOL_ERROR error might appear if the browser is incompatible with the website’s SSL/TLS configurations. It may also happen when the browser uses the QUIC protocol, but the website doesn’t support it.
Adjusting the SSL/TLS settings and temporarily disabling the QUIC protocol in your web browser may resolve the issue.
Important! Changing your browser’s SSL/TLS setting can present security risks. Proceed with caution and avoid lowering the security threshold permanently.
Here’s how to adjust these settings in different browsers.
Google Chrome and Microsoft Edge
Google Chrome and Microsoft Edge have the same settings because they share the same underlying technology. They don’t provide dedicated SSL/TLS configuration options, but you can enable or disable certain features:
- In the address bar, enter chrome://flags for Chrome or edge://flags for Edge.

- Experiment with disabling SSL/TLS-related settings, such as TLS1.3 Early Data and Omitting the TLS client certificate if credential mode disallows, to see if it resolves the issue.
- Find the Experimental QUIC protocol setting and disable it.
- Restart the browser to ensure the changes take effect.
Mozilla Firefox
Unlike Edge and Chrome, Firefox lets you adjust SSL/TLS settings through its configuration menu. Here are the steps to do it:
- Type about:config in the address bar and press Enter.
- Accept the warning and proceed.
- Set security.tls.version.min to 3 to enable TLS 1.2 as the minimum version and set security.tls.version.max to 4 to enable TLS 1.3 as the maximum version.
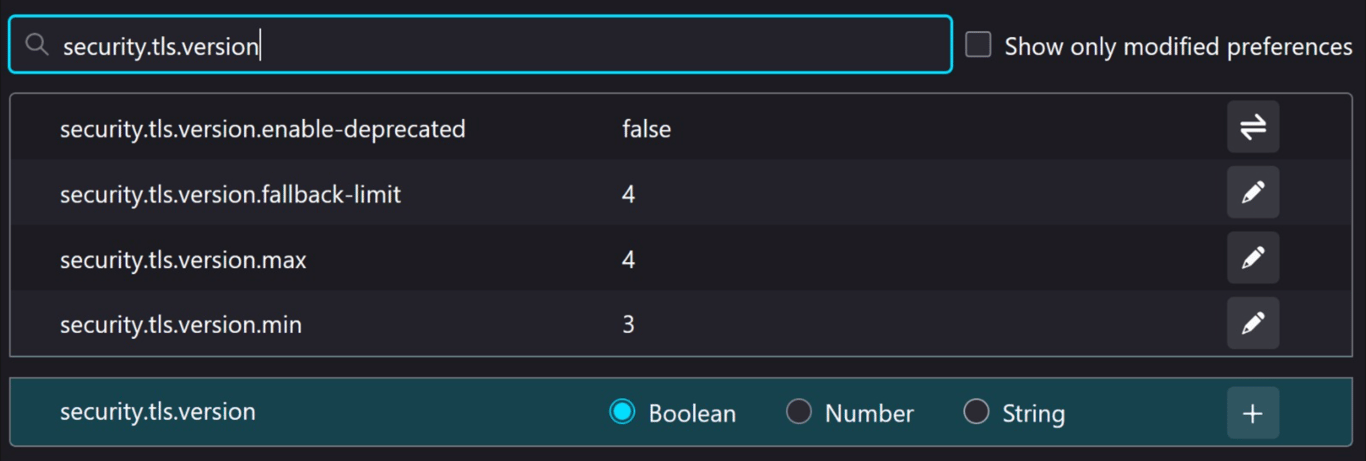
- Change the network.http.http3.enable setting to false to disable the QUIC protocol.
- Restart Firefox to apply the changes.
For Safari users, you can’t configure the SSL/TLS settings because this configuration is integrated at the system level on your operating system.
8. Reset network settings
Network configurations including DNS, proxy, and firewall rules determine how your device establishes internet connections. Over time, these settings can become corrupted due to software updates, network changes, or conflicting configurations, potentially causing errors.
Resetting your system’s network settings can help eliminate these issues. Here’s how:
Windows
- Open the Start menu and search for cmd.
- Launch Command Prompt as an administrator.
- Run the following commands one by one:
netsh int ip reset

netsh winsock reset

ipconfig /flushdns
- Restart your computer to apply the changes.
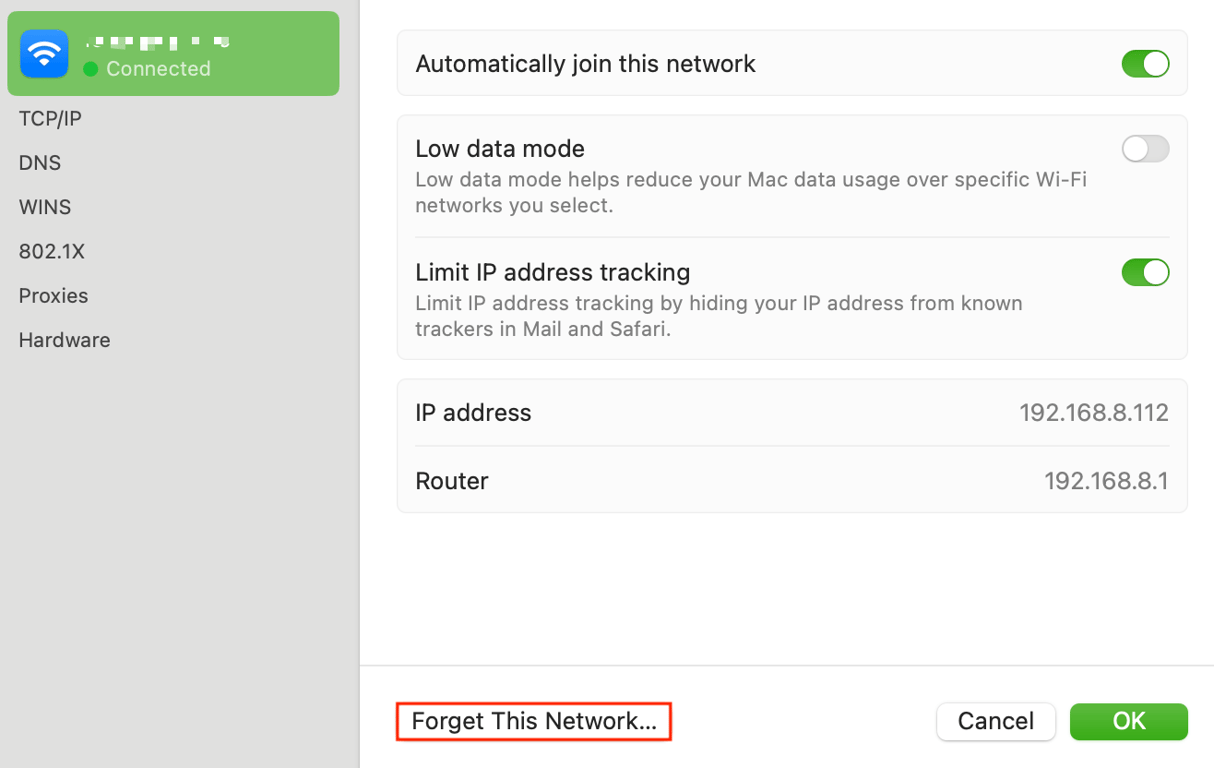
macOS
- Click the Apple icon and go to System Settings → Network.
- Select your active network connection, Wi-Fi or Ethernet, and click Details.
- Click Forget This Network and confirm the deletion.
- Re-add your network connection and configure it as needed.
9. Check for mixed content issues
Important! This solution is for website owners, not users.
If your website uses HTTPS but contains content served via HTTP, the web browser might be unable to establish a secure connection and show the ERR_SSL_PROTOCOL_ERROR message.
To identify if your website contains mixed content via a web browser, open your browser’s developer tool and access your website. Look for “Mixed Content” warnings that indicate which resources are being loaded over HTTP.
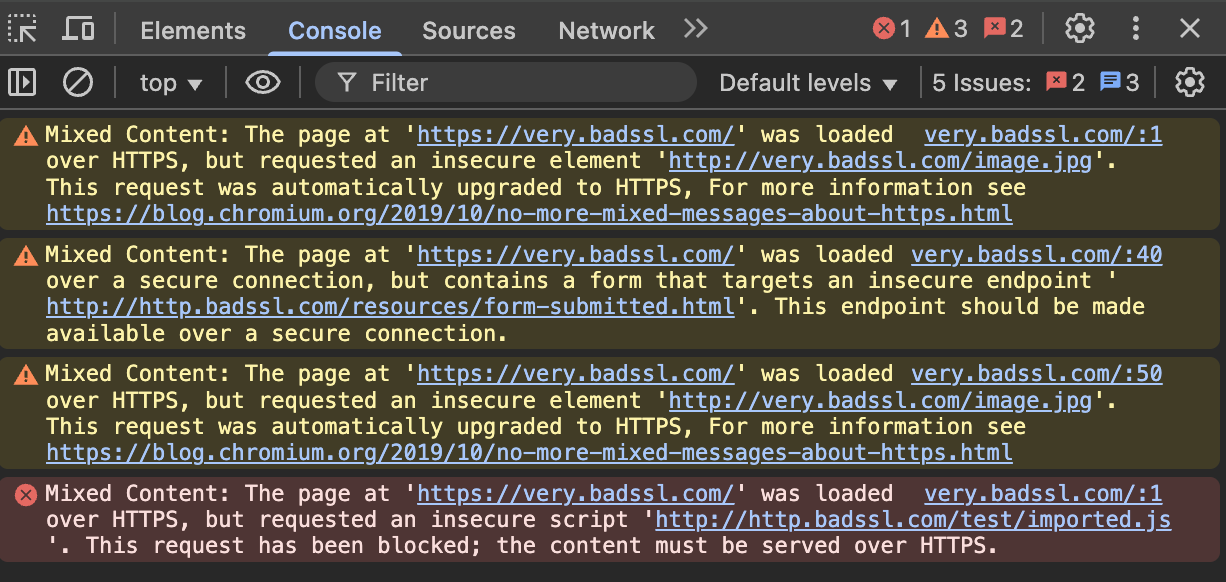
If this type of warning message is present, update all internal resource URLs to use HTTPS instead of HTTP. This might involve editing the HTML, CSS, or JavaScript files directly or using a plugin for CMS platforms like WordPress. Ensure that third-party resources also use HTTPS.
Next, force all HTTP requests in your website to HTTPS by redirecting them. If you use the Apache web server, add the following code to your .htaccess file:
RewriteEngine On

RewriteCond %{HTTPS} off

RewriteRule (.*) https://%{HTTP_HOST}%{REQUEST_URI} [L,R=301]
If you use NGINX, add the following server block to the web server configuration file, which might be nginx.conf or /sites-available/example.com, depending on your setup. Remember, replace example.com with your website’s actual domain name.
server {

listen 80;

server_name example.com www.example.com;

return 301 https://example.com$request_uri;

}
Save the changes and try reopening the website using your browser’s private or incognito mode. This ensures caches don’t interfere and cause other issues.
10. Verify the validity of your SSL/TLS certificate
Important! This solution is for website owners.
If you suspect your website’s SSL/TLS certificate is corrupted, revoked, or expired, use an online tool like Why No Padlock? to check its validity. Simply enter your website’s URL to see if any problems are present.

If so, the easiest way to fix this SSL configuration issue is to regenerate the certificate. The process will depend on the provider and how you obtained the SSL certificate.
11. Check web server configuration
Important! This solution is for website owners.
Server misconfiguration, such as incorrect SSL certificate installation and protocol settings, can lead to connectivity errors like ERR_SSL_PROTOCOL_ERROR.
Follow this procedure to ensure your server is correctly configured:
- Verify that the SSL/TLS certificate, intermediate certificates, and private key are correctly installed on the server using SSL Certificate Checker.
- Open your web server configuration, which is typically /etc/apache2/apache2.conf for Apache and /etc/nginx for NGINX.
- Disable outdated protocols like SSL 2.0 and SSL 3.0 and enable the newer TLS 1.2 and TLS 1.3. If you use an Apache web server, add the following to your configuration file:
SSLProtocol all -SSLv2 -SSLv3
For NGINX servers, update ssl_protocols in the configuration file:
ssl_protocols TLSv1.2 TLSv1.3;
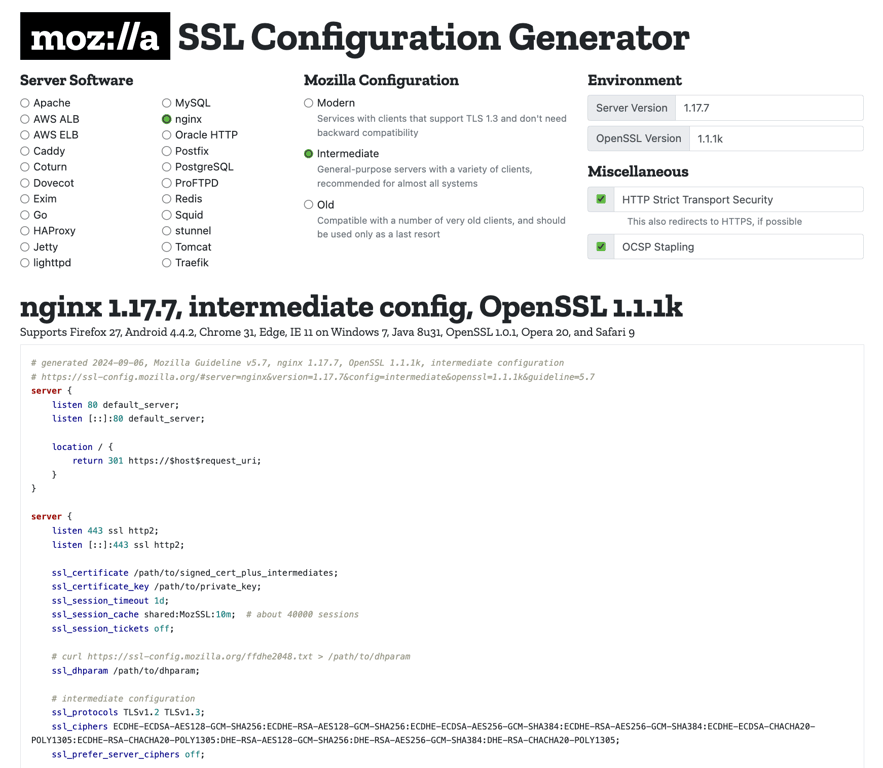
- Generate cipher suites for your web server using Mozilla’s SSL Configuration Generator to generate secure cipher suite configurations for your web servers.
- Update your web server configuration with the newly generated cipher suite setting.
- Save the changes in your web server’s configuration file.
- Restart the web server to apply the updates. For Apache, use this command:
sudo systemctl restart apache2
Or run the following for NGINX:
sudo systemctl restart nginx
Use the same SSL Certificate Checker tool again to look for warnings or errors and address them accordingly. Then, access your website in incognito or private browsing mode to see if the issue has been resolved.
After resolving the issue, it’s important to apply preventive practices to reduce the chance of this error appearing again whether you’re a site visitor or a server administrator.
How to prevent ERR_SSL_PROTOCOL_ERROR in the future
Encountering ERR_SSL_PROTOCOL_ERROR can be annoying for both website visitors and owners. Here are some strategies to prevent this issue from happening again.
Preventing ERR_SSL_PROTOCOL_ERROR as a visitor
While the appearance of ERR_SSL_PROTOCOL_ERROR is inevitable if the issue is on the website, follow the following practices to avoid it from the client side:
Update your software
As discussed, updating your web browser and operating system ensures they have the latest features to meet the newest security standards. This also helps prevent other issues, including bugs and security flaws.
Configure your device properly
Correctly configuring your system’s time, date, and network settings ensures better browsing and smoother operation overall. We also recommend reassessing these configurations regularly.
Install trustworthy software
Only install reputable firewalls, antiviruses, extensions, and other software to ensure their configurations don’t conflict with your system’s settings.
Use a VPN
A VPN can tunnel your connection to avoid errors like ERR_SSL_PROTOCOL_ERROR and improve privacy when surfing the internet. There’s almost no downside to using a VPN daily, except occasional slowdowns or instability.
Preventing ERR_SSL_PROTOCOL_ERROR as a website owner
Since ERR_SSL_PROTOCOL_ERROR can harm your website’s traffic, reputation, and conversion numbers, follow these practices to prevent it from happening again:
Regularly update certificates
Website owners must renew SSL/TLS certificates on time to maintain a secure and uninterrupted connection. Monitor your certificates’ expiration dates and set up auto-renewal if available.
Implement SSL best practices
Use strong cipher suites, ensure your server only supports TLS 1.2 and TLS 1.3, deactivate outdated protocols like SSL 2.0 and SSL 3.0, and implement the HTTP Strict Transport Security (HSTS) header to prevent users from accessing insecure versions of your site.
Conduct regular maintenance
Regular server and website maintenance helps prevent errors, including SSL/TLS-related ones. This includes updating server software, plugins, and frameworks to their latest versions, checking server configurations, and performing website security audits.
Monitor your website
Monitoring your website’s uptime helps identify issues like SSL errors sooner before they affect more users. Hostinger web hosting users can use the built-in analytics dashboard to detect performance irregularities, which typically point to problems with the website. If you want an automated alerting system, use a third-party tool like Site24x7.

Conclusion
ERR_SSL_PROTOCOL_ERROR occurs when web browsers fail to initiate a secure connection with the visited website due to SSL/TLS issues. On the client side, this happens due to system misconfiguration or outdated software. Server-side problems like invalid SSL/TLS can also be the culprit.
If you’re a website visitor, resolve this issue by checking your device’s configuration, updating all software in your system, using a VPN, and temporarily disabling the firewall and extensions.
Meanwhile, website owners can fix ERR_SSL_PROTOCOL_ERROR by forcing all content to use HTTPS, reissuing the SSL/TLS certificate, and reconfiguring the web server. Following these practices regularly can also prevent the issue from happening again.
We hope that this article has helped you in resolving ERR_SSL_PROTOCOL_ERROR. If you need assistance or have any questions, leave us a comment below. Good luck!
ERR_SSL_PROTOCOL_ERROR FAQ
Why am I seeing the ERR_SSL_PROTOCOL_ERROR message?
The ERR_SSL_PROTOCOL_ERROR message appears due to expired or misconfigured SSL certificates, incorrect system date and time settings, outdated browser or OS, mixed content issues, or conflicts with antivirus or firewall software.
How can I fix the ERR_SSL_PROTOCOL_ERROR?
To fix ERR_SSL_PROTOCOL_ERROR, check the SSL/TLS certificate’s validity, delete browsing data, disable browser extensions, ensure firewall and antivirus settings allow secure connections, and reset network configurations. If you are a website owner, serve your website content over HTTPS, check your certificate’s validity, and verify your server’s configuration.
How does ERR_SSL_PROTOCOL_ERROR error impact website performance and user experience?
When encountering ERR_SSL_PROTOCOL_ERROR, website visitors are very likely not to reach the website at all, which results in traffic loss and damages the site’s reputation. In addition, search engines will penalize your website because it is not secure, leading to poor SEO performance.
All of the tutorial content on this website is subject to Hostinger's rigorous editorial standards and values.

Aris is a Content Writer specializing in Linux and WordPress development. He has a passion for networking, front-end web development, and server administration. By combining his IT and writing experience, Aris creates content that helps people easily understand complex technical topics to start their online journey. Follow him on LinkedIn.