How to delete a WordPress site (WordPress.com and WordPress.org)
Oct 15, 2025
/
Edvinas B. & Ariffud M.
/
5 min Read
You can delete a WordPress site permanently by removing it from your WordPress.com account or uninstalling the software from your self-hosted WordPress.org instance.
The process is simple, but it’s crucial to understand the difference between the two platforms and the options you have before you begin.
WordPress.com is a hosted service where the platform manages the technical aspects for you. In contrast, WordPress.org is self-hosted, meaning you install the software on your own hosting account, giving you full control over configuration and customization.
Depending on the platform and your goals, you can use the following deletion or unpublishing methods:
- WordPress.com steps. Remove the site directly through the platform’s settings.
- Manual deletion. Erase the WordPress files and database from your hosting provider’s server.
- Hosting auto-installer. Use a control panel tool for a simplified, one-click removal.
- Unpublishing options. Make the site private or activate maintenance mode as an alternative to deletion.
How to delete a WordPress.com site
You can delete a WordPress.com site from the Site Settings menu in the Jetpack/WordPress.com mobile app or under Settings if you’re logged into your WordPress.com account in a web browser.
This action is permanent – it will erase all your content, and the site address can’t be reused.
From the Jetpack or WordPress.com app
- Open the Jetpack or WordPress.com app on your device.
- Tap My Site and choose the specific site you want to remove (if you own more than one).
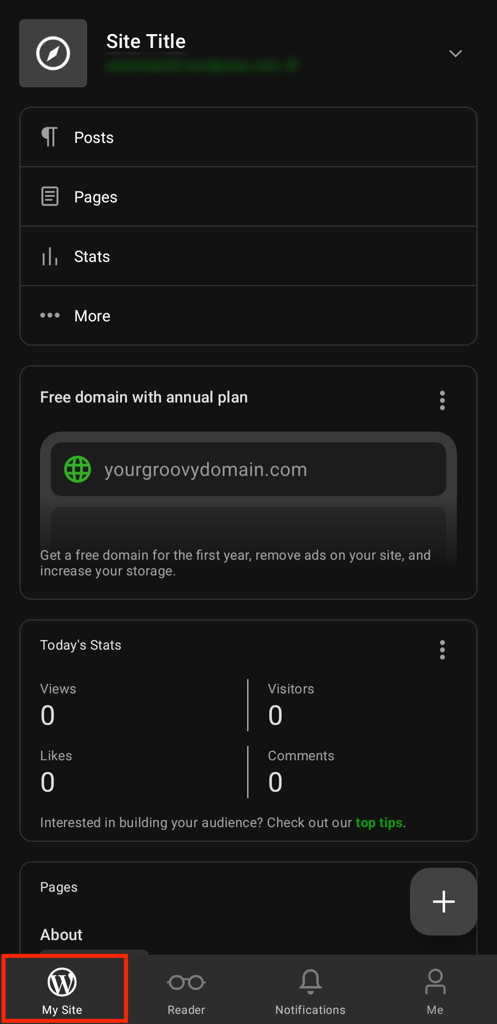
- Tap More → Site Settings.
- Scroll to the bottom of the menu and tap Delete site.
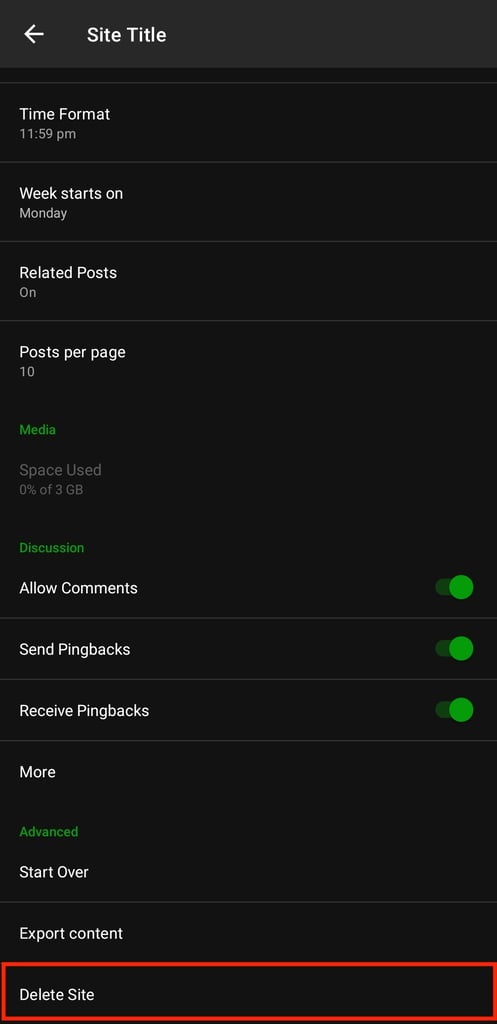
- Confirm the action to permanently delete the site.
From a web browser
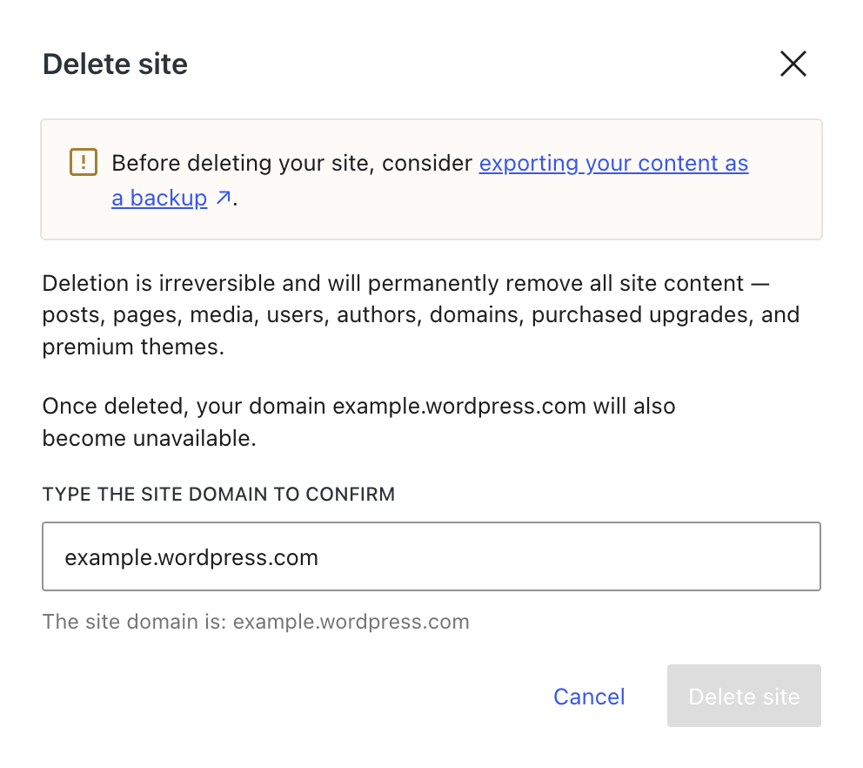
- Open WordPress.com and log in with your account.
- From the dashboard, click the WordPress icon in the top-left corner → Sites.
- Under your site’s thumbnail, click the ellipsis (⋮) menu → Settings.
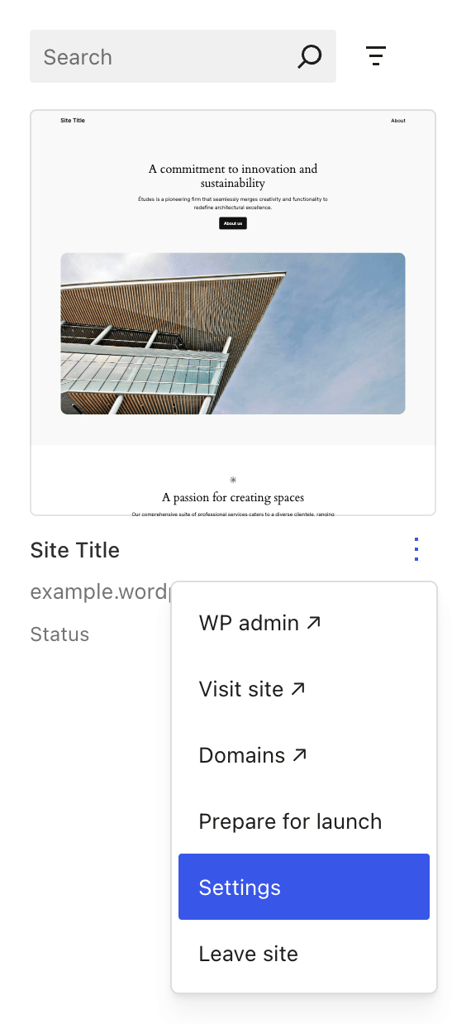
- Scroll down to the Delete site option and select it.
- As final confirmation, type your site’s address into the text field and click Delete this site.
How to delete a self-hosted WordPress (WordPress.org) site
To delete a self-hosted WordPress site, you must manually remove the website files from your hosting account using a File Manager or FTP client. Then, delete the associated database with a tool like phpMyAdmin.
1. Back up your site first
Backing up your site before deleting it is a critical safety step. If you change your mind or make a mistake, you can fully restore your site from the backup.
To back up your WordPress site, you have three main options:
- Use a plugin. Install a backup plugin like UpdraftPlus to schedule and store backups.
- Do it manually. Download your site files with an FTP client like FileZilla and export the database using phpMyAdmin.
- Use hosting tools. Many hosting providers include built-in backup tools that automatically save your files and database.
2. Delete WordPress files (File Manager or FTP)
Your core WordPress files usually sit in your hosting account’s public_html directory. You can delete them using either your host’s File Manager or an FTP client.
Here’s how to do it with File Manager:
- Log in to your host’s control panel and open the File Manager app.
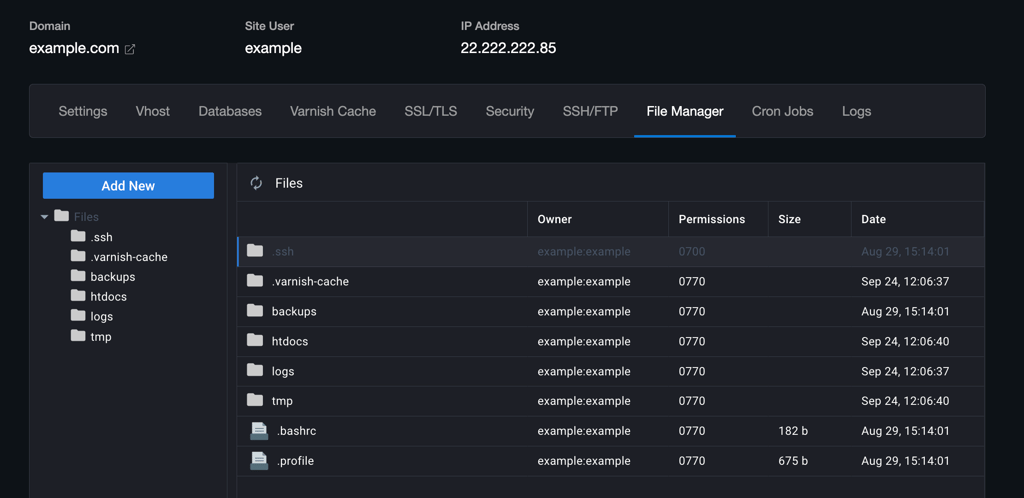
- Navigate to your site’s root directory, typically public_html.
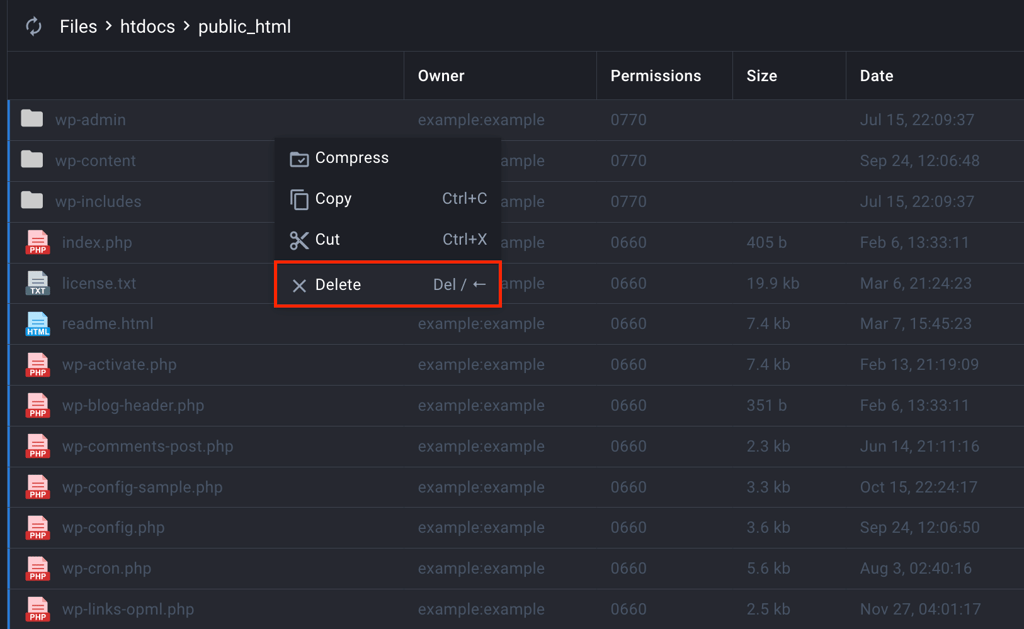
- Open the wp-config.php file and find the line that says:
define( 'DB_NAME', 'your_database_name' );

- Note down the database name, as you’ll need it to delete the database later. Then close the file.
- Select all files and folders within the public_html directory.
- Use the Delete function to permanently remove them. Be careful not to delete unrelated files if you host multiple sites or apps in the same directory.
3. Delete the WordPress database
Deleting your site’s files doesn’t remove its database, which stores all your content, settings, and user information.
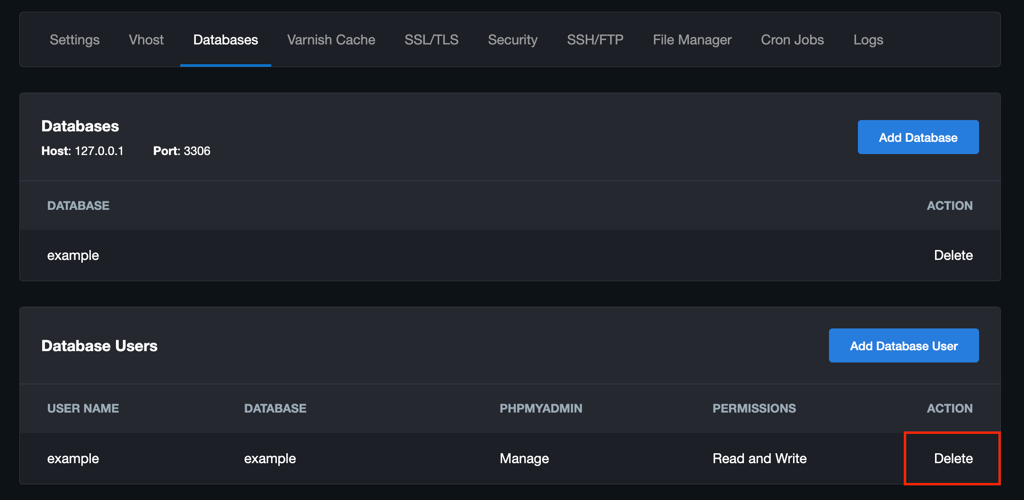
Follow these steps to delete the associated WordPress database:
- Access your hosting control panel and open the database management tool, whether phpMyAdmin, MySQL Databases, or a proprietary tool provided by your host.
- Locate the database name you noted earlier in wp-config.php.
- Select the database and choose the Delete or Drop option to permanently remove it.
How to temporarily disable or unpublish a WordPress site
To temporarily disable or unpublish a WordPress site, you can install a maintenance mode plugin like LightStart, make your site private from the WordPress.com dashboard, or redirect your domain to a different URL.
- Use a maintenance mode plugin. Enable WordPress maintenance mode on your self-hosted site by installing a plugin like LightStart. Once activated, choose a maintenance page template and customize it. When finished, the plugin displays the maintenance page to visitors while you still have full administrator access.
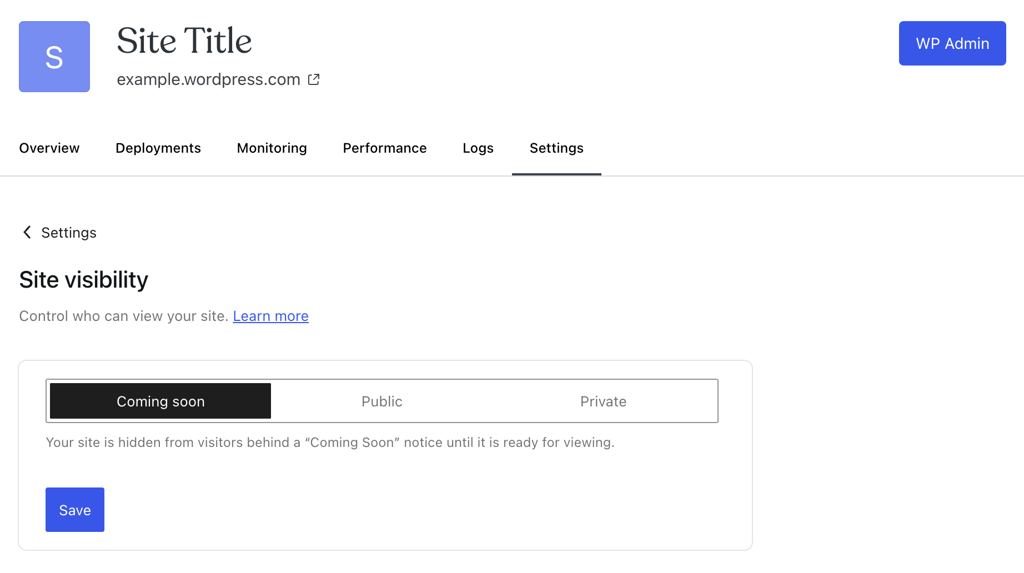
- Make your site private. For WordPress.com users, the platform has a built-in feature. In a web browser, go to Settings → Site visibility → Coming soon. Meanwhile in the mobile app, navigate to Site Settings → Privacy → Private. This setting makes the site visible only to you until you’re ready to publish again.
- Redirect your domain. You can temporarily redirect your domain to send visitors to another URL, such as a social media profile or a landing page. Log in to your domain registrar, open the DNS or Domain Forwarding settings, and enter the new destination URL.
How to delete a WordPress site on Hostinger
For Hostinger users, you can delete it through our custom control panel, hPanel, either with the Auto Installer feature or by manually deleting your website files and database.
Delete via Auto Installer
The easiest way to remove a WordPress installation on Hostinger is by using the Auto Installer feature.
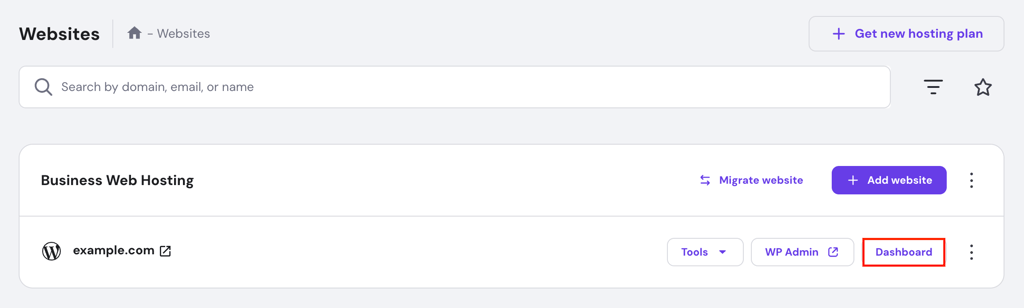
- Log in to hPanel with your Hostinger account and navigate to Websites → Website list.
- Click Dashboard next to the website you want to delete.
- From the left sidebar of your dashboard, go to Website → Auto Installer.
- Click the three-dot menu next to your WordPress website URL and select Delete.
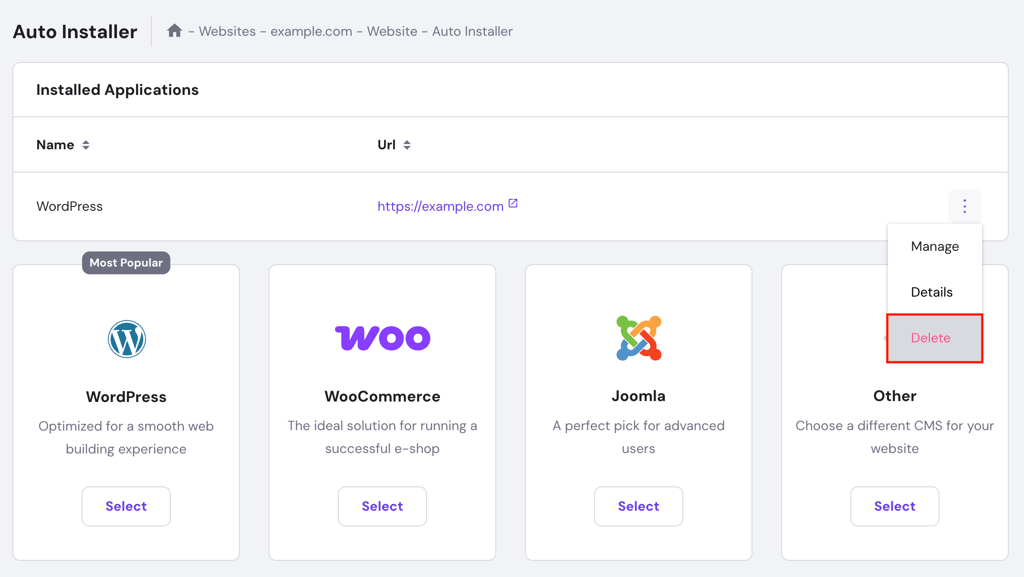
- A confirmation window appears. Check the boxes to confirm you want to delete the application, files, and database, then click Delete.
Delete manually in hPanel (files + database)
For more control, you can delete your WordPress website manually by removing all its files and the database.
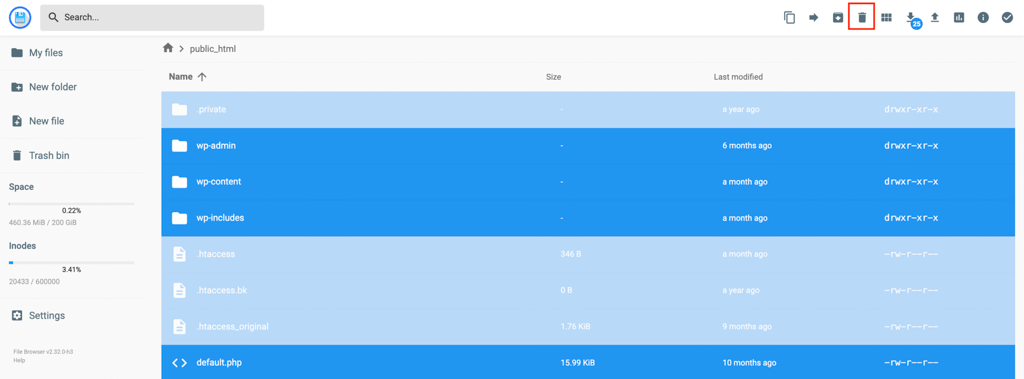
- From your website’s dashboard of hPanel, go to Files → File Manager → public_html.
- Open the wp-config.php file to find your database name.
- Select all files and folders inside public_html and click the trash bin (Delete) icon on the top bar.
- Return to the website dashboard and select Databases → Management.
- Find the correct database in the list, click the three-dot menu → Delete.

- In the pop-up window, confirm the deletion.

Additional considerations when deleting your site
Before deleting your WordPress site, consider the following long-term effects:
- SEO consequences. Deleting your site causes it to be removed from search engine indexes like Google, and you lose all existing search rankings permanently.
- Removing cached versions from Google. Even after deletion, cached versions of your site may still appear in search results for some time. To speed up removal, use the Google Search Console Removals tool.
- Keeping or deleting your domain. Your domain name is registered separately from your hosting account. You can let it expire, sell it, or keep it for a future project.
- Internet Archive. The Wayback Machine may have archived snapshots of your website. To erase them, you must contact the Internet Archive directly with a removal request.
What to do after deleting your WordPress site?
After deleting your WordPress site, decide what to do with your domain name and how to prepare for a new project. Whether you plan to start over or move on, managing the transition properly is key to maintaining your online presence.
Here are the most common paths forward:
- Start fresh. If you’re ready to build a new website, learn how to install WordPress on your hosting account.
- Prioritize security. For your next project, follow our WordPress security checklist to protect your site from the beginning.
- Migrate your backed-up content. If you deleted your site after backing it up because you plan to move it, see our guide on how to move WordPress to a new domain.
If you’re building a new site, Hostinger’s WordPress hosting service provides a strong foundation. Our plans include helpful features like one-click WordPress installation, automatic updates, free SSL certificates, and 24/7 expert support to help you succeed.
All of the tutorial content on this website is subject to Hostinger's rigorous editorial standards and values.

Edvinas is a professional mentor and trainer of customer support agents. When he's not teaching the secrets of providing exceptional service, he likes to travel the world and play basketball.

Ariffud is a Technical Content Writer with an educational background in Informatics. He has extensive expertise in Linux and VPS, authoring over 200 articles on server management and web development. Follow him on LinkedIn.


