How to install WordPress: 4 methods for any setup
Oct 02, 2026
/
By Bruno S. & Marco C.
/
11 min Read
To install WordPress, you can use your host’s automated setup during signup, a one-click installer from your control panel, or upload the files manually with File Manager or FTP.
New Hostinger users get the fastest path through the onboarding wizard, which installs WordPress automatically after you pick a plan. Existing users can go straight to the WordPress Installer in hPanel, which adds WordPress to any site in seconds.
The File Manager and FTP methods give you full control over the installation and work on any hosting provider, not just Hostinger.
Most installation errors trace back to database credentials, misplaced files, or domain setup and have straightforward fixes. Once WordPress is running, a few quick steps get your site ready to publish: choosing a theme, installing essential plugins, and configuring permalinks.
What do you need to install WordPress?
To install WordPress, you need web hosting, a domain name, an SSL certificate, and access to your hosting control panel.
- Web hosting. Stores your site’s files on a server and makes them accessible online. The best WordPress hosting plans include automatic WordPress installation, automatic backups, and tools built for WordPress performance.
- A domain name. The web address people type to reach your site, such as yoursite.com. Hostinger includes a free domain for the first year with any annual WordPress hosting plan.
- An SSL (Secure Sockets Layer) certificate. Encrypts the connection between your site and visitors. Hostinger activates SSL automatically when you connect a domain.
- Access to your hosting control panel. All Hostinger installation methods use hPanel. The FTP method also requires an FTP client such as FileZilla.
WordPress is open-source software, so it is free to download and use. Hosting and domain registration are the only costs. WordPress pricing breaks down the cost of each element, from plan tiers to domain registration.
Hostinger WordPress hosting includes LiteSpeed acceleration (a caching system that speeds up your site), automatic WordPress updates, and a vulnerability scanner. Unlimited and higher plans also include staging, object cache, and AI tools for WordPress.
Pro tip
If you want to try WordPress without a live site first, you can install WordPress locally on your computer.

How to install WordPress during Hostinger onboarding
To install WordPress during Hostinger onboarding after purchasing a plan, complete the setup wizard and wait a few minutes for WordPress to install automatically. This is the recommended method for new users setting up their first site on Hostinger.
If you already have a hosting plan, launch it from Websites → + Create website → WordPress in hPanel.
- Enter a domain name in the Secure your domain field and select it from the results.
- On the Where should we host your website? screen, Hostinger selects the closest server region based on your location. Sites load faster when the server is near their visitors, so change this if most of your audience is somewhere else. Then click Next.
- On the Create login details for your WordPress website screen, fill in your WordPress admin language, WordPress admin mail, and Administrator password.
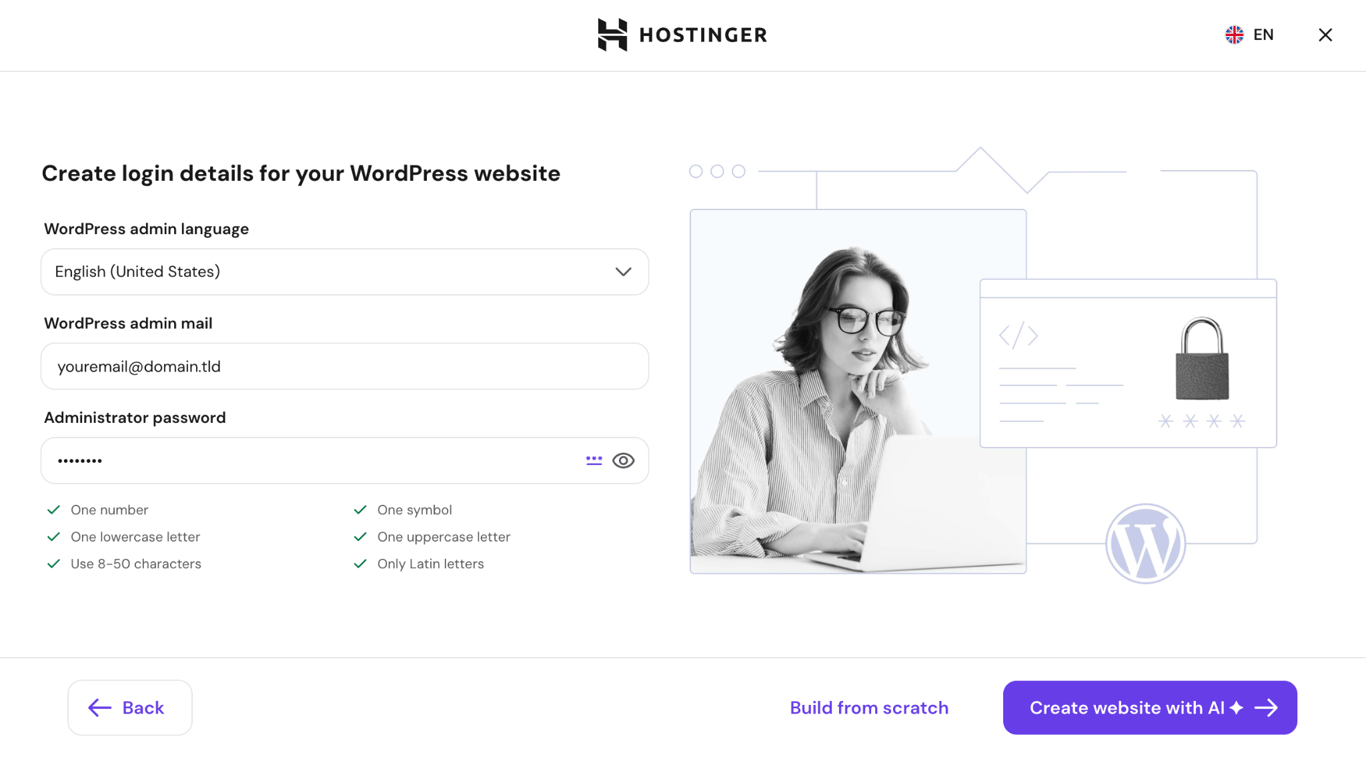
- Choose how to set up your site after installation:
- Build from scratch. The WordPress dashboard opens immediately with no pre-loaded content — choose a theme and install plugins to build your site from a blank canvas.
- Create website with AI. An AI website assistant generates a starter site with pages and design after WordPress is installed.
- After you choose your setup option, the Installing WordPress screen appears. The process takes approximately two minutes.
After installation, Hostinger opens a site setup screen. If you chose Create website with AI, describe your site in the prompt, confirm your pages and brand name, and click Continue. Optionally add contact and social details, then wait for the site to generate. Review the result, adjust colors and fonts if needed, then click Setup in WP admin.
Pro tip
The Create website with AI flow uses Elementor (a drag-and-drop page builder plugin) as the default editor. Select Gutenberg from the Editor dropdown before confirming your site details if you prefer WordPress's built-in block editor.
If you chose Build from scratch, the WordPress dashboard opens directly. From there, you can choose a theme, install plugins, and build your site to your own design.
Either way, you land on the Hostinger Onboarding page in your WordPress dashboard, which includes a checklist to help you complete your site setup.
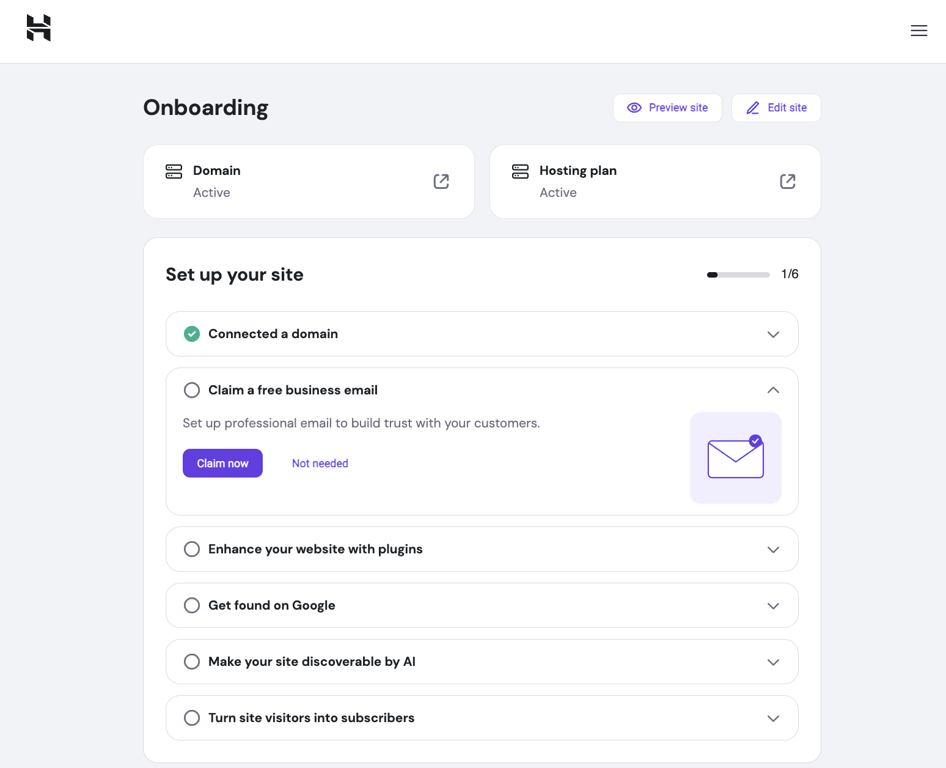
To return to your WordPress dashboard later, log in to hPanel, go to Websites, and click WP Admin next to your site.
How to install WordPress using the Hostinger WordPress Installer
To install WordPress using Hostinger WordPress Installer, navigate to Website → WordPress Install in hPanel and complete the two-step form.
Use this method if you already have a website hosted on Hostinger and want to install WordPress on it. It is the quickest way to get WordPress running and also lets you choose a specific version or install in a subdirectory.
Installing WordPress will overwrite any existing files in the target website. Back up your site before proceeding if you have content you want to keep.
- Log in to hPanel and go to Websites. Click on the Dashboard button next to your desired website, then go to Website → WordPress Install. Click Install.
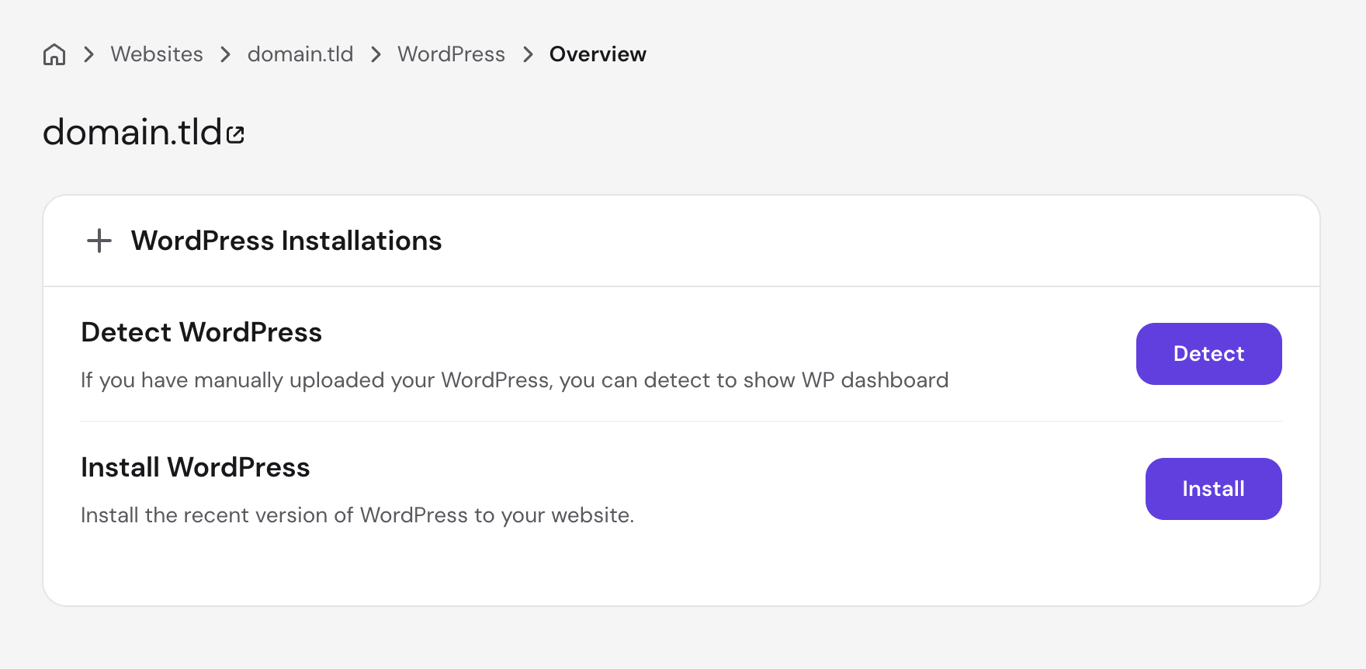
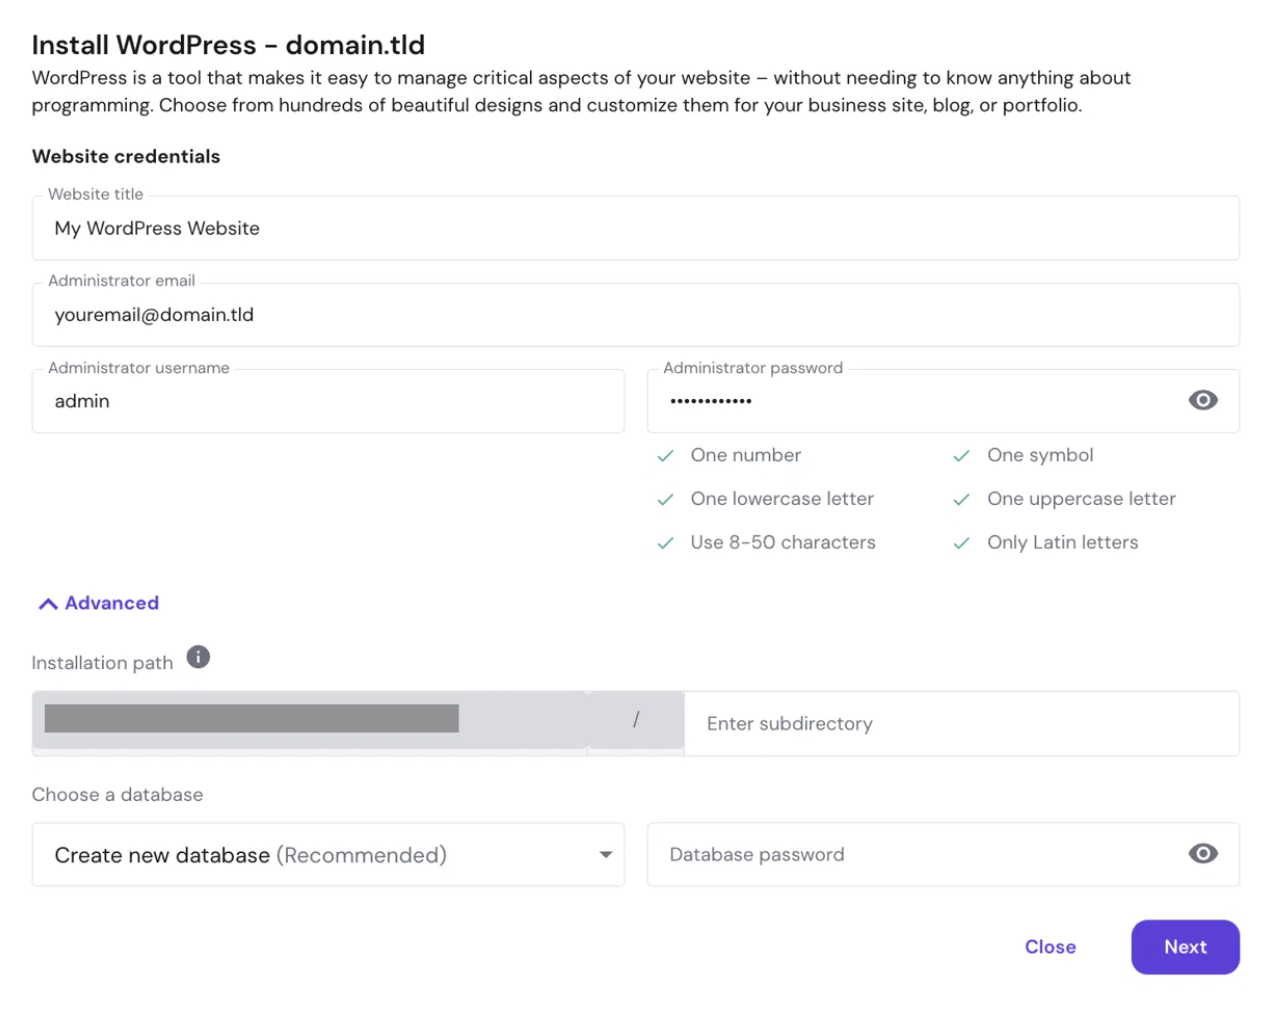
- Fill in your website credentials:
- Website title. The name of your site (you can change this later).
- Administrator email. Prefilled with your Hostinger account email.
- Administrator username. Prefilled with your account username.
- Administrator password. Enter a strong password and save it somewhere secure.
- Click Advanced if you want to change where WordPress is installed::
- Installation path. Shows your domain with an optional subdirectory field – use this to install WordPress on a subdomain or in a subfolder. Leave it empty to install at the main domain.
- Choose a database. Leave this on to Create new database (Recommended). The installer sets up the WordPress database for you.
- Click Next.
- Set your version and update preferences:
- Select application version. Defaults to the latest WordPress version. The dropdown includes versions back to the 4.x series, but older versions no longer receive security updates – only pick one if you have a specific reason.
- Select language. Defaults to English.
- Application Updates. Select Update only to minor version (preselected and recommended). This installs security and bug fixes automatically while leaving bigger upgrades for you to approve.
The installer checks whether the PHP version on your site (the server-side language WordPress runs on) is compatible with WordPress. If it flags a conflict, you can switch PHP versions directly from the same screen without leaving the installer.
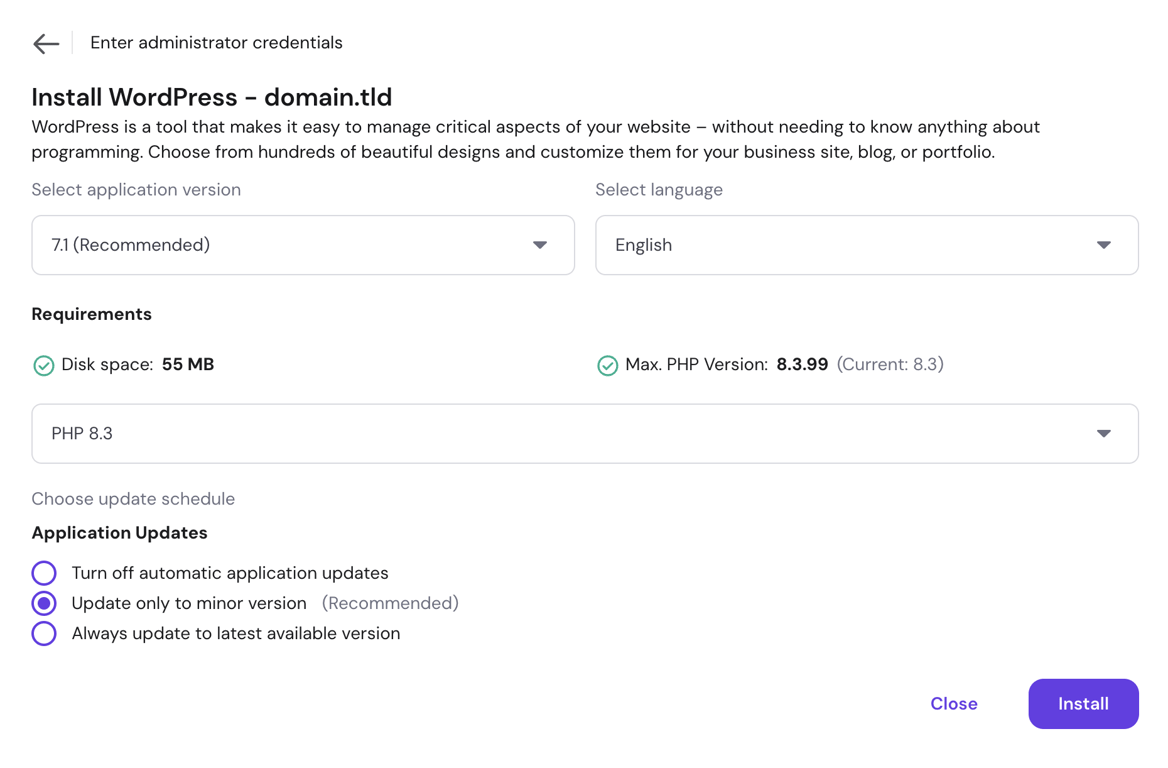
- Click Install. The installer takes a few seconds, then opens the WordPress Overview page for your site in hPanel.
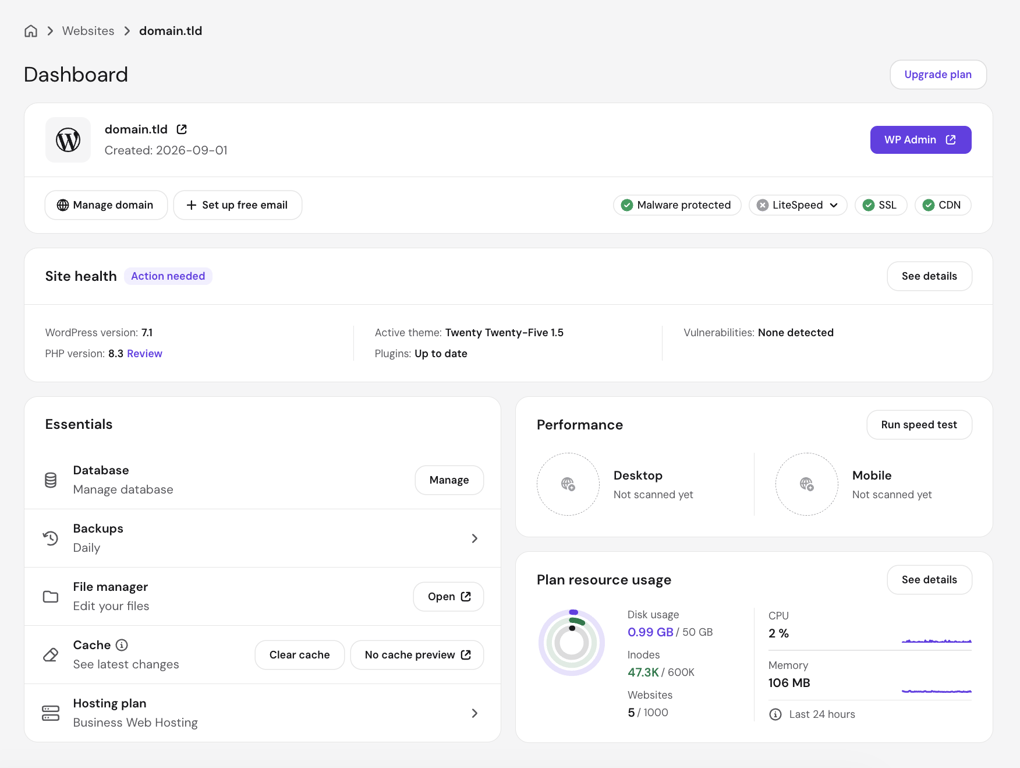
The Dashboard page shows your SSL status, the Force HTTPS toggle, your WordPress version, and a WordPress admin button. Click WordPress admin to open your WordPress admin page.
Pro tip
The first time you open your WordPress dashboard after this installation, Hostinger's AI website creation screen appears. Click Go to WordPress admin at the bottom to skip it and go directly to the standard dashboard.
How to install WordPress using the File Manager
To install WordPress manually using File Manager, download the WordPress package from wordpress.org, upload and extract it to public_html in hPanel, create a MySQL database, and run the browser installer.
This method gives you full control over the file structure, and installs plain WordPress with no additional plugins. It works on all Hostinger hosting plans and on any other hosting provider that includes a file manager. Steps and interface options may vary depending on your host.
If public_html already has an active site, WordPress will take over the root domain after installation. Your existing files won't be deleted, but the old site will stop loading. Back up anything you want to keep before continuing.
- Go to wordpress.org and click Get WordPress on the top right corner. Download the most recent available version of the software, which will be saved to your computer as a .zip file.
- In hPanel, go to Websites, select your site, then navigate to Files → File Manager. Click Access files of [your site].
- Open public_html and delete default.php.
- Click the upload icon in the toolbar and select the .zip file you downloaded. Wait for the upload to complete.
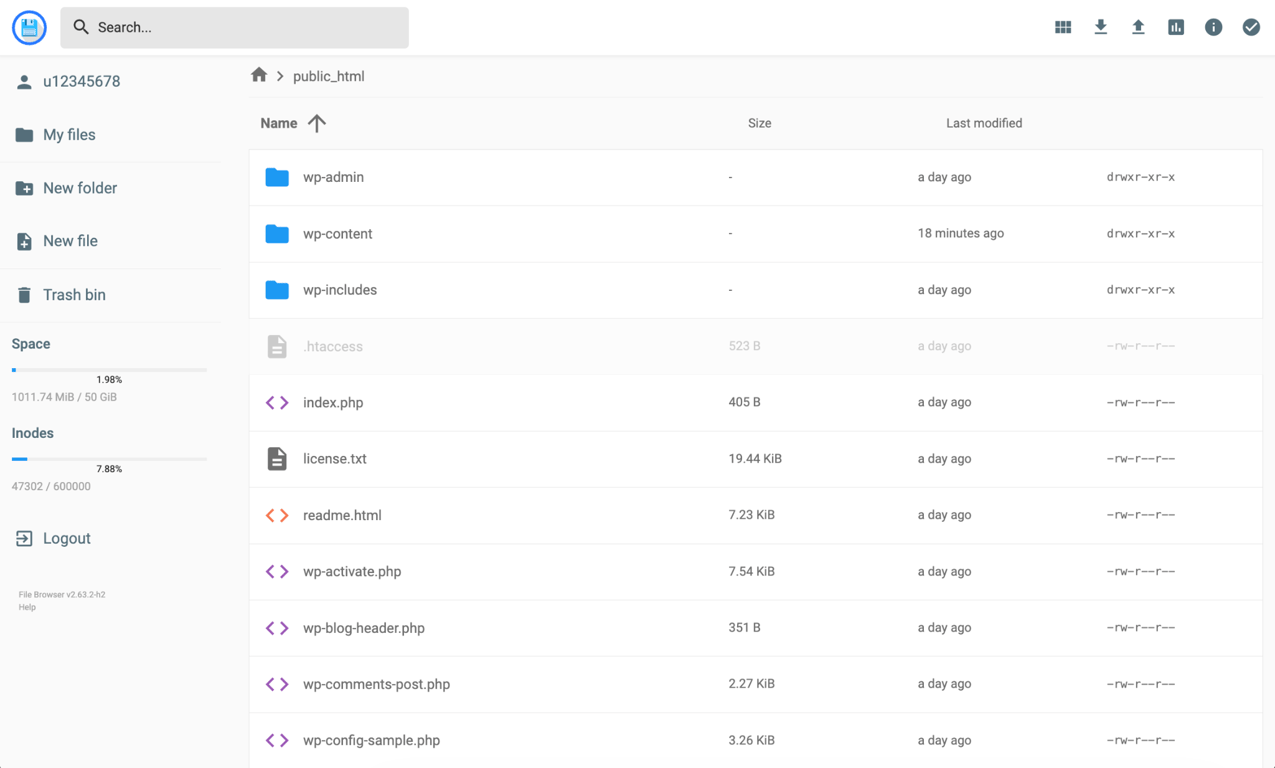
- Right-click wordpress-7.1.zip and select Extract. In the dialog, navigate into public_html, clear the Choose folder name field, and click Extract.
- Check whether the WordPress files landed directly in public_html or inside a wordpress subfolder. If they are in a subfolder, select all the files inside it, move them to public_html, then delete the empty wordpress folder and the zip file.
Pro tip
wp-admin, wp-content, wp-includes, and index.php should sit directly inside public_html with no subfolder. If the domain loads a blank page after installation, files placed in the wrong folder are the most likely cause.
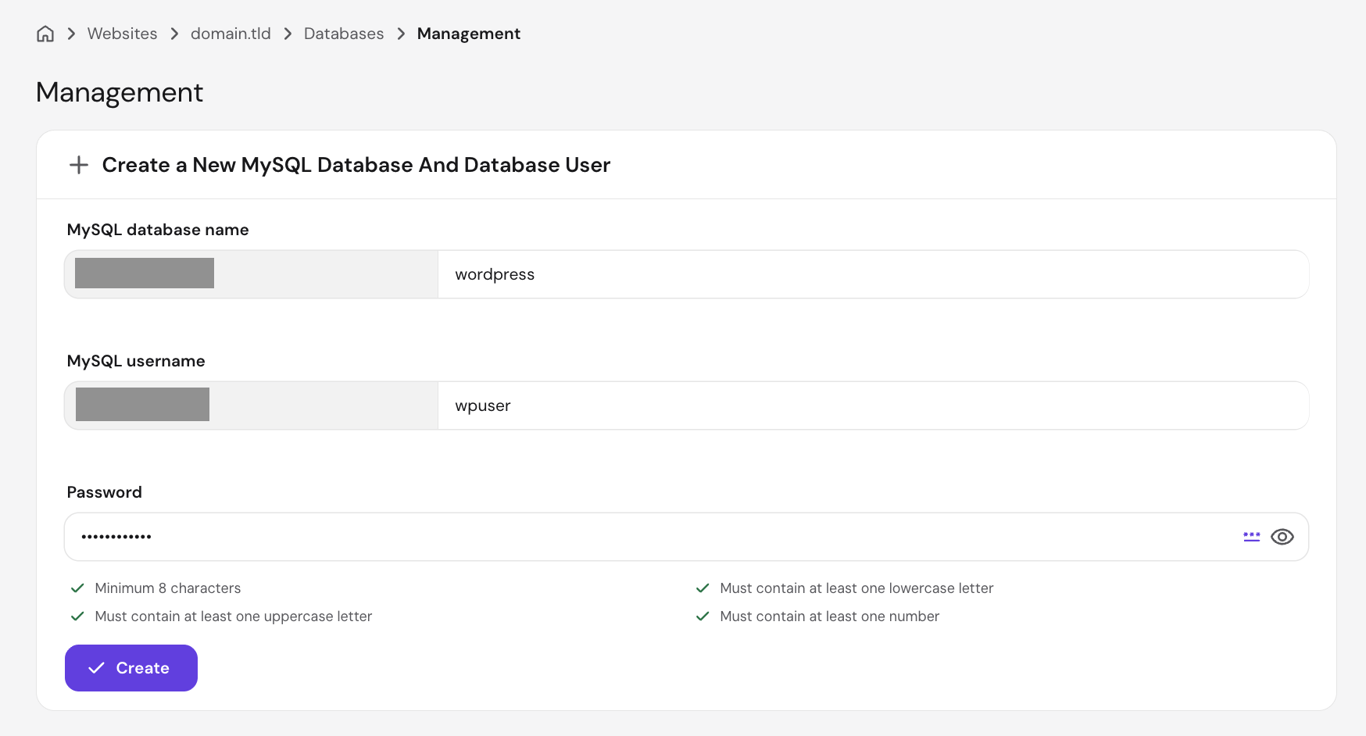
- Create a MySQL database in your hosting control panel. In hPanel, navigate to Databases → Management. Click Create a New MySQL Database And Database User and fill in:
- MySQL database name. Enter a short name, such as wordpress.
- MySQL username. Enter a username such as wpuser.
- Password. Click the generate icon for a strong password, or type your own.
Click Create and write down the full database name, username, and password shown in the list below the form.
hPanel automatically adds a prefix to both the MySQL database name and username. If you entered wordpress, the full name will be something like u123456789_wordpress. Use the full prefixed values in the next step; entering only wordpress will cause a database connection error.
- Open a new browser tab and type your domain address into the address bar (e.g., domain.tld). The WordPress database configuration wizard opens automatically.
- Select your language and click Continue, then click Let’s go! on the intro screen.
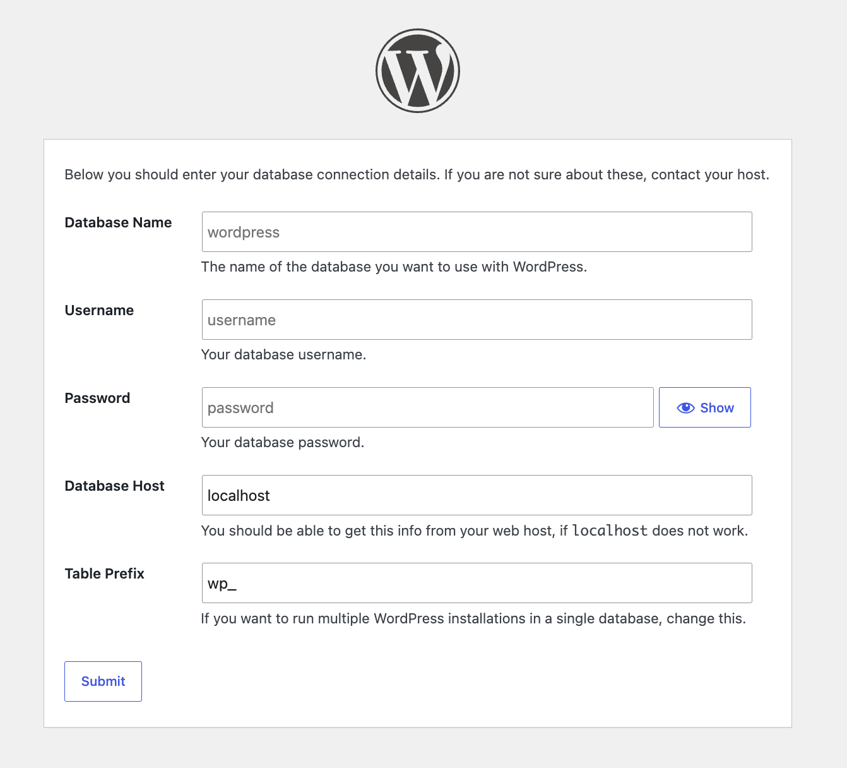
- Fill in your database connection details:
- Database Name. The full prefixed database name.
- Username. The full prefixed database username.
- Password. The database password.
- Database Host. localhost (leave as is).
- Table Prefix. wp_ (leave as is).
Click Submit.
- When you see “WordPress can now communicate with your database”, click Run the installation.
- Fill in your site details:
- Site Title. The name of your site.
- Username. Your WordPress admin username.
- Password. Your WordPress admin password.
- Your Email. Your email address.
- Search engine visibility. Leave unchecked unless your site is not ready to go public.
- Click Install WordPress.
- The Success! screen confirms the installation. Click Log In and enter the admin credentials you just set.
If you’re using Hostinger, head back to hPanel and go to Website → WordPress Install, then click Detect to register your installation. Without it, the WP Admin button will not appear in the Websites list. Refresh the page after a few minutes.
How to install WordPress manually using FTP
To install WordPress using FTP, download and extract the WordPress package on your computer, upload the files to your server’s public_html folder using an FTP client (such as FileZilla), create a MySQL database, and run the browser installer.
FTP is a protocol for transferring files between your computer and a web server. Use this method if you prefer to work with an FTP client or are installing WordPress on a server that does not include a file manager.
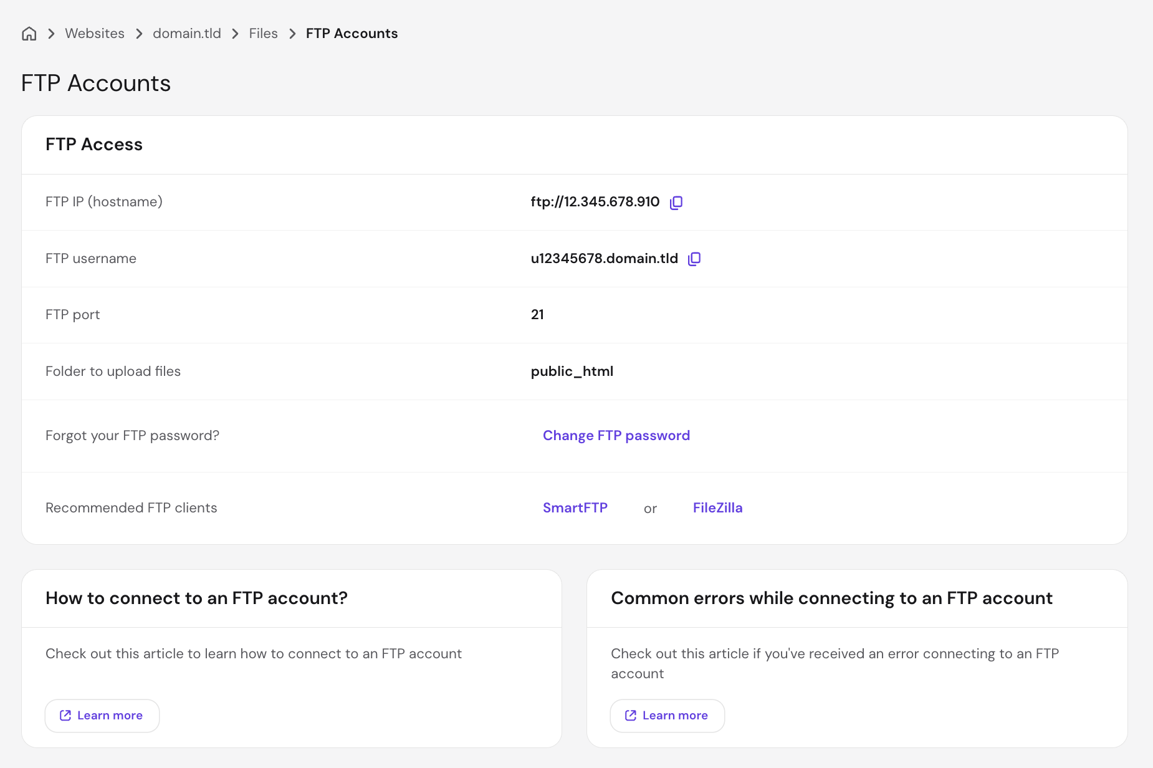
- Find your FTP credentials in your hosting control panel. In hPanel, navigate to Files → FTP Accounts. The FTP Access panel shows:
- FTP IP (hostname). Your server address.
- FTP username. Your FTP username.
- FTP port. 21.
- Click Change FTP password and set a password – the FTP password is separate from your hPanel account password and has no default value. You can also create FTP accounts with access restricted to specific directories if needed.
- Download and install an FTP client. These steps use FileZilla (client version, available at filezilla-project.org), but any FTP client works.
- In FileZilla’s Quickconnect bar, enter your connection details:
- Host. The FTP IP from step 1.
- Username. The FTP username from step 1.
- Password. The FTP password you set in step 2.
- Port. 21.
Click Quickconnect. On your first connection, check Always trust this certificate in future sessions in the certificate prompt and click OK. The log area shows “Status: Logged in” when the connection succeeds. If it shows an error instead, check if your FileZilla FTP configuration matches the credentials from step 1.
- Go to wordpress.org and click Get WordPress in the top right corner. Download the most recent available version and extract the .zip file on your computer. This creates a folder called wordpress containing all the WordPress files.
- In FileZilla, navigate to public_html in the remote panel on the right. Open the local wordpress folder in the left panel, select all the files inside it, and drag them to public_html on the remote side.
Pro tip
Select the files inside the wordpress folder, not the folder itself. Dragging the folder creates a public_html/wordpress/ path, which prevents WordPress from loading correctly.
- Create a MySQL database in your hosting control panel. In hPanel, navigate to Databases → Management. Under Create a New MySQL Database And Database User, fill in:
- MySQL database name. Enter a short name, such as wordpress.
- MySQL username. Enter a username such as wpuser.
- Password. Click the generate icon for a strong password, or type your own.
Click Create and write down the full database name, username, and password shown in the list below the form.
hPanel adds a prefix to both the database name and username automatically. If you entered wordpress, the full name will be something like u123456789_wordpress. Use the full prefixed values in the next step. Entering only wordpress will cause a database connection error.
- Open a new browser tab and type your domain address into the address bar (e.g., domain.tld). The WordPress database configuration wizard opens automatically.
- Select your language and click Continue, then click Let’s go! on the intro screen.
- Fill in your database connection details:
- Database Name. The full prefixed database name.
- Username. The full prefixed database username.
- Password. The database password.
- Database Host. localhost (leave as is).
- Table Prefix. wp_ (leave as is).
Click Submit.
- When you see “WordPress can now communicate with your database”, click Run the installation.
- Fill in your site details:
- Site Title. The name of your site.
- Username. Your WordPress admin username.
- Password. Your WordPress admin password.
- Your Email. Your email address.
- Search engine visibility. Leave unchecked unless your site is not ready to go public.
- Click Install WordPress.
- The Success! screen confirms the installation. Click Log In and enter the admin credentials you just set.
If you are on Hostinger, go to Website → WordPress Install in hPanel and click Detect to register your installation. Without it, the WP Admin button will not appear in the Websites list. Dismiss the confirmation dialog and refresh the page after a few minutes.
How to fix common WordPress installation problems
To fix common WordPress installation problems, check your database credentials, verify if your files are in the correct folder, and confirm that your domain and SSL are fully set up. Most errors trace back to one of the issues below.
Error establishing a database connection
The error establishing a database connection means WordPress cannot connect to its database, and the most common cause is entering incorrect credentials during installation.
On Hostinger, confirm you used the full prefixed database name and username from the Management page, such as u123456789_wordpress rather than just wordpress. If the details look right, reset the database password in hPanel and enter the new one.
Blank page or 403 error after installation
A blank page or 403 error after installation usually means WordPress files are in the wrong folder.
Check that wp-admin, wp-content, and wp-includes are located directly inside public_html, not in a subfolder like public_html/wordpress/. Open File Manager, move all the files to the root of public_html, and delete the empty subfolder.
Site is unreachable after connecting a domain
If your site is unreachable after connecting a domain – you see an error like “This site can’t be reached,” or your old host’s page – the domain most likely hasn’t finished pointing to your server yet. DNS changes (the records that tell the internet where your domain lives) can take up to 24 hours to spread worldwide.If it is still unreachable after that window, check how to point a domain to Hostinger or contact your hosting provider.
Browser shows a security warning
A security warning (such as Your connection is not private) when visiting your site after installation means SSL is still being set up. On Hostinger, SSL activates automatically once the domain connects to the server and typically resolves within a few hours. If it does not resolve, check how to get an SSL certificate or contact your hosting provider.
Can’t log in to WordPress
A failed WordPress login usually means the username or password does not match what was set during installation. Check that you are going to yoursite.com/wp-admin and that the username and password match what you set during installation. If you pasted the password, check for stray spaces at the start or end.
Where your credentials came from depends on how you installed WordPress: the onboarding wizard and Auto Installer both had you set them in hPanel, while manual installs set them in the final browser step.
If you can’t recall them, click Lost your password? on the login screen to reset by email. Hostinger users can also open the site’s dashboard in hPanel and use the WP Admin button, which logs you in without a password. If the problem persists, check how to troubleshoot WordPress login issues.
Other WordPress errors
Other post-installation WordPress errors usually involve PHP issues, memory limits, or plugin conflicts.
- WordPress white screen of death. A blank screen when visiting the site or wp-admin, usually caused by a PHP error or plugin conflict.
- WordPress memory limit. Fatal errors related to PHP memory that can appear right after activation.
- Debug WordPress. How to enable error logging to identify less obvious installation issues.
What to do after installing WordPress
To launch a WordPress site after installing the software, choose a theme, install essential plugins, set your permalink structure, confirm SSL is active, and check your site visibility settings before going public.
Log in to your WordPress dashboard at domain.tld/wp-admin using the admin credentials you set during installation. On Hostinger, click WP Admin from the Websites list in hPanel.
If you did not use the Hostinger AI website assistant during setup, the default WordPress theme is active on your site. Go to Appearance → Themes to browse installed options or add a new one and personalize the design and layout of your site.
Install WordPress plugins for extra functionality, such as security, caching, backups, and SEO (Search Engine Optimization). Do it from Plugins → Add New in your WordPress dashboard.
Set your permalink structure (the URL format for your pages and posts) so addresses are readable. Go to Settings → Permalinks, select Post name, and click Save Changes.
On Hostinger, SSL and Force HTTPS (which redirects all traffic to the secure version of your site) are active by default. If you are on a different host, confirm that SSL is enabled and that HTTP traffic redirects to HTTPS.
Check your search engine visibility before launch. Go to Settings → Reading and confirm that Discourage search engines from indexing this site is unchecked.
Set up automatic backups and a security plugin before publishing any content. Hostinger includes automatic backups on all plans, with daily backups on the Unlimited and higher plans. Verify the schedule under Backups in hPanel.
Ang artikulong ito ay isang lokal na bersyon ng How to install WordPress: 4 methods for any setup, orihinal na inilathala sa Ingles.
All of the tutorial content on this website is subject to Hostinger's rigorous editorial standards and values.

Bruno is a Content Writer at Hostinger, focused on creating and optimizing helpful, engaging articles about web development and marketing. With a background in journalism, he combines storytelling with practical insights to make complex topics easier to understand. He has also contributed to publications like MacMagazine and Jornal A Tarde. Outside of work, Bruno enjoys exploring art, cooking, and technology.

Marco Chiesi is the Head of WordPress at Hostinger, with over 20 years of experience as a software engineer in the web industry. He specializes in open-source technologies and the WordPress ecosystem, where he has contributed in different areas: Plugin Developer (with over 10 million downloads), WordCamp speaker and organizer, Meetup organizer, Translator, and Core Contributor. He is passionate about leading his team to create innovative solutions for Hostinger's web hosting product, which hosts over 5 million WordPress installations. Follow him on LinkedIn.