How to start a photography business: A step-by-step guide
Sep 13, 2026
/
By Ariffud M. & Miglė C.
/
17 min Read

To start a photography business, research your local market, choose a niche, get the equipment you need, build your brand, and set up the legal and financial basics.
From there, create a focused portfolio website, promote your services, and turn satisfied clients into repeat customers and referrals.
Starting with market research and a clear niche helps you avoid overspending on gear or marketing before you know what clients need and what type of photography you want to offer.
Here’s how you can start your photography business in 10 steps:
- Research your local photography market. Identify local demand, compare competitors, and look for gaps in pricing or services.
- Choose your photography niche. Pick a niche that matches your skills and interests while meeting local demand.
- Pick equipment for your photography niche. Build a practical setup with the camera, lenses, lighting, backup gear, and editing software you need for the work you plan to offer.
- Shape your photography brand. Choose a business name, visual style, and voice that fit your photography and target clients.
- Create a photography business plan. Define your services, target market, costs, marketing approach, and income targets.
- Set up your photography business legally. Choose a legal structure and complete the required registrations, tax setup, insurance, and banking steps.
- Set your photography prices. Calculate your time and expenses, then set prices that cover your costs and leave room for profit.
- Build your photography website. Showcase your best work, explain your services, and give potential clients a clear way to contact or book you.
- Market your photography business. Use local search, social media, partnerships, and other relevant channels to reach potential clients.
- Generate referrals and repeat bookings. Deliver a reliable experience that encourages reviews, recommendations, and future bookings
1. Research the photography market
To research your local photography market, look at what people are already booking, what nearby photographers offer and charge, and what services clients struggle to find.
Start with Google and Google Maps by searching the services people commonly book in your area – weddings, family portraits, corporate headshots, real estate, and product shoots. Note which photographers come up first and which searches return thin results.
Then browse Instagram and local Facebook groups to see what clients are asking for. Community groups are where people post “looking for a photographer for…” requests, which shows you demand that hasn’t reached search results yet.
Don’t limit your research to other photographers. Look at businesses that regularly hire them, including wedding venues, event planners, real estate agencies, schools, and local companies. Then check their websites, social media posts, and job listings to see what kind of photography they need.
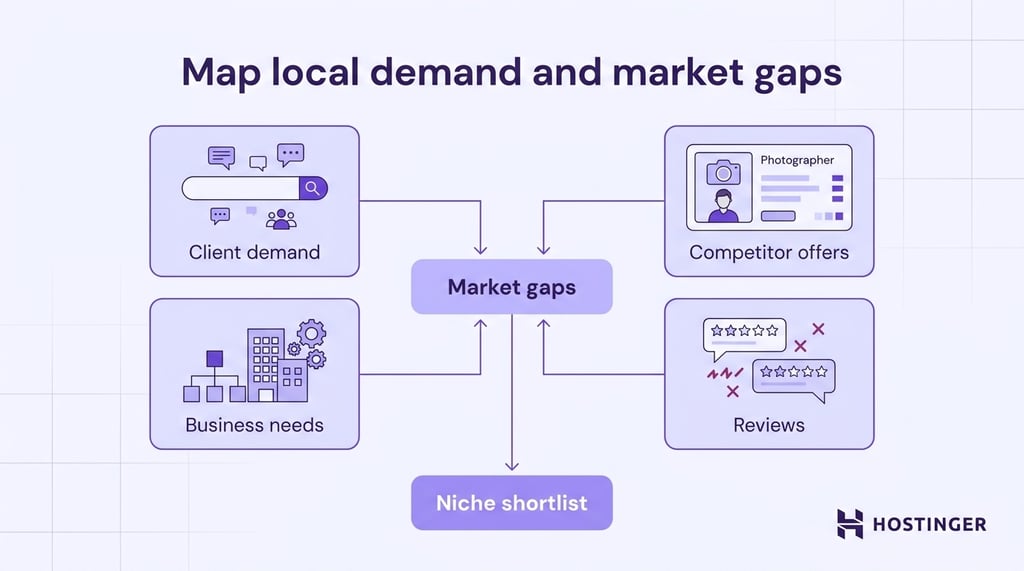
Next, take a closer look at the photographers you’ve found through their websites and Google Business Profiles.
Compare their packages, starting prices, session lengths, included image counts, turnaround times, and paid add-ons so you’re comparing what clients actually get for the price, not just the headline number.
Look for needs that other photographers aren’t serving well. Your area might have plenty of wedding photographers but few offering courthouse packages, or several real estate photographers but limited options for next-day delivery.
Client reviews can uncover gaps you won’t spot from a pricing page. Repeated complaints about unclear pricing, slow image delivery, or limited availability can show you where there’s room to offer a better experience.
Write down the services people seem to want most, typical price ranges, and the gaps you keep noticing. You’ll use that shortlist when deciding which photography niche is worth testing.
2. Decide your photography niche
Compare two or three promising niches from your market research and choose one that matches your skills and interests while meeting local demand. Instead of trying to photograph everything for everyone, focus on a niche where you can stand out.
Consider what each niche requires from you in practice. Portrait photography can suit you if you like directing people, while weddings and events require quick decisions and confidence during moments you can’t reshoot.
Also think about the clients you want to work with, the schedule you prefer, and whether the niche can bring repeat bookings.
Family photographers can work with returning clients as families reach new milestones, while product, headshot, and real estate photographers may build ongoing relationships with businesses.
Pay attention to how each niche makes money, too. Wildlife photographers, for example, may earn from assignments, image licensing, publications, prints, and workshops rather than individual client sessions.
Narrow your niche further if your research reveals a specific gap. Rather than marketing yourself as a wedding photographer, focus on courthouse weddings and elopements. If you offer general product photography, specialize in ecommerce product shoots.
A narrower niche gives you a smaller pool of potential clients, but it also reduces direct competition and makes your positioning clearer. Before committing, make sure local demand is strong enough to support the number of bookings you need.
That means the best photography business to start is one built around a niche people will pay for and that you can deliver confidently with the time, equipment, and budget you have.
Portraits, headshots, and small events can be practical niches to test because you can start with clearly defined shoots and build your portfolio as you gain clients.
Your first niche doesn’t have to be permanent. Tilly Edwards discovered that wedding photography suited her after photographing a family friend’s wedding.
What the expert says
I never saw myself as a wedding photographer, as I thought I’d never be capable of capturing such a big day! I was lucky enough to have a family friend ask if I’d capture their special day, and from then on, I was in love with capturing the love of two people celebrating with all their family and friends.

Tilly Edwards
Owner of Tilly Rose Creative
Weddings and commercial work command the highest per-project fees, but they also consume the most hours per booking. Portraits and headshots pay less per session and repeat more often.
Kari Bjorn chose weddings because they matched his event photography experience while bringing in more revenue for his business.
What the expert says
For my photography business, I switched to weddings as they tend to be more profitable while still staying in the event photography sphere, which is my comfort zone. Weddings allow all that and pay, on average, 2.5 to 3 times more than working with other businesses. Wedding clients also tend to be a little less demanding, believe it or not!

Kari Bjorn
Owner of Kari Bjorn Wedding Photography
Test your strongest options with a few paid or portfolio-building shoots before committing to one niche. Track your time, expenses, client demand, and earnings so you can see which niche works in practice, not just on paper.
3. Choose the right equipment
To choose your photography equipment, start with a reliable camera body and one versatile lens suited to your niche. Add lighting, backup gear, and editing software as your bookings start to require them.
An entry-level or mid-range mirrorless camera is a practical starting point, especially when it gives you the autofocus, low-light performance, or weather sealing your niche demands.
A DSLR can cost less, particularly secondhand, but it uses older technology as the camera market continues to move toward mirrorless systems.
Think about what happens when your main camera stops working during a shoot you can’t repeat. For weddings, events, and similar jobs, prioritize a second camera body and consider dual memory card slots so one failed card doesn’t mean losing the photos.
Choose lenses based on the photos you need to deliver, not because a particular focal length appears on an essential-gear list.
A zoom covering roughly a 24–70mm full-frame-equivalent range is a versatile starting point for portraits, events, and general commercial work, while a 50mm prime works well for portraits and low-light photography.
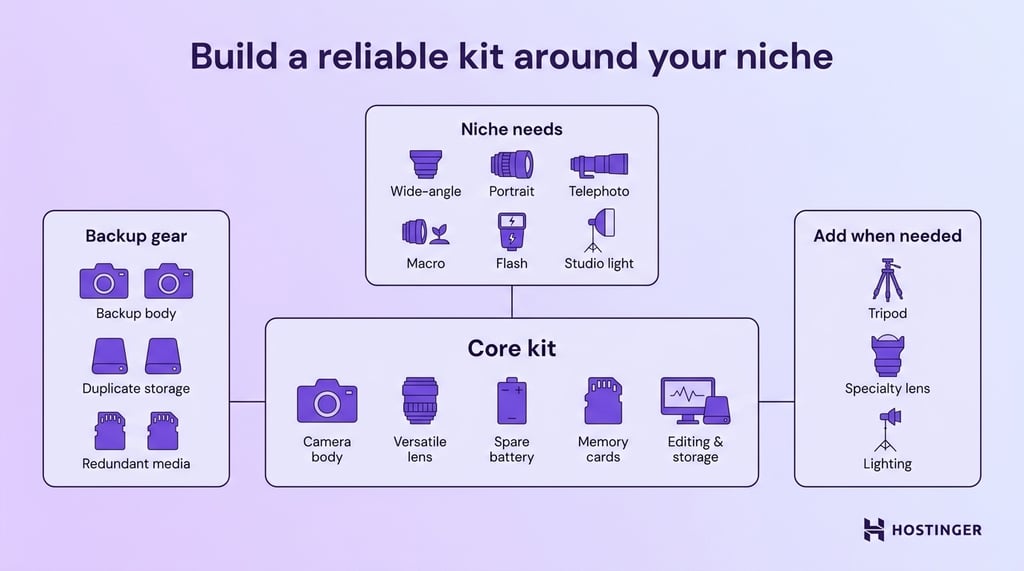
Your niche may need something different. Real estate photographers often need a wider lens, sports and wildlife photographers need more reach, and product photographers benefit from a macro lens for close-up details.
Pay attention to your camera’s sensor size when comparing focal lengths, too. A 50mm lens gives you a tighter view on an APS-C camera than on a full-frame camera, so try one before deciding whether it suits the way you shoot.
Match your lighting equipment to where and what you expect to photograph.
An external flash and reflector cover many portrait and event shoots, while product photography and studio headshots may call for continuous lights or strobes, light stands, softboxes, and diffusers.
Don’t buy a complete studio setup before you have a reason to use it. Add specialized lighting when your bookings start requiring it regularly.
Dual slots protect the photos you’ve already taken. Spare cards and batteries keep you shooting if a card fills up, a card fails, or a battery dies.
Add a sturdy tripod when your niche depends on consistent framing or slower shutter speeds, such as real estate, product, interior, or long-exposure photography.
Start with at least 2 TB of external storage for active client files and keep at least one additional backup copy. Increase to 4 TB or more as your archive grows, especially for high-volume work such as weddings and events.
Choose editing software that fits the type and volume of work you plan to deliver. Adobe Lightroom handles photo organization, batch editing, color adjustments, and exports, while Adobe Photoshop is useful for detailed retouching and more complex edits.
Start with the smallest kit that lets you complete paid work reliably. Rent specialty cameras, lenses, or lighting for occasional jobs so you can try the gear first instead of paying for something you’ll rarely use.
Buying secondhand equipment can also lower your startup costs. Choose reputable sellers with clear return policies, test used cameras and lenses before relying on them for client work.
Andrew Cussens recommends prioritizing versatile equipment that can remain useful as your photography business grows.
What the expert says
Choosing equipment was a case of prioritizing versatility and sustainability. Trendy gadgets can be alluring, but we ended up investing in industry-standard cameras, lenses, and lighting: affordable but, most importantly, future-proof.

Andrew Cussens
Owner of FilmFolk
4. Build your photography brand identity
To build your photography brand identity, choose a business name, visual style, and tone that match the kind of photography you offer and the clients you want to attract.
Start with a business name that gives people the right impression of your photography.
A personal name such as “Jordan Lee Photography” keeps the brand closely tied to you, while a creative name such as “Northlight Portraits” makes a niche or style clearer from the start.
A location-based name helps emphasize where you work, while initials keep the name short. Pair initials with a descriptive word such as “Photography” or “Studio” when the name alone doesn’t make it obvious what you do.
Before committing, test your strongest name options with people who resemble your target clients. Ask what kind of photographer they expect from each name, then check whether the matching domain name and social media handles are available.
Next, create a simple logo, choose a small color palette and one or two readable fonts that work well with your photography. Your branding should support your images, not compete with them.
Your editing and photography style are part of the brand, too. Keep the portfolio look consistent, whether your work is bright and natural, dark and cinematic, clean and editorial, or something else entirely.
Match your brand voice to the experience you want clients to expect from you. A family photographer might sound warm and reassuring, while a commercial photographer may use a more direct, business-focused tone.
Write down your business name, logo variations, colors, fonts, image style, and voice in a simple brand style guide.
Use the same choices across your website, social profiles, client galleries, pricing guides, and other materials so clients get a consistent impression wherever they find you.
5. Write a business plan
To write a photography business plan, map out what you’ll sell, who you want to photograph, what each job costs you to deliver, and how many bookings you need to make the business worthwhile.
A good business plan doesn’t need to be long, but it should show whether the business you’re planning can realistically support your target income.
- Executive summary. Summarize your photography niche, service area, ideal clients, main services, and what makes your business different. Include your business name and the main ways you expect to earn money, such as sessions, events, commercial shoots, prints, or image licensing.
- Market analysis. Bring in the useful findings from your market research, including local demand, typical price ranges, competitors, and service gaps. Be specific about the clients most likely to book you instead of trying to appeal to everyone who might need a photographer.
- Business structure. Record whether you plan to operate as a sole proprietorship, limited liability company (LLC), or another structure that fits your situation. Include regular collaborators, such as second photographers, assistants, editors, or retouchers, when their work affects your costs or how many bookings you can handle.
- Services and packages. List what each service includes, such as shoot length, locations, number of edited images, turnaround time, prints or albums, and commercial usage rights when relevant. Estimate the time you’ll spend on shooting, editing, travel, and client communication so you don’t build packages that cost more work than it pays for.
- Marketing and bookings. Write down how you plan to find clients, whether that’s local search, referrals, social media, venue partnerships, or networking. Also map out what happens after someone contacts you, from the first inquiry and quote to booking, payment, the shoot, and final image delivery.
- Financial projections. Add up your startup and recurring costs, including equipment, registration, software, insurance, website expenses, advertising, travel, maintenance, and payment processing fees. Then work backward from your desired take-home income: estimate the pre-tax amount you need, add annual business costs, and divide that revenue target by your average booking value to estimate how many shoots you need.
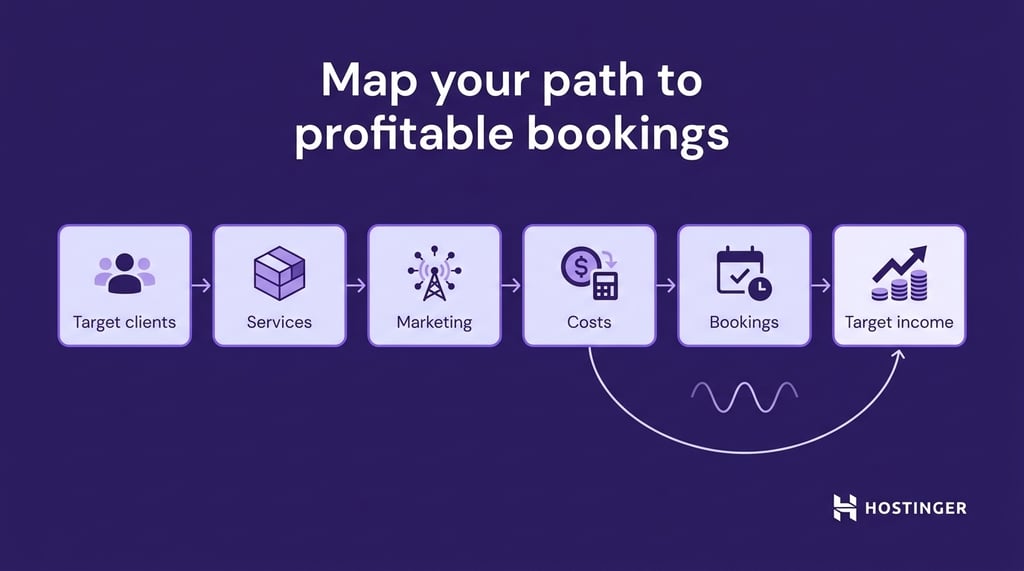
Adjust your booking estimates for seasonal demand, especially for weddings, school photography, holiday sessions, and outdoor shoots. A plan built around your busiest month can give you a very different picture from what the full year actually looks like.
6. Register your photography business
To set up your photography business legally, choose a legal structure, register your business name, then handle the tax, licensing, insurance, and banking steps that apply where you operate. Requirements vary by country, so the steps below cover the US process.
Start by deciding whether a sole proprietorship or limited liability company (LLC) makes more sense for your situation.
A sole proprietorship is simpler to start but doesn’t create a separate legal entity, while an LLC can help protect your personal assets from business liabilities in many situations.
You don’t automatically need an LLC just because you’re charging for photography. Compare your state’s filing fees and ongoing requirements with the risks involved in the work you plan to take on before deciding.
Kari Bjorn, for example, started as a sole proprietor before forming an LLC as his photography business developed.
What the expert says
I started as a sole proprietor and quickly changed to an LLC to protect my personal assets in case of any mishaps in the field. Forming an LLC in Connecticut took just over an hour online and cost just $200 in total.
Kari Bjorn
Owner of Kari Bjorn Wedding Photography
Don’t treat Kari’s $200 cost as a standard LLC fee. Filing fees and ongoing requirements vary by state.
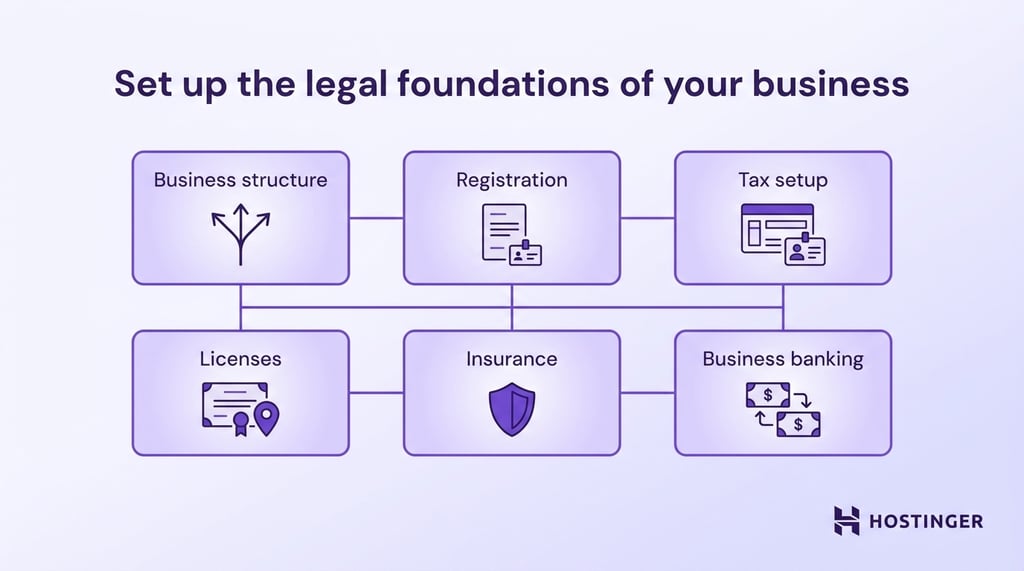
Next, register the photography business name you chose with the appropriate state or local authority when required. You may also need a doing business as (DBA) registration when you work under a studio or brand name instead of your legal name.
Check your state’s business registry for conflicting names before filing. It’s also worth searching the U.S. Patent and Trademark Office trademark database for potentially conflicting trademarks.
Get an Employer Identification Number (EIN) from the Internal Revenue Service (IRS) for free if your business needs one. You generally need an EIN if you hire employees, operate certain types of businesses, or have specific federal tax obligations.
A single-member LLC with no employees and no applicable excise tax obligations generally doesn’t need a separate EIN for federal tax purposes, although a bank or state agency may still require one.
Check your city, county, and state requirements for business licenses, home-based business permits, and sales tax registration.
Get business insurance that matches the shoots you take on. General liability covers claims if someone is injured or property is damaged during your work. Equipment insurance covers your gear, which your home or renter’s policy usually won’t once you’re using it commercially.
Many parks and venues want proof of that coverage before they’ll let you shoot, and some also require a commercial photography permit. Check the rules for any location you plan to use for paid work.
Open a separate business bank account for client payments and photography expenses. Keeping business money separate from personal spending makes your income and expenses much easier to track.
Finally, check how your state applies sales tax to photography sessions, digital images, prints, albums, and other products you sell.
Confirm anything you’re unsure about with your state tax agency or a qualified tax professional when possible because sales tax rules vary by location.
7. Set your photography pricing
Set your photography pricing by working out what each type of shoot actually costs you, paying yourself for all the time involved, and leaving enough profit to keep the business worthwhile.
Include ongoing costs such as equipment maintenance and replacement, editing software, insurance, marketing, storage, gallery software, payment processing fees, and travel.
Add job-specific expenses, such as venue fees, assistants, or second photographers, when they apply.
Don’t price a one-hour shoot as one hour of work. That session also means client emails, preparation, travel, selecting the best images, editing, gallery setup, and delivery.
For example, suppose a portrait session takes four hours of your time from start to finish. At a target rate of $60/hour, that’s $240 for your time.
Add $30 for travel, $55 for your share of ongoing business expenses, and $15 for payment processing and gallery software. Your total cost would be $340.
To build in a 25% profit margin, divide $340 by 0.75. That gives you a price of about $453, which you can round to $455.
Replace these example figures with your actual expenses, target hourly pay, and desired profit margin. The point is to know what a booking needs to bring in before you decide whether a price looks competitive.
Set your pricing based on the type of photography you offer.. Wedding packages may include coverage time, a second photographer, albums, or engagement sessions, while commercial photography may require separate licensing fees based on how clients use the images.
Portrait and family photographers can offer packages with different session lengths, numbers of edited images, prints, or digital downloads.
Use the same cost-based approach you’d use to price a product when setting prices for albums, prints, and other physical products.
Use the typical price ranges from your market research to check whether your prices fit the local market. Don’t copy competitors’ rates directly, since their expenses, experience, and deliverables may differ from yours.
Review your prices when your expenses, workload, demand, or packages change. Use discounts for a clear reason, such as filling quieter dates or promoting limited mini sessions, instead of making them part of your standard pricing.
Kari Bjorn recommends working backward from your annual business costs, personal income needs, and realistic number of bookings.
What the expert says
I’d recommend starting small – and if you have a full-time job, hold on to it while you gather experience and a set of portfolio-worthy images. You should first figure out what it will cost you to run your business in a year. Then, figure out how much you will need to live comfortably after taxes and how many shoots you can expect to book in a year.
Kari Bjorn
Owner of Kari Bjorn Wedding Photography
8. Create your photography website
To create your photography website, build it around the work you want people to book: a focused portfolio, clear service descriptions and pricing, and an obvious way for potential clients to contact or book you.
Using an AI-powered, no-code platform like Hostinger AI Builder makes the setup easier if you don’t want to code your website.
It offers manual mode for drag-and-drop editing and agentic mode for building and customizing a site through natural-language prompts.
For a photography business, manual mode is especially useful when you want more control over how your images are arranged and presented.
You can start with a template or describe your ideas in a prompt, then adjust the layout, text, colors, and portfolio images until the site feels consistent with your brand.
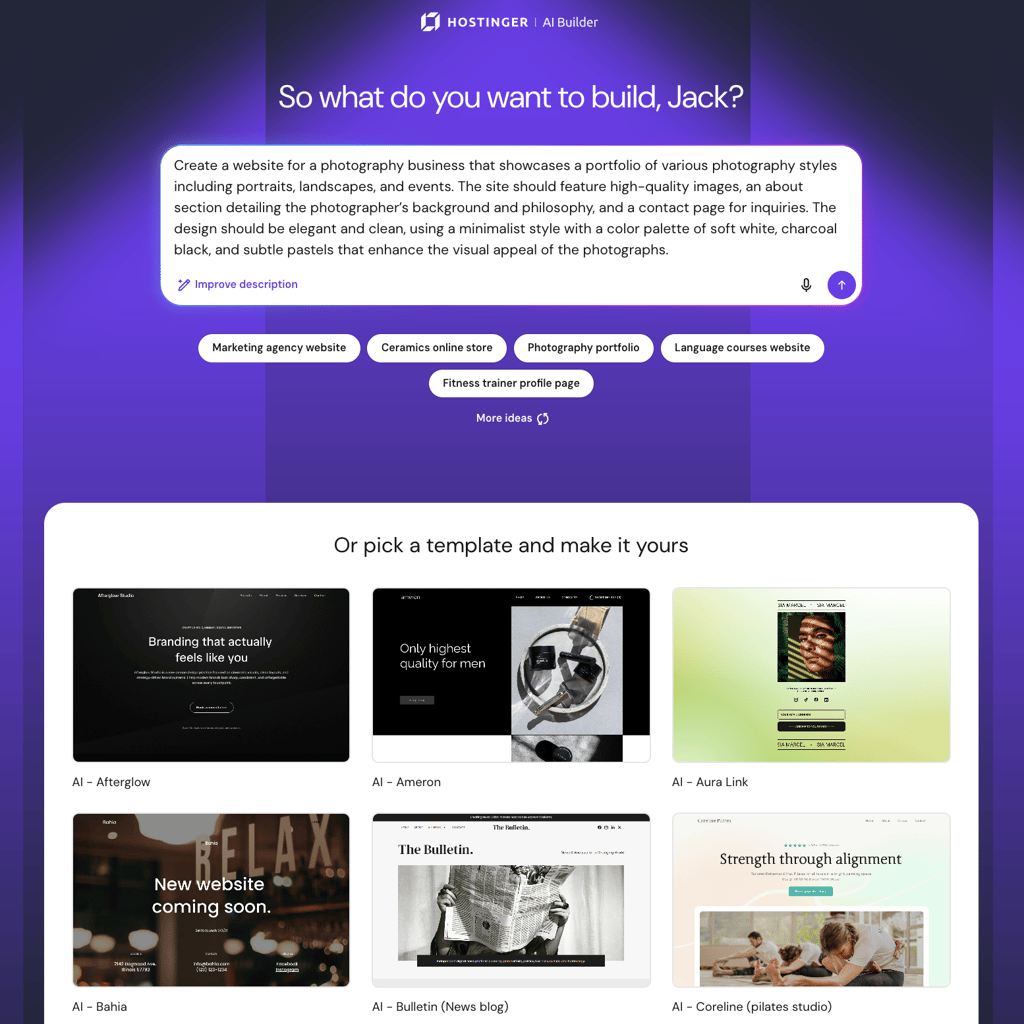
Be selective with the photos you show instead of uploading every strong image you have.
Your portfolio should make it easy for someone to see the kind of work they can hire you for, whether that’s weddings, family portraits, headshots, products, or another niche.
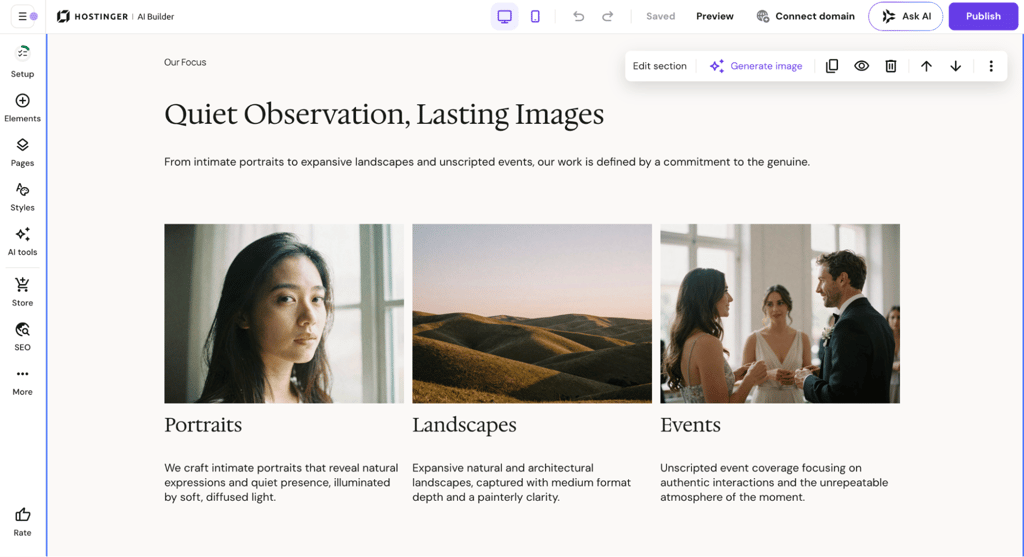
Consider checking some photography website examples for ideas on how to organize and present your work.
What the expert says
It’s so easy to design the exact website you’re after, and you don’t have to be a website guru to create a great website! My favorite feature of Hostinger is that I can see every contact submission in my emails and on the website, so I don’t lose track of potential clients!
Tilly Edwards
Owner of Tilly Rose Creative

9. Promote your photography business
To promote your photography business, put your work in front of the people most likely to hire you – through local search, the social platforms that suit your niche, and vendors who serve the same clients.
Focus on a few channels that fit your niche instead of trying to show up everywhere.
A wedding photographer and a real estate photographer need very different marketing strategies, so spend your time where your clients actually look for photographers.
Set up a Google Business Profile to appear on Google Maps and in local search results. Keep your category, services, contact details, website, service area, and portfolio photos up to date so potential clients can quickly see what you offer.
Follow SEO for photographers best practices to tailor your website to the services and locations you want to be found for. Use clear page titles and headings such as “Chicago wedding photographer” when they accurately describe your services.
Use Instagram to share finished galleries, recent shoots, client highlights, and short tips. Make your niche, service area, and website or booking link easy to find so people don’t have to dig for basic information.
Use TikTok for short videos showing quick transformations, lighting setups, editing before-and-afters, or lighthearted behind-the-scenes moments and funny outtakes.
Use YouTube when a topic needs more room, such as how to prepare for an engagement shoot, what to wear for family photos, or how a commercial shoot comes together from planning to delivery.
Facebook is useful for reaching local communities, especially for family, event, school, and small-business photography.
Join relevant groups, contribute useful advice, and follow each group’s promotion rules instead of dropping your services into every conversation.
Get each client’s permission before posting their photos or behind-the-scenes footage on social media.
Don’t rely only on social media to bring you clients. Build referral relationships with professionals who already work with the same people you want to photograph.
Wedding photographers, for example, can connect with venues, planners, florists, and makeup artists, while real estate photographers can build relationships with agents, home stagers, and property managers.
Share approved photos with vendors after a shoot, credit their work when you post, and make your contact and booking details easy to pass along when they recommend you.
Track which channels actually bring you inquiries and confirmed bookings instead of judging your marketing by follower counts.
Ask new clients how they found you – a “How did you hear about us?” field on your contact form collects this without you having to remember. Then put more effort into the channels and partnerships that bring the work you want, and drop the ones that don’t.
10. Build a network of clients
To build a network of photography clients, give people an experience they’ll feel good recommending, then stay in touch after you deliver their photos.
Set expectations clearly before each shoot, arrive prepared, and deliver the final gallery when you said you would. The finished work should also match the quality and style clients saw in your portfolio, so they know they got what they booked you for.
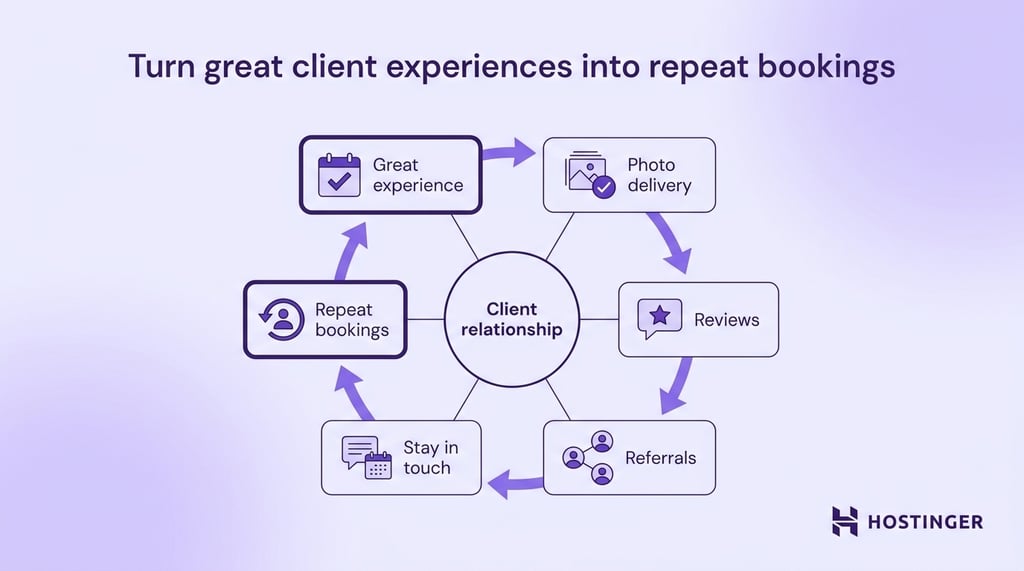
Ask clients for a Google review after delivering their photos. Don’t offer discounts, free prints, or other incentives in exchange for a review, as this goes against Google’s review policies.
Make referrals easy, too. You might offer a discount or credit toward a future session after a referred client completes a paid booking.
Stay in touch when there’s a natural reason for someone to hire you again instead of only reaching out when you need bookings.
Family photographers can promote annual or holiday sessions, wedding photographers can offer anniversary or family shoots, and commercial photographers can follow up about updated headshots, product photos, or new campaigns.
Is a photography business profitable?
Yes, a photography business can be profitable, but it depends on charging enough per shoot and booking enough shoots to cover your costs.
Profit varies widely between niches. A wedding photographer may bring in more from a single booking but spend much more time on planning, travel, coverage, choosing best pictures, editing, and delivery, while a headshot photographer may fit several shorter sessions into the same amount of time.
As a reference point, Professional Photographers of America (PPA) sets its cost-of-sales benchmark at 25% of total sales. In practical terms, that means keeping the direct costs of producing what you sell to about one-quarter of your sales or less.
Treat that percentage as a benchmark, not a rule you have to hit exactly. Your numbers will depend on your niche, prices, workflow, and business model.
How quickly your photography business becomes profitable depends on your startup costs and how consistently you can book paid work.
How much does it cost to start a photography business?
Starting a photography business can cost roughly $2,000 to $15,000+, depending on your niche, what equipment you already own, and whether you buy gear new or secondhand, or rent it.
A camera body can cost around $700 to $3,500+, while lenses can add another $200 to $5,000+.
You won’t necessarily need the top end of those ranges, but wedding and event photographers may need a second camera body, and specialized niches can call for more expensive lenses.
Lighting can cost around $100 to $300 for a basic flash, reflector, or continuous light setup, or $500 to $1,500+ for studio strobes, stands, softboxes, and other lighting equipment.
Portrait, headshot, and product photographers may need to put more of their starting budget into lighting than photographers who mainly work with natural light.
Set aside around $200 to $1,000+ for memory cards, spare batteries, a camera bag, and backup storage. You may also need $1,000 to $2,500+ for a computer when the one you already own struggles with the size and volume of files you’ll be editing.
Editing software is another recurring cost. Adobe Lightroom costs about $144/year, while the Photography plan with Lightroom and Photoshop costs about $240/year.
Budget around $50 to $300+/year for your domain, website, and hosting, depending on the platform and features you need.
When comparing website builders for photographers, look for features you’ll use, such as portfolio galleries and appointment booking.
Business registration and licensing may cost around $50 to $500+, depending on your location and legal structure.
Photography insurance can add several hundred dollars or more per year, depending on your coverage and the value of the equipment you need to insure.
You don’t need a big advertising budget on day one. Social media, referrals, and local partnerships cost little or nothing upfront, while paid ads, printed materials, sample albums, and other promotions may add $500 to $1,000+.
Add up the costs that apply to your niche, then separate one-time purchases from expenses you’ll keep paying every month or year. This gives you a clearer idea of how much cash you need to launch and what it will cost to keep the business running.
What are other ways to make money from photography?
Other ways to make money from photography beyond client shoots include selling photos online as digital downloads or prints, licensing images, and creating digital products such as presets.
Digital downloads work well for photos people want for personal use, such as travel images, local landmarks, backgrounds, or wall art. Selling them through your own photography website gives you control over the price, file size, and usage terms.
Stock photography lets you license the same image to multiple customers for websites, ads, articles, and other projects.
It usually works better when you build a useful library over time, so upload consistently and use accurate, descriptive keywords that help buyers find your photos.
Prints are a natural fit for landscapes, wildlife, travel photography, architecture, and local scenes.
You can print and ship orders yourself or use a print-on-demand service that handles production and shipping, which saves you from keeping physical inventory at home.
You can also create a digital product from resources that come naturally from the work you already do, such as Lightroom presets or editing guides.
Start with one product that fits your style and expertise, then see whether people actually buy it before spending time building a larger product range.
Artikel ini merupakan versi setempat bagi How to start a photography business: A step-by-step guide, asalnya diterbitkan dalam bahasa Inggeris.
All of the tutorial content on this website is subject to Hostinger's rigorous editorial standards and values.

Ariffud is a Technical Content Writer with an educational background in Informatics. He has extensive expertise in Linux and VPS, authoring over 200 articles on server management and web development. Follow him on LinkedIn.

Miglė Cicėnaitė-Jocė is a Product Manager for Hostinger's Website Builder. She is on a mission to redefine website creation, focusing on the AI flow and its features, and is always eager for product feedback and market insights to improve the user experience. Follow her on LinkedIn.