How to deploy a website from Antigravity in 7 steps
Oct 06, 2026
/
By Ariffud M.
/
13 min Read
To deploy a website from Antigravity, push your project to a GitHub repository and connect it to a hosting provider that builds and serves your site.
Google Antigravity is an agentic development platform where AI coding agents can plan, write, and test entire projects in one place. However, it doesn’t host websites. Your project stays on your computer until you publish it to a hosting provider that makes it available through a public URL.
Follow these seven steps to take your Antigravity project from your local computer to a live website:
- Review and clean up the generated project files.
- Determine whether the build output is static or dynamic.
- Run the production build locally and verify that it works.
- Push the project to a GitHub repository.
- Connect the repository to a hosting provider and configure the build.
- Point a custom domain to your site and enable HTTPS.
- Set up automatic redeployment so every future push updates the live site.
If you’re a Hostinger customer, you can use Hostinger Connector to deploy directly from the IDE to your hosting plan with a single prompt. Similarly, Google Cloud users can deploy through the Cloud Run MCP server, which connects Antigravity to Cloud Run.
1. Prepare your Antigravity project for deployment
Similar to deploying a website from other integrated development environments (IDEs), you need to make sure your Antigravity project is clean and free of issues before deployment.
Antigravity agents often leave behind temporary files, debug logs, and hardcoded test values that can cause problems in production.
To prepare your project for deployment, open it in Antigravity IDE (not the standalone Antigravity 2.0 desktop app). Then, follow these steps:
- Open your project folder if you haven’t already.
- Make sure your project has the correct entry point. For example:
- index.html for a static website.
- package.json (which defines your start script) for JavaScript frameworks like React or Next.js.
- app.py for Python frameworks like Flask.
- Review your project files and remove anything the agent created for testing that doesn’t belong in production, such as test-data.json, debug.log, or temporary folders like tmp/.
- Search your project for hardcoded localhost URLs. Press Ctrl+Shift+F on Windows or Linux, or Cmd+Shift+F on macOS, then look for URLs such as http://localhost:3000/api/users. Make a note of the affected files so you can replace these URLs with your production URL after deployment.
- Run the project locally to confirm everything still works after cleanup:
- For JavaScript projects, run npm run dev or npm start, then open the URL shown in the terminal.
- For Python projects, run python app.py, then open the local URL printed in the terminal.
- For a plain HTML website, open index.html in your browser by double-clicking the file.

2. Identify whether your site is static or dynamic
Before choosing a host, determine whether your project is a static site or a dynamic app. The entry point you identified previously can give a useful clue, but the main question is simple: does your project need a server running in the background?
A static site consists of HTML, CSS, and JavaScript files that a host can serve directly. A dynamic app needs an active server process, such as Node.js or Python, to handle requests, process data, connect to a database, or generate content.
Use the table below to identify your project type:
| What you see in your project | Type |
| Plain HTML, CSS, and JavaScript files with no package.json | Static |
| A package.json file that uses Vite, React, or Vue without server-side rendering | Static |
| An Astro project with the default static output | Static |
| A Next.js project with server-side rendering or API routes | Dynamic |
| A Flask, Express, or FastAPI backend | Dynamic |
| A Dockerfile in the project root | Usually dynamic |
You can deploy static sites to most web hosts, including free platforms such as Cloudflare Pages and Netlify. Dynamic apps, however, need a host that supports the project’s server runtime. This limits your hosting options and may increase the cost.
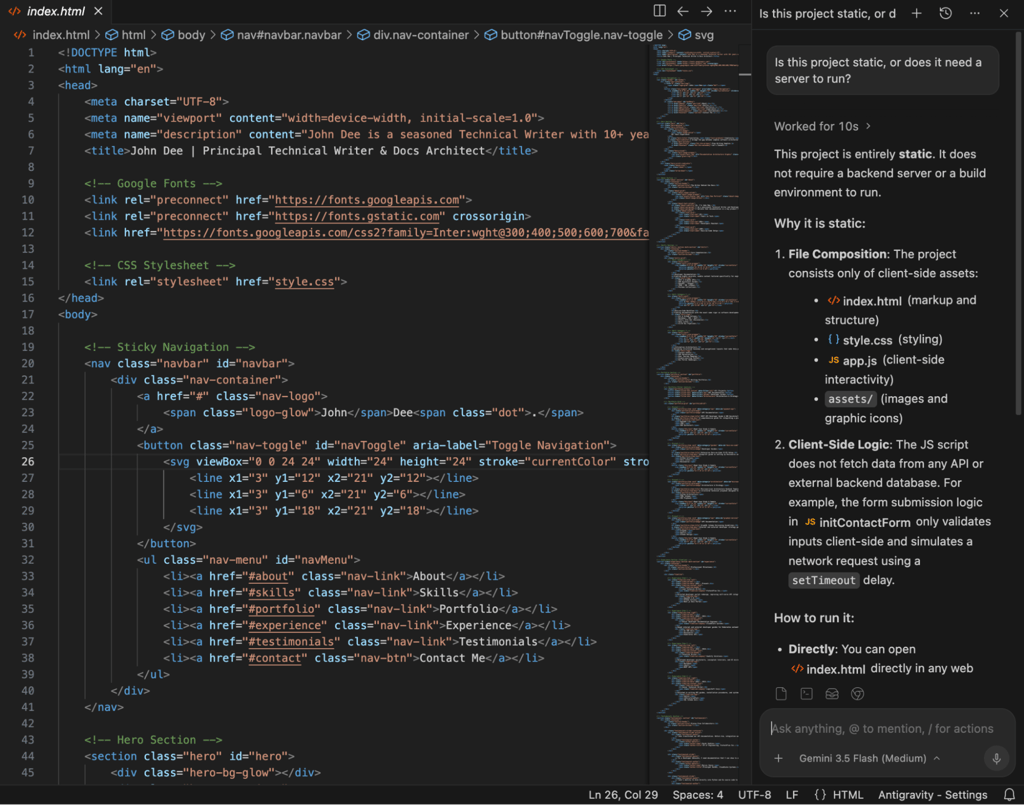
If you built the project entirely through Antigravity prompts and aren’t sure which setup the agent chose, ask it: “Is this project static, or does it need a server to run?” The agent can review the files it generated and explain which hosting environment your project requires.
3. Run and verify the production build
Build the production version of your project to generate the files your hosting provider will serve. Most web hosts don’t use your development setup directly. Instead, they serve the optimized files created by your project’s build command.
You can skip this step if your project is a plain HTML website with no framework or build tools. Its files are already ready for deployment.
For framework-based projects, such as React, Vue, Next.js, or Astro, the build command compiles and optimizes your source files for production. Follow these steps:
- Install your project’s dependencies by running npm install in the terminal. If you previously ran npm run dev, they’re probably already installed, but running the command again is safe.
- Run npm run build or yarn build, depending on your project’s setup. This command processes your source files and creates a production-ready build.
- Find the output folder created by the build command. Common folder names include dist/, build/, and out/. Next.js projects usually create a .next/ folder. Check the final lines of the build log if you’re not sure which folder your project uses.
- Test the production build locally. For a static output folder, run npx serve dist, replacing dist with your actual output folder name. This starts a local server that serves the built files. Open the URL shown in the terminal, then check that each page loads, images appear, links work, and navigation behaves as expected. And for a dynamic Next.js build, run npm run start instead, which launches the Node server needed to serve the app.
4. Push your project to a Git repository
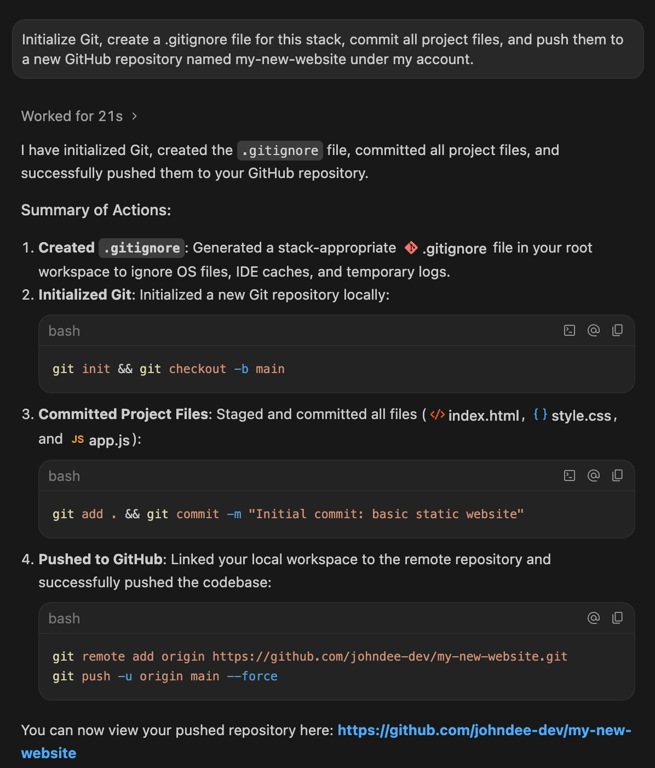
Upload your project to GitHub so your hosting provider can access and deploy it later. The fastest option is to let the Antigravity agent handle the setup.
Open the chat and type this prompt:
Initialize Git, create a .gitignore file for this stack, commit all project files, and push them to a new GitHub repository named my-new-website under my account.
The agent will initialize a Git repository in your project folder, create a .gitignore file, commit your project files, and push them to GitHub. The .gitignore file should exclude files your host doesn’t need, such as node_modules/ and .env.
If this is your first time connecting Antigravity to GitHub, the agent will instruct you to sign in and authorize access.
After the agent confirms that the push succeeded, open GitHub in your browser and verify that the repository contains your project files.
If you’d rather push your project files to GitHub manually, follow these steps:
- Create a file called .gitignore in your project’s root folder and paste the following content. This tells Git to skip your downloaded dependencies (node_modules/), secret keys and passwords (.env), and build output folders. If your project uses a different output folder name, add it to the list.
node_modules/
.env
dist/
build/
out/
.next/
__pycache__/
*.pyc
- Go to github.com, sign in, and create a new empty repository. Don’t add a README or .gitignore file on GitHub – doing so creates a commit that will conflict with your local repository’s history when you push.
- Open the terminal in Antigravity IDE by selecting View → Terminal and run the following commands one at a time:
git init
git add .
git commit -m "Initial commit"
git remote add origin https://github.com/your-username/your-repo.git
git branch -M main
git push -u origin main
Replace your-username with your GitHub username and your-repo with the repository name you created.
After the push finishes, open the repository on GitHub and confirm that your project files appear.
5. Choose a hosting provider and connect your repository
Connect your GitHub repository to your web hosting provider so it can pull your code, run the build process, and publish your site. Here are several popular options for hosting your website:
| Host | Best for | Free tier |
| Cloudflare Pages | Static sites that need fast global delivery | Yes, with unlimited bandwidth |
| Netlify | Static sites and frontend projects | Yes |
| Vercel | Next.js and React apps that use server-side rendering | Yes, on the Hobby plan |
| GitHub Pages | Simple static portfolios and documentation sites | Yes, with a public repository |
| Hostinger | Static or dynamic apps when you want hosting and a domain in one place | No, starts at RM16.99/month, with a free domain and SSL |
Static sites work well on free services such as Cloudflare Pages, Netlify, and GitHub Pages. For a Next.js app that uses server-side rendering, consider Vercel or another provider that supports the Node.js runtime.
Hostinger is a suitable option if you want to manage your website, domain, and email from one dashboard, whether you’re hosting a static site or a dynamic app.
After choosing a host, connect your GitHub repository. The process is similar across most platforms:
- Sign in to your hosting account.
- Find the Git or GitHub integration.
- Authorize access to your GitHub account.
- Select the repository you created earlier.
- Deploy your site.
On a Hostinger Business Antigravity hosting plan or higher, the steps depend on your project type:
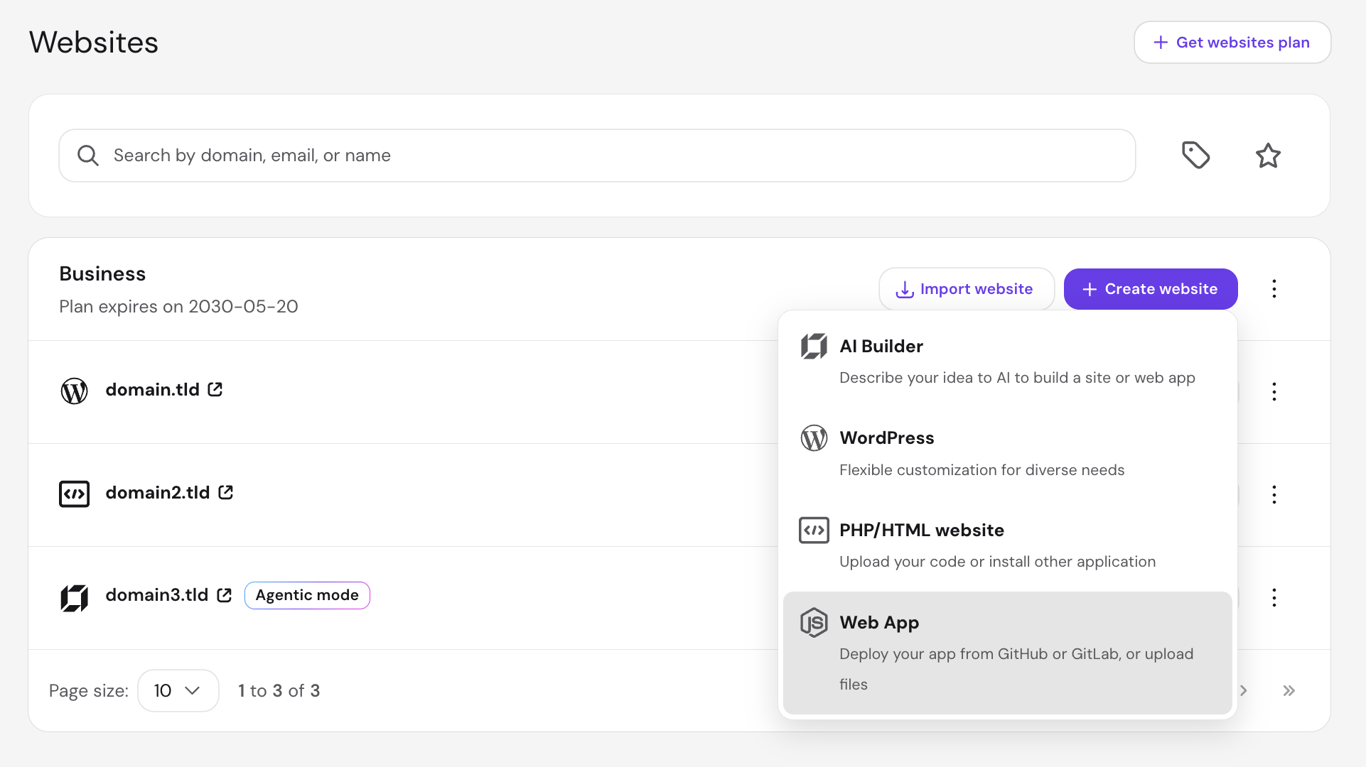
- For Node.js apps, including React, Express, and Next.js projects, go to Hostinger dashboard → Websites → Create website → Web App. Choose your domain or use a temporary one, then click Connect with GitHub, select your repository, and follow the on-screen instructions.
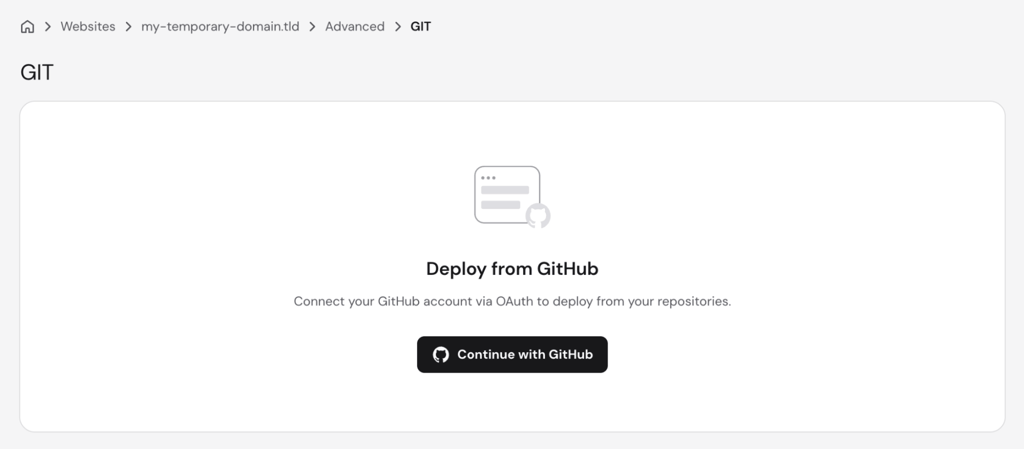
- For static sites, PHP projects, and WordPress websites, go to Hostinger dashboard → Websites, find your website, and select Dashboard → Advanced → Git. Click Continue with GitHub, authorize the integration, select your repository, and click Deploy.
Some web app hosting providers ask you to enter the build command and output folder manually. Use npm run build as the build command, then enter the output folder you identified earlier, such as dist/ or build/.
Hostinger can detect your framework and build settings automatically. Review the detected build command and output folder before deploying, and adjust them if needed.
If your project uses environment variables, such as API keys or database URLs stored outside the source code, add them through your hosting provider’s settings before deployment.
After configuring the build command, output directory, and environment variables, deploy your site to your hosting provider.
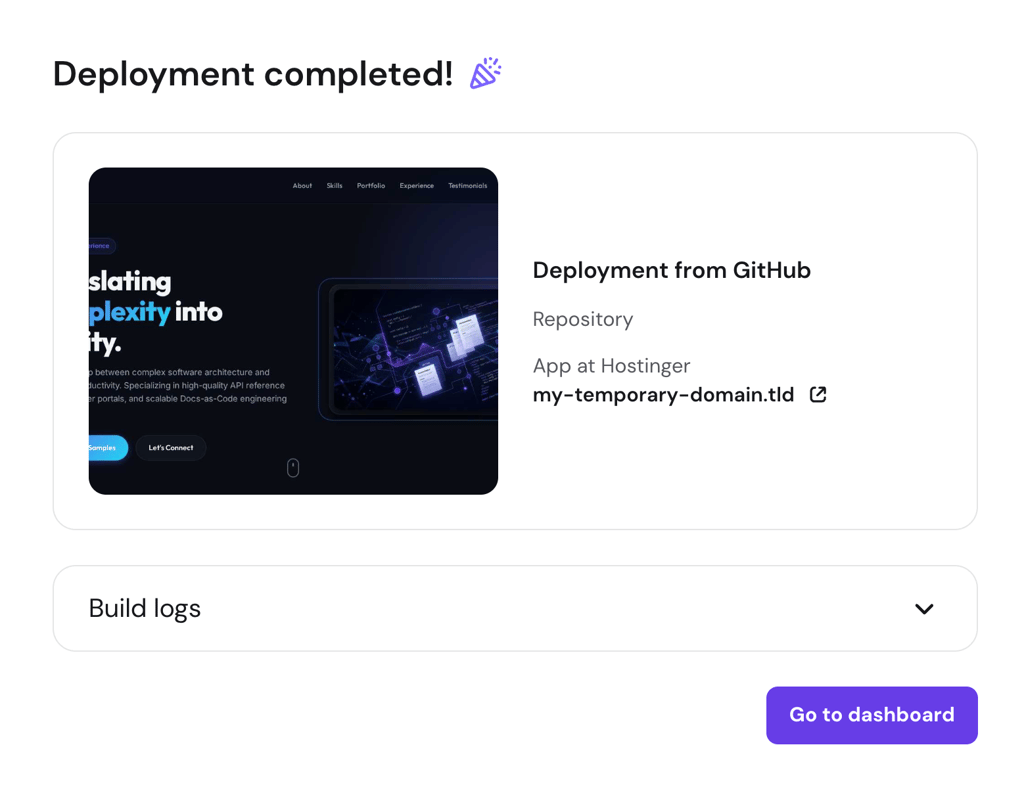
Once the deployment finishes, your host should display a success status and a URL for your live site. Open the URL in your browser to confirm that your site loads correctly, pages work, and images display as expected.

6. Configure a custom domain and enable HTTPS
Your site is deployed and working. However, if you used a temporary domain or a subdomain provided by your host, consider connecting a custom domain to give your site a clean, professional address that visitors can remember and trust.
If you already set up a domain name during deployment, you can skip this step. Your domain and SSL certificate should already be active.
On Hostinger, if you’re using a temporary subdomain, go to Hostinger dashboard → Websites, find your site, and click Connect domain. Follow the on-screen instructions to link a domain to your website.

If your domain is registered with another provider, point it to your host:
- Open your hosting dashboard and find the domain settings for your deployed site. Your host will show the required DNS records, usually an IP address and a CNAME value.
- Sign in to the service where you registered the domain, open the DNS settings, and add the records provided by your host.
- Wait for the changes to take effect. This usually takes 5-30 minutes, but it can take up to 24 hours. It’s normal if your site doesn’t load on the new domain right away.
- Once the domain connects, open your site in a browser using the new address and confirm that every page loads correctly.
Most modern hosts, including Hostinger, also set up SSL certificates automatically after the domain connects. You should see the Connection is secure status in the address bar shortly after the domain starts working.
If your domain still doesn’t load after an hour, clear your browser cache, open it in an incognito window, or try a different network or device. Cached DNS records can make it seem like the changes aren’t working when they actually are.
Domain Name Checker
Instantly check domain name availability.
7. Use continuous deployment for future changes
Some hosting providers, including Hostinger, support automatic redeployment. This means every push to GitHub triggers a new build and updates your live site without requiring you to open the hosting dashboard.
If your provider doesn’t mention this feature, contact its support team to confirm whether it’s available on your plan.
To verify that automatic redeployment is working:
- Make a small, visible change to your project, such as editing a heading or changing a color.
- Push the updated code to GitHub, either by prompting the Antigravity agent or by running the following commands in the terminal:
git add .
git commit -m "Update heading"
git push
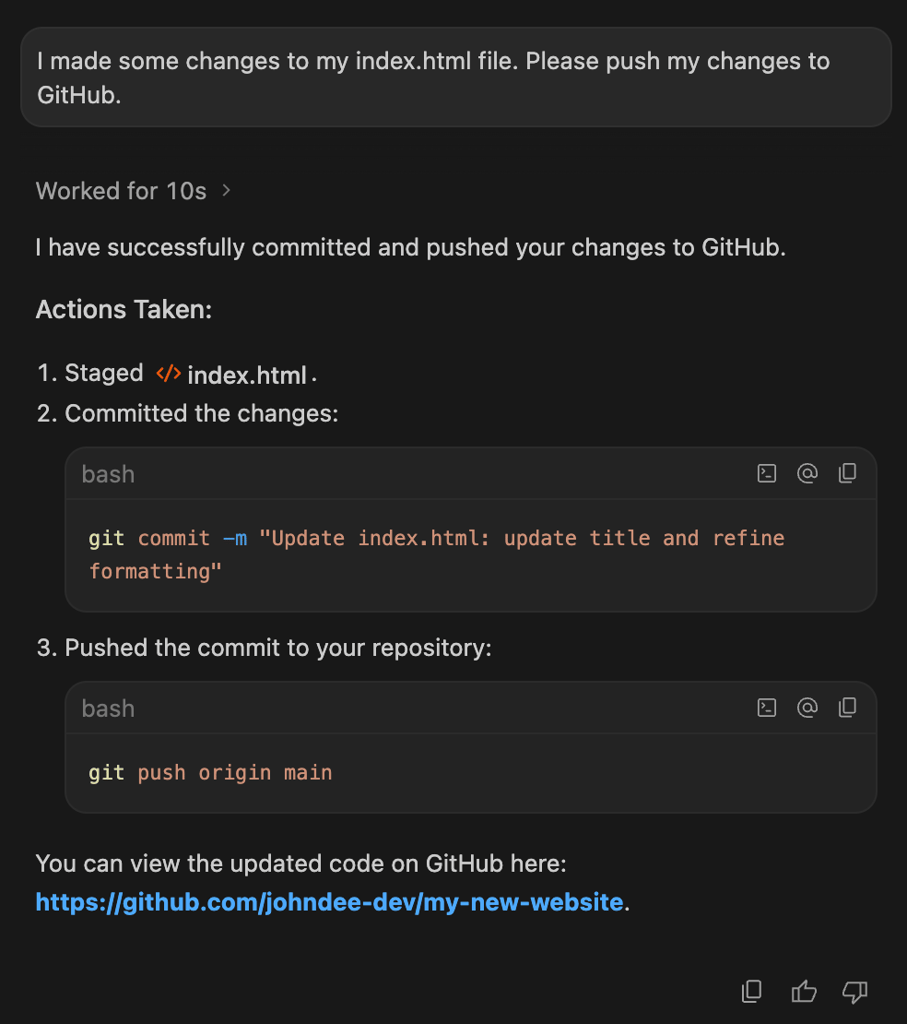
- Wait a few minutes, then refresh your live site in your browser and confirm that the change appears.
If the update doesn’t appear, open your hosting dashboard and look for a deployment log or build history. Most hosting providers show the status of each deployment, so you can see whether they detected the latest push and whether the build succeeded or failed.
If a change breaks your live site, most providers also let you roll back to an earlier deployment. Look for a deployment history or previous builds section in your dashboard, then redeploy the last working version.
How to deploy a website from Antigravity to Google Cloud
To deploy a website from Antigravity to Google Cloud, set up the Cloud Run server from Antigravity’s built-in extension store, then prompt the agent to handle the deployment.
Before you start, install the Google Cloud CLI on your computer. Then open a terminal, either your system terminal or the one in Antigravity IDE, and run these commands to sign in and select your project:
gcloud auth login
gcloud auth application-default login
gcloud config set project your-project-id
Replace your-project-id with your Google Cloud project’s actual ID. The second command generates the credentials that the Cloud Run server in Antigravity uses to make API calls on your behalf.
After authenticating, set up the Cloud Run server in Antigravity:
- Open the Agent Manager panel in Antigravity IDE and click the … menu at the top.
- Select MCP Servers to open the MCP Store.
- Search for Cloud Run and click Install.
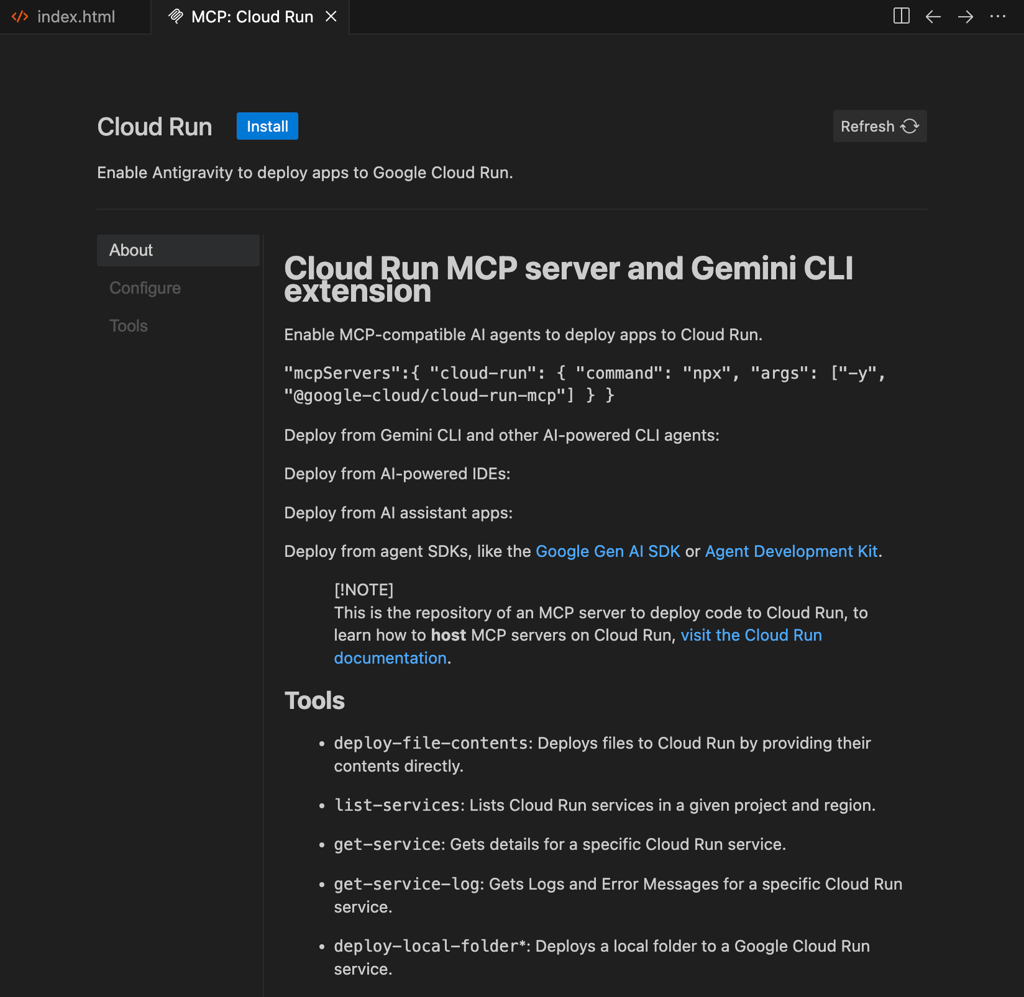
- Return to the agent chat and enter this prompt:
Build and deploy this project to Cloud Run in my Google Cloud project your-project-id.
- Approve the terminal commands when the agent asks for permission. It will create the required configuration files and run the deployment.
This method works well if your app uses Google Cloud services such as authentication, databases, or serverless functions.
Cloud Run is a paid service that charges based on the CPU and memory your app uses while handling requests. It includes a monthly free tier, but costs can increase as your traffic grows. You can find the full rate breakdown on the Cloud Run pricing page.
How to deploy a website from Antigravity via Hostinger Connector
To deploy a website from Antigravity using Hostinger Connector, install the extension in your editor, connect your Hostinger account, and prompt the agent to publish your project to your hosting plan.
Hostinger Connector is a free extension that gives the AI agent in your preferred IDE direct access to your Hostinger hosting account. You can manage website deployments, domain setup, and server settings through prompts without leaving the IDE.
You only need an active Hostinger account to get started. However, you’ll also need an active hosting plan to deploy a website directly from Antigravity to Hostinger.
To set up Hostinger Connector in Antigravity IDE:
- Open the Extensions panel by pressing Ctrl+Shift+X on Windows or Linux, or Cmd+Shift+X on macOS.
- Search for Hostinger Connector and click Install.
- Click the Hostinger icon in the Activity Bar, then select 1-Click Connect.
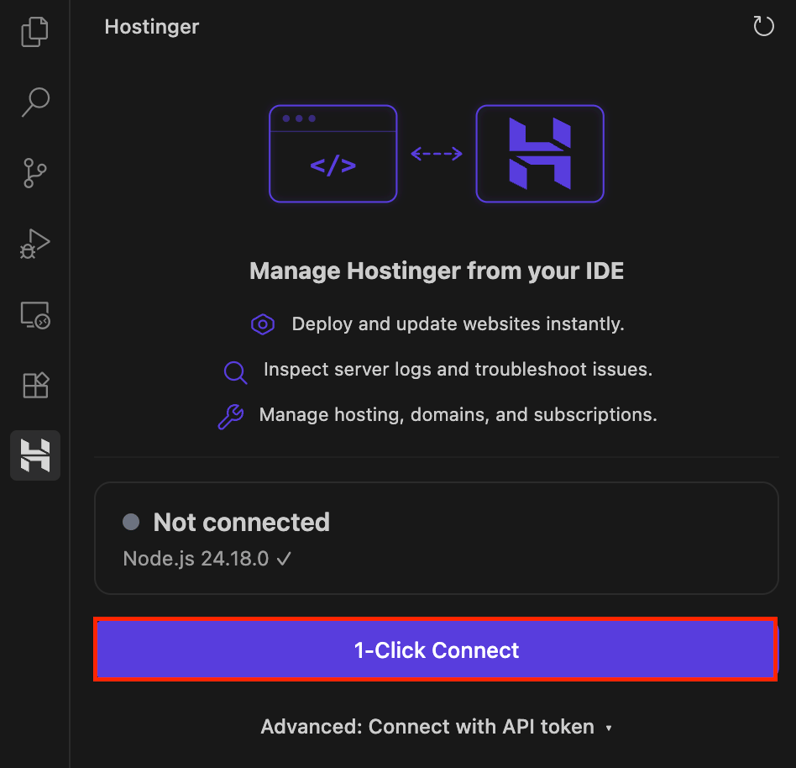
- Complete the browser-based sign-in process. The status badge in the IDE will turn green once you’re connected.
To deploy your project, prompt the agent with your hosting plan and domain. For example:
Deploy this project to my Hostinger Business hosting plan on domain.tld.
Or:
Deploy this static site to any of my active Hostinger plans using a temporary domain.
Hostinger Connector handles the hosting setup and returns the live URL in the same chat window.
After deployment, you can continue managing your site from the same panel. Try prompts such as “Connect a domain to my website,” “Show the DNS records for domain.tld,” or “Which hosting plans are active on my account?”
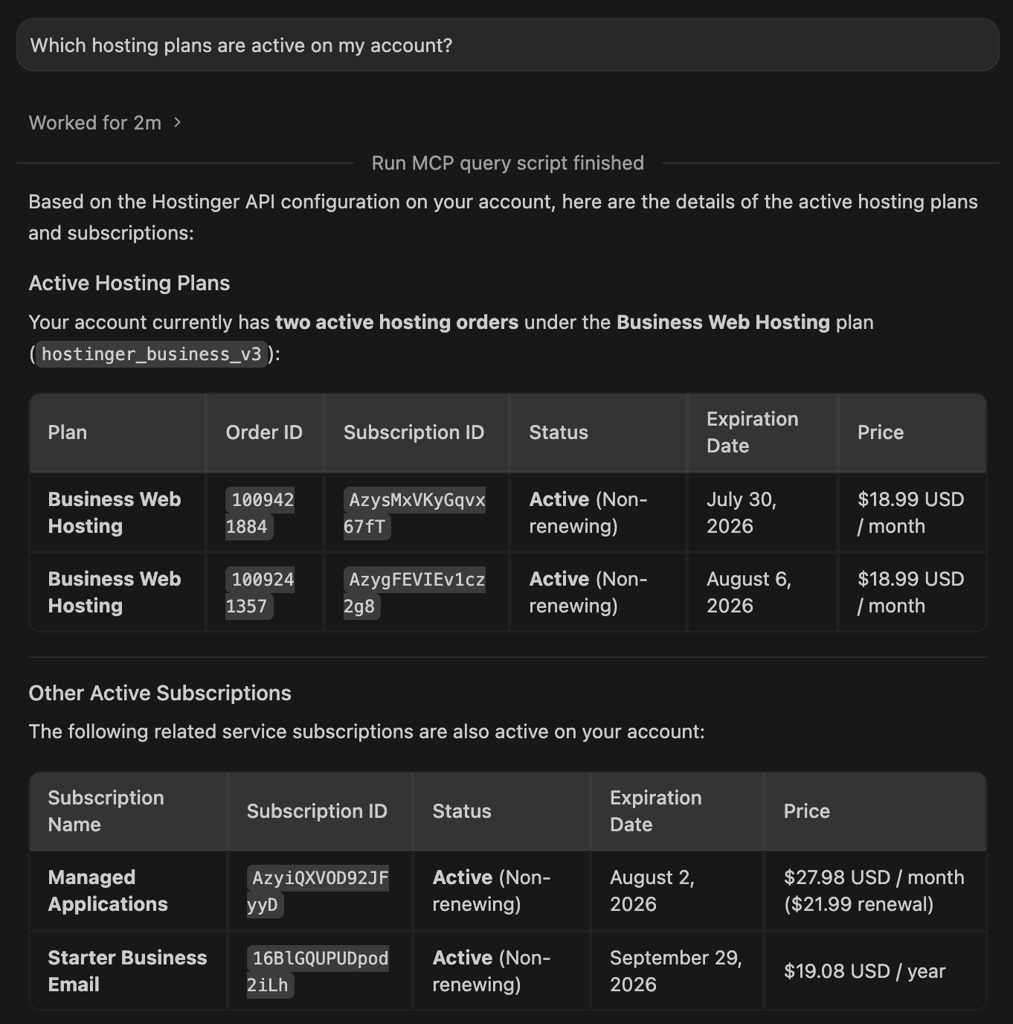
Hostinger Connector also works with other editors. For example, deploying a website from Visual Studio (VS) Code follows a nearly identical process because both editors support the same extensions.
Common Antigravity deployment errors and how to fix them
To fix most Antigravity deployment errors, check whether your host’s build settings match your local setup. Most first-time deployment failures happen because your computer and hosting environment use different configurations.
The table below covers five common issues and how to fix them:
| Symptom | Likely cause | Fix |
| The build succeeds locally but fails on the host | The host uses a different Node.js version than your computer | Set the Node.js version in your host’s build settings, or add an engines field to package.json. |
| A single-page app shows a 404 error after you refresh a page | The host serves static files but doesn’t redirect unknown routes to index.html | Add a redirect rule. Use a _redirects file for Netlify, a vercel.json rewrite for Vercel, or an .htaccess rewrite rule for Hostinger and other Apache-based hosts. |
| The host build shows a “Module not found” error | The agent installed a package locally but didn’t save it to package.json | Run npm install <package-name> to add the missing package to package.json, then commit package.json and package-lock.json and push them to GitHub again. |
| The site shows a blank page after a successful deployment | The output directory in the host’s build settings is incorrect | Check the output directory you identified during the production build, then update the host’s configuration to match it. |
| The site loads, but API calls fail | Environment variables are missing on the host, or the code still points to localhost | Add all required variables in the host’s dashboard and replace hardcoded localhost URLs with production endpoints. |
If you’re not sure what went wrong, paste the full deployment log into Antigravity’s agent chat and enter this prompt:
This is the deployment log from [host name]. Fix the underlying issue.
The agent can trace the error to specific files, identify missing dependencies, and fix the code.
Once you resolve the issue, push the fix to GitHub and let your host redeploy the site automatically. If you set up Hostinger Connector earlier, you can redeploy directly from the IDE with a prompt such as:
Redeploy my website on Hostinger.
Best practices when deploying a website from Antigravity
Deploying your Antigravity project from the IDE to a live site is easier when you build good habits into your workflow, such as using planning mode before major changes, reviewing the agent’s output before pushing, and keeping your dependencies up to date.
These habits help every time you make changes, not just during the first deployment:
- Use planning mode before major changes. Without planning mode, the agent may start writing code in a direction that’s difficult to undo. Start your prompt with “Use planning mode to implement [task]” or “Write a plan first. Don’t modify any files yet.” The agent will create a plan and wait for your approval before making changes.
- Review the agent’s changes before pushing. The agent may accidentally delete files, hardcode values, or add packages that weren’t part of your request. Review the changed files every time the agent finishes a task. If something looks wrong, ask the agent to explain or revert the change.
- Keep dependencies up to date. Outdated packages are a common vulnerability on websites. In your GitHub repository, go to Settings → Advanced Security, then enable Dependabot alerts and Dependabot security updates. GitHub will automatically open pull requests when a package needs a security update. You can also run npm audit in the terminal after each major change to check for vulnerabilities manually.
- Check deployment logs after every push. A successful push to GitHub doesn’t always mean the host completed the build successfully. After the build runs, open the deployment log in your hosting dashboard and confirm that it succeeded. If it fails, paste the log into the agent chat and ask the AI to trace the error and fix the code before you push again.
Next steps after your Antigravity site is live
Once your Antigravity site is live, set up analytics, monitoring, and backups so you’re ready for real traffic and protected from data loss.
- Install analytics. Set up Google Analytics or Plausible on your site so you can see where visitors come from and which pages they view. Both services provide a code snippet during signup that you paste into your site’s HTML. Push the updated code to GitHub and confirm events appear in your analytics dashboard.
- Add uptime monitoring. Consider adding uptime monitoring to your website to get an alert when your site experiences downtime or stops responding. You can do this using a free service like UptimeRobot or Better Uptime. Create an account, add your site’s URL as a new monitor, and set it to check every five minutes.
- Enable backups. This is especially important for dynamic apps with a database, but static sites also benefit from a quick rollback option as well. On Hostinger, you can back up your site on Hostinger dashboard by going to Websites → Dashboard → Files → Backups. Other hosts should have a similar option in their dashboard settings.
- Audit access tokens. Open the settings or API section of each service you connected during setup (your hosting provider, database, third-party APIs) and check for active tokens. Remove any you no longer need, and rotate the ones you’re still using every three to six months.
- Upgrade hosting if you hit resource limits. Free-tier hosts cap build minutes, bandwidth, or both. If your site starts failing builds or loading slowly under traffic, open your host’s resource usage dashboard to confirm you’ve hit a limit, then upgrade to a paid plan. Hostinger customers can upgrade to a higher-tier plan by going to Hostinger dashboard → Websites → Upgrade next to the website.
This article is a localized version of How to deploy a website from Antigravity in 7 steps, originally published in English.
All of the tutorial content on this website is subject to Hostinger's rigorous editorial standards and values.

Ariffud is a Technical Content Writer with an educational background in Informatics. He has extensive expertise in Linux and VPS, authoring over 200 articles on server management and web development. Follow him on LinkedIn.