How to Create a WordPress Mega Menu Using a Plugin and Manually
Mar 10, 2026
/
Brian
/
10 min Read
When designing a site, a WordPress mega menu is crucial for seamless navigation. This is especially true for eCommerce sites offering a wide selection of product categories.
A WordPress mega menu lets you display menu content in multiple columns or rows, making it easy to organize large amounts of information. As a result, users can access different sections of your site without having to browse through multiple pages.
In this comprehensive WordPress tutorial, we will show you how to add a mega menu using a plugin and manually through editing code. You will also find suggestions for the best WordPress mega menu plugins and steps to create dropdown menus as an alternative solution.

What Is a WordPress Mega Menu?
A WordPress mega menu lets website owners add multiple columns, rich media content, and customized styling. Compared to traditional menus, mega menus make navigating through complex websites easier. Visitors can find the information they need quickly and efficiently.
A WordPress mega menu usually consists of several levels:
- Top-level menu. This is the primary menu visitors see upon landing on a website. A top-level menu typically contains the main categories or sections of a website, such as a Products page.
- Second-level menu. It will be visible when users hover or click a top-level menu item. For instance, fashion brands usually list Clothing as one of the second-level items in the Products section.
- Third-level menu. These sub-menus appear when visitors interact with a second-level menu. For example, the third-level items for Clothing can be Shirts, Sweaters, and Jackets.
While it’s possible to create more sub-menu levels, stick with three to avoid overwhelming visitors.
How to Create a Mega Menu in WordPress
The easiest way to create a mega menu in WordPress is by using a plugin. If you possess some level of technical knowledge, it’s also possible to add a mega menu manually using custom CSS code.
This section will cover both options in more detail. Feel free to jump straight into your preferred method.
How to Create a WordPress Mega Menu Using the Max Mega Menu Plugin
Max Mega Menu is a complete menu management plugin that supports multiple menu locations. This flexibility lets you customize mega menu settings for different sections of your site.
Before we dive deeper into how Max Mega Menu works, install and configure the plugin first.
1. Configure the Max Mega Menu Plugin
To install a WordPress plugin, log in to your WordPress dashboard and head to Plugins → Add New. Enter Max Mega Menu in the search bar, then click Install Now and Activate once you’ve found the plugin.
Pro Tip
Before proceeding, publish all important pages and create a custom navigation menu. After that, make sure to add those pages to your menu items in WordPress.
Next, access Mega Menu from the left sidebar to configure its default settings. For example, if you want to add a menu location, follow these steps:
- Go to Appearance → Menus.
- Select Menu Locations and click Add another menu location.
- Enter the website section where you want to display the menu, such as the header, footer, or sidebar.
- Select the custom menu you have created.
- Click Add menu location.
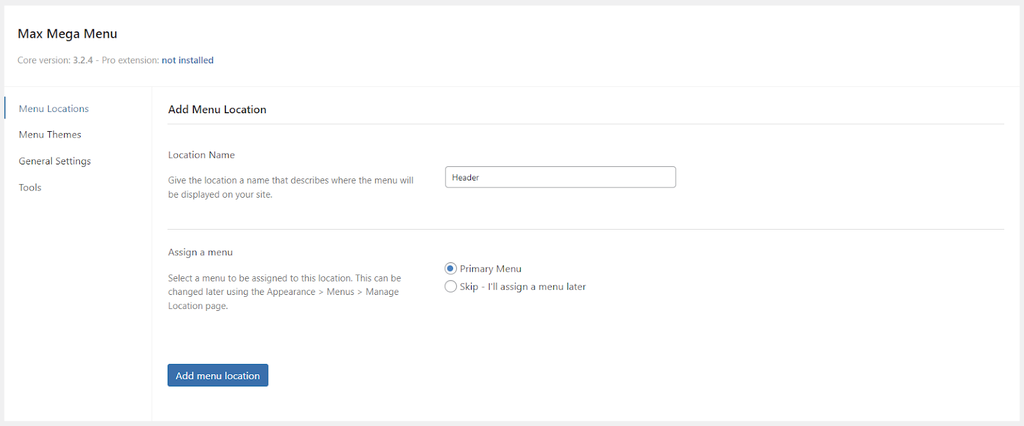
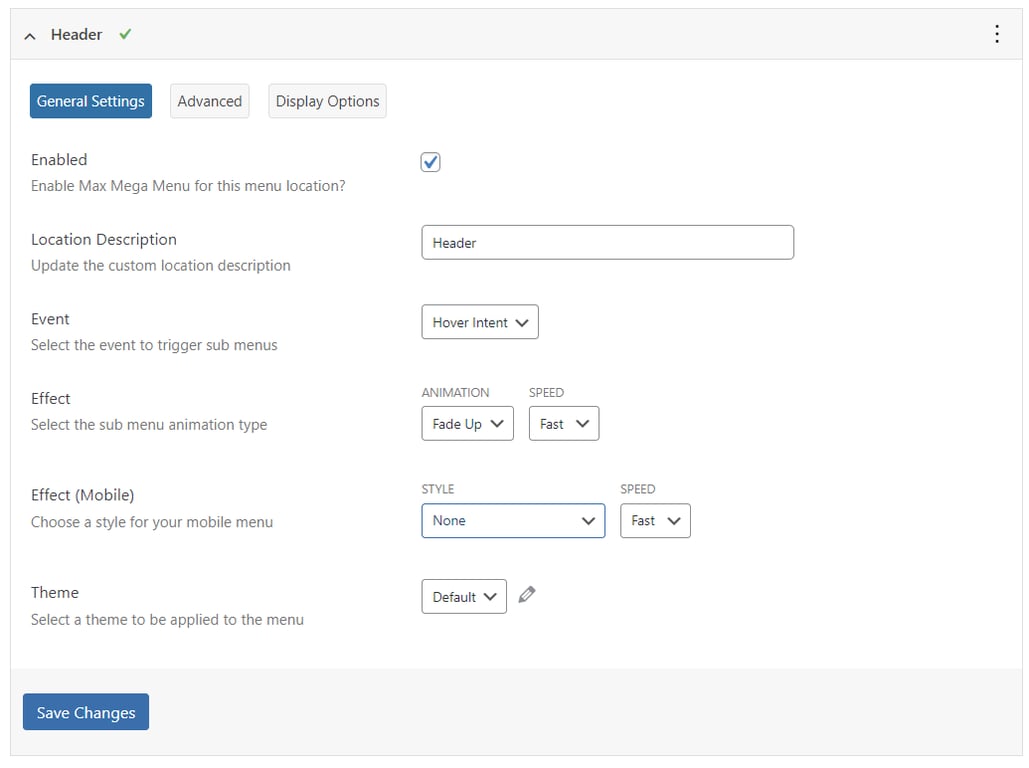
Once created, tick the Enabled box under General Settings. Next to Event, choose from the three main options to trigger the menu:
- Hover Intent. Users need to hover over the top-level menu for a few seconds before its second-level menu appears. This delay is designed to prevent accidental clicks.
- Hover. Sub-menus will open instantly when a user hovers their mouse pointer over the parent menu. Since there’s no delay, this method works best for delivering a smooth navigation system.
- Click. It requires visitors to click or tap the mega menu to open its second-level items. This option is ideal for touchscreen devices and situations where precise mouse hovering might be challenging.
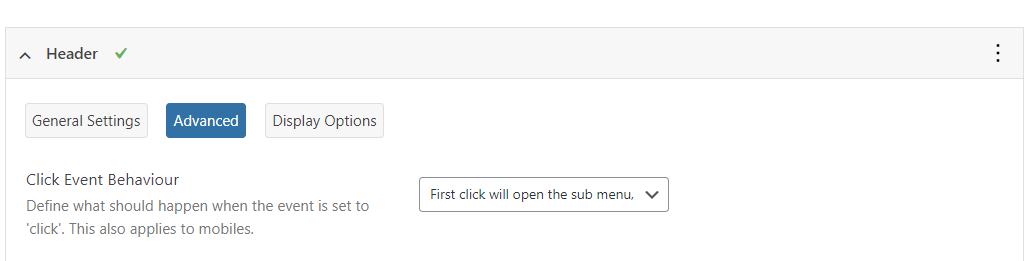
If you select Click, head to the Advanced tab → Click Event Behaviour. Then, choose one of these options to determine what will happen when users click the mega menu:
- The first click will open the sub-menu, and the second click will close it.
- The first click will open the second-level menu, and the next click will follow the page link.
- The first click will directly open the page link.
Afterward, go back to the General Settings tab and locate the Effect area.
Here, select an animation type for your mega menu, including fade, fade up, slide, and slide up. You can also set the animation speed to fast, medium, or slow.
To enable animation for your mobile menu, choose a style next to Effect (Mobile) – slide down, slide left, or slide right. Note that using an interactive element may slow down your site on mobile devices or systems with slow internet speeds.
Once you’re satisfied with the configuration settings, click Save Changes.
2. Set Up the Menu Layout and Appearance
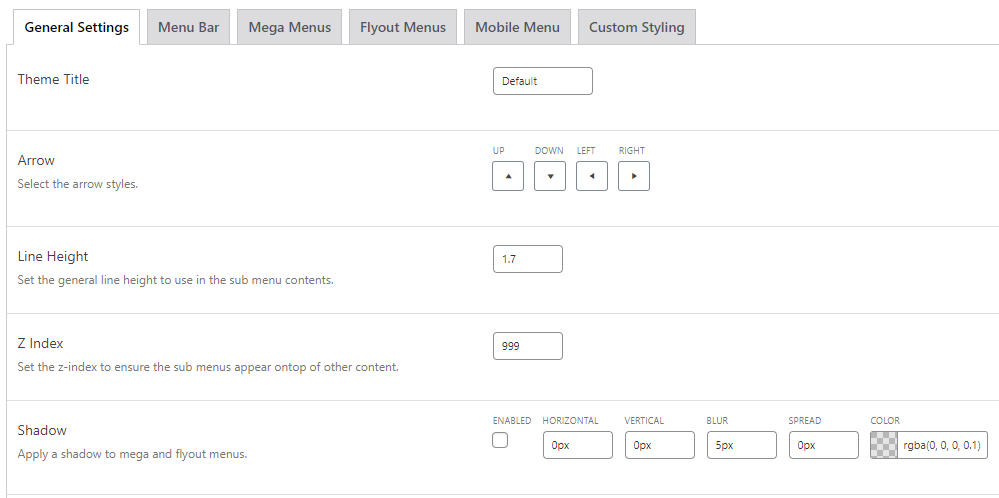
Max Mega Menu offers a default menu theme you can use right away. But if you prefer creating a custom theme, you can personalize your mega menu easily.
To do so, access Menu Themes from the Max Mega Menu settings. Click the three-dot icon next to Select theme to edit, and choose Add new theme.
Under General Settings, you can change the new theme’s title, select an arrow style, set the general line height for sub-menu items, and apply a shadow to your mega menu layouts.
Next, open the Menu Bar tab to personalize your top-level menu. This will determine how visitors see your navigation menu on its minimized view.
The upper side of this tab offers settings to adjust the menu’s height and background color. You can also set a custom padding to achieve the desired layout and add borders around menu items for visual distinction.
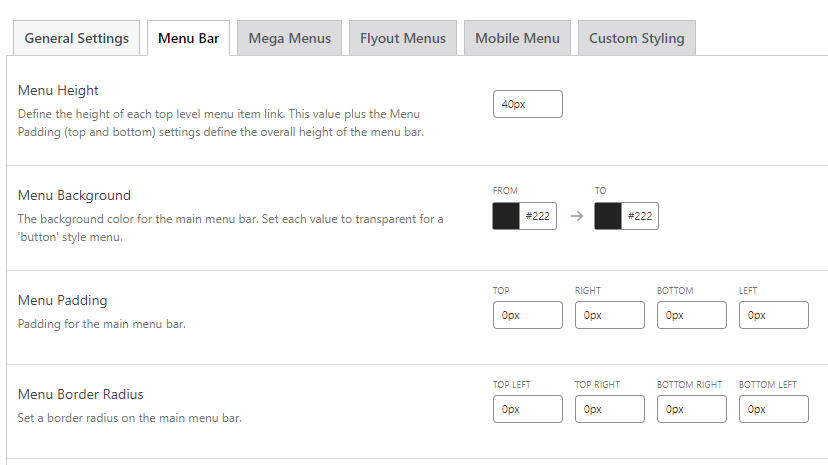
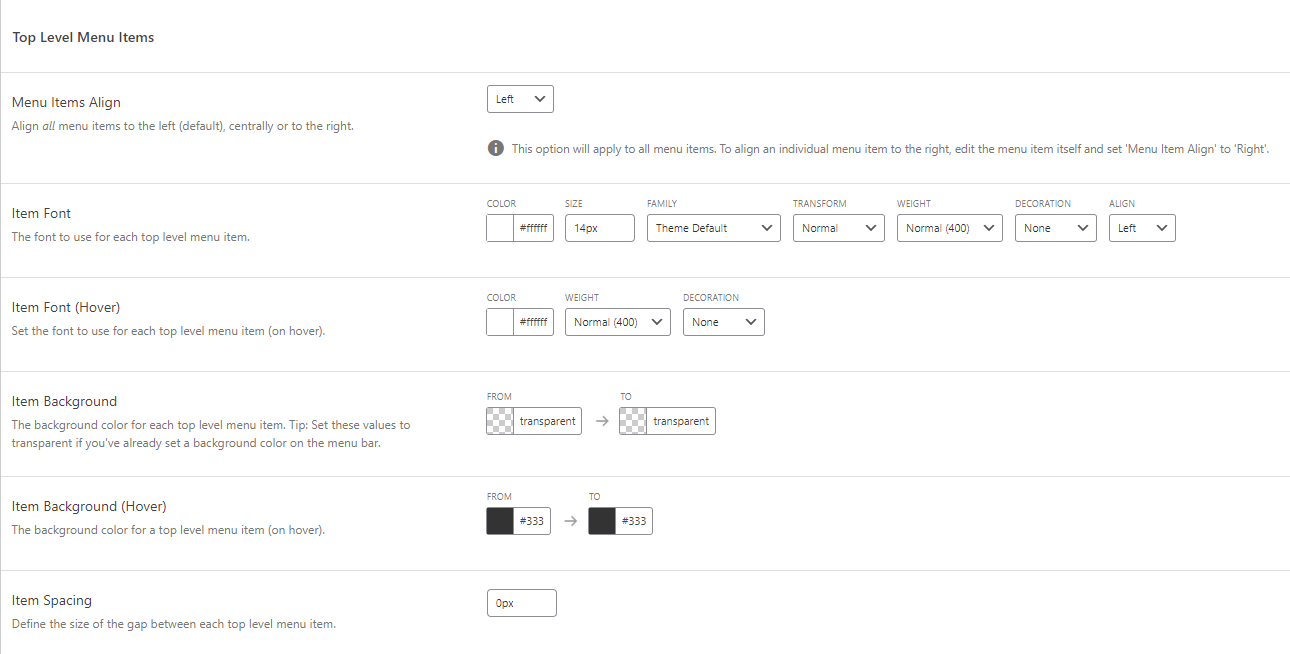
Upon scrolling down, there’s also a dedicated section for customizing your top-level menu items:
- Menu Items Align. Place all menu items to the left, center, or top right of your website.
- Item Font. Customize the menu typography to match your site design, including the font family, size, weight, color, and visual styling options.
- Item Background. Change the background color of each menu item. Leave it transparent if you’ve already set the Menu Background.
- Item Spacing. Adjust the margin and padding around each item to fine-tune your mega menu layout.
- Item Border. Define the border’s color, menu width, and radius to create different visual effects.
- Highlight Current Item. When enabled, the current menu item will be highlighted when users hover over it, making navigation more intuitive.
After your top menu is set, move on to the Mega Menu section. In this tab, you can change the font, background color, spacing, and border of your second-level and third-level items.
To create a distinct look, make sure to assign different color schemes to the parent menu and sub-menus. However, we recommend using the same typography to ensure consistency.
Once done, don’t forget to save your changes.
3. Add Content to the WordPress Menu
Max Mega Menu offers a drag-and-drop interface, making it easy to add new content. Apart from text links, you can also add WooCommerce products, images, and search filters.
Pro Tip
To add products to your WordPress site and start selling online, read this comprehensive WooCommerce tutorial.
Start by navigating to Appearance → Menus to create a new menu or edit your existing one. Then, follow these instructions:
- Tick the Enable box from the Max Mega Menu Settings on the left. This box also allows you to configure the menu settings for multiple locations.
- Move down to Pages, select all pages, and click Add to Menu.
- Repeat the same process for Posts, Categories, and Product Categories.
- Under Menu Structure, drag and drop the sub-categories to their respective main category. You can create a third-level menu by dragging it to the right side of a second-level menu and so on.
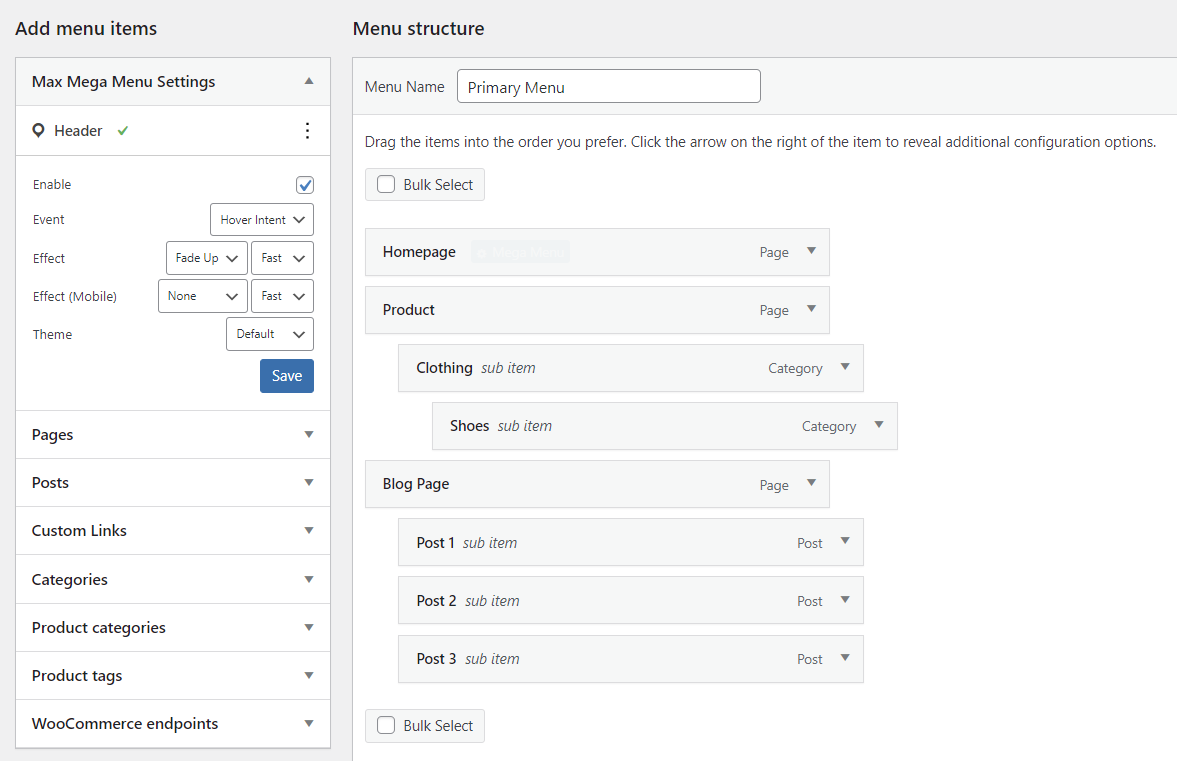
By default, this plugin uses a flyout or dropdown menu style. To create a mega menu, hover over one of your pages and click the Mega Menu button.
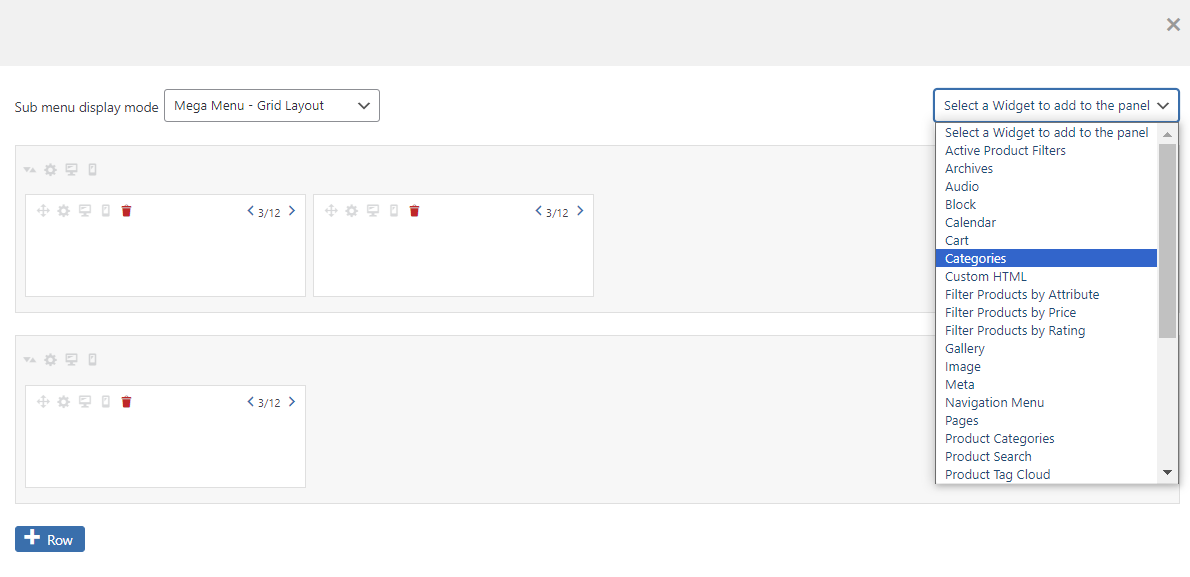
When a pop-up appears, set the sub-menu display mode to either Grid Layout or Standard Layout.
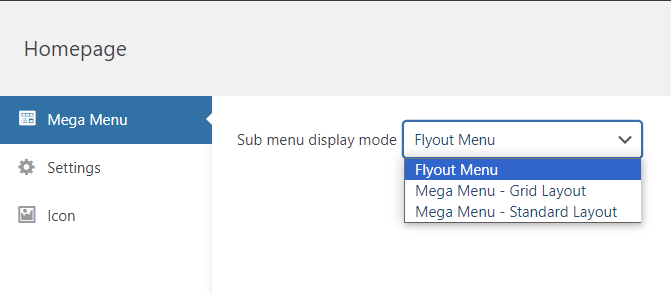
The mega menu grid layout lets you create a menu in multiple columns and rows. Meanwhile, you can only change the number of columns when using the standard layout.
Add rich content to make your menu more visually appealing by clicking Select a widget to add to the panel. Then, choose a widget from the dropdown list, including a search bar, image gallery, calendar, audio content, video, and product filters.
If your site has a complex menu with many links, assign an icon to each item to boost the user experience. Simply navigate to Icons on the left sidebar and select icons from various platforms.
Close the Mega Menu pop-up and repeat the process for each top-level page. After configuring all the settings, click Save Menu to enable the mega menu on your site.
How to Create a WordPress Mega Menu Manually Using Code
Creating a WordPress mega menu manually using code gives you more control over its design and functionality. However, this method requires custom CSS knowledge and the ability to tweak your theme’s stylesheet file.
Follow this step-by-step guide to add a mega menu to your WordPress site:
1. Prepare Your Development Environment
WordPress is an open-source content management system (CMS), which means you can use custom code to tweak its themes and plugins.
However, editing code on your live website can lead to unexpected issues. To prevent this, back up your WordPress site and create a safe environment for experimentation.
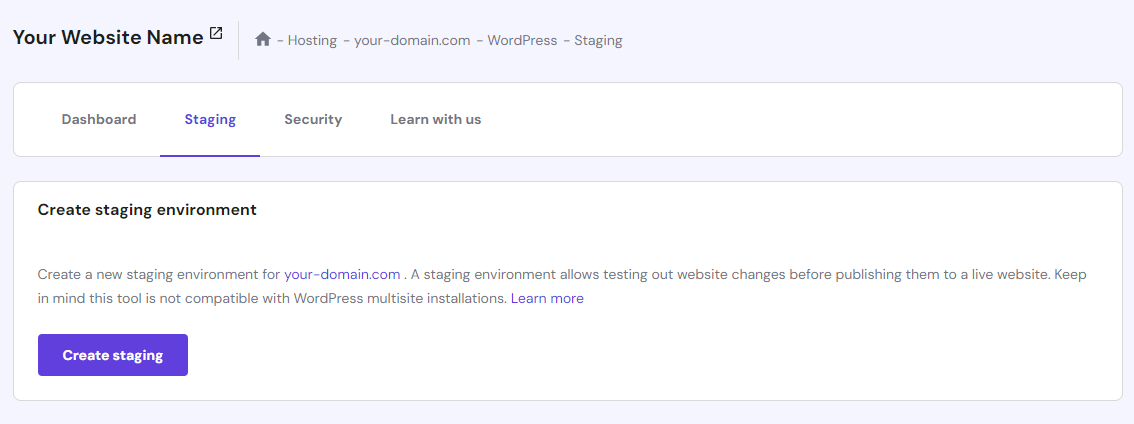
Hostinger’s managed website hosting for WordPress offers automated backups to keep your files safe. The Business and Cloud Startup plans also come with a WordPress staging tool. This feature allows you to duplicate your website and test changes before deploying them to the live site.

Here’s how to set up a WordPress staging environment with Hostinger:
- Log in to hPanel and go to Websites.
- Select your domain name and click Manage.
- Navigate to WordPress → Staging on the left sidebar.
- Head to the Staging tab and click Create Staging.
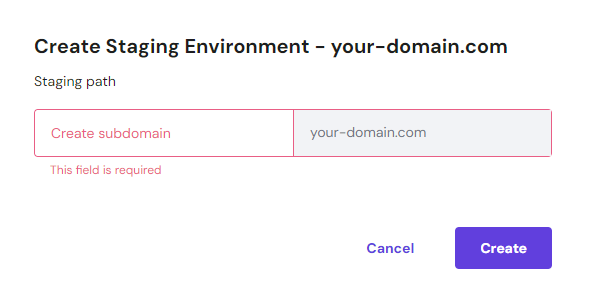
- Create a subdomain for your staging environment. The process can take up to 15 minutes to complete.
2. Access Your Theme’s Stylesheet File
The next step is to customize your theme’s style.css file on the newly created staging site.
Pro Tip
To minimize error risks during testing, we recommend creating a WordPress child theme instead of using the parent theme.
With most hosting providers, it requires connecting to a third-party File Transfer Protocol (FTP) client. Luckily, Hostinger users can easily do this via hPanel:
- Navigate to Files → File Manager, and choose Access files of (your domain).
- Open public_html → staging → wp_content → themes.
- Choose the WordPress theme you want to tweak and open its folder.
- Double-click the theme’s style.css file to make changes.
- Scroll down to the bottom of the text editor and enter this code:
.main-navigation ul:hover li ul,
.main-navigation ul:hover li ul li ul {
    display: inherit;
}
This will make your second-level and third-level items visible when users hover over them.
Step 3: Customize the Mega Menu
To customize the menu styling further, enter your own code directly into the theme’s stylesheet. Below are some common examples of WordPress mega menu CSS snippets:
Creating columns within the mega menu:
.mega-menu li.mega-menu-column {
  width: 25%; /* for a 4-column layout */
  float: left;
  padding: 10px;
}
Customizing the color, padding, and text style for each menu item:
.mega-menu ul.mega-sub-menu li a {
  color: #555;
  padding: 8px 15px;
  display: block;
  text-decoration: none;
}
Optimizing the menu layout for mobile view:
@media screen and (max-width: 767px) {
  .mega-menu li.mega-menu-column {
    width: 100%;
    float: none;
  }
}
Whether these code snippets will work as intended depends on the rest of your site’s CSS and HTML structure. That’s why it’s important to test each code and adjust as necessary.
Best WordPress Mega Menu Plugins
While it’s possible to create a mega menu in WordPress without a plugin, this manual method is not suitable for users with little to no coding experience. If you’re a complete beginner, it’s best to use WordPress menu plugins to streamline the whole process.
Apart from Max Mega Menu, here are the three best WordPress plugins for creating a mega menu. You can install QuadMenu from the WordPress plugin directory, while WP Mega Menu Pro and JetMenu are only available in third-party marketplaces.
1. QuadMenu
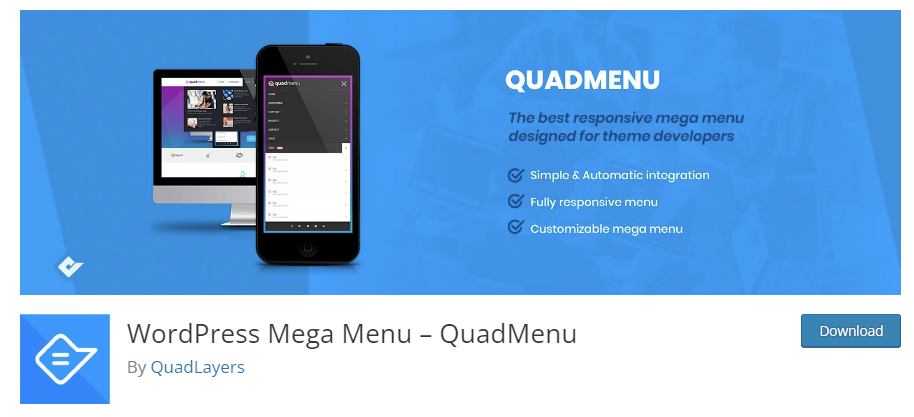
QuadMenu is an open-source, native WordPress mega menu plugin that provides a wide range of themes and locations.
With the free version, you can display a navigation menu widget within menus, customize breakpoints for menu collapse, and create a wide range of mega menu options. Those include off-canvas, sticky, horizontal, and vertical mega menus.
The pro plans start at $49/year, offering additional features such as tabs, login, register, social, and carousel menus.
2. WP Mega Menu Pro

WP Mega Menu is an easy-to-use mega menu builder designed for beginners. It offers instant setup, allowing you to create responsive mega menus right away.
Despite its focus on user-friendliness, this WordPress mega menu plugin offers extensive customization capabilities. You can easily tweak your fonts, menu types, post metadata, menu color schemes, and menu animations.
WP Mega Menu is only available in a premium version. It costs $19/license for unlimited sites with one-year updates and priority support.
3. JetMenu
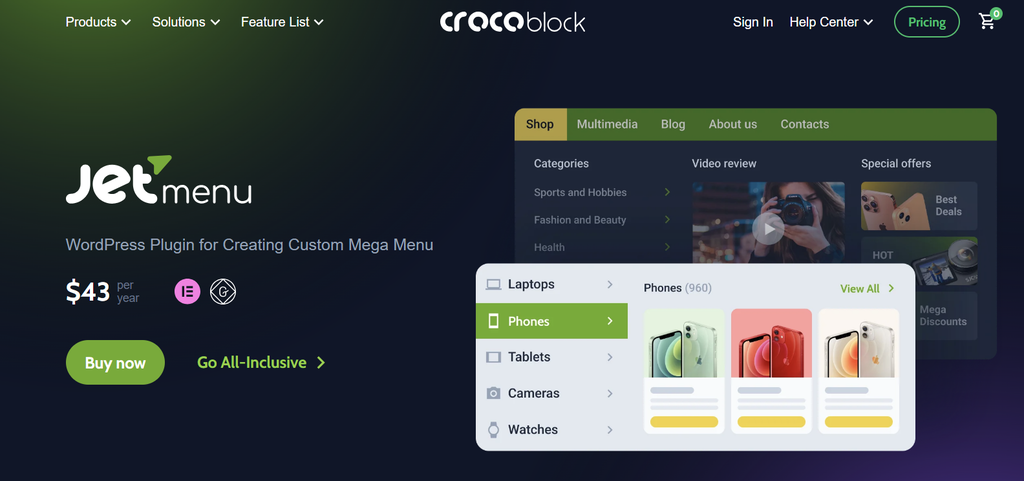
JetMenu is a premium plugin for creating a WordPress mega menu with images, videos, audio records, and other types of interactive content.
By subscribing for $43/year, you will gain access to a drag-and-drop builder and several menu orientation layouts – hamburger, horizontal, and vertical menus.
Another standout mega menu feature is the preset manager, enabling you to create and save multiple templates for different menus.
Benefits of Using a WordPress Mega Menu
Compared to traditional menus, using a mega menu in WordPress brings several benefits to your website:
- Better organization. If your WordPress site has a lot of content or product categories, a mega menu can help you neatly organize and present them to users.
- Enhanced visual appeal. Mega menus can be customized to match your website’s branding, ensuring a cohesive and visually appealing design.
- Improved user engagement. Users are more likely to explore your WordPress site when they can easily find what they need. A mega menu simplifies navigation, encouraging users to stay longer and interact with your content.
- Efficient space utilization. Use a mega menu to showcase a wide range of options without cluttering the site’s layout.
- Competitive advantage. Offering a mega menu can set your website apart from competitors, showing that you’re committed to providing an exceptional user experience.
WordPress Mega Menu Alternative
While a WordPress mega menu enables you to display a complex menu structure, you can also opt for a simpler alternative by using dropdown or flyout menus.
This is especially suitable if you have a straightforward menu hierarchy and want to keep the WordPress site design clean.
How to Create Dropdown Menus via a Classic Theme
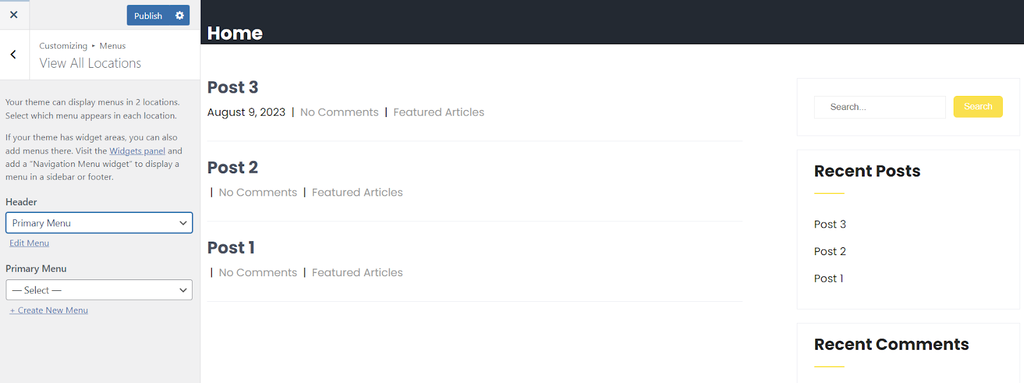
If you’re using a classic theme, here’s how to create a dropdown menu using the WordPress Customizer:
- Log in to your WordPress dashboard and navigate to Appearance → Customize.
- In the Customizer interface, choose Menus and select your existing menu. Otherwise, create a new one.
- Click Add Items to add new pages or posts.
- Arrange the sub-menus hierarchically by dragging them below and slightly to the right of the parent item.
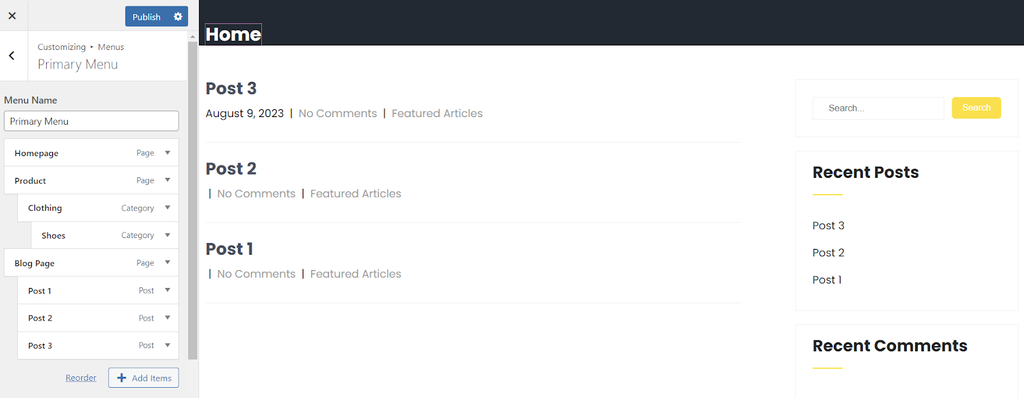
- Once done, go to Menu Locations and assign your dropdown menu to the desired section.
- Click Publish to save your changes.
How to Create Dropdown Menus via the Block Editor
For block theme users, create a dropdown menu via the Gutenberg Editor:
- Head to Appearance → Editor from your WordPress dashboard.
- In the Block Editor, click the plus (+) icon at the top menu bar and select Blocks.
- Search for the Navigation block and drag it to your preferred area.
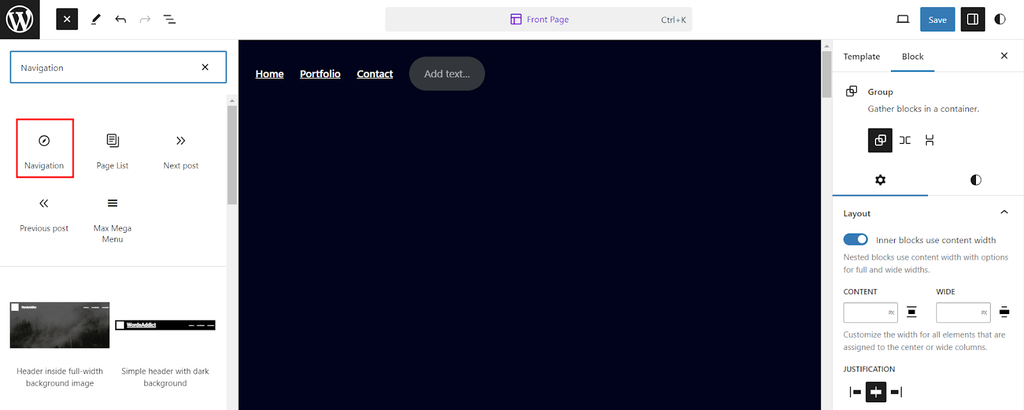
- Once you’ve added the Navigation block, navigate to the right sidebar and open the Block settings panel.
- Click the plus (+) icon and select Page Link to add your main pages and sub-menu items.

- To create a dropdown menu, drag sub-menu items slightly to the right beneath their parent item. Alternatively, click the three-dot icon next to your existing menus and choose Add submenu link.

- From the Settings tab, you can adjust the menu layout and display the menu vertically or horizontally.
- Once you’re satisfied with the dropdown menu’s appearance and functionality, click Publish or Update to save your changes.
Conclusion
Before launching your WordPress site, it’s important to ensure intuitive navigation. For eCommerce stores and sites with many pages, using a mega menu is the ideal solution.
Unlike the standard WordPress menu, a mega menu enables you to organize complex information in a simple yet visually appealing way.
There are two main ways to add a mega menu to your site. For beginners, we recommend using Max Mega Menu or other plugins to create a top-level navigation bar and its sub-menus.
If you’re an advanced user who prefers more flexibility, use CSS code to customize the mega menu as you wish. To save time and effort, sign up for a reliable hosting provider like Hostinger that offers a WordPress staging tool and a built-in code editor.
We hope this WordPress mega menu tutorial has provided the necessary guidance to help you deliver a better user experience. If you have more questions, don’t hesitate to leave a comment below.
WordPress Mega Menu FAQs
Find the answers to frequently asked questions about a WordPress mega menu.
Do I Need a Mega Menu for My WordPress Website?
Mega menus are perfect for websites with complex structures or a large amount of information. If your site has multiple categories, sub-categories, or extensive navigation needs, creating a mega menu can help visitors find the intended content quickly.
Does a WordPress Mega Menu Impact Site Performance?
A well-optimized mega menu should have minimal impact on WordPress site performance. Use efficient coding practices and ensure that images and other media elements within the mega menu are appropriately compressed and optimized. This will help maintain fast loading times and a positive user experience.
Can I Make a WordPress Mega Menu Mobile-Friendly?
Yes, there are plenty of responsive mega menu plugins that work well on different screen sizes. Choose a plugin that explicitly mentions mobile responsiveness, and thoroughly test the mega menu on various devices to ensure it works properly.

Brian is a Content Writer who loves telling complex stories in a simple way. He has written all types of content, including tutorials, blog posts, landing pages, social media posts, white papers, infographics, and YouTube scripts. Follow him on LinkedIn.


Comments
0 responses