Joomla tutorial for beginners
Mar 10, 2026
/
Nabilla R.
/
12 min Read
Joomla is an open-source content management system (CMS) that powers nearly 2 million websites on the internet.
The platform offers numerous advanced features, allowing you to easily make a website or an app.
Considered one of the best WordPress alternatives, Joomla supports various content types and custom fields, including gallery, calendar, and checkboxes. This allows you to create a dynamic website without using third-party plugins.
This article will provide a step-by-step tutorial on how to install Joomla and its core components. It will also walk you through the content creation process and give a few tips on how to speed up your site.

Understanding Joomla
Joomla provides every tool that users need to manage, update, and publish content. Additionally, the platform allows you to build any website, be it for a personal or business project.
From site management to core enhancement, Joomla also helps extend your site’s functionality with the vast amount of extensions available. They fall under these types:
- Components – core extensions that you can modify from the back-end and view on the front-end of your site. Some examples are com_content, com_newsfeeds, and com_weblinks.
- Modules – lightweight extensions or widgets that display certain content types, such as recent articles, article categories, or search boxes.
- Plugins – pieces of software that provide additional functions such as adding a music player or social media share buttons to enhance your website’s performance.
- Templates – sets of design and layouts that control the site’s appearance. A template defines how components and Joomla modules are shown on the website.
- Languages – offers translation packs for creating a multi-language site.
- Libraries – collections of function-related code that are used in modules, components, or plugins.
You can find them in the official Joomla! Directory and other third-party sources, such as Joomlart and Joomdev.
Because of the flexibility, many famous brands and organizations use this platform for their websites, including Harvard University, Linux.com, Guggenheim, MTV Greece, and the UNRIC.
Of course, this platform also has a steeper learning curve compared to other CMSs. Not to worry, as there are many articles, tutorials, videos, forums, and documentation to help you along.

How to Install Joomla
There are two ways to install this platform – automatically and manually.
Using Hostinger’s Auto Installer
Most Joomla hosting providers include auto-installers to allow you to set up software from the admin panel. On Hostinger’s hPanel, users can access auto-installers under the Website menu.
If you use Joomla web hosting, the procedure will be the same.
- Open the Auto Installer, find Joomla, and click Select.
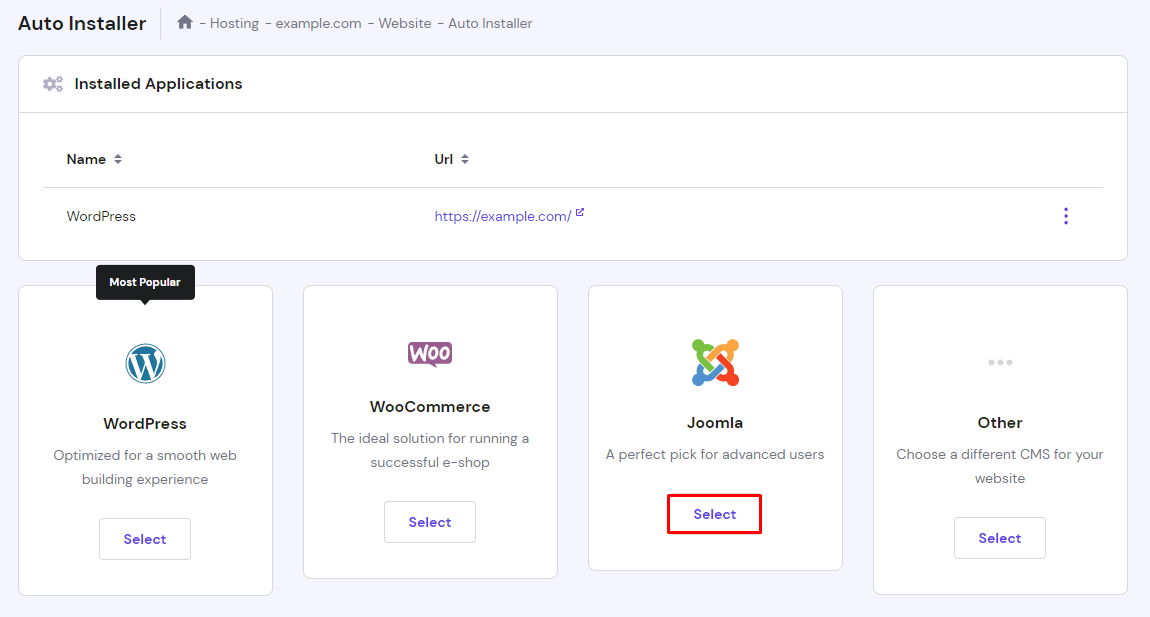
- Enter your website credentials and select Next. Specify the configuration details, like your domain, preferred language, administrator email, password, and username. When you’re done, click Install.
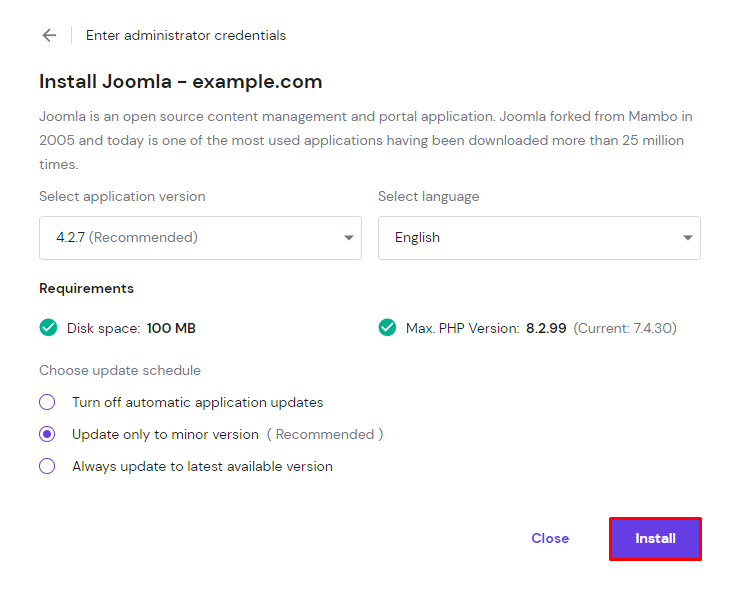
- Once the installation is complete, you can log in to the control panel and start creating your Joomla website.
Pro Tip
Access the Joomla admin panel by adding "/administrator" at the end of your URL (e.g., www.mydomainname.com/administrator)

Installing Joomla Manually
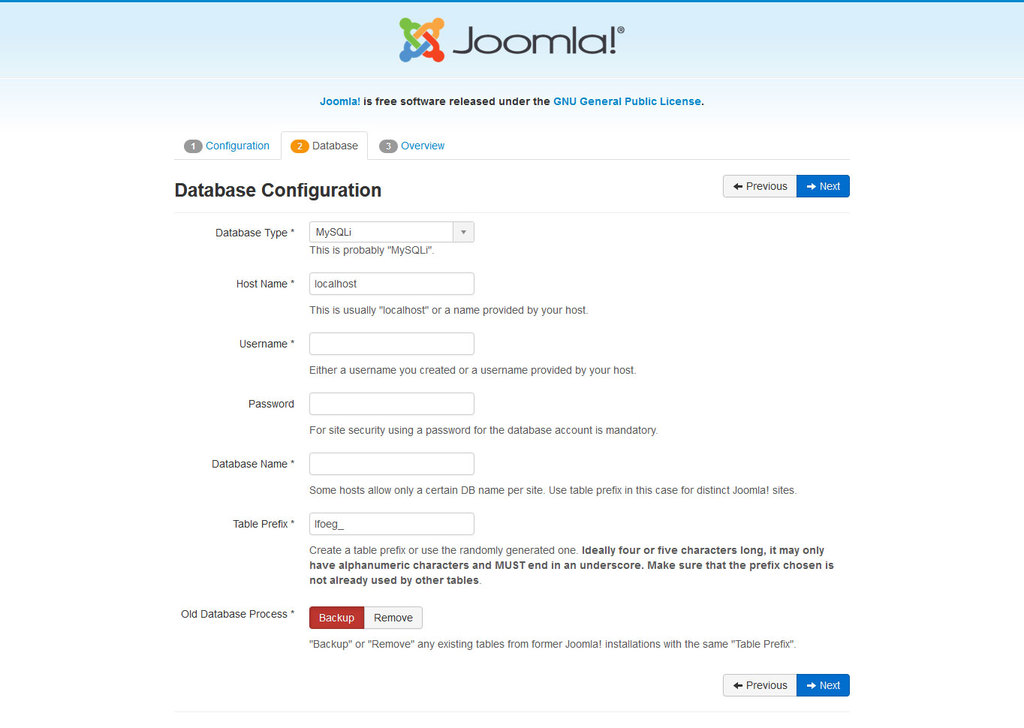
Another way to set up Joomla is through manual installation. This method will require you to create a database to serve as storage for the content.
Before you proceed to the installation, download the latest version of Joomla from its official website.
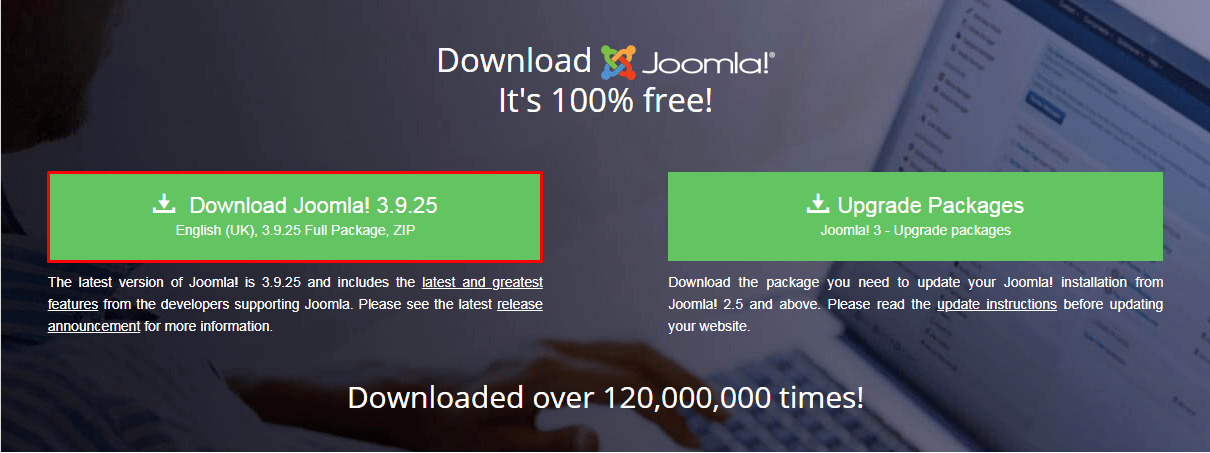
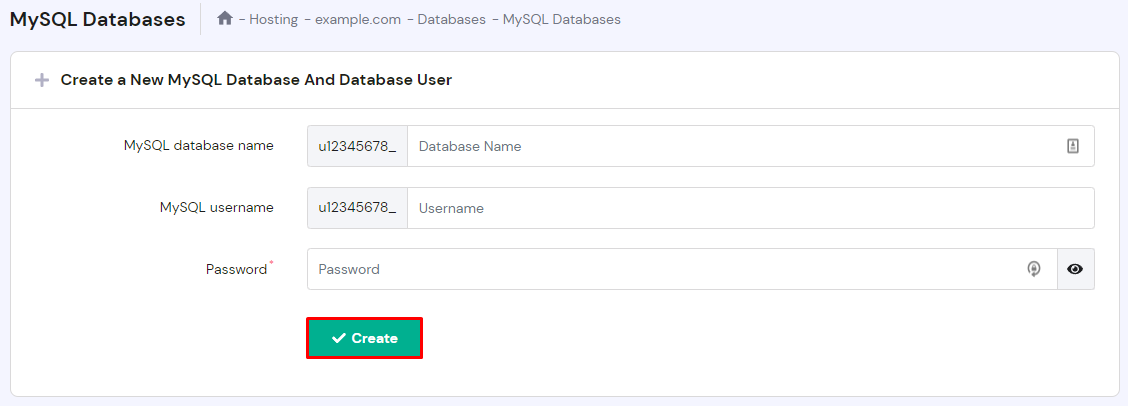
Once the download is complete, access your web hosting control panel to create the database.
- Navigate to your hPanel -> Databases -> Management. Define your database name, username, and password in the provided fields. Then click the Create button.
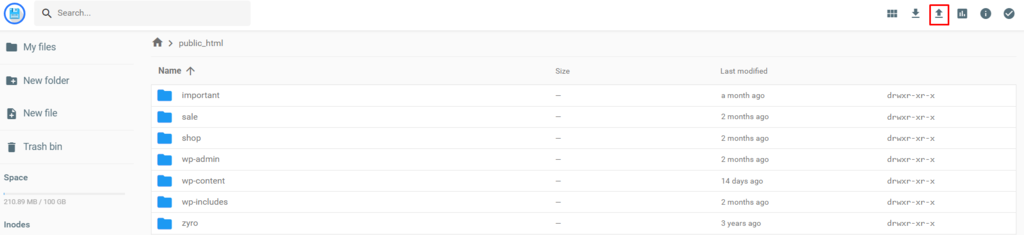
- When your database is all set, upload the downloaded .zip file from your computer into your server using Hostinger File Manager. Choose the domain or access all files.

Open your public_html folder and click on the Upload Files button in the upper right corner.
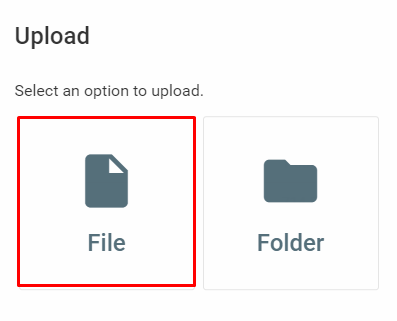
Click File to select the installation package from your computer to begin the process.
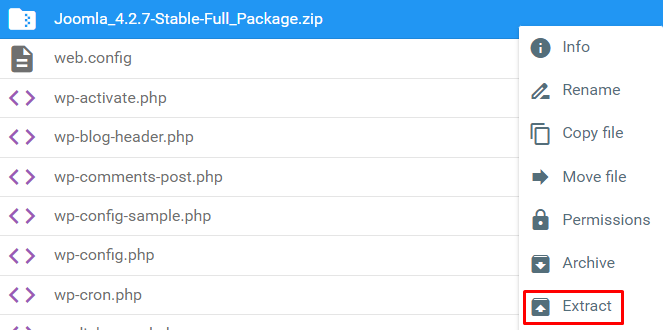
After the file has successfully been uploaded to the folder, you should see the file name on the list.
- Extract the file to retrieve the content by right-clicking and choosing the Extract option.
- Access your domain name through any browser. This will take you to Joomla’s Main Configuration page.
Pick your preferred language, then fill out the blank fields.
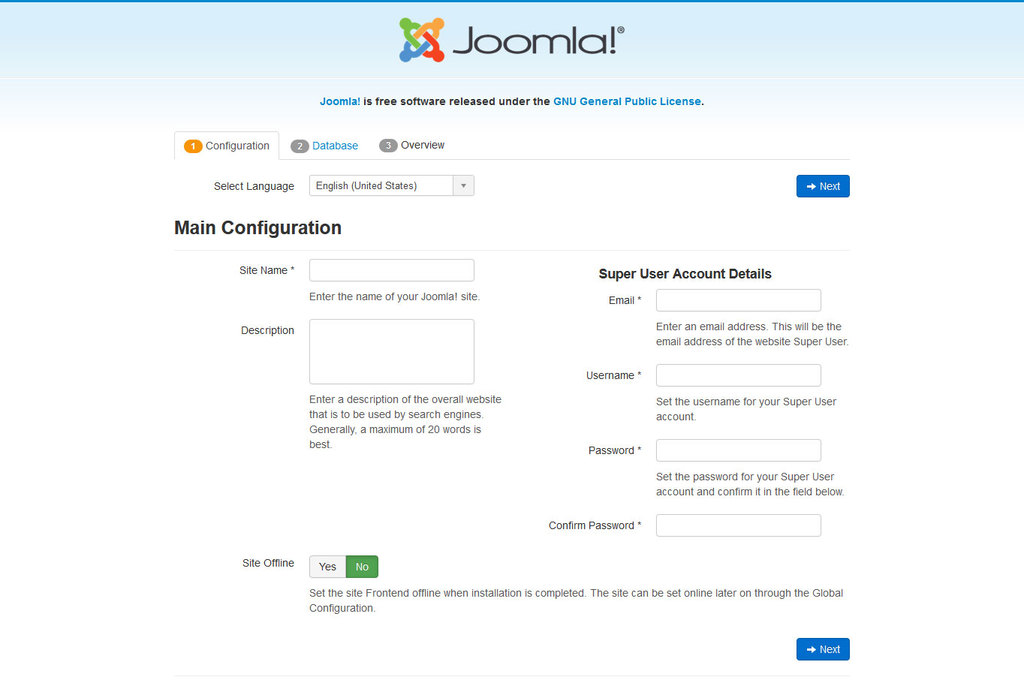
- Input your MySQL database credentials from earlier steps.
- Review the configurations and click Install to finish up.

When the installation process is done, the page will tell you that Joomla has been successfully installed.
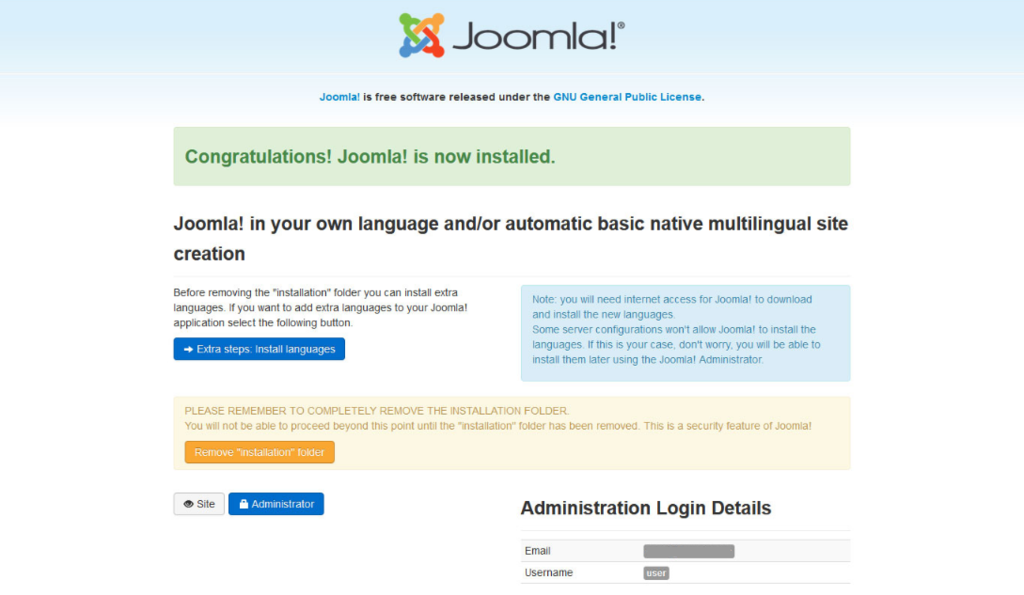
You can now access the Joomla admin dashboard via yourdomain.com/administrator and start working on your project.
Installing Joomla on Hostinger VPS
If you use virtual server hosting from Hostinger, you have another option to install Joomla with a one-click template. This OS template includes Joomla, OpenLiteSpeed, and LSCache image in the installation, which simplify your setup process.
It makes setting up parts like PHP OPCache faster to help you optimize the web server more efficiently.
You can find this feature by opening hPanel and clicking on your server.
After that, look for Operating System on the side panel, and choose Applications under the Change Your Operating System section. You can find the Joomla template in the drop-down menu. Click Change OS to begin the installation.
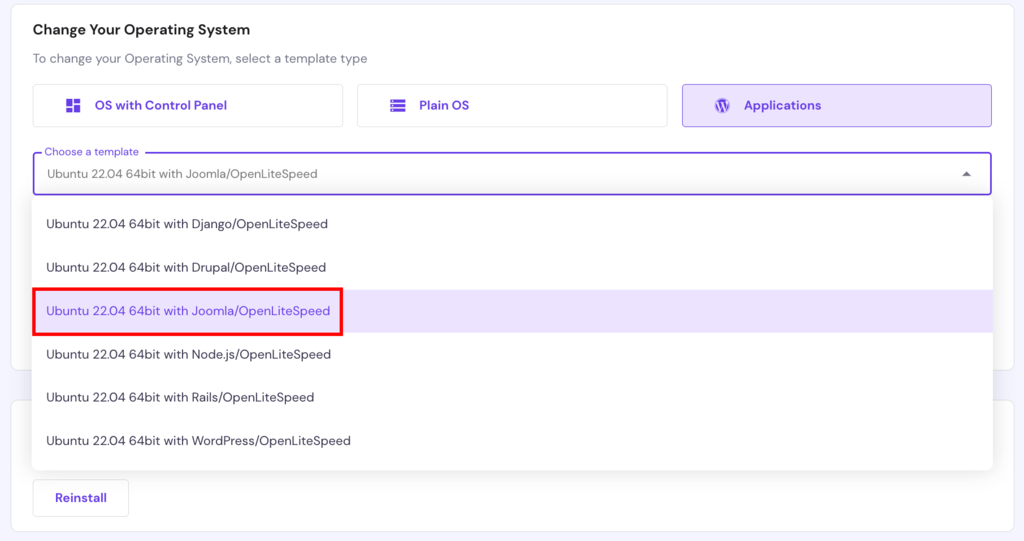
This process will overwrite your previous OS installation if you have one, so make sure to back up your files beforehand.

Creating a Website With Joomla
The following section will help you get familiar with Joomla basics and showcase how to perform various tasks from the Control Panel.
Adding Articles
Articles in Joomla refer to blog posts that users display on their websites.
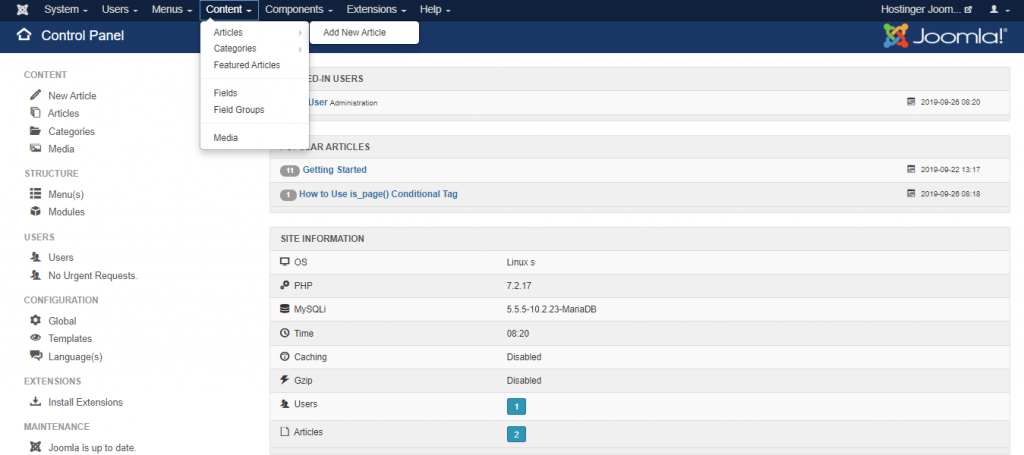
- To create one, access your admin panel and click Content -> Articles -> Add New Article.
- The window will bring up the WYSIWYG editor, where you can write and modify the article.
When you’re done, pick one out of the three provided statuses – Published, Unpublished, or Archived.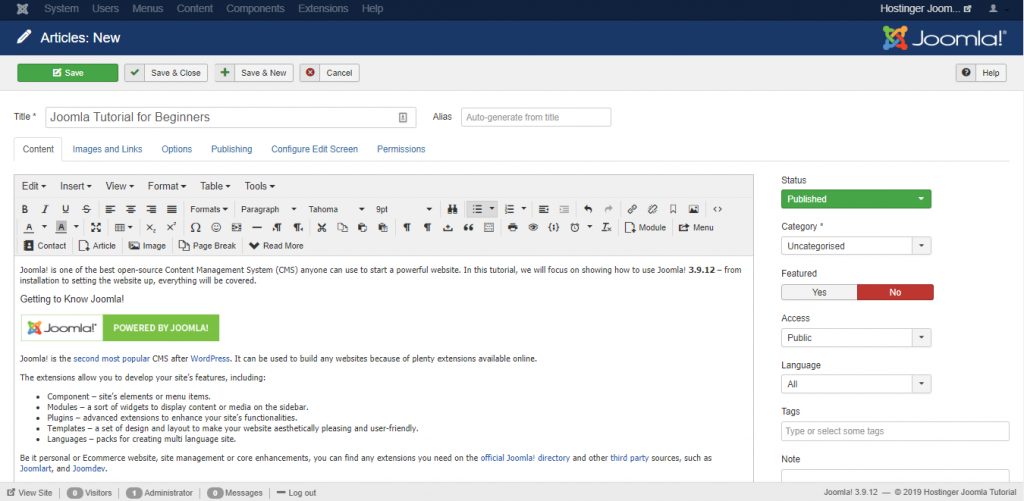
- Press the Save button or select Save & Close to be directed to the Articles page. Once the post is created, it’ll appear in the Latest Articles section of your website.
Creating Categories
A category in Joomla enables users to organize their posts based on relevant topics. If you plan to create a wide variety of content, creating categories will let people find information on your site easily.
In order to assign a category to your content, make sure to create them in advance:
- Click Content -> Categories -> Add New Category on the top-bar menu.
- Fill in the Title, Description, and Alias (optional).
- Select Save or Save & Close to create your new category.

In addition to assigning a category to a post, Joomla allows you to categorize other components, including banners, contacts, and web links.
Adding Featured Articles
To feature an article, navigate to Content -> Articles. There, you’ll see the list of published posts on your website. Simply click on the Star icon next to the desired article to make it featured.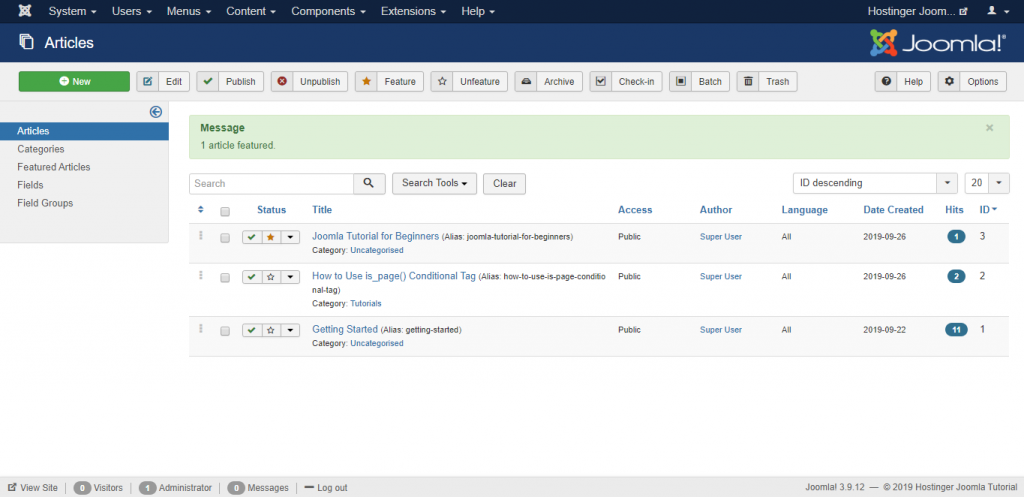
With this function, you can display and highlight specific posts from multiple categories on your home page.
Creating Menus
Joomla menus play an important role in defining your site’s structure and improving user experience. The more straightforward your site’s menu, the easier it will be for people to navigate your website.
You can display a featured articles page and other dedicated pages on your website by creating menus.
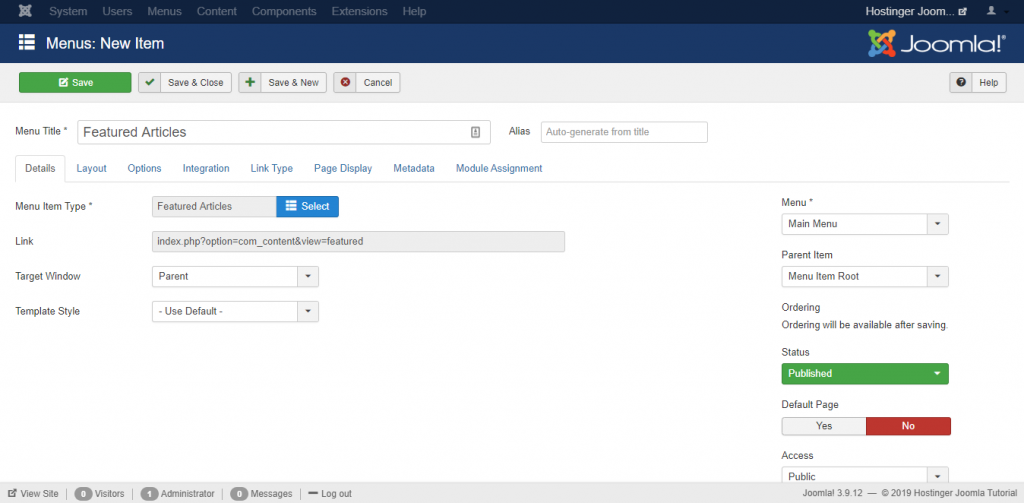
- Head over to the Menus -> Main Menu and choose the Add New Menu Item option.

- Type a title for your menu item, e.g., “Featured Articles” then define the Menu Item Type. For this Joomla tutorial, we’ll choose Articles -> Featured Articles.
- Select which Menu item will be displayed and press the Save or Save & Close button.
Now the new menu should be accessible from your website.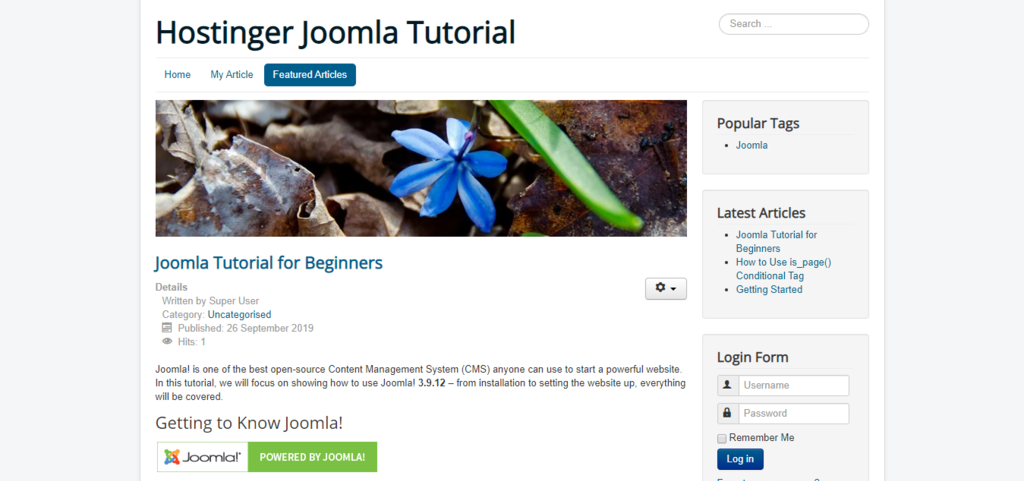
Aside from the Featured Articles menu, Joomla has other types of menu items you can set, including:
- Article Category Blog – shows categories of blog posts in a blog layout.
- Single News Feed – highlights one RSS feed.
- Contact Featured – displays a list of featured contacts.
- Search Results – enables a search form for visitors.
Creating Components
Components in Joomla refer to extensions that are responsible for the site’s main elements. They consist of two main categories – administrator and site.
The administrator side allows you to modify aspects of the components on the back-end. The site part works to render pages requested by your visitors.
This tutorial will show you how to create Joomla’s default components, such as News Feed, Contact Us page, and Banner.

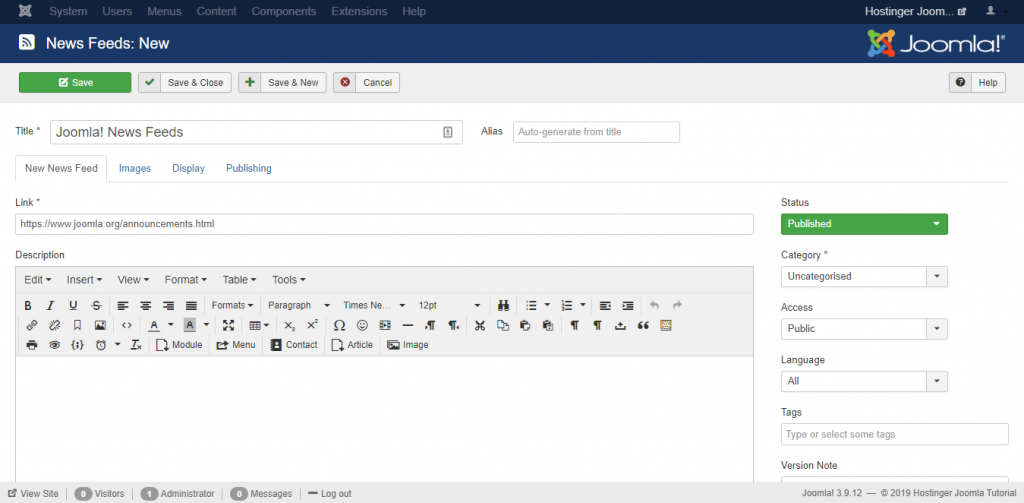
News Feeds
The News Feed Manager allows you to display news from other websites to your Joomla site.
- To get started, navigate to Components -> News Feeds -> Feeds.
- Click New, and fill in the required details – the Title, Link of the source you want to display, and the Category.
- Press the Save button.
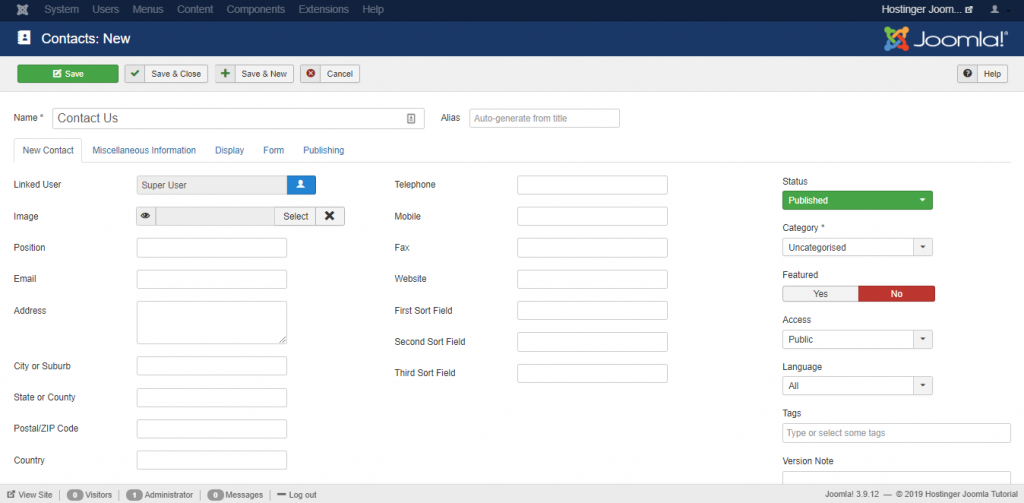
Contact Us Page
Another feature from Joomla that can help with user experience is the contacts component. It allows you to receive feedback from visitors and build engagement by creating a Contact Us page.
- To create a contact page, go to Components -> Contacts.
- Press New, and fill in your contact details.
- Use the Miscellaneous Information tab if you want to add a description.
- Save the page when you’re done.
Pro Tip
Create a Menu for the Contact Us page to make the contact form viewable and accessible from your main website.
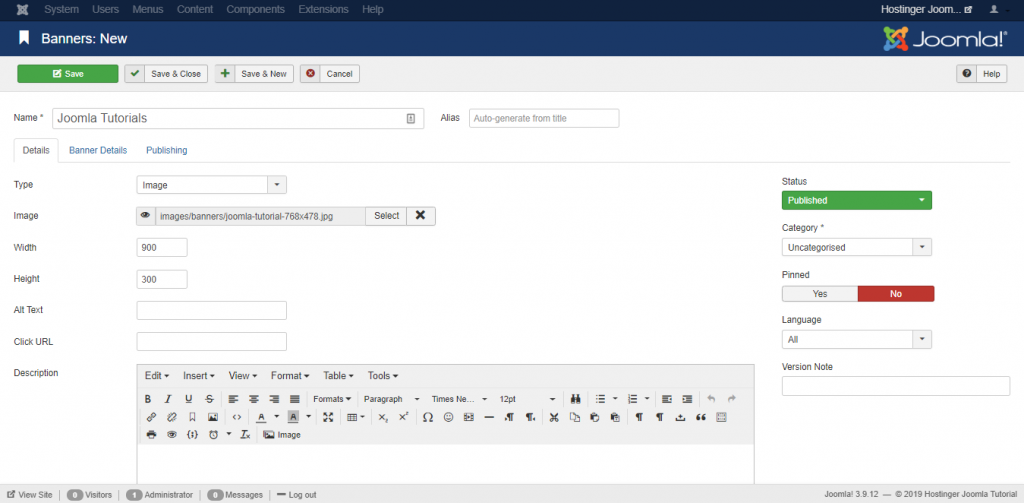
Banners
Joomla provides a banners component, enabling you to create and edit ad banners as well as image sliders or carousels.
- To create a banner, click on Components -> Banners -> Banners.
- Press New on the top-left and enter a name for your banner.
- Upload your image and fill in the optional details, such as the dimension, alt text, and description.
- Once you are done, press the Save & Close button.
To publish a new module and display your new banner, go to Extensions -> Modules. Press the New button.
A list of modules will appear – select Banners. Set the Title and Position for the module. Finally, Save your configuration.
As an example, we have added a featured image banner to the footer of our “Hostinger Joomla Tutorial” project.
In addition to the core components above, there are many more available on the Joomla extensions directory. Every extension serves a specific function, from the site’s structure and navigation to style and design.
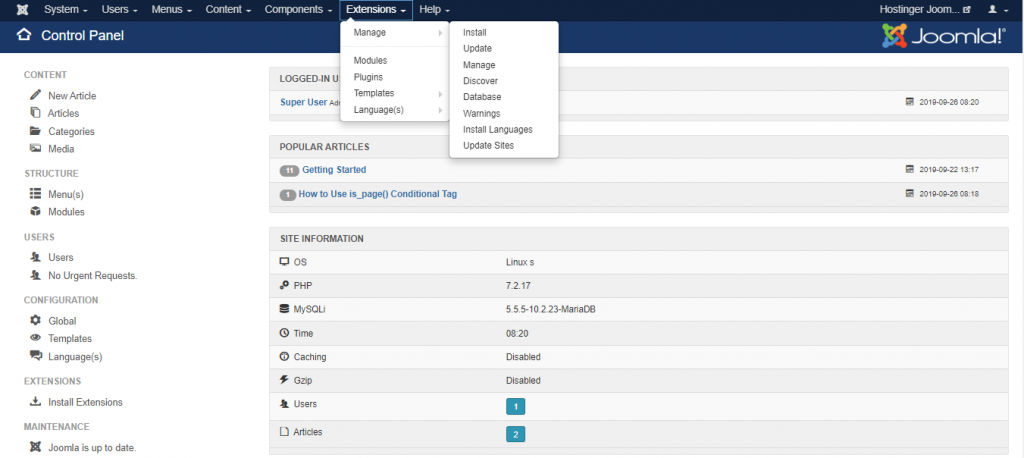
Installing Joomla Extensions
A Joomla extension refers to a software package that enhances website functionality.
You can manage your extensions through the Extensions -> Manage section.
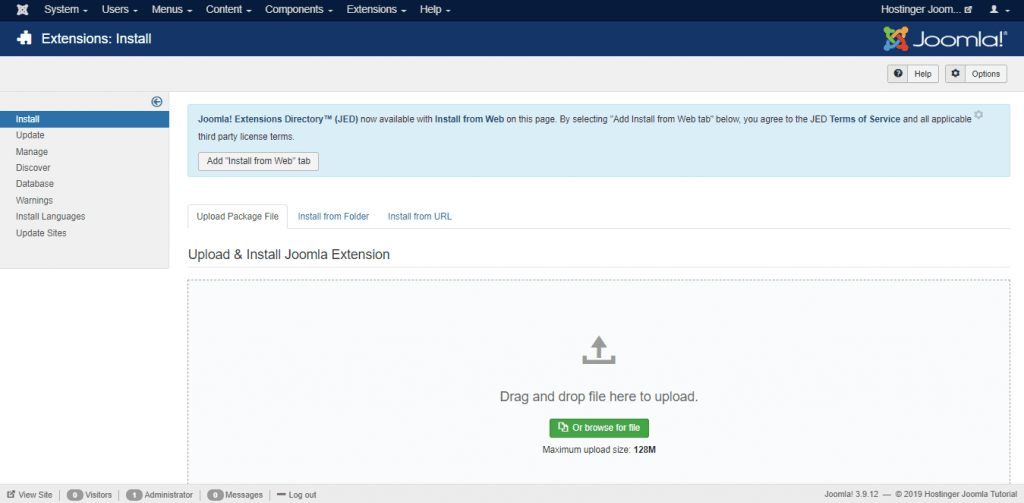
To perform a manual installation, follow these steps:
- Download the .zip package from the Joomla extensions directory.
- Go to Extensions -> Manage -> Install section.
- Click on the Upload Package File tab.
- Choose the file and upload the .zip archive.
Pro Tip
Enable the Install from Web tab to allow you to search and install any Joomla extensions without leaving the administrator panel.
With thousands of selections on the extension directory, finding the right one for your website can be a hassle. Below we have a list of the must-have extensions for your Joomla website to help you get started:
- AllVideos – allows you to embed internal or third-party videos and audios within your content. It also integrates with Unsplash to generate images for the audio files.
- Akeeba backup – creates an open-source backup of your website in a single archive. The AJAX-powered system helps to avoid timeouts during the backup and restoration processes.
- Admin Tools – fixes your files and directories permissions by enabling a password. The software also regularly notifies and installs a new version of Joomla.
- JSitemap – generates an XML sitemap to allow search engines to index your website better. It provides integration with Google Search Console and Google PageSpeed Insights.
Installing Joomla Templates
Joomla has plenty of free and paid templates available online, though not as many as WordPress or Drupal. The installation process of templates is almost identical to installing extensions.
- Download the template and head to Extensions -> Manage -> Install.
- Navigate to Extensions -> Templates -> Styles. Tap the Star icon next to the template you want to enable.
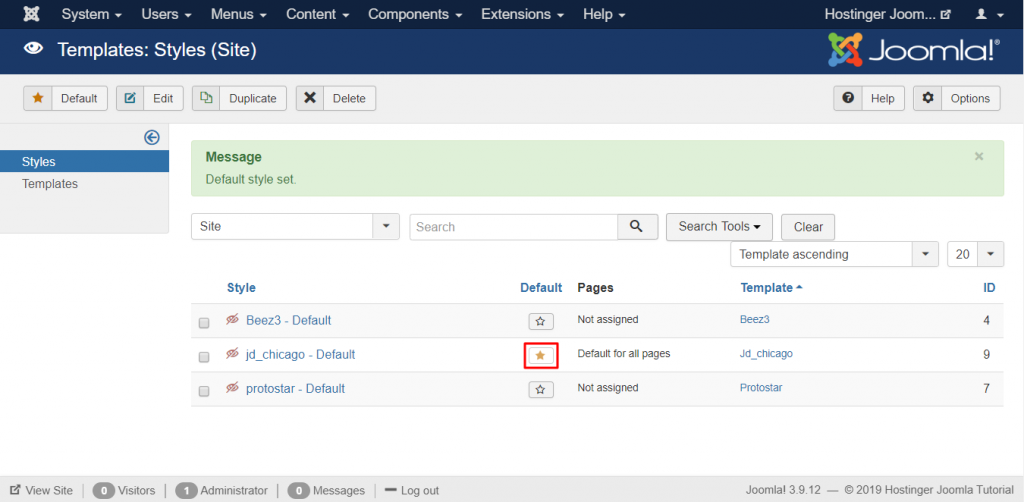
Clicking the star icon will activate the template as your default user interface, but you can apply different templates for your front-end and back-end.
The front-end template defines how your main website is presented to your visitors. Meanwhile, the back-end template controls how elements are displayed on the administration dashboard.
Backing Up Joomla
As a website owner, regularly backing up your website is an important task to do. With website backup, you can reverse changes made by technical or human errors without losing any data.
Some hosting services offer auto backup for your site’s files and databases regardless of what CMS you use. Hostinger automatically creates weekly or daily backups, depending on your hosting type.
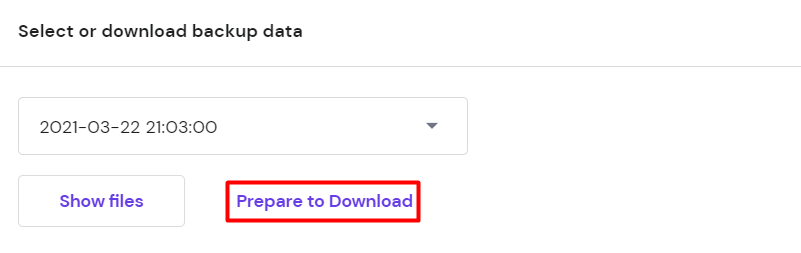
- To access and download these backups, log into the hPanel, go to Files and click Backups. It will present two backup options – MySQL database and website files. If you’re using CMS, like Joomla, you will need both backups.
- To download website files, click Files backups. As for databases, choose Database backups.
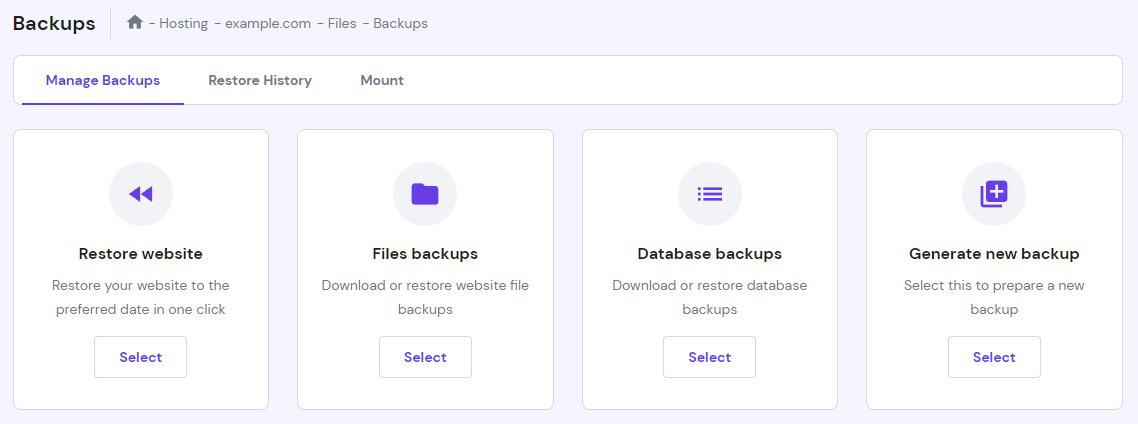
- Select the backup data you want to restore later and click Prepare to Download. The system will automatically start the download process and notify you once it’s done.
Alternatively, you can also backup up your Joomla files and databases on your own.
Backing Up Joomla Manually
To create a backup copy manually, you need to archive all of your Joomla files and databases first.
- Access the File Manager through your hPanel.
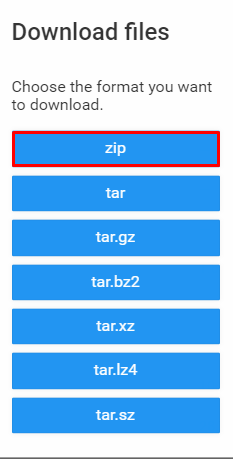
- Open your main Joomla installation folder and select the Download icon at the top menu.

3. Select the .zip file.
Pro Tip
Alternatively, you can use an FTP client. The process is straightforward – all you need to do is navigate to the Joomla folder, select all files and press the Download button.
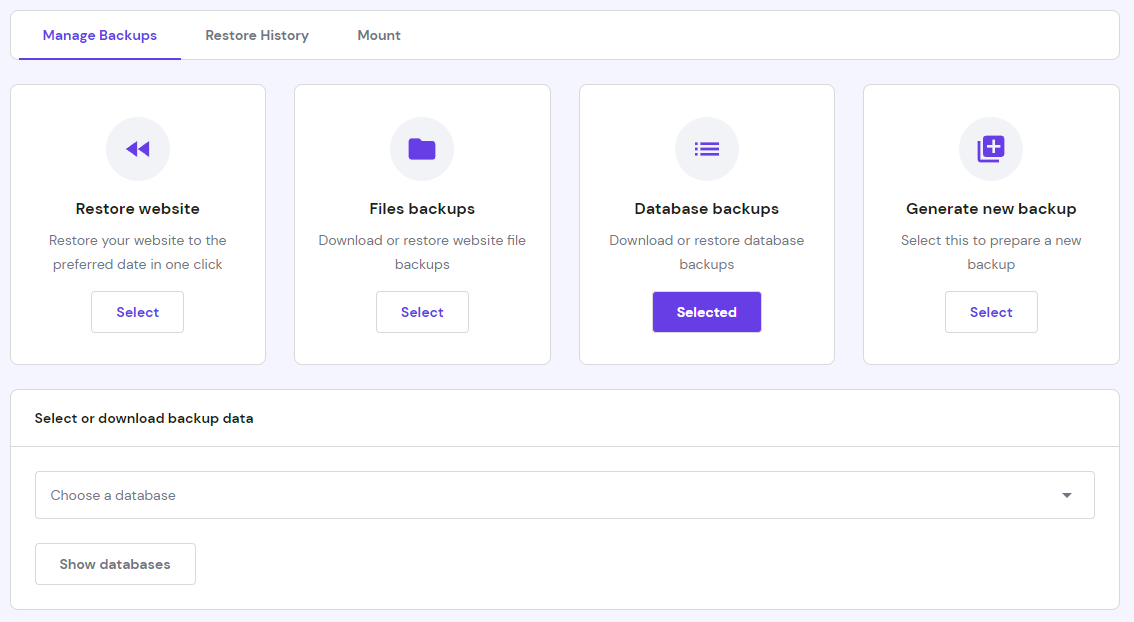
In Hostinger, you can create a database backup directly through the Files menu instead of using the phpMyAdmin tool.
- Access Files on your hPanel and select Backups.
- Click Select under the Database backups option and choose from the available databases.
Pro Tip
Find out which database Joomla uses by accessing the configuration.php file in the public_html folder.
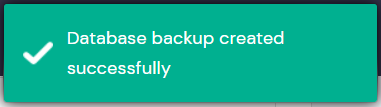
The system will start the backup process. Once it’s done, a successful backup prompt will appear on your screen.
Keep in mind that you can only generate one backup within 24 hours.
Also, every time you create a new one, it will automatically override the old backup files.
Using Akeeba to Back Up Joomla
Akeeba Backup is the most popular Joomla open-source extension. However, it’s not in the official directory, so you will need to download the extension from the official Akeeba website.
Follow the tutorials below to set it up:
- Navigate to Extensions -> Install to upload and install Akeeba via the Upload Package File tab.
- Go to Components -> Akeeba Backup.

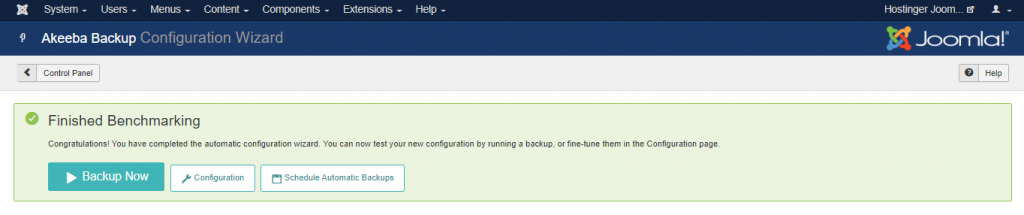
- Click the Configuration -> Configuration Wizard to activate a benchmarking wizard that will optimize the backup performance for your site.
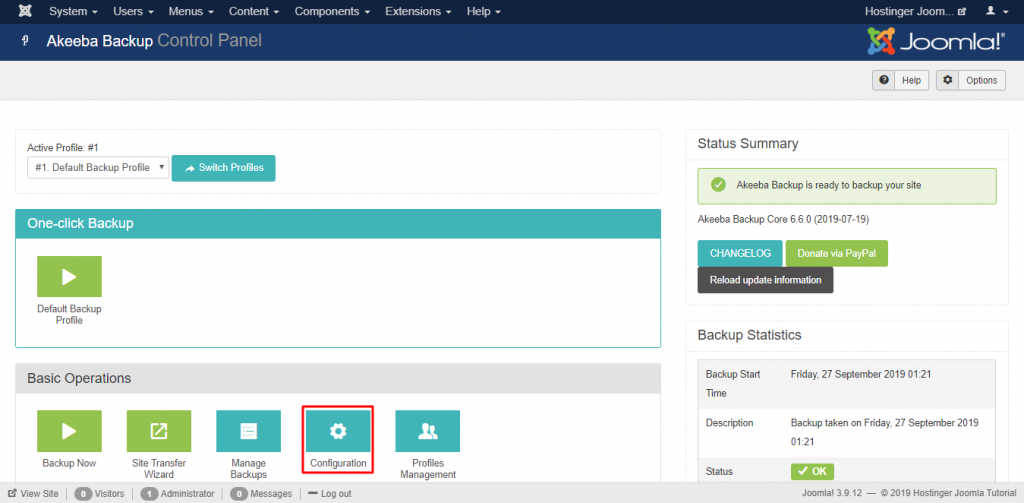
- Once the benchmarking process is done, you’ll be given three options:
- Backup Now – backs up your website straight away.
- Schedule Automatic Backups – sets the time and date to automate your backups.
- Configuration – changes the settings that the benchmarking wizard has set up.
Pro Tip
Once the backup is generated, we recommend keeping a local copy of your backup. Click on the Manage Backups and select the Download button to save it on your computer.
That said, the free package of Akeeba Backup doesn’t support remote backup via FTP, Google Drive, and Google Storage. It also limits you from generating separate backups for your database and site files. To enable such tasks, you can subscribe to its premium version for €50/year.
Updating Joomla
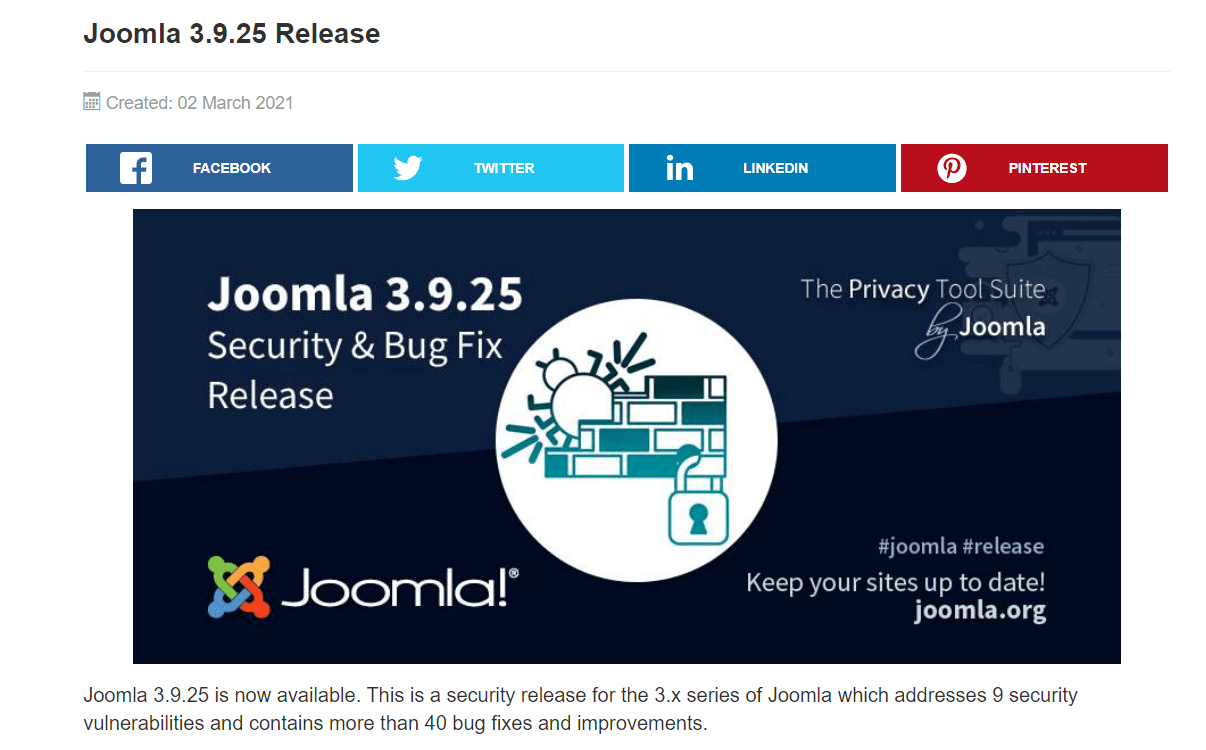
Keeping Joomla up to date is very important due to several factors:
- Security – Joomla regularly releases updates and examines vulnerabilities to keep your website secure.
- New Features – every time Joomla releases a new update, it comes with new features and changes to enhance your site’s functionality.
- Performance – the latest version of Joomla fixes bugs and technical issues, improving the website’s performance.
Every time you log in, Joomla will automatically check to see if any new versions are available.
You will see a new notification on the top of your control panel if there is a new version present in the official repository. It’ll contain the name of the update along with an Update Now button.
Click on the button to be taken to the Joomla update page. You’ll see the information regarding your current and new versions of Joomla. Click on Install to start the installation.
Important! It’s recommended to create a backup before you begin the update.
Speeding Up Joomla
Whether you’re running a business website or a personal blog, loading speed is one of the essential factors that determine user experience. Google also defines a site’s performance as a ranking factor that affects SEO (Search Engine Optimization).
A slow-loading web page can have a higher bounce rate. Additionally, it can impact the conversion rate by an average of 2.11% for each additional second.
With that in mind, we will show you two ways to improve your website’s performance and loading speed.
Enabling Gzip Compression
Compression is the process of decreasing file sizes, including HTML, CSS, PHP, and JavaScript. Gzip compression helps you decrease the total size of your website files, reducing your site’s loading time.
- To enable Gzip compression, go to System -> Global Configuration from your admin dashboard.
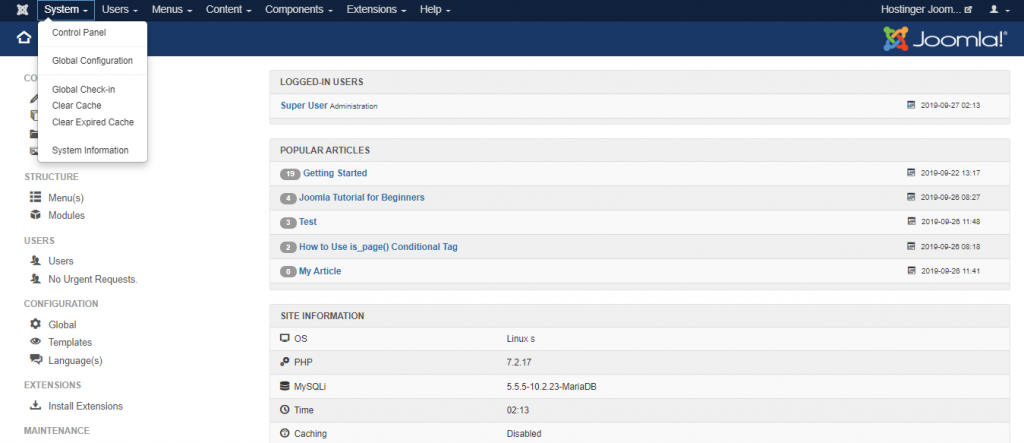
- Click on the Server -> Server Settings -> Gzip Page Compression. Select Yes and Save your changes.
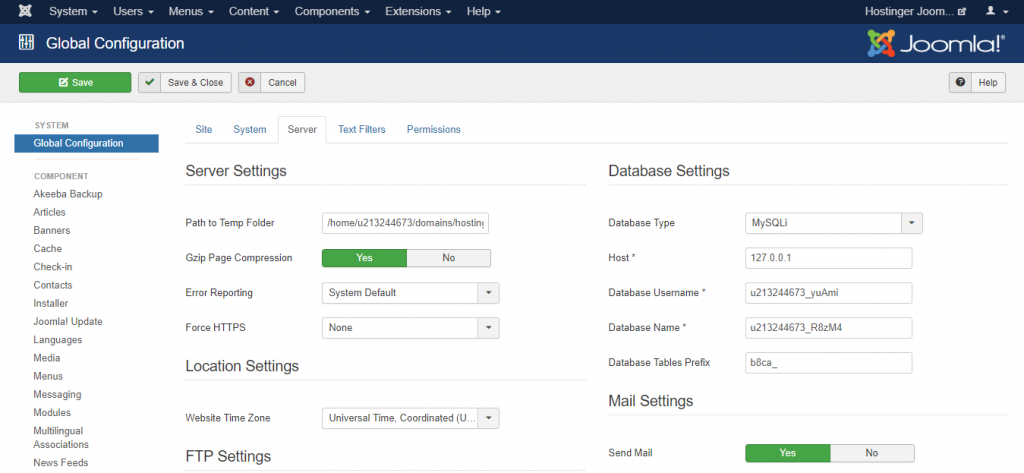
Gzip compression is now enabled for your website.
Activating the Default Joomla Cache
A cache is a temporary storage location that collects data, such as files, scripts, and images, to make websites load faster.
When people access your website, Joomla’s system automatically performs queries on your database to retrieve data from the internet and serve it to the visitors. As your database expands, hothe system will take longer to fetch this information.
By enabling caching, the system will retrieve files from the saved cache whenever people visit your site. This way, your website’s response time will be much faster.
To enable caching for your website, follow this tutorial:
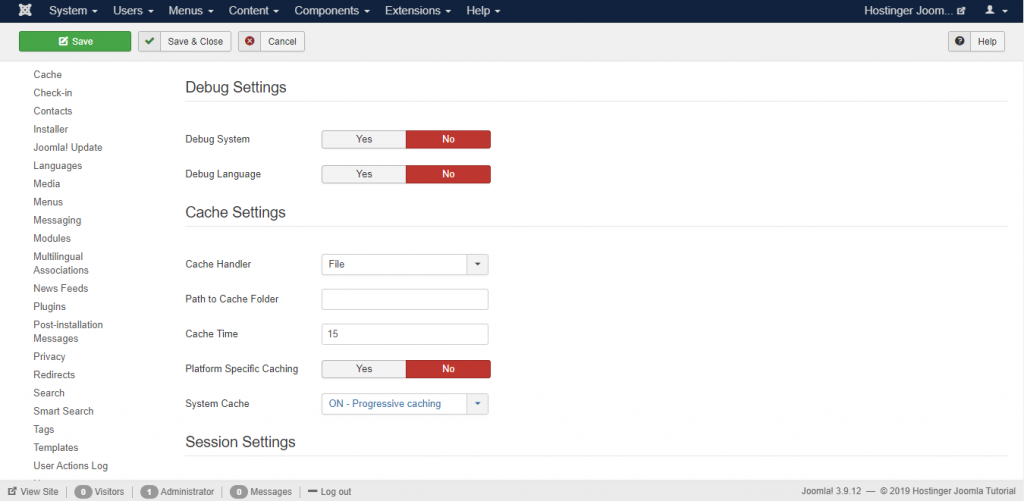
- Go to the same Global Configuration section and select the System tab.
- Under the Cache Settings, choose which Cache Handler you want to use. On most shared hosting providers, the File cache handler should be applied.
- Leave Path to Cache Folder empty unless you want to save cache files in a custom directory.
- Cache Time determines how long the cached content stays the same before updating – the default value is 15 minutes.
Pro Tip
If your website is frequently updated, then you can shorten the cache time value. Otherwise, you can increase the number.
- Leave Platform Specific Caching as No, unless you provide different HTML content on mobile devices.
- Turn on System Cache by selecting one of the two options available.
Pro Tip
Select Conservative Caching if you have a huge website. Otherwise, choose the default Progressive Caching option that is best suited for most Joomla sites.
- Save your changes.
Using Cache Plugins
Another way to enable caching is by turning on the cache plugin.
- To do this, proceed to Extensions -> Plugins.
- Find the Page Cache plugin through the search field. Tick the Status column with a green checkmark.
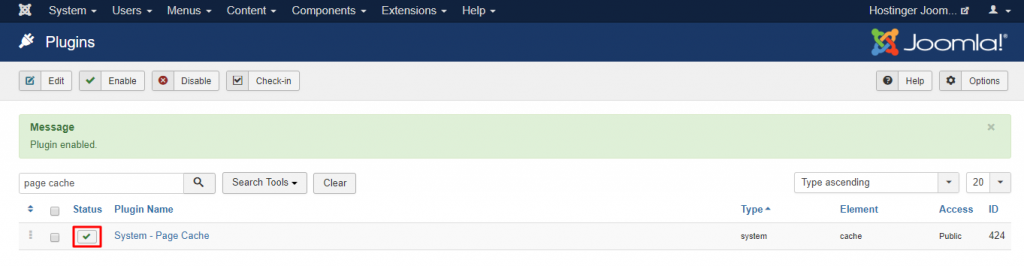
Having done this, your website’s loading speed should improve.
Pro Tip
For further optimization, it is also advised to serve scaled image.
Conclusion
Joomla is an open-source content management system that comes with powerful built-in features and functionality. Compared to other CMSs, this platform has several advantages, including:
- Advanced user management – allows multiple administrators to manage and control the site’s environment and configuration.
- Multilingual support – there is a built-in translation system, enabling you to produce multilingual content.
- Flexible templates – set different templates for your front-end and back-end interfaces.
Joomla has a steeper learning curve compared to WordPress. However, thanks to the ever increasing, widely available documentation, tutorials, and forums, learning Joomla has become more accessible.
All in all, we hope this article has helped you understand more about this platform. Once you’ve set up your Joomla website, don’t forget to perform backups, updates, and caching to optimize its performance.
Other Suggested Reading
Drupal Tutorial Explained for Beginners
12 Best Forum Software to Build an Online Community
Joomla FAQ
Here are some of the most frequently asked questions about Joomla.
Is Joomla Easy to Use?
Joomla is one of the easiest content management systems to use and most web hosts even offer a Joomla auto-installer. Joomla extensions help you expand the site functionality. To modify the website design, choose from free and premium templates available at marketplaces like TemplateMonster.
What Can You Do with Joomla?
You can create all kinds of websites with Joomla, like forums, portfolios, online stores, business websites, online magazines, and personal websites. Often you’ll need the appropriate extensions for the best results. There are over 5,000 extensions available, covering over 30 different categories.
How Do I Edit an Existing Joomla Website?
Log in to your Joomla admin panel. To edit published content, go to Content -> Articles to see the list of articles on your website. Click on the one that you wish to edit. After you finish editing, click Save and close.
Is Joomla Better than WordPress?
WordPress is arguably better than Joomla, thanks to its ease of use and a vast collection of themes and plugins. It also has a huge user community, making it easier to find help and support if you run into issues.
How Do I Switch a Joomla Template?
If you want to switch templates, go to Extensions -> Templates. This will take you to the Template Manager, where it’s possible to edit the template’s options, delete it or set a new template as default.

Nabilla is a website hosting and development enthusiast. She loves to share her knowledge with others in order to help them grow their online presence. When she's not busy writing, Nabilla enjoys exploring nature and going on adventures. She is passionate about helping people achieve their online goals.


Comments
5 responsesFebruary 20 2019
Thanks for all the info, very clear and useful
September 19 2020
Great!
March 27 2024
This article provides valuable insights on the importance of commenting your JavaScript code. Commenting not only helps you understand your own code better but also makes it easier for others to collaborate with you. It's a good practice to include clear and concise comments throughout your code to explain the purpose of each function, variable, or block of code. This can save you time in the long run and improve the overall readability and maintainability of your codebase.
March 29 2024
Nice post. This wasn't what I was looking for but I still enjoyed reading it.
March 30 2024
Nice post. This wasn't what I was looking for but I still enjoyed reading it.