How to add an email account on Mac to send and receive emails in Apple mail
Mar 10, 2026
/
Ariffud M.
/
6 min Read
Efficient email management is a vital part of professional communication. Part of this is adding an email account to your Mac Mail app, which is simple and hassle-free.
Whether setting up a new device or integrating a professional email into your workflow, understanding how to add an email account on Mac is essential.
This guide will walk you through configuring email on Mac Mail using Hostinger’s email hosting services. These plans not only provide the resources and reliability that modern businesses need but also ensure easy email setup and management on Mac. Let’s get started.
Download website launch checklist
How to Add an Email Account on Mac
From gathering your details to choosing your email account type and verifying your configurations, we’ll guide you through each step to add an email account to your Mac Mail app.
1. Collect Your Email Details
Before setting up email on Mac, ensure you have all the account information ready. This step prevents unnecessary interruptions and ensures a smooth setup. Make sure you have:
- Your email address – this is the credential you’ll use to log in and receive emails.
- Password – the secret key to accessing your email address.
- Incoming and outgoing server settings – these settings are vital for sending and receiving messages.
If you’re missing any of these details, there’s no need to worry. Reach out to your email provider or check their support resources for assistance.
Keep in mind that choosing a reliable email provider is crucial. Hostinger’s Business Mail plans cater to businesses of all sizes, offering mailing solutions starting at just CA$ 0.59/month. Meanwhile, web hosting customers can get a professional email service for free with their plan.
Hostinger offers handy features like email forwarding, aliases, anti-spam, and virus protection. We also ensure your account information and server settings are easily accessible for seamless integration with various email clients, including Mac Mail.

2. Add an Email Account in Mac Mail
Once you’ve gathered all the necessary details, it’s time to add an email account to Mail. For Hostinger customers, follow this step-by-step email setup for Mac tutorial:
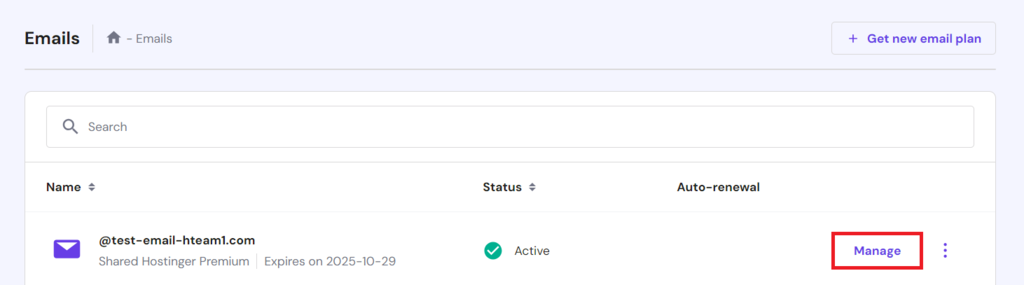
- Using the Safari browser, log in to your Hostinger account.
- Navigate to the Emails section and click on Manage next to your domain.
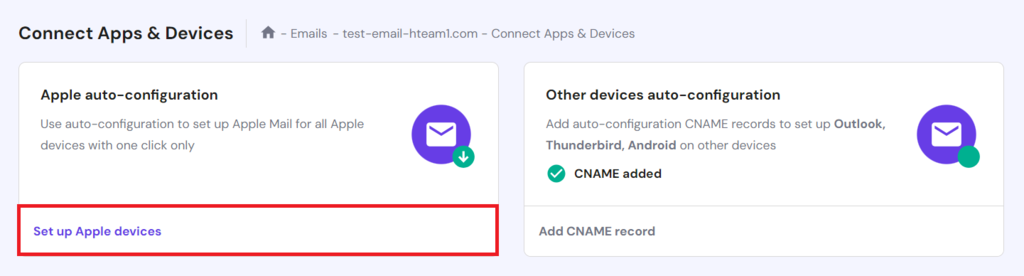
- Access Connect Apps & Devices from the left sidebar.
- Click on Set up Apple devices in the Apple auto-configuration section.
- Enter your name and select the correct email address. Then, click Continue.
- The following information will appear. Scan the QR code or click the Download profile button to save it to your Mac device.
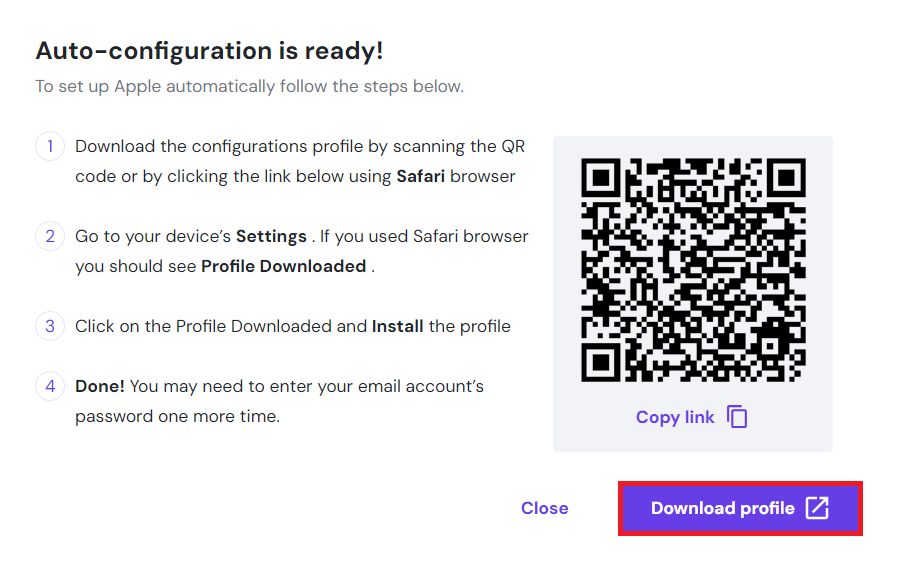
- Click on the downloaded file and follow the prompts to approve and install the profile.
- Open your Mac Mail app. If prompted, re-enter your email account’s password.
This completes the Mac email client setup. If the synchronization for your new email address doesn’t start automatically, wait a moment or restart the email client app.
Pro Tip
Setting up an email account on an iPhone or iPad with the Apple auto-configuration option follows a similar process.
If you prefer adding Hostinger email to Mac Mail manually, return to the Connect Apps & Devices page and access the Manual Configuration section. Here, you’ll find the POP3, IMAP, and SMTP protocols to use.

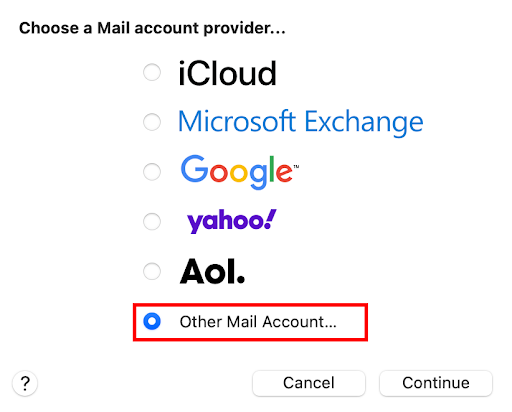
On your Mac device, go to Mail → Add Account. Choose Other Mail Account, then click Continue.
3. Enter the Account Details
After selecting your email provider, the Mac Mail app will take you to the Add a Mail Account panel. Here, enter the following information in the corresponding fields:
- Name – enter your full name or company name as you want it to appear on your outgoing messages, depending on the purpose of the mail account.
- Email Address – input the Mac email address for the account you are adding. Enter it accurately to prevent any login issues.
- Password – input the password associated with your email address, which is the same one used to access your email provider’s web interface.
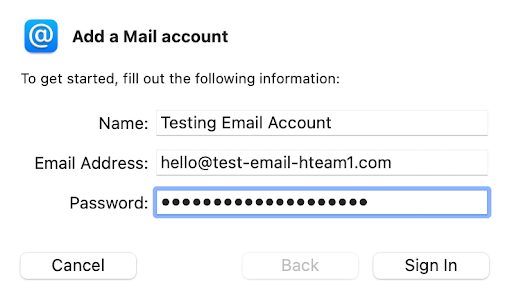
Once you’ve filled out these details, click Sign In to proceed.
4. Choose the Account Type
In the next panel, you may see the Unable to verify account name or password message. Don’t worry, as this prompt is common. The Mail app often can’t automatically detect the email subdomain and may require you to input server details manually.
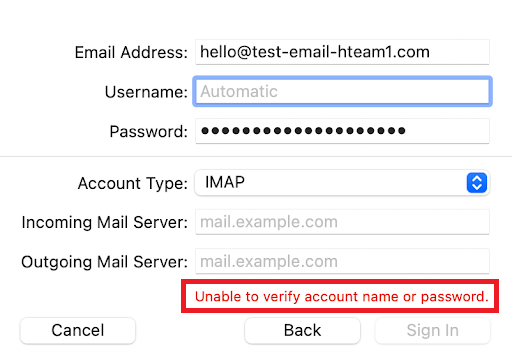
Now, select an account type. You have two options – POP3 or IMAP. Here are their key differences:
- POP3 – the POP3 protocol downloads your emails from the server to your mail client, but it doesn’t sync these actions back to the server. This could cause discrepancies between the inboxes on your various devices.
- IMAP – IMAP is generally the recommended method for accessing your emails. Unlike POP3, this account type synchronizes your messages across all devices. So, any actions you take in the mail client on your Mac will be reflected on your phone or tablet.
Hostinger’s email services are fully optimized for IMAP, ensuring consistent and reliable email management across all your devices. For smooth synchronization, especially when checking emails on multiple devices, it is advisable to choose IMAP as your account type.
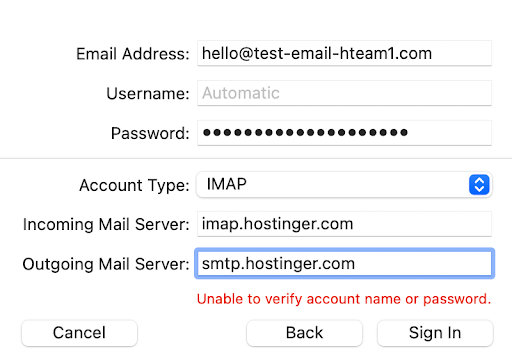
5. Set Up the Incoming Mail Server
The next step in setting up your Mac Mail is configuring your incoming mail server, which is essential for receiving emails. You can typically find these settings in your email service provider’s configuration section.
If you use Hostinger, input the following as your incoming mail server, depending on your account type:
- IMAP – imap.hostinger.com
- POP3 – pop.hostinger.com
Enter the corresponding address into the Incoming Mail Server field.
6. Configure the Outgoing Mail Server (SMTP)
Now, it’s time to set up your outgoing mail server. Simple Mail Transfer Protocol (SMTP) is the standard method for sending emails over the internet. Correctly entering the outgoing mail server information is vital for sending emails from your Mac.
For Hostinger customers, the outgoing server is smtp.hostinger.com. Input this address into the Outgoing Mail Server field.
Pro Tip
SMTP uses a variety of ports, such as 25, 465, and 587. Learn the differences between each SMTP port to determine which one you need to use.
7. Verify Your Account
After completing your IMAP and SMTP setup on Mac, double-check everything to prevent any errors that could obstruct the verification process. Then, click the Sign In button.
Once the Mac Mail email account configuration is complete, you will see a prompt asking which applications you’d like to sync with your email account. This enables you to select if you want to integrate your email with just the Mail app, the Notes app, or both.
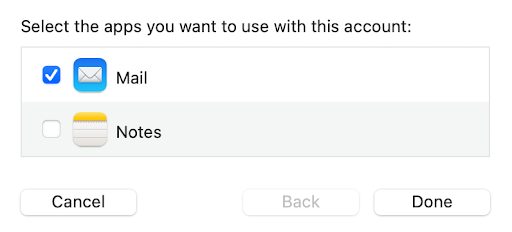
After making your selection, click Done to finalize the setup. As a test, try sending a personal email to and from your other mail account to ensure everything is set up correctly.
For enhanced security, we recommend enabling TLS/SSL encryption for your email communications, ensuring all data sent and received is encrypted. Follow these steps to adjust the settings:
- From your Mac Mail app, navigate to the Mail menu and click on Settings.
- Select Accounts and choose the email account for which you want to enable TLS/SSL encryption.
- In the Account Information tab, make sure the Enable this account option is checked.
- Navigate to the Server Settings tab.
- In the Incoming Server section, uncheck Automatically manage connection settings.
- Click the Use TLS/SSL checkbox and change the port to 993 for IMAP accounts.
- Next, in the Outgoing Mail Server section, uncheck Automatically manage connection settings.
- Check Use TLS/SSL and update the port to 465. Click Save to apply your changes.
While the default ports 143 (IMAP) and 587 (SMTP) can be used with TLS/SSL, they may initially connect without encryption. Using ports 993 and 465 eliminates this risk by establishing a secure, encrypted connection from the outset, adding another layer of protection for your email communications.
You can also back up your emails periodically from the Mac Mail app to external storage, ensuring you have a secure copy in case of data loss.
Conclusion
In this guide, you’ve learned the process of adding an email account to Mac Mail, enhancing your communication experience on a Mac device. By following the outlined steps, you’re equipped to manage your messages more efficiently and take full advantage of the Mac email account integration.
For those looking to elevate their email capabilities further, consider Hostinger’s business email plans. Starting at just $1.59/month, they provide features like auto-replies and advanced anti-virus, giving you a professional edge in email communication on the Mac Mail app.
Discover the perfect email plan for your needs by clicking the banner below. If you need assistance or have questions about the email account setup tutorial for Mac, our support team is ready to help in the comments section.
How to Add an Email Account on Mac FAQ
This section will answer the most common questions about how to add email accounts on Mac.
What Do I Need to Set Up an Email Account in Mac Mail?
To proceed with the Mac Mail account setup, you will need your email details, including the address, password, and your provider’s incoming and outgoing mail server information. These can typically be found on your provider’s settings page.
Can I Add Multiple Email Accounts to Mac Mail?
Yes, this app allows you to add multiple email accounts for convenient Mac Mail email account synchronization. Repeat the process for email configuration on Mac for each new email address to manage all your accounts in one place.
Is It Possible to Set Up a Business Email Account in Mac Mail?
Yes, adding business email to Mac is simple. Apple Mail supports business email accounts just as it does personal ones. You can follow the same Mac Mail email setup by entering your email details and server settings specific to your business email provider.

Ariffud is a Technical Content Writer with an educational background in Informatics. He has extensive expertise in Linux and VPS, authoring over 200 articles on server management and web development. Follow him on LinkedIn.


Comments
6 responsesNovember 26 2020
This is not working for me. Please help me resolve this.
February 09 2021
Hi there, Spencer! If you're not able to connect, I'd suggest checking with our Customer Success team - they'll be happy to check it out for you ;)
October 03 2021
You need to update this post because NO, This is broke on the Mac. Using OSX Big Sur and Apple Mail v14 You can try and save with just the server names (no ports) and it will neither send nor deliver. If you add the ports and SSL/TSL, and the username field, it won't save those setting will not persist in this version. So your description is obsolete. It works on the iPhone (using the QR code). you need to try this on Big Sur ...
October 05 2021
Hi, Apple Mail does not require ports or to specify SSL/TLS encryption. I have re-tested just now - it works well with the most recent update (OS Big Sur 11.6 and Apple Mail v14). If you're not able to connect, there might be issues with your email account itself, so I would suggest checking with your email service provider.
December 14 2021
didn't work for me =[
December 14 2021
Hi Bruno, sorry to hear that - if you're having any trouble, feel free to have a chat with your host. If you're hosting with Hostinger, you can reach our Customer Success live chat like so :)