Laravel commands: Top Artisan commands to know and how to create them
Jan 29, 2025
/
Alanas M.
/
10 min Read
Laravel is celebrated for its clean architecture and developer-friendly approach to web development. Yet, even in such a well-designed framework, tasks like creating files, managing databases, or debugging can slow you down.
That’s where Laravel Artisan comes in. This powerful command-line interface tool simplifies and automates these tasks, freeing you to focus on building exceptional features and delivering high-quality applications.
Getting started with Laravel Artisan
Laravel Artisan is the out-of-the-box command-line interface included in Laravel. It provides developers with a comprehensive suite of commands to generate code, manage databases, and optimize applications. By automating these tasks, Artisan helps you save time, maintain consistency, and streamline your workflows across projects.
Artisan works by using terminal commands, which allow you to interact with your Laravel project directly from the command line. Instead of manual actions, Artisan enables writing console commands that handle everything from scaffolding new code to performing maintenance tasks, making it an essential part of a Laravel developer’s toolkit.
Starting out with Artisan commands
Follow these steps to get started:
- Check if Laravel is installed. To do so, open your command line interface and run the following command:
php artisan
If Laravel is installed, this will return a list of all available Artisan commands:
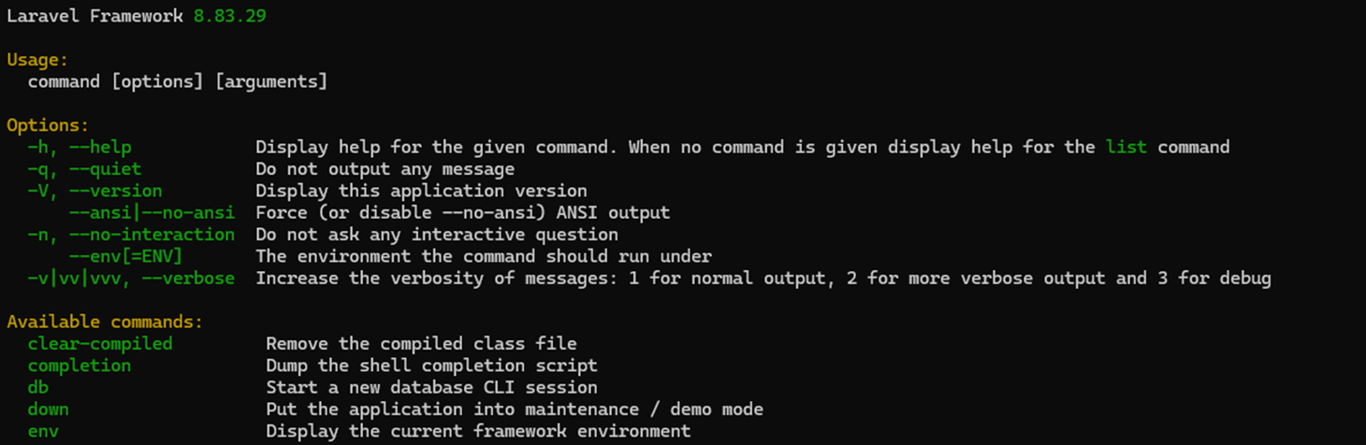
If the command throws an error, you will need to set up Laravel first.
- Navigate to the folder that hosts your Laravel project:
cd path-to-your-project
Change path-to-your-project with the actual path of your Laravel project.
- Run the php artisan list command to see a list of all the commands you can use. Each command comes with a short description explaining what it does.
- Run any Artisan command by typing php artisan followed by the command name. For example, this command will spin up a local development server:
php artisan serve
You can add the –help flag to any command to view the information about a command, including its description and the command parameters:
php artisan [command-name] --help
Top Laravel Artisan commands
Core commands
These commands allow you to efficiently set up the main components of your application, saving you from manually creating boilerplate code:
- Generate a new model class to represent a database table. Create models for interacting with database records, such as products, users, or orders.
php artisan make:model [ModelName]
- Generate a new controller class. Create controllers for managing user input and handling actions like logging in or updating profiles.
php artisan make:controller [ControllerName]
- Generate a new form request validation class. Handle form validation logic in a clean and reusable way, such as validating user registration input.
php artisan make:request [RequestName]
- Generate a new resource class for transforming data in API responses. Format and structure data when building APIs, such as defining how user details should be returned.
php artisan make:resource [ResourceName]
- Generate a new factory class for generating fake data. Create factories for testing purposes, such as generating fake product or user data for testing features.
php artisan make:factory [FactoryName]
- Generate a new database seeder class. Create seeders for populating your database with test data, such as creating a list of sample users or products.
php artisan make:seeder [SeederName]
Development and setup commands
These commands streamline the process of configuring your Laravel application, helping you manage databases, enforce request handling rules, and organize your project efficiently:
- Start a local development server for your Laravel application. If no input value is provided for the options such as host or port, it defaults to 127.0.0.1:8000.
php artisan serve --host=[IP] --port=[port]
- Apply all pending migrations to update your database schema. Make changes to your database, like adding tables or modifying columns, without manually writing SQL.
php artisan migrate
- Drop all tables and re-run all migrations.Reset your database during development, ensuring a clean slate for testing or rebuilding your schema.
php artisan migrate:fresh
- Execute database seeders to populate tables with sample data. Fill your database with test data, such as creating sample users or products for testing purposes.
php artisan db:seed
- Roll back the most recent batch of migrations. Undo recent changes to your database schema, such as removing a newly created table during testing.
php artisan migrate:rollback
- Generate a new middleware class. Define middleware for tasks like verifying user authentication or restricting access to certain routes.
php artisan make:middleware
- Create a symbolic link from the storage directory to the public directory. Make files in your own storage location accessible from the web, such as user-uploaded images.
php artisan storage:link
- Generate a new policy class for managing authorization logic. Implement rules for user actions, such as defining who can update or delete a specific resource.
php artisan make:policy [PolicyName]
Debugging and testing commands
These commands act as tools to diagnose problems, allow interaction with the application in real-time, and verify that everything functions as intended, ensuring a smoother development process:
- Display a list of all registered routes in the application. Review all available routes, including their HTTP methods, URIs, and associated controllers, which is helpful for debugging routing issues.
php artisan route:list
- Open an interactive REPL (Read-Eval-Print Loop) for your Laravel application. Interact with your application directly, test queries, or debug logic without modifying your codebase.
php artisan tinker
- Run all PHPUnit or Pest tests in your application. Validate your application’s functionality and ensure that features are working as intended before deploying.
php artisan test
- Display the current application environment (e.g., local, staging, or production). Verify the environment your application is running in, which is useful for debugging configuration issues.
php artisan env
- Clear all cached configuration files. Force the application to reload configuration settings after changes are made.
php artisan config:clear
- Clear all cached view files. Resolve issues caused by outdated templates or compiled views after updating your Blade files.
php artisan view:clear
Optimization and deployment commands
These commands help ensure your application is fast, reliable, and ready for production while also providing tools to manage downtime during updates:
- Optimize your application by caching routes, views, and configuration files. Use this command before deploying your application to enhance performance by reducing runtime overhead.
php artisan optimize
- Cache your configuration files for faster access. Speed up the loading of configuration settings in the production environments.
php artisan config:cache
- Cache all registered routes. Improve performance by reducing the time it takes to load routes during runtime.
php artisan route:cache
- Compile all Blade view files into cache. Precompile views and ensure faster rendering in production.
php artisan view:cache
- Clear the application cache. Refresh the cache when changes aren’t reflected in your application.
php artisan cache:clear
- Process jobs from the queue. Handle queued tasks, such as sending emails or processing file uploads.
php artisan queue:work
- Put the application into maintenance mode. Use this before deploying updates to prevent users from accessing the application during maintenance.
php artisan down
- Bring the application out of maintenance mode. Restore user access after maintenance tasks are completed.
php artisan up
This is not an extensive list of all Artisan commands, as there are many more. However, these commands will likely be the main ones you interact with while using Laravel.

Creating custom Laravel Artisan commands
While built-in Artisan commands cover many scenarios, there are times when your project requires more specific functionality. Custom commands allow you to extend Laravel’s capabilities, turning repetitive or complex processes into reusable tools.
Some examples of when custom commands are particularly useful include:
- Automating repetitive jobs: You can automate manual tasks like deleting old records, cleaning up unused files, or resetting system data, and focus your time where it matters.
- Managing complex processes: You can streamline multi-step workflows, such as data imports, scheduled maintenance tasks, or generating backups with a single command.
- Creating tools for specific needs: Custom commands are as flexible as you make them, so you can always make them fit your use case.
Custom Artisan commands allow you to turn unique application needs into efficient, maintainable, and easily executable solutions, making your development process more streamlined and scalable.
Let’s break down the process of creating a custom Artisan command, from generating the file to testing it in your application.
1. Generate a new command
To create a new command for Artisan, we start by generating the command file. Artisan has a helpful command to make this file quickly:
php artisan make:command MyCustomCommand
This will create a new file with a name matching the one you specified in the app/console/commands directory. For example, running the command above generates a file named MyCustomCommand.php.
Here’s how the generated new command class looks like:
namespace App\Console\Commands;

use Illuminate\Console\Command;

class MyCustomCommand extends Command
{
    /**
    * The name and signature of the console command.
    *
    * @var string
    */
    protected $signature = 'command:name';

    /**
    * The console command description.
    *
    * @var string
    */
    protected $description = 'Command description';

    /**
    * Execute the console command.
    *
    * @return int
    */
    public function handle()
    {
        //
    }
}
This file provides the structure you need to define your custom command. Here’s a quick breakdown of the key properties in the generated command class:
- $signature: Specifies the name of the command that you’ll use in the command line interface. You can also define input arguments and options here and assign default values to them.
- $description: Provides a short explanation of what the command does. This is what you will see when you run php artisan list or php artisan help.
- handle(): Contains the custom command logic. This is where you define the task the command will perform.
2. Define command properties
After generating your command, the next step is to give it a name, define any arguments or options it needs, and describe what it does. These are set in the $signature and $description properties.
In this example, we’ll create a command that sends a notification to a user:
protected $signature = 'user:notify {user_id} {--force}';
protected $description = 'Send a notification to a specific user, with an optional force flag';
Syntax for Defining Arguments and Options
- Arguments: {argument_name}
- Define required inputs for your command. Arguments are mandatory unless wrapped in square brackets ([ ]), making them optional.
- Example: {user_id} requires a value like 42.
- Options: {–option_name}
- Define optional inputs or flags to alter how the command behaves. You can also specify values for options using =.
- Example: {–type=} allows you to pass an optional value (e.g., –type=email).
Setting these properties properly makes your command intuitive and effective in fulfilling its purpose.
3. Implement the handle() method
The handle() method defines the core functionality of your custom command. This code runs every time the command is executed, making it the heart of your command’s functionality.
In our notification command example, here’s how the handle() method could look:
public function handle()
{
    // Step 1: Retrieve argument and option method values
    $userId = $this->argument('user_id'); // Get the user_id argument
    $force = $this->option('force');     // Check if the --force option is used

    // Step 2: Validate input
    $user = User::find($userId);         // Find the user by ID
    if (!$user) {                        // Handle missing user
        $this->error('User not found!'); // Write error message text
        return Command::FAILURE;         // Exit with failure exit code
    }

    // Step 3: Confirm action (if --force is not used)
    if (!$force && !$this->confirm('Do you really want to notify this user?')) {
        $this->info('Command cancelled.');
        return Command::SUCCESS;         // Exit cleanly as no error occurred
    }

    // Step 4: Perform the task
    Notification::send($user, new CustomNotification()); // Send the notification

    // Step 5: Exit gracefully
    $this->info('Notification sent successfully!');      // Provide success feedback
    return Command::SUCCESS;                             // Exit with successful exit code
}
Step-by-step breakdown:
- Retrieve argument and option method values. The command retrieves the user supplied arguments and options for your command.
- Validate input. Using User::find($userId), the command checks if the specified user exists. If not, it outputs an error message through the error method and exits with Command::FAILURE.
- Confirm action. Unless the –force flag is provided, the command prompts the user to confirm whether they want to proceed using the confirm method $this->confirm().
- Perform the task. The Notification::send() method is used to notify the specified user.
- Exit gracefully. The command outputs a success message using $this->info() and exits with Command::SUCCESS.
And now we have the entire Artisan command defined, just about ready for use.
4. Register the command
After creating your custom command, you need to ensure it’s registered in Laravel so it can be executed. Laravel automatically registers commands stored in the app/Console/Commands directory. To confirm this, you can run:
php artisan list
If your command appears in the list, it’s already registered. However, if your command is stored elsewhere or doesn’t appear in the list, you’ll need to register it manually in the Kernel.php file.
The Kernel file, located in the app/Console directory, is a PHP file that acts as the central hub for managing Artisan commands. It tells Laravel which commands to load and ensures they are ready for use.
Beyond registering commands, Kernel.php also manages task scheduling, making it an essential part of your application’s command-line operations.
Registering your custom command manually
- Navigate to the app/Console directory in your Laravel project and open the Kernel.php file in your code editor. This file is where you’ll register any custom commands not detected automatically.
- Inside the Kernel class, find the commands() method. This method is where Laravel expects a list of manually registered commands. By default, it looks like this:
protected function commands()
    {
        $this->load(__DIR__.'/Commands');

        require base_path('routes/console.php');
}- Add the fully qualified class name of your custom command to the command method. For example:
protected function commands()
{
    $this->load(__DIR__.'/Commands');

    // Explicitly register a command
    $this->commands([
        \App\Console\Commands\MyCustomCommand::class,
    ]);

    require base_path('routes/console.php');
}- Ensure the namespace matches the location of your command. If your command is stored in a custom directory, update the namespace accordingly.
Important! Ensure that your class name defined in your custom command and your file name match. If they do not, Laravel’s autoloader won’t detect your command properly!
- After adding your command, save the Kernel.php file to apply your changes.
- Run the php artisan list command to list every existing artisan command, then look for your command’s name and description in the output:

If your command doesn’t appear in the list after saving your changes, you may need to clear your cache by running php artisan optimize:clear.
5. Run and test the custom command
Testing your custom command ensures it functions as intended and handles different scenarios correctly. Follow these steps:
- Execute your custom command in the terminal as you defined it. In our example, that would look like this:
php artisan user:notify 42
Replace 42 with a valid user ID to see if it works under the intended circumstances.
- If you have optional flags defined, run the command when using them to see if the behavior changes. In our example:
php artisan user:notify 42 --force
- Check if the expected task you defined in your handle() method is completed.
- Check if the terminal is accurately displaying output based on what you defined.
- Check for invalid inputs to see if your command handles errors gracefully. For example, we could try a non-existent user ID:
php artisan user:notify 99999
Based on our handle() method, this should return the error User not found!
Be sure to test your command thoroughly, especially in scenarios that mimic its intended real-world usage. Extensive testing ensures your command is reliable and meets the needs of your application.
Conclusion
Laravel Artisan is an essential tool for every Laravel developer. It helps you automate tasks, manage workflows, and simplify complex processes. Its built-in commands streamline development, while custom commands enable you to solve problems unique to your application.
By mastering Artisan, you’ll not only save time but also improve the quality and consistency of your code.
Laravel commands FAQ
What are common Laravel commands?
Some commands are php artisan make:model ModelName, which creates a new model, php artisan migrate, which runs migrations and php artisan route:list, which lists all the routes in your application.
How do I create a new Laravel project using the command line?
You can use Composer to create a new Laravel project. An example command could be composer create-project laravel/laravel project-name, where project-name would be the name of your Laravel application.
What is the command to run migrations in Laravel?
To run migrations in Laravel, use php artisan migrate. This command applies all pending migrations to your database, creating or updating tables as defined in your migration files.
All of the tutorial content on this website is subject to Hostinger's rigorous editorial standards and values.

Alanas is a Content Writer with a foundation in IT and Operations. His expertise spans cloud engineering, DevOps, and process definition and optimization, gained through his experience in fintech and data-driven organizations of various sizes. Outside of work, he enjoys traveling, exploring history, gaming, and spending quality time with his family. Find him on LinkedIn.