How to port forward a Minecraft server
Dec 24, 2025
/
Ignas R. & Paulius Z.
/
5 min Read

Port forwarding a Minecraft server requires mapping your local machine’s IP address and the game’s port number within your router settings. This enables other players to connect to the locally hosted game server and play in multiplayer mode.
To successfully set up a multiplayer server, follow these five steps:
- Identify network details. Locate your device’s unique local address and the router’s gateway.
- Adjust server settings. Define which port the Minecraft application will use.
- Update firewall rules. Permit incoming connections through your computer’s security system.
- Create router rules. Map the game port to your internal IP address.
- Launch and connect. Restart the application and share your public IP with other players to connect to the server.
Find your IP address and default gateway
Finding your computer’s IP address and default gateway is the first step in forwarding your Minecraft port. This is because your router requires a precise destination to direct external game traffic to the machine where the Minecraft server is running.
An IP address, or specifically an IPv4 Address, is a unique numerical label assigned to your computer that enables other devices to identify it within the local network.
Without the IP address, the router cannot forward the traffic to the correct system because it can’t distinguish your Minecraft server from smartphones or laptops that are also connected to the local network.
Meanwhile, the default gateway is the IP address of your router, which serves as the access point into your local network. When a user connects to your Minecraft server, it uses this address to identify the router, which then forwards the request to the corresponding IP address within its local network.
Here is how to find the IP address and default gateway on Windows. After obtaining them, we’ll continue to set up a static IP address to ensure players can connect to your Minecraft server using the same address:
- Press Windows + R and type cmd. Hit Enter.
- Type this command and press Enter:
ipconfig
- Find the addresses next to IPv4 Address and Default Gateway.
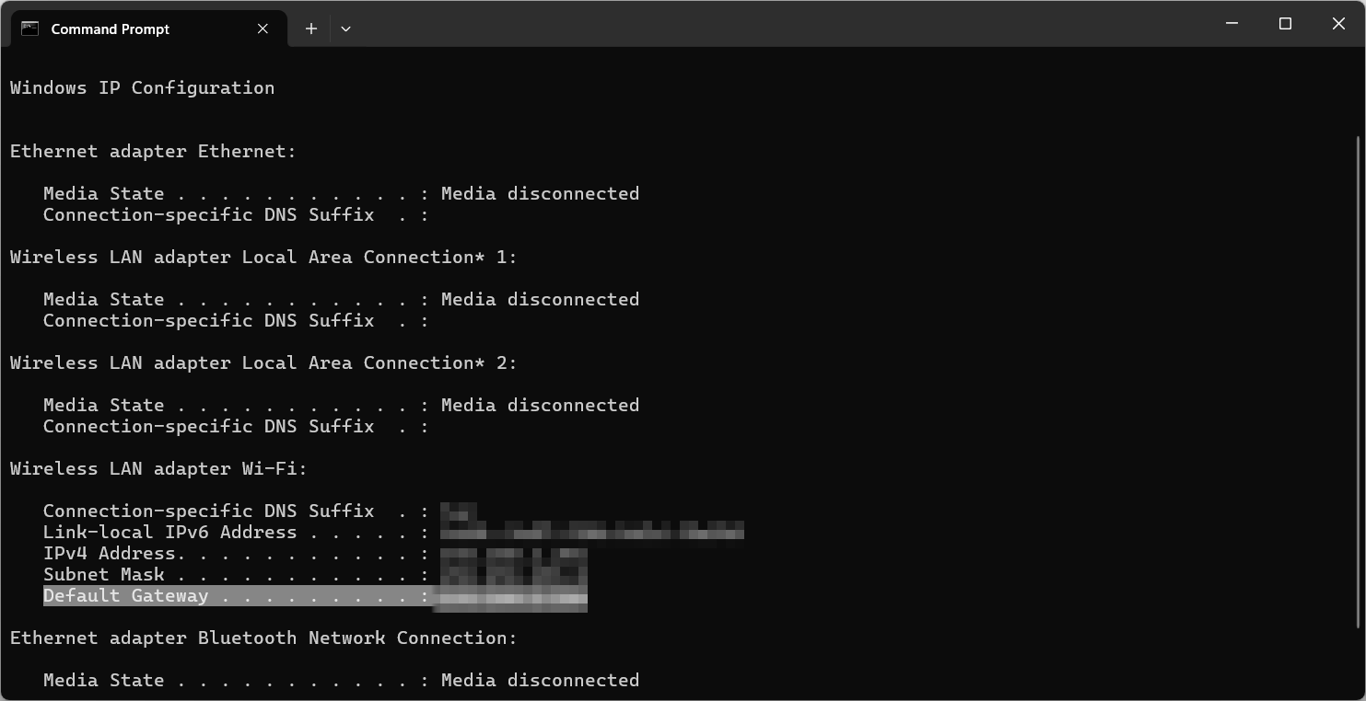
- Close the Command Prompt.
- Hit Ctrl + R again and enter ncpa.cpl.
- Right-click your network connection, select Properties, locate Internet Protocol Version 4 (TCP/IP), and hit Properties again.

- Select the Use the following IP address option.
- Enter the IP address and default gateway you obtained earlier in their corresponding fields. For the subnet mask, 255.255.255.0.
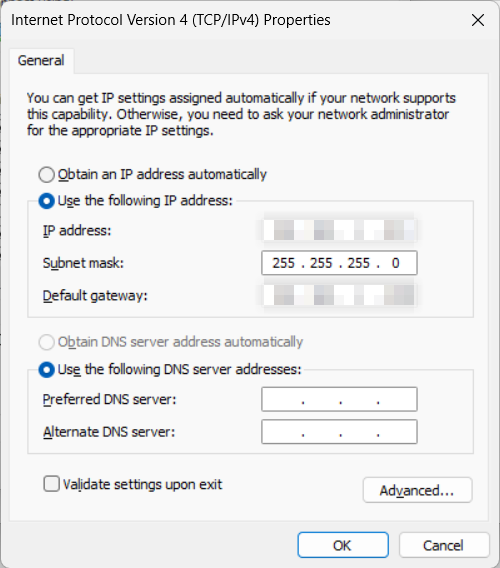
- Click Ok to save the changes.
Meanwhile, the steps look like this on macOS:
- Open Terminal.
- Type the following command and press Enter to identify your router’s default gateway:
netstat -nr | grep default
- Enter the following command in the same terminal window to find your computer’s IP address. Replace en0 with en1 if you use Ethernet:
ipconfig getifaddr en0
- Go to System Settings → Network.
- Find the network you’re using and click Details.
- Go to the TCP/IP tab and expand the Configure IPv4 drop-down menu.
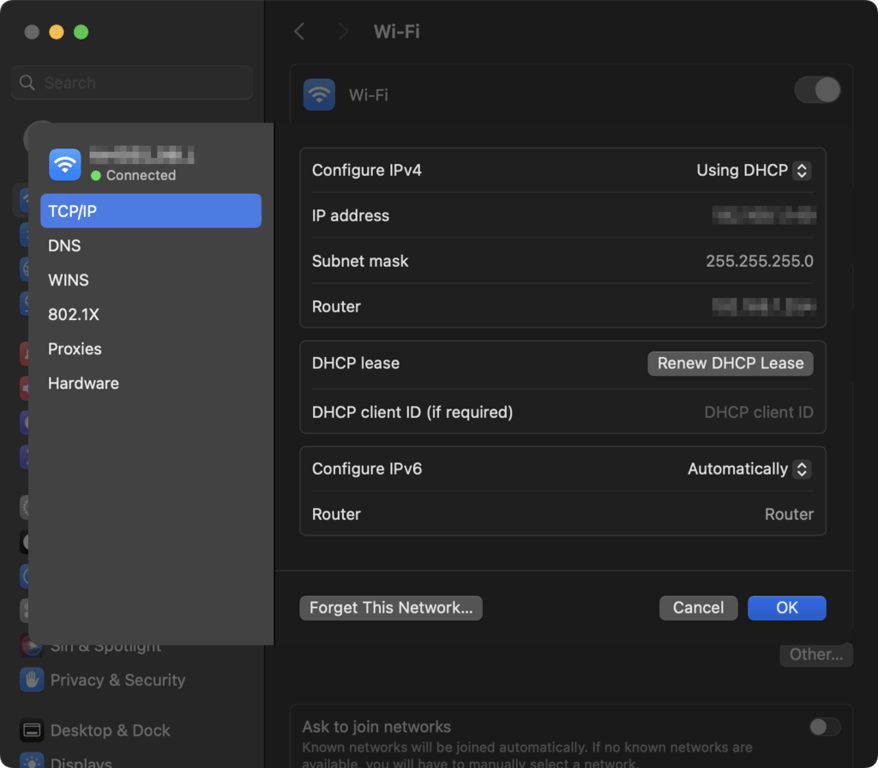
- Select Using DHCP with manual address, and fill out your preferred IP address. For the router address, we recommend using 0.
- Click OK to save the changes.
If you use Linux, the procedure is as follows. Note that since we are using Ubuntu, the commands might differ slightly depending on your distro:
- Open your terminal.
- Run the following command to find the gateway:
route -n | grep "^0.0.0.0" | cut -d ' ' -f 10
- In the same shell, run this command to find your computer’s IP address:
hostname -I

- Open your computer’s network configuration by running the following. If you can’t find the file, the name or location might be different:
sudo nano /etc/netplan/01-netcfg.yaml
- Change the Routes parameter to the default gateway value obtained earlier, and Addresses to your preferred IP address.
- Save the changes by pressing Ctrl + X, Y, then Enter.
Configure the Minecraft server port
Configure the Minecraft server port to ensure it listens for incoming data on the correct channel. Depending on your Minecraft version, the port to use differs:
- Java Edition: 25565 (TCP)
- Bedrock Edition: 19132 (UDP) for IPv4, and 19133 (UDP) for IPv6
To do this, locate and edit your Minecraft server properties file by following these steps:
- Locate the server.properties file on your computer. This differs depending on your operating system and installation path.
- Right-click the file and open it with a text editor like Notepad.
- Locate the line server-port and ensure it matches the correct default port for your specific game version. Otherwise, change the value accordingly.
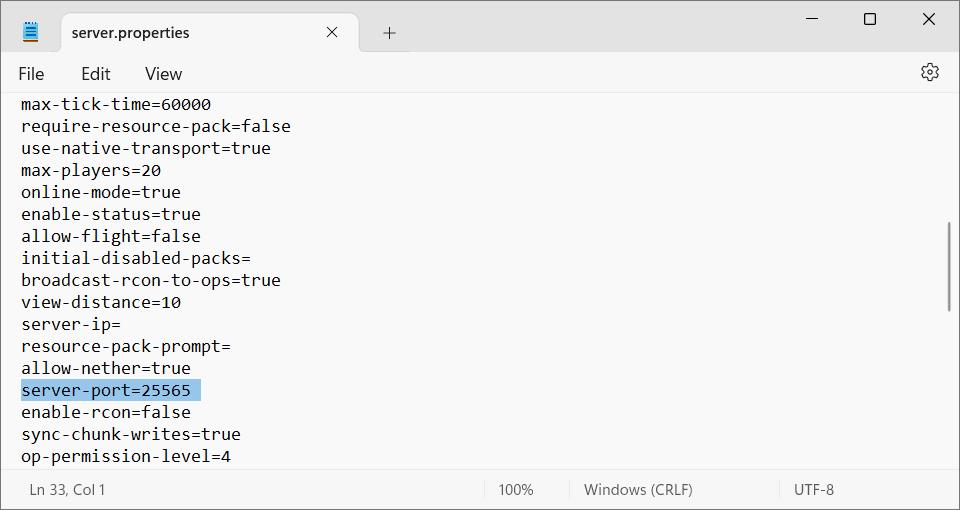
- Hit Ctrl + S to save the changes.
Technically, you can change the default Minecraft port to any number between 1 and 65535. However, it’s not recommended as it may conflict with another network service if you are unsure whether the port is free.
Moreover, using non-default ports requires every player to manually type the port number after the IP address to connect, which makes the process more complicated.
Allow the Minecraft port through the firewall
Allowing the Minecraft port through the firewall enables other players to connect to the game server running on your computer. This is crucial because your operating system’s security software is designed to automatically drop unsolicited incoming packets to prevent unauthorized access.
Here’s how to set up your Windows firewall to allow the Minecraft port:
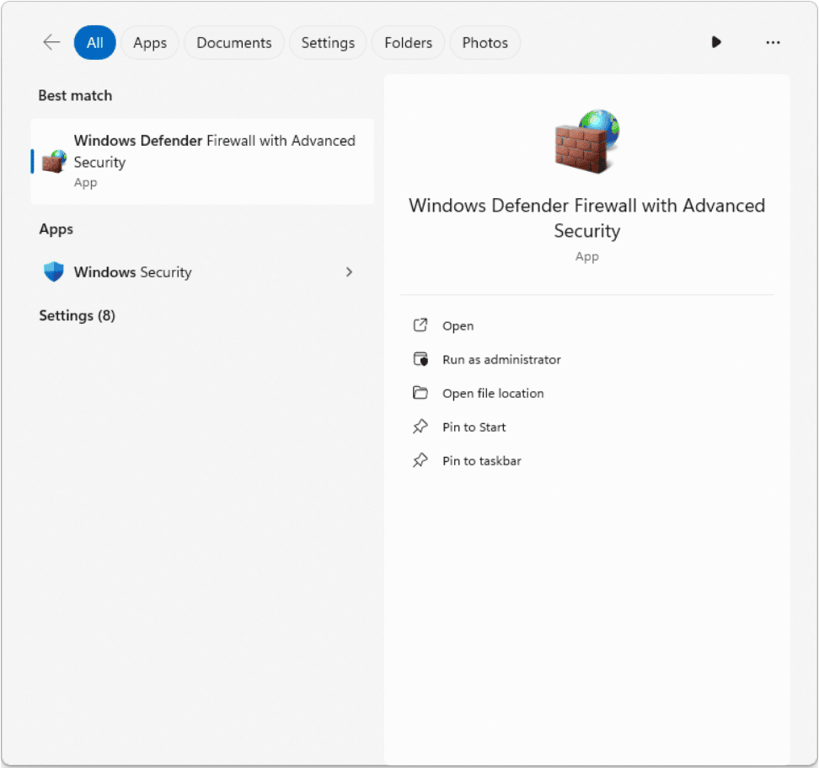
- Open Windows Defender Firewall with Advanced Security.
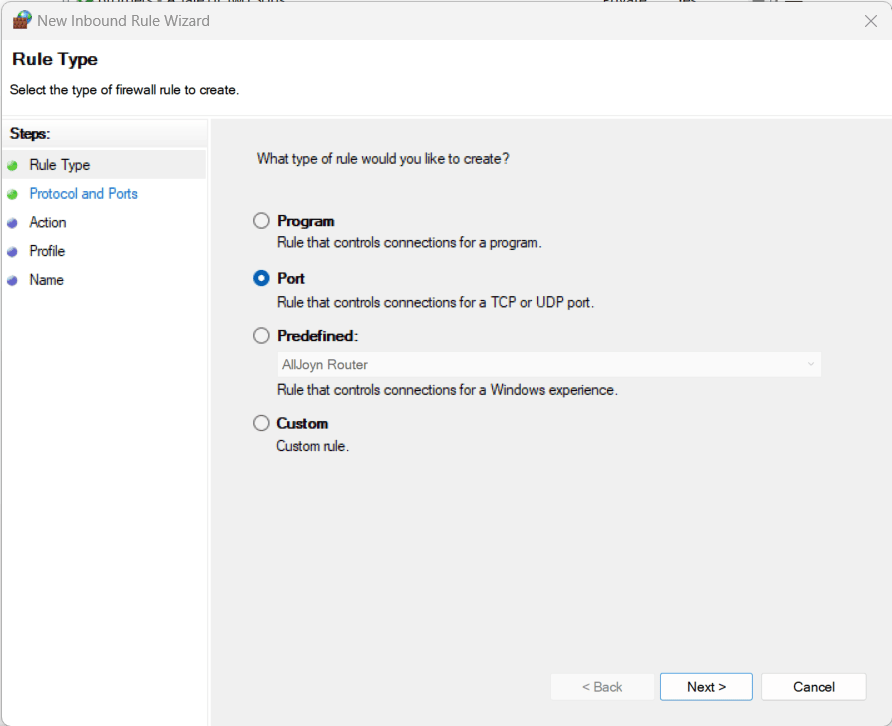
- Select Inbound Rules and click New Rule.
- Choose Port, select TCP, and enter 25565.
- Select Allow the connection and name the rule, such as Minecraft TCP.
- Repeat the steps to create a separate rule for UDP to ensure full connectivity.
In macOS, the process is more straightforward:
- Navigate to System Settings → Network → Firewall.
- Toggle the Firewall on. You may need to enter the admin password.
- Click Options and then the + (plus) button.
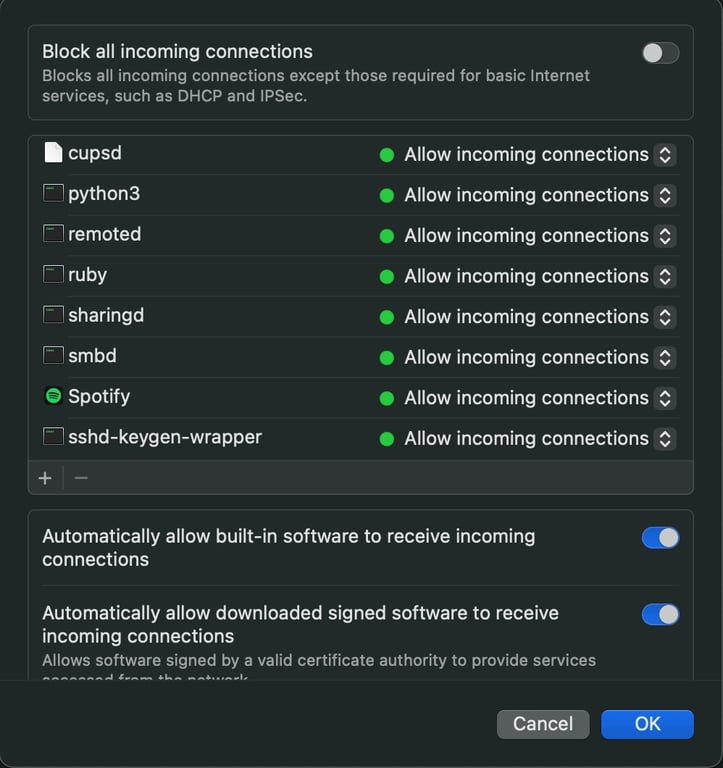
- Select your installed Java application, or the specific Minecraft server executable, and ensure Allow incoming connections is set.
On Linux, configuring the system firewall to allow ports typically uses Uncomplicated Firewall (UFW). Here are the steps:
- Install UFW by running this command. Since we are using Ubuntu, remember to change the package manager according to your distribution:
sudo apt install ufw
- Allow the Minecraft server port using this command:
sudo ufw allow 25565/tcp
- Enable UFW to enforce the rule:
sudo ufw enable
If you want to learn more about this tool, check out our guide about how to configure the firewall on Ubuntu using UFW.
Set up port forwarding on the router
Port forwarding on the router bypasses the Network Address Translation (NAT) firewall, which hides internal devices’ actual addresses from the internet for security reasons. By creating a forwarding rule, you explicitly authorize the router to accept external requests on a specific port and funnel them directly to your server’s local IP address.
The steps to configure port forwarding depend on your router, but the general procedure remains the same. Here’s how to do it on a D-Link router:
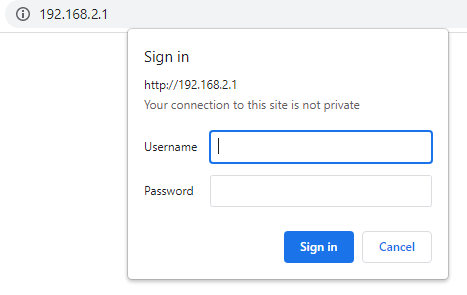
- Enter your Default Gateway IP address into a web browser and log in with your router’s credentials. If you are unsure, contact your internet service provider.
- Find and enable the Port Forwarding option.
- Add a name for your forwarding rule.
- Enter the static IP address obtained from the first step.
- Fill out the port fields using your Minecraft server port.
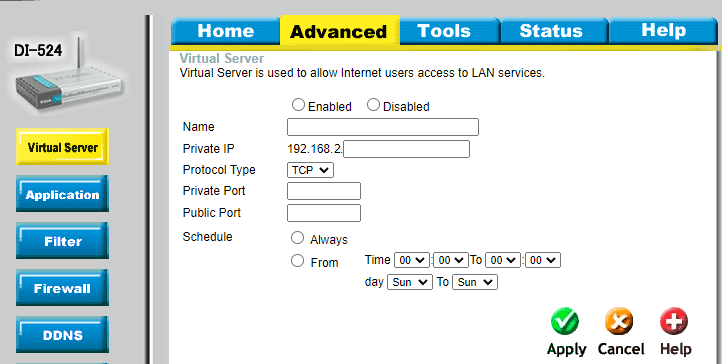
- Click Apply to save the changes.
While generally safe, opening ports to the internet creates a potential entry point for traffic. To minimize the risk, follow VPS security best practices, which apply to both a local and remote computer.
Restart the Minecraft server and connect
Restart your Minecraft server and connect to it to finalize the setup. Since the server typically reads configuration files and binds to ports during the startup sequence, rebooting ensures the changes are applied.
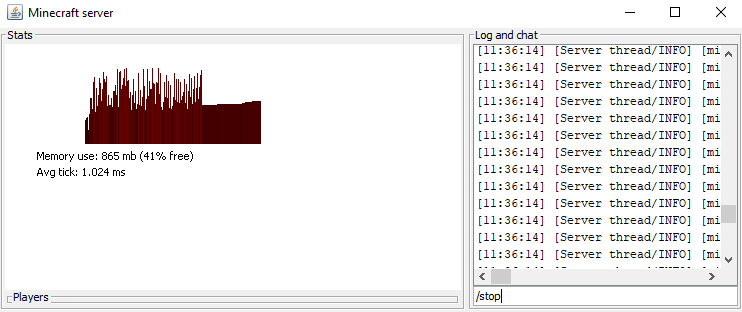
To do this, open your Minecraft server console and type /stop. Then, search what is my ip on Google to find your public IP address, which other players can then use to connect to your game server with this format:
185.185.185.185:25565
Change 185.185.185.185 with the actual IP address of your system and 25565 with your Minecraft server’s port number.
Expert tip
Never share your public IP on the internet, as this can expose your physical location and make you a potential target for numerous cyber attacks.

How to enhance your Minecraft server after port forwarding
After forwarding your Minecraft server’s port, other players should be able to connect to your game server. This enables multiplayer on a self-managed server, where you have autonomy over game rules and performance, ensuring an enjoyable gaming experience.
To make multiplayer gameplay more fun, enhance the server by adding features such as land protection, an economy, or mini-games. The easiest way to do this is by installing a plugin, which you can obtain from a repository like Modrinth.
After downloading your desired extensions, check our guide on how to add plugins to your Minecraft server. Have fun!

All of the tutorial content on this website is subject to Hostinger's rigorous editorial standards and values.

Ignas takes great satisfaction in helping people tackle even the most complex technical issues. His current goal is to write easy-to-follow articles so that these issues will not happen at all. During his free time, Ignas likes to play video games and fix up things around his house.

Paulius is as a Content Editor who excels in creating engaging technology-based content, while his keen eye for detail ensures accuracy in all aspects of his work. In addition to his role, Paulius brings 4+ years of valuable experience to the team, with a particular knack for crafting YouTube-related content. Beyond his professional know-how, he is more than willing to talk to you about everything board games.