Jan 21, 2026
Ariffud M. & Aris S.
7min Read
The n8n Loop Over Items node is a component in n8n that enables you to iterate through and process data in a batch. It helps handle large datasets, such as email addresses, API responses, or database records.
To implement loops in your n8n workflow, there are a few key points you need to understand about this feature:
Looping in n8n refers to repeating a set of actions for each item in a list or array within a workflow. This lets you automate tasks for every item in a dataset without manual intervention.
For example, if you have a list of 100 contacts and want to send an email to each one, looping lets n8n process each contact sequentially rather than sending bulk emails to all of them at once.
Looping is necessary when you need specific control over the order of operations, or when handling too many items simultaneously could overwhelm your system or external APIs. You can set it up in n8n by using the Loop Over Items node.
The Loop Over Items (Split in Batches) node works by dividing an incoming list of items into smaller, manageable batches and processing them one batch at a time. Here is the breakdown of the process:
By defining a batch size, you control how many items flow through your workflow in each iteration. This is similar to a for loop in programming, where you perform a specific action a set number of times before continuing.
Batch size is especially important if you are fetching data from an API because it ensures requests are sent in controlled, manageable groups rather than all at once, helping avoid hitting the rate limit.
Note that if you fetch data from an API or other paginated data, you must add conditional logic – like an If node – to check if there are more pages. This condition tells the workflow when to stop, preventing it from looping through empty pages.
You should use the Loop Over Items node when you need to split data into smaller chunks and process items one by one. This is especially useful for large datasets, when each item requires individual action, or when you want to control the number of items processed in each iteration.
The Loop Over Items node is helpful if you want to:
In short, use the Loop Over Item node whenever your workflow must act on each record individually or respect rate limits.
The Loop Over Items (Split in Batches) node is commonly used for a fixed number of batches, similar to a for loop in the programming world. It’s used when you want to perform a specific action a set number of times before continuing to the next step.

To loop over items in n8n, combine several nodes to process each item individually in a list.
Loop Over Items (Split in Batches) is the main node for this, but you’ll pair it with other nodes, such as Edit Fields (Set) to prepare data, HTTP Request to interact with external services, and If to add logic or define stopping conditions.
Here’s a general procedure for looping over items in n8n:
Here’s an example of a simple workflow that loops over items:

In this example, we send 100 emails in groups of 10, which is the batch size. The workflow will run the email sending node 10 times. Once the loop finishes processing all items, the workflow continues via the Done output.
We’ll explore more practical examples in the following section.
Here are practical examples of what you can automate with n8n and loops:
In this example scenario, you have 100 email addresses and want to send messages in batches of five at a time, with a five-minute pause between batches.
Looping is needed because Email service providers apply strict rate limits on outgoing emails. Sending 100 emails at once can exceed these limits, resulting in failures or temporary account suspensions.
Looping with delays between batches helps you stay within these limits, maintain a legitimate sending reputation, and reduce the risk of your emails being marked as spam. Here’s how the workflow looks:
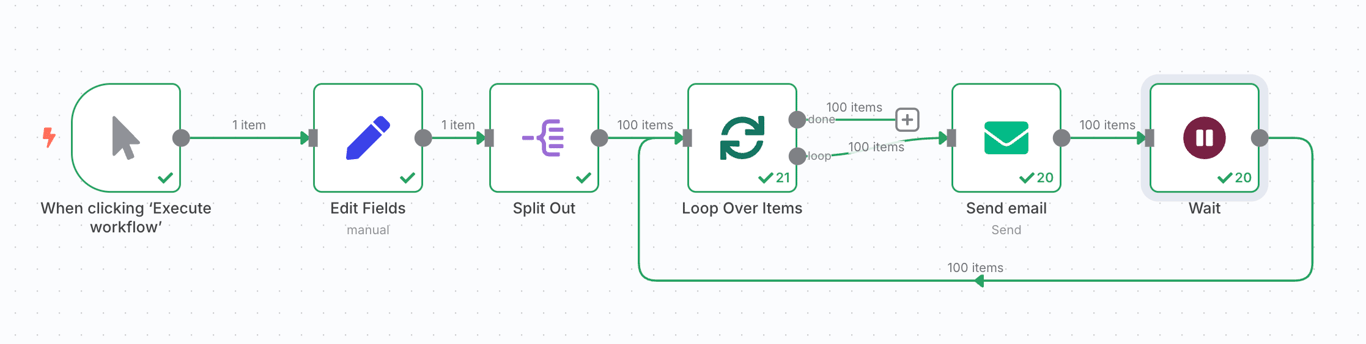
In the workflow, we set the email addresses using the Edit Fields node. However, if you’ve already connected n8n to Google Sheets, you can pull real email addresses from a spreadsheet using the Google Sheets node instead.
The workflow then splits out the source data into multiple individual email addresses, which the loop then iterates through. The workflow later uses each contact item as the destination for the Send email node.
In this example, imagine you need to process a large dataset while respecting rate limits or system constraints. This workflow processes 500 customer records in batches of 10.
Looping is crucial here because many APIs impose rate limits, such as 100 requests per minute. Processing all 500 records at once exceeds these limits, causing failures.
The Loop Over Items node divides the data into smaller chunks, preventing overloads on n8n and the target system while ensuring smoother, more reliable processing. Here’s how it fits into the workflow:
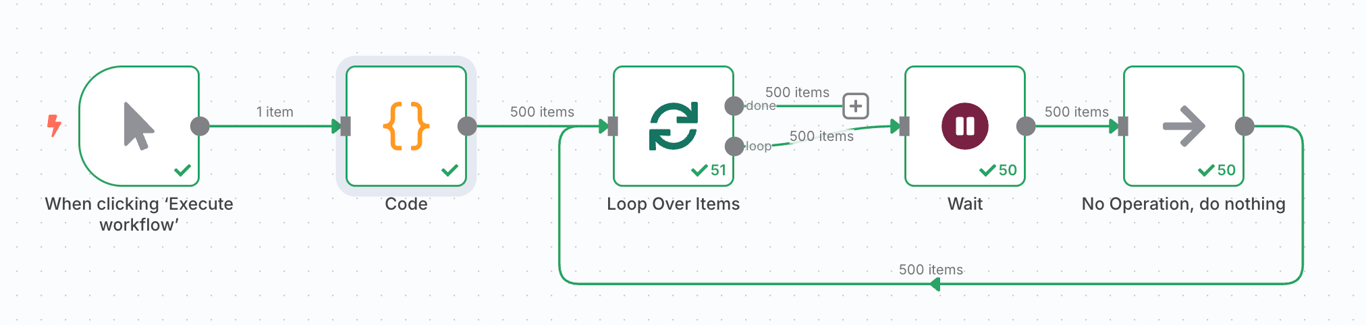
The code node generates dummy customer records. If you already have a list of customer data in a sheet or in a third-party CRM platform, like Airtable, connect the corresponding node.
The workflow loops through the fetched customer data and pauses the execution once it reaches the Wait node to avoid hitting the API rate limit. Then, the node passes the data to the processing node, which in the example above is represented by the No Operation node as a placeholder.
If you work with large or resource-heavy automations, learn how to keep them stable by using queue mode for large workflows.
In this scenario example, assume you want to set up an automated system that fetches content from multiple RSS sources – for example, Hostinger Tutorials and Blog – by doing it sequentially, with controlled delays.
Looping is required here to prevent simultaneous requests to multiple RSS feeds, whether from the same or different domains, from being mistaken as aggressive behavior. Pairing it with delays helps manage server resources, reduces the risk of IP blocking or rate limiting, and ensures reliable access to the feeds.
Here’s an example of a workflow with a loop that fetches multiple RSS feeds:
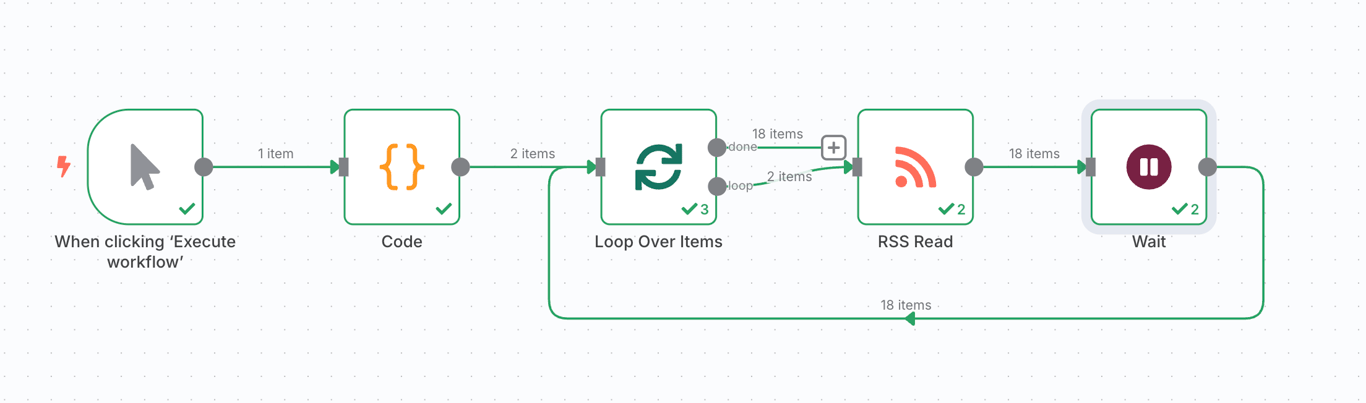
The Code block generates a list of URLs to fetch RSS feeds from. The workflow loops over each item and passes the address to the RSS Read node that will fetch the blog content.
Follow these best practices for looping over items in n8n to avoid issues and keep your workflows clean:
In addition to following these best practices, there are several mistakes you should avoid when looping data in your n8n workflow.
Some of the most common mistakes when looping through data in your n8n workflow include:
Ideally, you should host your n8n workflow in a reliable environment, as it requires stability, optimal performance, and consistent uptime. With this in mind, the best options are either using n8n’s official cloud plan or self-hosting it on a virtual private server (VPS) from a reputable provider like Hostinger.
With the n8n hosting from Hostinger, n8n and all required components come preinstalled, so you don’t need to install everything manually. You can run advanced automations without interruption, supported by powerful hardware and infrastructure that guarantees 99.9% uptime.
Scaling is simple. With up to 8 vCPU cores, 32 GB of RAM, 400 GB of NVMe SSD storage, and 32 TB of bandwidth, you can start small and upgrade with just a few clicks as your workflows grow.

Once you master looping over items, the next step is extending your workflows to interact with external data sources. For example, a loop is commonly used with APIs to allow your n8n to fetch or push data dynamically without going over the rate limit.
Since there are various APIs, you can connect n8n with them in different ways. For one, loop through a list of new orders and use an HTTP Request node to send details to an accounting API.
To learn more about integrating API into your n8n workflow, read our guide on how to use n8n with APIs. If you are new to APIs and want to understand how they work before connecting them to n8n, read our tutorial on what a public API is.
All of the tutorial content on this website is subject to Hostinger's rigorous editorial standards and values.

Ariffud is a Technical Content Writer with an educational background in Informatics. He has extensive expertise in Linux and VPS, authoring over 200 articles on server management and web development. Follow him on LinkedIn.

Aris is a Content Writer specializing in Linux and WordPress development. He has a passion for networking, front-end web development, and server administration. By combining his IT and writing experience, Aris creates content that helps people easily understand complex technical topics to start their online journey. Follow him on LinkedIn.

OpenClaw is an open-source AI agent platform that can connect to your messaging apps, run tasks on your server, and ...

OpenClaw best practices help you run AI agents safely in production environments by reducing risk, limiting unintended actions, and preventing ...
OpenClaw costs range from approximately $6 to $200+ per month, depending on how the system is deployed and how intensively ...