How to install PostgreSQL on Ubuntu and usage instructions for effective database management
Sep 10, 2025
/
Aris S.
/
10 min Read
PostgreSQL is a popular open-source relational database management system (RDBMS) known for its scalability and efficiency in handling large amounts of data.
Due to its high performance, PostgreSQL is ideal for large enterprise websites or applications. It also supports various data types and programming languages, including PHP and Python.
In this tutorial, we will explain how to install PostgreSQL on Ubuntu 22.04 and later. We will also cover the pgAdmin installation process and solutions to common PostgreSQL issues.

What Is PostgreSQL?
PostgreSQL is a relational database management system (RDBMS) popular for its performance. Unlike a standard DBMS, it arranges data in a logical structure for more efficient access.
Highly efficient and capable of handling many queries, the database solution is excellent for large enterprises. Moreover, it is free, open-source, and compatible with various data types.
How to Install PostgreSQL on Ubuntu
Before proceeding, ensure your virtual private server (VPS) runs Ubuntu 22.04 or later. Otherwise, follow our guide to change the operating system in Hostinger’s VPS.
1. Install PostgreSQL
PostgreSQL installation involves executing Linux commands on your machine. For a local system, run them directly via Terminal, the Linux command prompt.
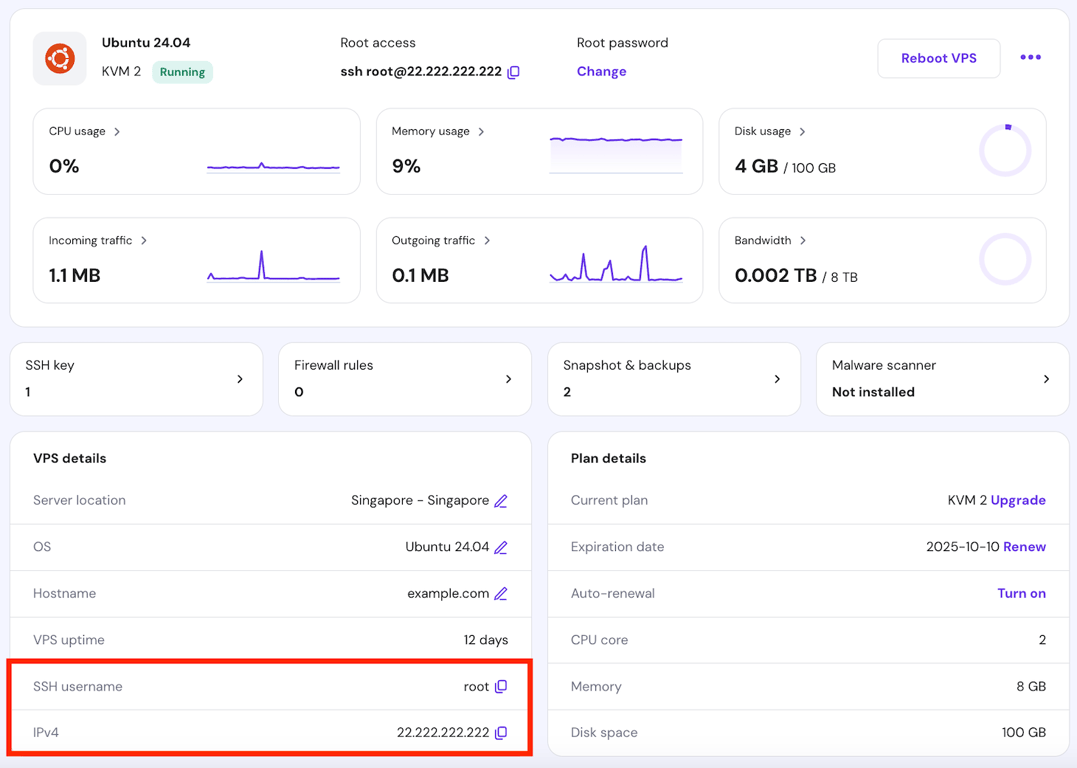
For a remote machine like VPS, connect using an SSH application or Terminal. Hostinger users can find their remote machine login credentials by navigating to the VPS overview menu in hPanel.
You can install PostgreSQL Ubuntu packages from the local repository or using the APT package manager. We recommend the latter to ensure you get the latest version.
Our VPS also supports other databases. For example, you can install MongoDB if you prefer a NoSQL DBMS.

Option 1 – Installation From APT Repository
The popular method to install PostgreSQL on Ubuntu is from the official repository via the APT package manager. Here are the steps to do so:
- Run these commands to import the key from PostgreSQL’s official repository to the APT package manager:
sudo sh -c 'echo "deb http://apt.postgresql.org/pub/repos/apt $(lsb_release -cs)-pgdg main" > /etc/apt/sources.list.d/pgdg.list'

wget --quiet -O - https://www.postgresql.org/media/keys/ACCC4CF8.asc | sudo gpg -
- Refresh APT to synchronize all repositories using this command:
sudo apt update
- Install the latest version of PostgreSQL with APT and sudo privileges:
sudo apt-get -y install postgresql
- To confirm the installation, run this command:
sudo -u postgres psql
- Enter the PostgreSQL version query statement:
SELECT version();
Pro Tip
To install a specific version, add the number in your command, for example sudo apt-get -y install postgresql-12. In this example, the command will install PostgreSQL version 12.
Option 2 – Installation Using Local Ubuntu Repository
The alternative PostgreSQL installation method uses the local Ubuntu repository. Here are the steps:
- Run this command to refresh the Ubuntu repository:
sudo apt-get update
- Verify the available PostgreSQL apt repository using this command:
sudo apt show postgresql
- Run this command to install the latest available version.
sudo apt install postgresql postgresql-contrib
- To verify whether the PostgreSQL installation is successful, run the following:
sudo -u postgres psql
- Then, run this command to check the current PostgreSQL version:
SELECT version();
The command line should show that the PostgreSQL server version 14.11 is successfully installed, similar to this:

2. Check the PostgreSQL Status
After installing PostgreSQL, check whether it is enabled and active. Use the systemctl or service command utility to verify the service status:
sudo service postgresql status

sudo systemctl status postgresql
If PostgreSQL is enabled, your command line will output active and loaded.
For Hostinger users, you can also check whether PostgreSQL is running by asking the Kodee AI assistant. Simply enter, “Check the postgresql service status in my VPS,” and Kodee will output the service status.
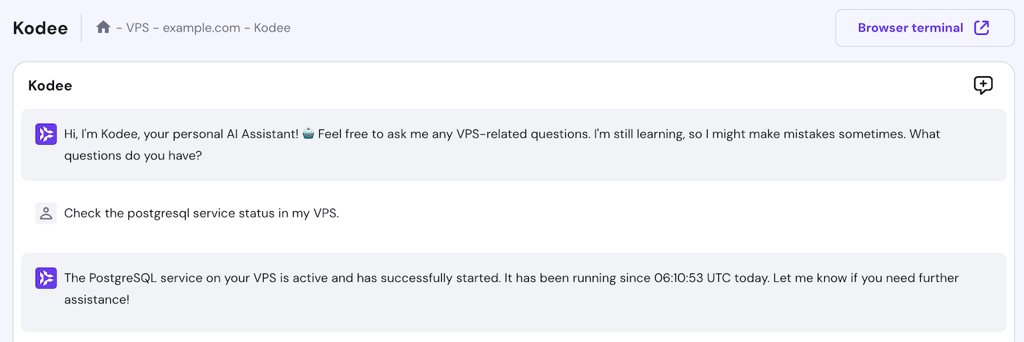
Ask Kodee to manage services
Aside from checking service statuses on your VPS, you can ask Kodee to reset services to their default settings and states.
In addition to the service status, check whether PostgreSQL is ready to accept a connection using this command:
sudo pg_isready
3. Connect to PostgreSQL
During the installation, PostgreSQL automatically creates the default postgres role for logging in to the database. To switch to this user, run the following command:
sudo su - postgres
Your command line should now begin with postgres. To connect to the PostgreSQL database, use the PostgreSQL shell using the following:
sudo psql
The psql command will create a session in the default database. If the command isn’t found, manually install the PostgreSQL client using this command:
sudo apt-get install postgresql-client
To check the connection status, run this command using the PostgreSQL prompt:
\conninfo

To quit the PostgreSQL prompt and return to the regular system user, use the exit command. Meanwhile, use \q to detach from the database’s interactive session.
4. Change User Password
Changing the default postgres role password is essential to improve database security. Here’s how to do it:
- Activate the PostgreSQL prompt using this command:
sudo -u postgres psql
- Run this statement to change the postgres account password. Don’t forget to replace NewPassword with your actual password:
ALTER USER postgres PASSWORD 'NewPassword';
- Check whether the change is applied successfully using the following command:
\p
- Restart the PostgreSQL service using this command:
sudo service postgresql restart

5. Create a User on PostgreSQL
To manage database access and ensure proper data organization, you will need multiple PostgreSQL users. The easiest way to create one is to use the interactive mode. Here are the steps:
- Switch to the postgres user:
sudo su - postgres
- Run this command to create a new user:
createuser --interactive
- Enter the new PostgresQL account name. For this tutorial, it is TheNewUser.
- To validate the new role, log in to PostgreSQL with the postgres account:
sudo -u postgres psql
- Check all the users with the following command:
\du
Important! As a part of security best practices for PostgreSQL, avoid granting the new role a superuser privilege unless necessary.
As shown in the output, the database successfully creates TheNewUser.

6. Create a Database on PostgreSQL
PostgreSQL assumes the role and the database will have the same name. Therefore, if you create a TheNewUser role, PostgreSQL will access a database with the same name.
Important! PostgreSQL uses Linux information for authentication. In the previous example, you need a user called TheNewUser.
Here are the PostgreSQL database setup steps:
- Run the following to switch to the postgres user and create a new database:
sudo -u postgres createdb TheNewUser
- To log in to the new database, create a Linux user account with the same name. Since the username contains capital letters, add the –force-badname option.
sudo adduser TheNewUser --force-badname
- Enter the interactive PostgreSQL prompt using the new user account:
sudo -u TheNewUser psql
- Confirm the connection using this command:
\conninfo

The user should now connect to the new database and be able to create a new table. For example, enter the following to create a buyer data table:
CREATE TABLE buyers(usr_id INT PRIMARY KEY, usr_name VARCHAR(240) NOT NULL, usr_location VARCHAR(240) NOT NULL);
When creating a database table, consider the six PostgreSQL constraints:
- PRIMARY KEY – indicates that a column can be a row’s unique identifier.
- FOREIGN KEY – specifies that the values in a column must be the same as the ones in another table’s rows.
- NOT NULL – ensures a column’s value is not empty.
- CHECK – sets a column’s value so that it must satisfy a Boolean expression, which is either “true” or “false”.
- UNIQUE – guarantees that the values in a column are unique among all rows.
- EXCLUSION – prevents values in two rows from overlapping when compared.
To add values to your table, use the following statement. Don’t forget to replace the placeholders with the appropriate value and adjust the number of rows accordingly:
INSERT INTO tablename (column1, column2, column3) VALUES (row1, row2, row3);
To show the table, enter the following statement:
SELECT * FROM tablename
7. Configure the PostgreSQL Server
Configure your PostgreSQL server to allow other systems to access the database remotely. To do so, let the server listen to all IP addresses by editing the configuration file.
Before proceeding, use the exit command to quit the PostgreSQL shell and return as the regular system user. Then, follow these steps:
- Open the configuration file using a text editor. Replace vim if you use another editor and change the directory accordingly:
vim /etc/postgresql/14/main/postgresql.conf
- Find the listen_addresses line.
- Remove the # symbol and change the value to an asterisk. Here’s how it should look:
listen_addresses = '*'
- Use the :wq command to save the changes and quit vim.

- Set the access policy to authenticate client connection to your PostgreSQL server. To do so, open the pg_hba.conf file in the same directory using vim. The command should look like this:
vim /etc/postgresql/14/main/pg_hba.conf
- Add a new policy at the bottom of the file using this syntax:
connection database user ip_address encryption
- For instance, we will enable all TCP/IP connections from all users to every PostgreSQL database. These users can use any IP address with an MD5-encrypted password. The rule looks as follows:
host all all 0.0.0.0/0 md5
- Restart the PostgreSQL service to apply the changes.
8. Set up a Remote Database Connection
After configuring the database, set up remote access to PostgreSQL using the psql command. To do so, use this command syntax in the client machine:
psql -h ip_address -p port -d database -U username
For example, run this command to connect to the TheNewUser database hosted in a VPS with the 185.185.185.185 IP address using the TheNewUser account:
psql -h 185.185.185.185 -p 5432 -d TheNewUser -U TheNewUser
Remember that the default PostgreSQL port is 5423. To verify if the connection is successful, run this command:
\conninfo
Once connected, you can send database queries to retrieve data. To enable PostgreSQL remote access in your application, install a database driver and import the module into your code.
For this tutorial, we will show you how to do so in a Python application hosted in an Ubuntu 22.04 VPS. After connecting via SSH, follow these steps:
- Install the pip package manager using this command. If you already have it, skip this step:
sudo apt-get install python-pip
- Download and install the psycopg2 database driver using pip:
pip install psycopg2-binary
- Add the following line to your application code to import the module and establish a connection with the PostgreSQL database. Remember to change the value accordingly:
import psycopg2
# Connect your app to the remote database.
conn = psycopg2.connect(host="182.182.182.182", port="5432", dbname="TestNewUser", user="TestNewUser", password="UserPassword")
# Open a cursor for database operations
cur = conn.cursor()
# Execute a query. Replace table with your own.
cur.execute("SELECT * FROM table")
# Retrieve data
records = cur.fetchall()
9. Install pgAdmin
Install the pgAdmin web-based GUI to simplify your PostgreSQL database management tasks. We will use the APT package manager to install it:
- Run these commands individually to add the pgAdmin official repository:
curl -fsSL https://www.pgadmin.org/static/packages_pgadmin_org.pub | sudo gpg --dearmor -o /etc/apt/trusted.gpg.d/pgadmin.gpg

sudo sh -c 'echo "deb https://ftp.postgresql.org/pub/pgadmin/pgadmin4/apt/$(lsb_release -cs) pgadmin4 main" > /etc/apt/sources.list.d/pgadmin4.list'
- Update the package lists to synchronize the repository.
sudo apt update
- Run the following command to install pgAdmin:
sudo apt install pgadmin4
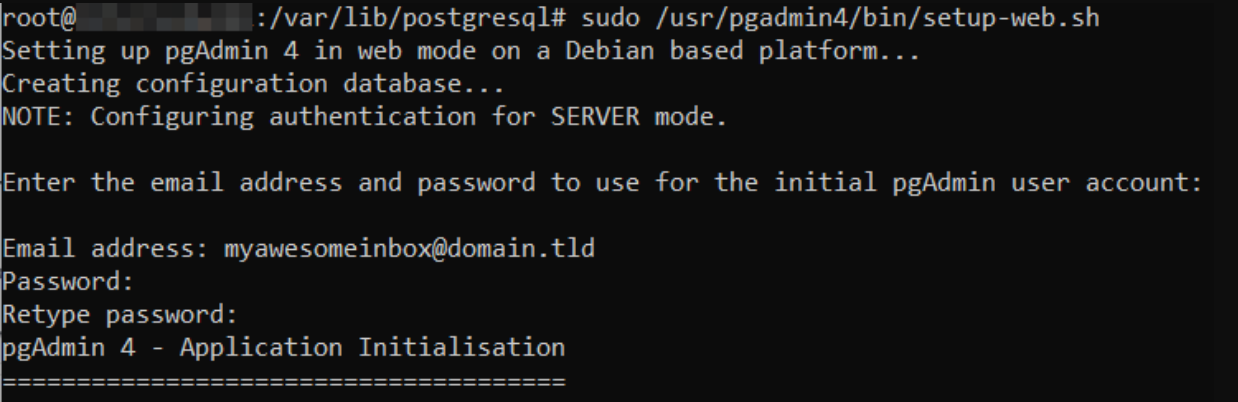
- After the GUI setup finishes, initiate the primary pgAdmin configuration with this command:
sudo /usr/pgadmin4/bin/setup-web.sh
- Enter your email address and password. It should look like the following:
To access the pgAdmin web-based interface, enter the following in your web browser’s address bar:
185.185.185.185/pgadmin4

Replace the IP address with your VPS’. Then, enter your email address and password. Click Login to enter the main pgAdmin dashboard.
To connect PostgreSQL, select Add New Server and proceed with the configuration process.

Troubleshooting PostgreSQL Installation
In this section, we will explore common issues regarding PostgreSQL installation and their solutions.
1. Unable to Connect to PostgreSQL Server
First, you should check whether the client system is properly connected to the internet. If the internet connection isn’t the issue, other common causes for this error include an inactive database or misconfigured file permission.
Check PostgreSQL status and ensure it is loaded and active. Otherwise, restart it using the following command:
sudo systemctl restart postgresql
If that doesn’t work, check whether the PostgreSQL directory and files permissions are set to 0700 and 0600. To do so, use the following command:
ls /var/lib/postgresql/main
Then, use the chmod command to change their permissions.
2. PostgreSQL Connection Issues from Remote Host
A misconfigured connection policy may cause remote host issues that prevent you from accessing the PostgreSQL server. To solve it, open your pg_hba.conf file and add the access policy from every client’s IP address:
host all all 0.0.0.0/0 md5
Then, check the listen_address value in your postgres.conf configuration file. Ensure it has an asterisk to ensure PostgreSQL can listen to all IP addresses.
If that doesn’t work, check if your firewall closes the PostgreSQL listening port. For Ubuntu server, run the ufw command:
sudo ufw status verbose
If the connection from and to port 5432 is disabled, open it using the following command:
sudo ufw allow 5432/tcp
Learn more about Ubuntu Firewall
Check out our other article to learn how to configure Ubuntu firewall using Uncomplicated Firewall (UFW).
3. pgAdmin Login Issues
pgAdmin login issues may occur due to a database connection error. If it is network-related, try the previous solutions and reinstall pgAdmin.
If the problem is related to the user account login credentials, enter the psql session and reset the password using this statement:
ALTER USER username WITH PASSWORD 'new_password';
You may also encounter login issues if the user doesn’t have the LOGIN privilege. To grant one, use the following statement:
ALTER USER username WITH LOGIN;
4. PostgreSQL Version Conflict
Version conflicts occur when PostgreSQL is incompatible with the database or other applications. Its common cause includes not updating PostgreSQL, resulting in a version mismatch.
To solve it, reinstall or update PostgreSQL from the APT official repository. Also, update all third-party applications since they may be outdated.
We recommend testing the newest version in a development environment to avoid further issues in the live server.
5. Unable to Create PostgreSQL User or Database
An incorrect command syntax often triggers PostgreSQL user and database creation errors. To fix it, ensure your command ends with a semicolon (;).
Also, you must run the command using the postgres user and the psql command line. To do so, run this command:
sudo -u postgres psql
If your Terminal shows the following, you should be able to create a user and database.
postgres=#
Learn More About PostgreSQL and VPS
How to Set Up a VPS
What is a VPS
how to install PostgreSQL on CentOS7
Conclusion
PostgreSQL is an open-source, community-driven database management system. It uses a logical structure to efficiently store large amounts of data and simplify access.
In this relational database management system tutorial, we have explained the steps to install PostgreSQL on Ubuntu 22.04 via the Linux command prompt. Here is the recap:
- Install PostgreSQL from the official repository using APT.
- Run systemctl status to check if Postgresql is active.
- Connect to the PostgreSQL account using sudo su – postgres.
- Change the default admin account’s password to improve security.
- Create a new PostgreSQL user to manage your databases.
- Make a new database using the createdb command.
- Set up the PostgreSQL server by configuring its connection policy.
- Configure a connection to your remote PostgreSQL database.
- Install pgAdmin to provide a graphical user interface.
To avoid issues, ensure the connection policies and pgAdmin login credentials are set correctly. Moreover, install the latest version of the RDBMS via APT to avoid incompatibility issues.
How to Install PostgreSQL on Ubuntu FAQ
In this section, we will answer several commonly asked questions about installing PostgreSQL on an Ubuntu server.
Where Is Postgres Installed on Ubuntu?
On Ubuntu, the main PostgreSQL server files are in the /usr/lib/postgresql/<version/bin/postgres directory. All database clusters are stored in /var/lib/postgresql/main directory. Meanwhile, the PostgreSQL settings are in the /etc/postgresql/main/postgresql.conf file.
How Do I Know if PostgreSQL Is Installed on Ubuntu?
The easiest way to check if PostgreSQL is installed on an Ubuntu server is to run sudo -u postgres psql or which psql. Terminal should output the installation path if it is installed.
Should I Use PostgreSQL 13 or 14?
PostgreSQL 14 has an improved connection scaling. It makes PostgreSQL 14 more suitable for large enterprises with many database connections. We recommend sticking to the newest version for the latest features, improvements, and patches.
All of the tutorial content on this website is subject to Hostinger's rigorous editorial standards and values.

Aris is a Content Writer specializing in Linux and WordPress development. He has a passion for networking, front-end web development, and server administration. By combining his IT and writing experience, Aris creates content that helps people easily understand complex technical topics to start their online journey. Follow him on LinkedIn.