How to fix email not sending errors
Jun 11, 2026
/
Alma F.
/
10 min Read
Email not sending comes down to one of a handful of causes: wrong SMTP settings, a dropped internet connection, a blocked port, DNS or domain problems, a failed login, account limits, or content that looks like spam.
The fix depends on where you’re sending from, since a message stuck in webmail, an email app like Outlook, a contact form on your website, or a marketing tool each fails for slightly different reasons. None of it takes a technical background to sort out.
A few quick checks catch the most common problems, like a typo in the recipient address or a message sitting in your Outbox. When those don’t work, the fix sits in your SMTP settings, a blocked port, your account status, your DNS records, your email app, or how your website sends mail. Sending limits, error codes, and spam-like content cover the rest.
Why are my emails not sending?
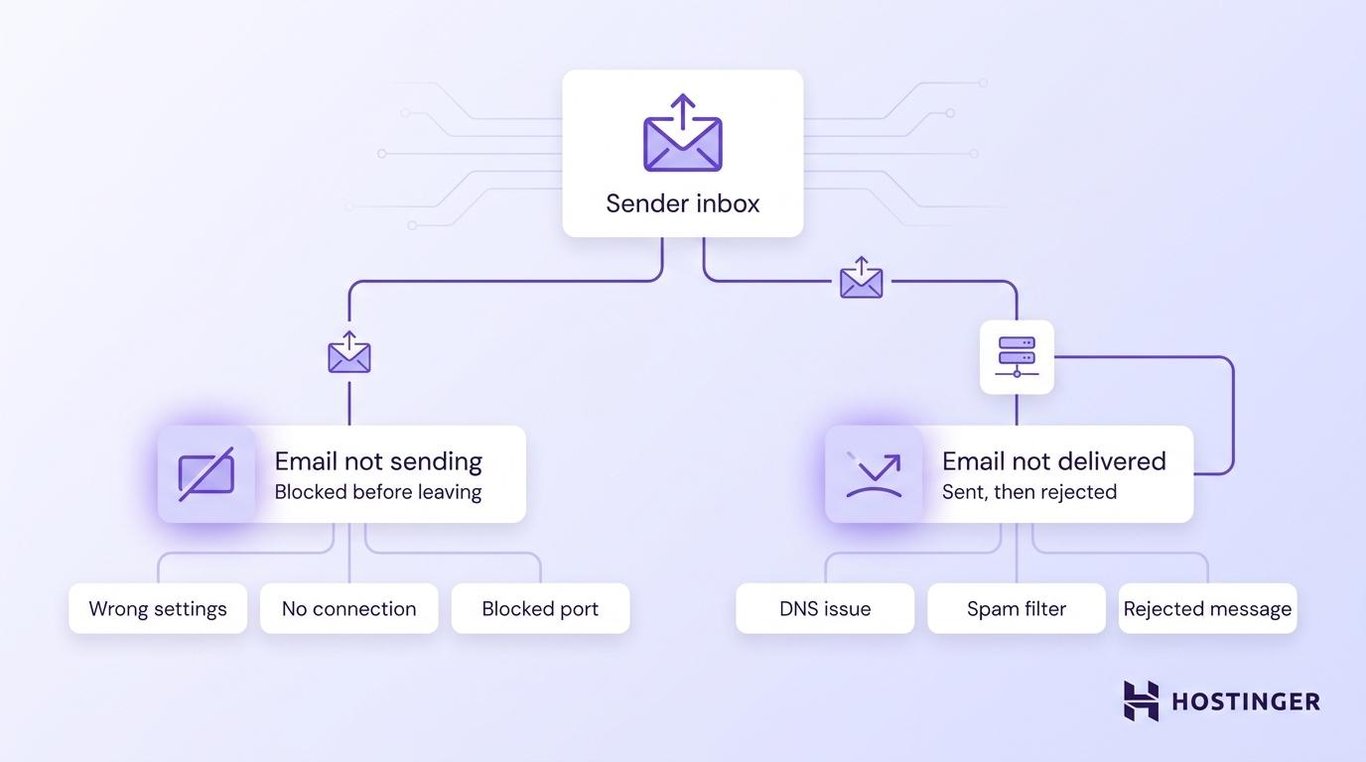
Your emails aren’t sending because something is blocking them before they ever go out. This is different from an email that gets sent but never reaches the recipient. The two look alike but need different fixes:
- Email not sending means the message fails to leave your account, app, website, or SMTP (Simple Mail Transfer Protocol) server.
- Email not delivered means the message left fine, but got rejected, bounced, blocked, or filtered somewhere down the line. That’s a deliverability problem, and improving your email deliverability is the solution.
Most “email not sending” cases trace back to one of these causes:
- A malformed recipient address, like a missing “@”.
- No internet connection.
- A message stuck in your Outbox.
- Wrong SMTP settings.
- An incorrect email password.
- A blocked sending port.
- A suspended or inactive email service.
- A sending limit you’ve hit.
The “email not delivered” cases have their own causes. Missing DNS records, a poor sender reputation, or spam-like content rarely block the send itself, but they cause the message to bounce or get filtered after it leaves.
Quick checks before changing email settings
Start with these basic checks before changing any DNS or SMTP settings. They take a couple of minutes and rule out the simple problems first, so you don’t dig into advanced fixes you may not need.
Walk through them in order:
- Check your internet connection. Reload the website, and if it still won’t load, reset your connection by reconnecting to Wi-Fi or toggling airplane mode on your phone.
- Confirm the recipient address is typed correctly. A malformed address, such as one missing the “@”, can prevent the send, while a simple typo usually sends and then bounces back.
- Look in your Outbox and Drafts. A message stuck there hasn’t actually gone out yet.
- Send a plain-text email with no attachments to test whether the basic send works.
- Reduce your attachment size if the message is large. Limits run between 10 and 25 MB, depending on the provider.
- Check whether your email password has changed recently. A changed password breaks the saved login in your app.
- Send the same message from webmail in your browser.
- Check whether your email provider is having an outage or scheduled maintenance.
The webmail test is the one that tells you the most. If your message sends from webmail but fails in Outlook, Apple Mail, or another app, the problem is the app’s settings, not your account, so that’s what you’ll want to check.
If these quick checks didn’t fix it, the cause is deeper in your settings, your account, or how your mail is routed.
1. Check your SMTP settings
Wrong SMTP settings are the most common reason an email app refuses to send. SMTP is the system your app uses to send emails, pushing your outgoing mail to the server. If even one setting is off, the message has nowhere to go.
Check these values against what your email provider lists. You’ll find them in your email app under the account’s outgoing server or mail server settings:
- SMTP server, the outgoing mail host, like
smtp.hostinger.com. - SMTP port, usually 587.
- Encryption method, either SSL/TLS or STARTTLS, and the security setting that scrambles your login. Match whichever your provider lists for your port.
- Username, usually your full email address, though a few providers give you a separate SMTP username.
- Password, the same one you use to log in to webmail.
- Authentication, which needs to be turned on.
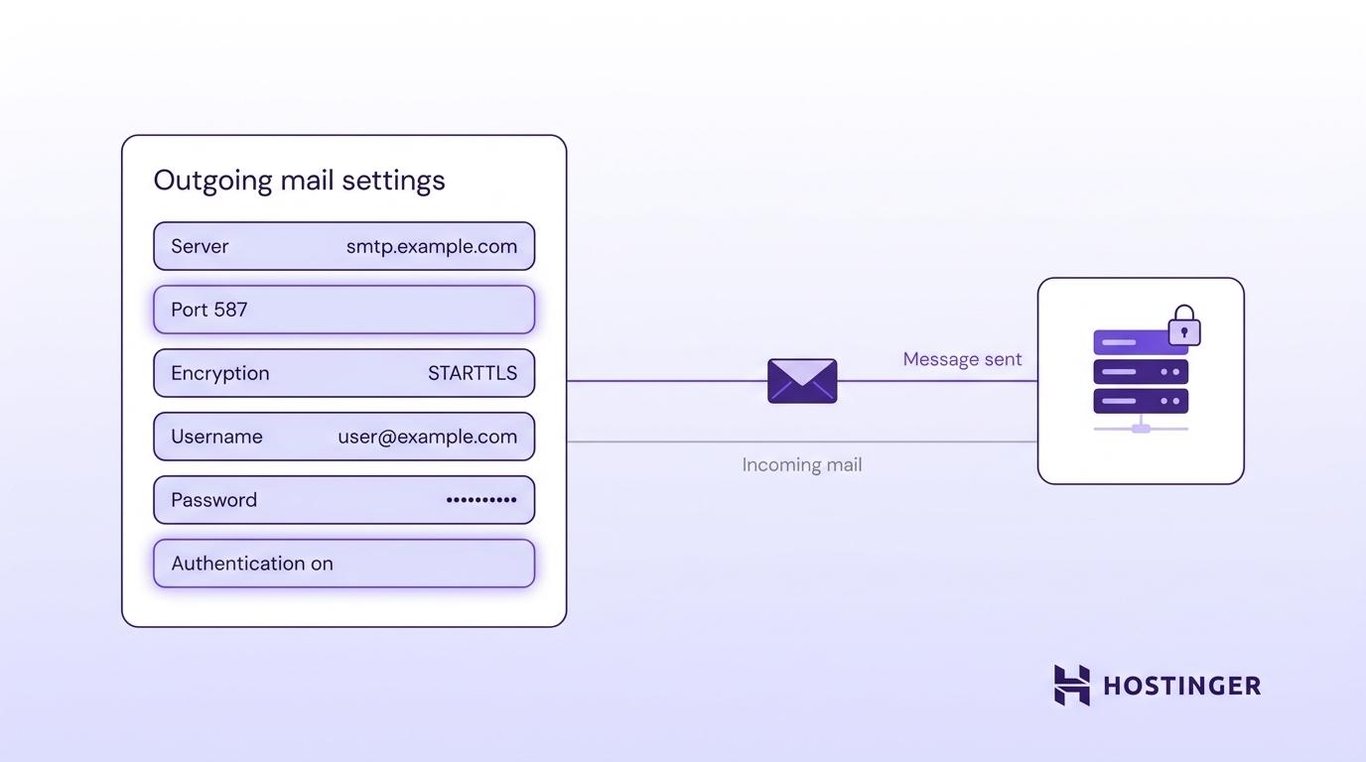
While you’re in those settings, watch for one common mix-up. IMAP and POP only handle incoming mail, while SMTP handles outgoing mail. So if your inbox loads fine but nothing sends, your incoming setup is working, and your SMTP settings are the ones to fix.
Using Hostinger Email? Pull the correct SMTP server, port, and encryption values straight from hPanel or the Hostinger support docs, then paste them into your app exactly as shown.
Hostinger supports both 465 with SSL and 587 with STARTTLS, and its setup guides start with 465, so try that first and switch to 587 only if you run into encryption errors. If the settings look right but the mail still won’t leave, the port itself may be blocked, which is the next thing to rule out.
Picking the right SMTP port matters as much as the server name, since the wrong one can quietly fail.
2. Check whether the SMTP port is blocked
A blocked SMTP port can prevent your email from being sent, even when all settings are correct. The port is the specific channel your mail travels through, and networks, firewalls, or internet providers sometimes close certain ones to cut down on spam. So your login works, your server is right, and the message still won’t go.
These are the ports you’ll run into:
- Port 587, the modern default for sending mail securely, and the first one to try on most providers.
- Port 465, a secure option that encrypts the connection from the start (called implicit TLS) and is still widely supported.
- Port 25, the original sending port, is now blocked by most internet providers and hosts because spammers abused it.
If your current port isn’t working, open your email app’s outgoing server settings and try 587 with TLS encryption, since that’s the modern default most providers expect (unless your provider points you to 465, as Hostinger does).
Still stuck? Check your firewall settings, since security software on your computer can quietly block the port.
To find out whether the port is open, you can run a command-line tool called telnet, use a free online port checker, or follow these steps to check if port 587 is open.
When your network or hosting provider blocks the port, switching ports usually solves it, since many providers won’t open ports like 25 at all.
3. Verify your email account and hosting status
Email won’t send if the account, hosting plan, domain, or email service behind it is inactive. Your settings can be perfect, but if the service isn’t running, there’s nothing to send through.
People miss this because the error shows up in the app, even though the cause is the account behind it. On a Hostinger Email hosting plan, you’d check these from hPanel.
Confirm that:
- Your hosting or email hosting plan is active and paid.
- Your domain is registered and hasn’t expired.
- The email account actually exists and is set up.
- Email services are enabled for your account.
- You haven’t hit a temporary sending restriction or limit.
If you recently registered the domain or changed a DNS setting, the change needs time to spread across the internet. This is called propagation, and it can take a few hours. Don’t panic if a brand-new setup won’t send right away.
If everything looks active but Hostinger Email still won’t send, you can work through the account-level checks in more detail.
4. Check your domain’s DNS records
DNS records tell mail servers where to send your messages and how to confirm they’re really from you.
DNS, or Domain Name System, is the internet’s directory, the part that connects your domain to the servers behind it. Think of these records as the address book and ID check for your domain’s email.
When they’re missing or wrong, servers get confused about whether to trust your mail.
Four records handle email for your domain:
- MX records route incoming mail to the right server. Wrong values here block incoming mail outright and often mean your email DNS isn’t fully set up.
- SPF tells receiving servers which mail servers are allowed to send for your domain.
- DKIM adds a digital signature that proves a message wasn’t tampered with in transit.
- DMARC specifies what receiving servers should do when an SPF or DKIM check fails.
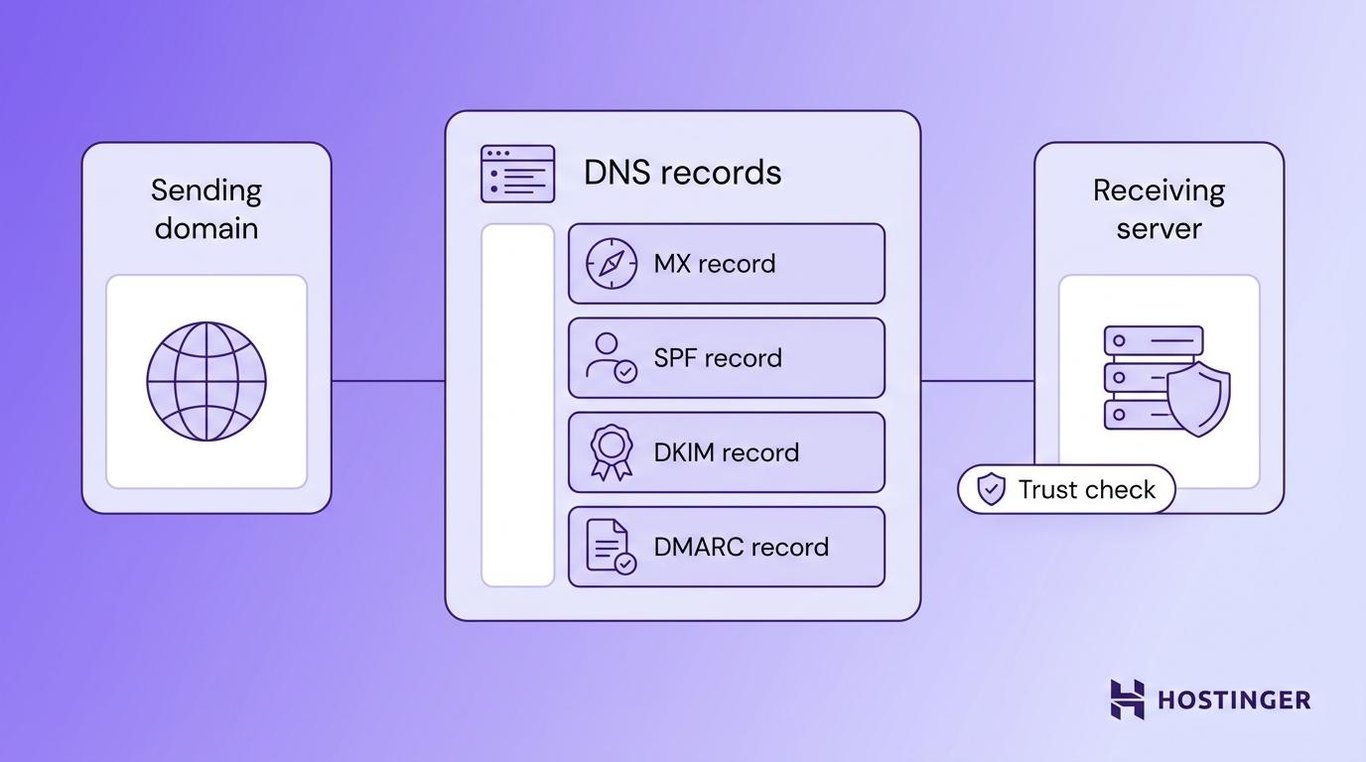
DNS problems affect receiving and deliverability more than sending itself. A missing SPF or DKIM record might not prevent a message from leaving, but it can cause it to bounce back, fail a security check, or drop straight into the recipient’s spam folder. So your mail “sends” but never lands.
Setting up DNS for email correctly puts these records in place, and SPF, DKIM, and DMARC records verify that your mail is legitimate. Check whether all three exist for your domain, and add any that are missing.
5. Fix email client issues
When webmail works, but your email app doesn’t, the problem is in the app’s configuration. This covers Outlook, Apple Mail, the Gmail app, Thunderbird, and mobile mail apps.
Each one stores its own copy of your SMTP details, so if one of those details is wrong in the app, that app can’t send, even while webmail works normally.
Try these fixes, roughly in order of how often they solve it:
- Remove the email account from the app, then add it back to refresh the connection.
- Re-enter your SMTP password, especially if you changed it recently.
- Turn on SMTP authentication in the account settings.
- Confirm the outgoing mail server matches your provider’s value.
- Update the app to the latest version.
- Clear stuck messages from the Outbox and try resending.
- Check whether Outlook is in offline mode, which silently stops mail from going out.
Re-adding the account fixes more of these than anything else, since it forces the app to rebuild the connection from scratch. If the problem persists after all this, follow the official setup guide for your specific app, since each app stores its settings in a different menu.
6. Check website or WordPress email settings
Website emails fail for different reasons than the messages you send from webmail or an app. These are the automatic emails your site sends on its own: contact form replies, WordPress password resets, WooCommerce order notifications, and membership or booking confirmations.
When one of these doesn’t arrive, the cause is in how your site sends mail, not in any inbox.
WordPress itself is usually behind it. WordPress sends mail through its built-in wp_mail() function, which by default hands off to the server’s basic PHP mail, and that method is unreliable.
The mail often does go out, but because it isn’t properly authenticated, many receiving servers reject it or drop it into spam. So your site reports the email as sent, while it never reaches the inbox.
The fix is to send through SMTP instead, which gives your site a proper authenticated connection. Work through these steps:
- Send a test email from WordPress to confirm whether the problem is sending or something else.
- Check the recipient address saved in your contact form settings.
- Install and configure a WordPress SMTP plugin, such as WP Mail SMTP, to replace the default PHP mail function.
- Connect the plugin to a sending service, such as your Hostinger Email account or a provider like Brevo, so your mail goes out via an authenticated server.
- Verify your SPF and DKIM records so the mail passes authentication checks.
If these steps don’t do it, you can dig into why WordPress isn’t sending emails for the trickier cases, like plugin conflicts or a misconfigured mail server.
Building a custom form or app instead of using a plugin? You can send emails using PHPMailer, a script-based way to send authenticated emails.
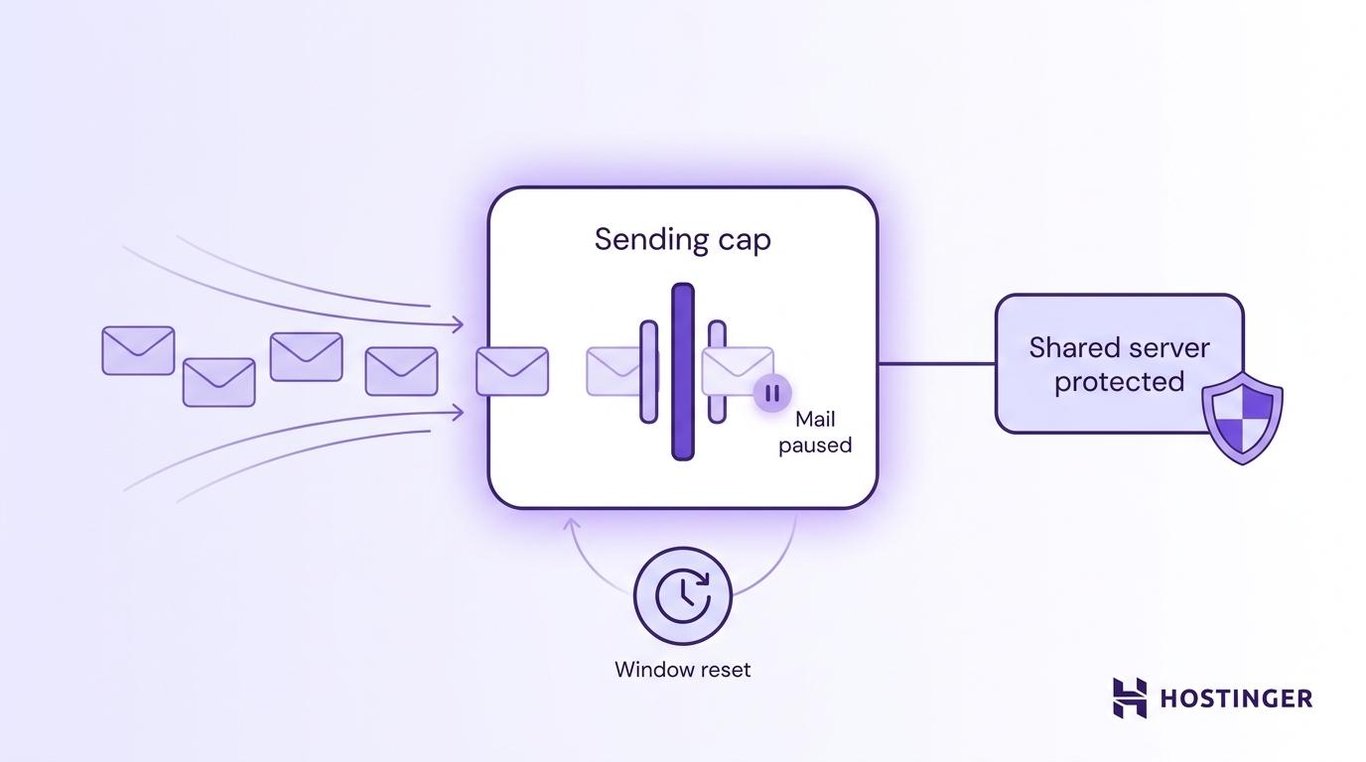
7. Check sending limits and account restrictions
Email providers limit how many messages you can send per hour or per day. These caps exist to stop spam and protect the reputation of the mail server you share with other users. Once you pass the cap, your mail stops going out until the window resets. The exact number and reset time vary by email provider.
That sudden stop has a telltale pattern. You’ve probably hit a limit rather than a settings problem if:
- Email worked fine earlier today, then suddenly stopped.
- Only bulk or repeated messages fail, while one-off emails still send.
- Error messages mention rate limits, quota, throttling, or suspicious activity.
If that sounds like your situation, wait a while before trying again, and cut back on how much you’re sending at once.
To avoid hitting the limit again, don’t send bulk email from your regular business inbox. Send newsletters and campaigns through a dedicated email marketing tool instead, since those tools are built for high volume and won’t trip the limits on your main inbox.
Contact your provider to sort it out if your account was restricted rather than just rate-limited.
8. Review bounce messages and error codes
Bounce messages and error codes tell you what went wrong, which makes them the fastest way to find the cause. When a send fails, the server usually replies with a short message or code.
Find the message you got below to see where to look:
Error type | What it usually means | What to check |
Authentication failed | Wrong username, password, or SMTP login | Your SMTP credentials |
Connection timed out | Server, port, firewall, or network issue on either end | Port, firewall, network, and the recipient’s server |
Relay access denied | SMTP authentication off, or sender mismatch | SMTP auth and your From address |
Message rejected | The recipient’s server blocked the email | Content, reputation, DNS |
Daily limit exceeded | You hit your sending quota | Your provider’s limits |
Gmail and other major mail providers publish their own documentation for SMTP error codes. When you get a specific code, search that exact code along with your provider’s name. That lands you on a page explaining what it means and how to clear it.
9. Check email content and sender reputation
Your email content and sender reputation can cause a message to be blocked even after it sends successfully. The message leaves your account, then a spam filter on the receiving end stops it.
This is less about settings and more about how trustworthy your mail looks, which is crucial for marketing emails and bulk campaigns.
A handful of things make a message look risky, and spam filters treat each one as a warning sign:
- Spammy subject lines, like all caps or money promises.
- Too many links crammed into one message.
- Shortened URLs that hide where they lead.
- Oversized attachments.
- A missing unsubscribe link in marketing emails.
- Poor list quality, with old or fake addresses.
- Sending from a brand-new domain without warming it up first, since new domains get little trust and even a few dozen messages can trip filters before you build up volume gradually.
- Missing email authentication, meaning no SPF or DKIM.
Fix the signals that apply to you, and your mail starts clearing filters again. For most senders, the fastest fixes are trimming links, adding an unsubscribe option, and implementing authentication.
These deliverability habits keep your mail trusted once the obvious problems are gone.
10. Contact your email provider
Contact your email provider when you’ve ruled out all the other fixes and mail still won’t send. Some problems live on the server side, which you can’t reach. If you’ve checked your settings, ports, and DNS and still can’t send, support can see what’s happening behind the scenes.
Reach out when any of these are true:
- Webmail also can’t send, which points to something beyond your app or device.
- Your SMTP credentials are correct, but still get rejected.
- The ports are open, yet the connection keeps failing.
- Your account looks restricted or suspended.
- Error messages mention server-side blocking.
- Your DNS records are correct, but mail still fails after propagation finishes.
Have a few details ready before you message your email provider, so they can help faster:
- The affected email address.
- The exact error or bounce message.
- The app or email client you’re using.
- The SMTP settings you entered.
- When the problem started.
- Whether webmail can send.
Handing all of that over in your first message saves a round of follow-up questions.
How to prevent email sending issues in the future
You can prevent most email-sending problems with a few small habits in your settings, authentication, and sending volume.
Most failures trace back to a setting that was changed, a record that wasn’t set up, or a limit you didn’t know about. Stay ahead of those three, and you’ll rarely see a failed send again.
Build these into your routine:
- Keep a note of your SMTP settings so you can restore them fast after any change.
- Use strong passwords, and update the passwords you save in your apps whenever you change them.
- Set up SPF, DKIM, and DMARC once and properly so your mail stays authenticated.
- Keep bulk sending off your regular inbox and use a marketing tool for campaigns.
- Watch your bounce rate, as a rising one is an early warning sign.
- Update your email apps to fix old bugs that could cause connection issues.
- Send website and WordPress mail through SMTP rather than the default PHP method.
Start with SPF, DKIM, and DMARC, since they make the biggest difference. Once those records are correct, your mail passes more security checks and reaches more inboxes. Add the rest over time, and your mail will stay reliable in the long run.

All of the tutorial content on this website is subject to Hostinger's rigorous editorial standards and values.

Alma is an AI Content Editor with 9+ years of experience helping ideas take shape across SEO, marketing, and content. She loves working with words, structure, and strategy to make content both useful and enjoyable to read. Off the clock, she can be found gaming, drawing, or diving into her latest D&D adventure.