How to use the n8n WordPress node to create posts with AI
Feb 27, 2026
/
Aris S.
/
8 min Read
n8n is a low-code platform that enables you to create automation workflows for various tasks by connecting various tools or applications, including WordPress. For example, n8n’s Create Post node lets you generate and publish content as WordPress posts.
Integration between n8n and WordPress can also facilitate other content management tasks. For example, you can publish posts to multiple websites from a single source, or automatically translate articles for a multilingual site.
If you already have the platforms and credentials set up, you can automate a content creation task by integrating the Create Posts node into your n8n-WordPress workflow, which can be done in five steps:
- Generate the WordPress REST API credentials
- Plan the workflow arrangement and logic
- Configure the topic generation and routing nodes
- Add the content writer and WordPress post nodes
- Test and troubleshoot the complete workflow
Let’s explore the steps to use the n8n WordPress node to create posts with AI automatically.
What is an n8n WordPress node?
The WordPress node in n8n is the main building block of your automation system. It lets you integrate the WordPress content management system (CMS) and run various pre-determined tasks without directly interacting with the platform.
Each node performs a specific action, like creating a post or assigning a role to a user. By chaining them, you can build a series of actions, otherwise known as a workflow, that complete a particular goal.
Here are examples of content-related tasks that you can automate with n8n and WordPress:
- Creating content. Combining an AI agent with WordPress creates an autonomous content creation workflow that writes and drafts posts on your website.
- Publishing posts. You can automatically push content from platforms, like Google Docs or Notion, to WordPress without opening the post editor.
- Distributing articles. n8n’s integration with various social media and messaging platforms lets you automatically share new WordPress posts.
- Alerting the team of new posts. Integrating platforms like Slack or Microsoft Teams with WordPress lets you notify your team of new posts.
- Translating for locales. Using tools like DeepL and Google Translate, you can automatically translate and publish new WordPress posts to another locale.
- Syncing multiple blogs. If you want to publish duplicate content to multiple blogs or websites, you can easily do it from a single entry point in n8n.
Prerequisites for connecting WordPress to n8n
Before creating an n8n workflow with WordPress, you must meet certain prerequisites to ensure a smooth integration process.
Ensure you have installed n8n and deployed your WordPress website. While you can use n8n’s official hosting plan, we highly recommend self-hosting it for better flexibility and data privacy.
You must also have created an account on each platform. WordPress requires an admin-level account to be able to configure the integration credentials.
Next, check if your WordPress website’s REST API is reachable. To do this, open the following address in your web browser, with yoursite.com being your website’s actual domain:
yoursite.com/wp-json
If you see errors like 403 forbidden, the API is inactive. In this case, enable the WordPress REST API manually and update the CMS to the latest version.
Since we’ll write WordPress posts using AI, you need an API key from a large language model (LLM) provider. n8n supports different providers, but we’ll use OpenAI’s ChatGPT as it’s the most popular and the easiest to set up.
To integrate ChatGPT, create an account on the OpenAI portal API page and generate an API key. Store the key in a safe location, as you’ll need it later.
Now that you have all the prerequisites, let’s dive into the steps.
How to set up a WordPress node in n8n to create posts
Depending on what you want to automate, there are several possible ways to set up a WordPress node in n8n to create posts. For this tutorial, we’ll create an autonomous system that writes a daily WordPress post based on a random topic.
1. Generate WordPress REST API credentials
An application password is a credential that authenticates other platforms to access your WordPress instance. It enables n8n to connect and exchange data with your WordPress instance securely.
Here’s how to create an application password. Note that it’ll only be valid for the account that generated it:
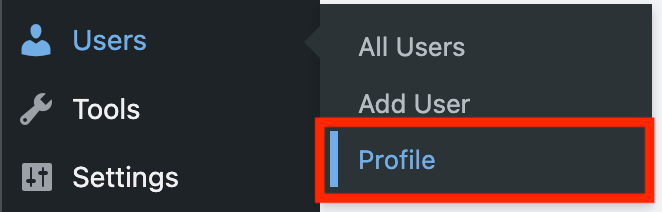
- Open your website’s WordPress admin dashboard and navigate to the Sidebar → Users → Profile.
- Scroll down to the Application Passwords section.
- Enter a name for your application password, preferably something descriptive like n8n-create-post.
- Hit Add Application Password.

- Copy the application password and store it in a safe location.
Important! After closing the profile page, you won’t be able to reaccess your WordPress application password for security reasons. Make sure you have copied it before proceeding.
We’ll use this application password later when configuring the WordPress node. First, you’ll need to create your workflow.
2. Plan your workflow
Developing a blueprint of your workflow helps you determine what nodes you need and their arrangement.
To set up a simple automation system that creates a WordPress post at a fixed schedule, the required nodes and the general workflow logic are:
- The Schedule trigger node starts the workflow in a specific interval.
- OpenAI’s Message a model node sends a predetermined prompt to the chosen LLM, generating a topic to write.
- Google Sheets’ Get row node fetches a list of already-written topics.
- The If node checks whether the newly generated topic already exists in the list. If it does, this node requests OpenAI’s Message a model node to develop another topic.
- Otherwise, the Google Sheets Append row node takes the new topic and puts it at the bottom of the list. It then forwards the topic to the second OpenAI’s Message a model node.
- The OpenAI node creates the content and passes it to the WordPress Create post node to publish the writing.
After determining how the workflow functions, you can go on to create it in n8n. This is outlined node by node below to better explain the logic.
3. Configure the topic generation and filtering nodes
The goal of configuring the topic generation and filtering nodes is to ensure your workflow generates a unique theme for your content each time it runs.
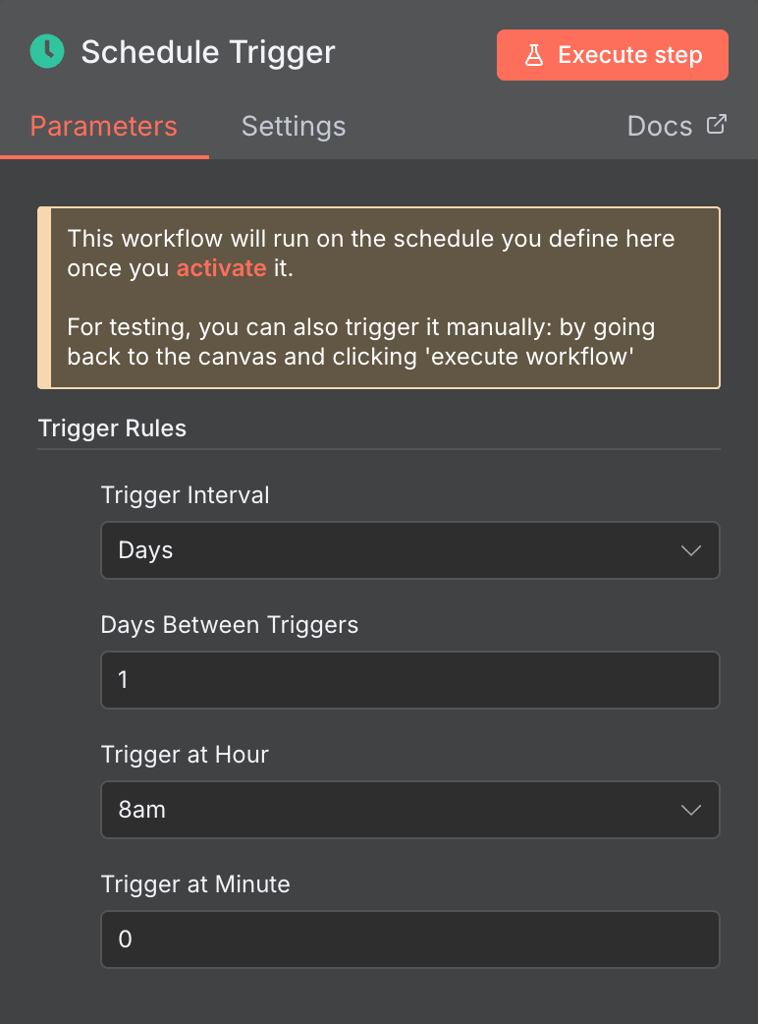
Insert a trigger by clicking the + icon on your n8n canvas and selecting Schedule trigger. Adjust the schedule based on your needs. For this tutorial, we’ll make the workflow run daily at 8 AM.
Next, configure the OpenAI Message node that will generate a topic for your WordPress post:
- Click the + icon on n8n and add the OpenAI Message a model node.
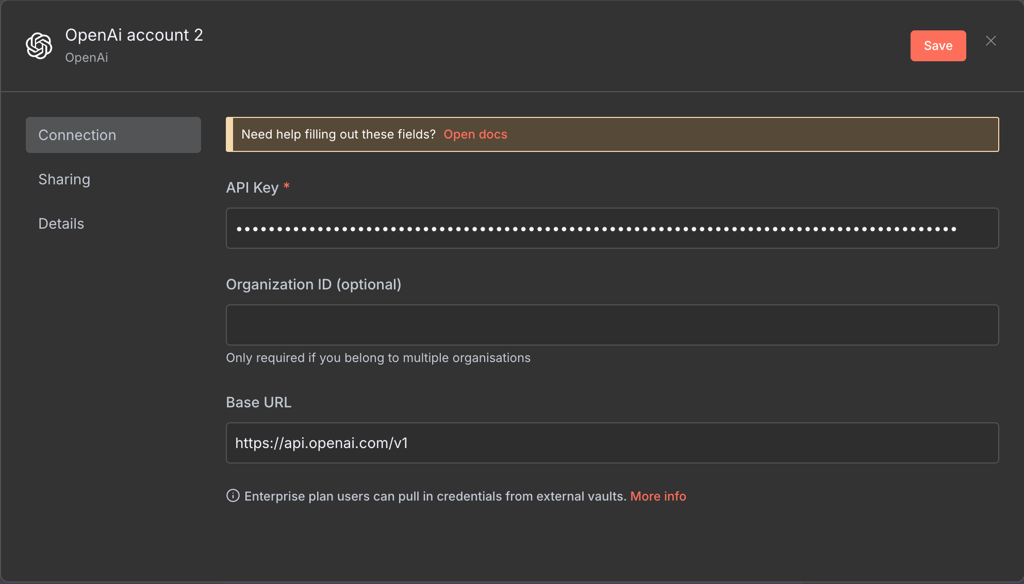
- Expand the Credential to connect with and select Create new credential.
- Enter your OpenAI API key and hit Save.
- Select your desired OpenAI model.
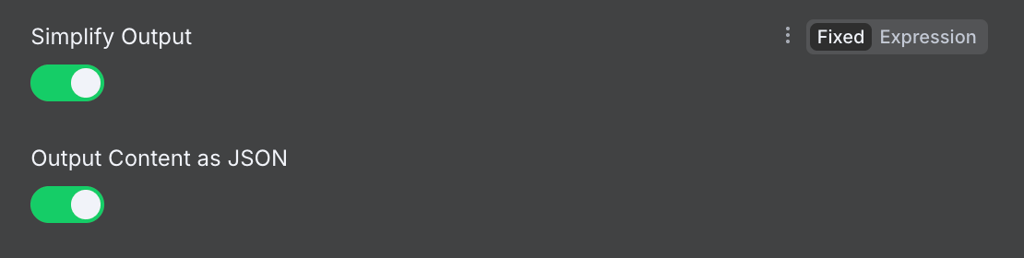
- Scroll down and enable the Output Content as JSON setting.
- Add the prompt for generating a topic. The {{ $json.Topic }} expression will automatically change based on existing topics fetched from the sheet:
Generate a new topic for a blog post about tech. Only give the topic name and don't output anything else. It should be a short phrase. I already have the following topics, which should not be duplicated: {{ $json.Topic }}Remember to adjust the prompt accordingly if you wish to write about other themes.
Next, connect the Google Sheets Get row node to fetch a list of previously written topics. Learn more about the steps by checking out our guide on integrating n8n with Google Sheets.
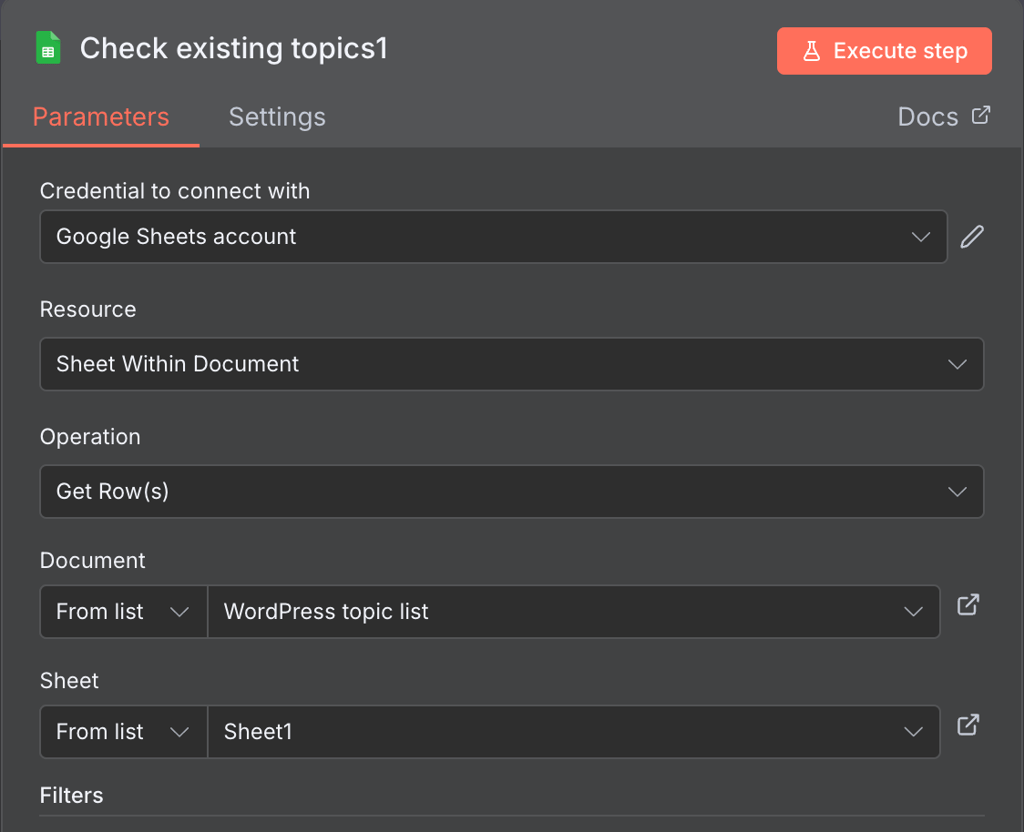
Important! Name the column in which you list all the topics as Topic. Otherwise, the expressions for forwarding the data between nodes will differ.
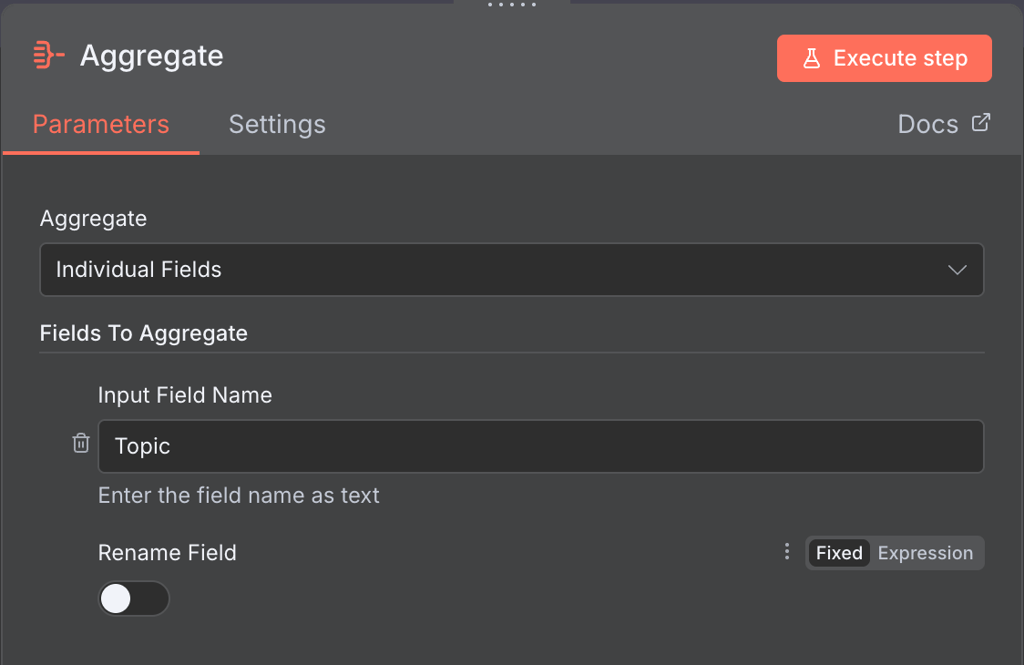
Group the fetched topics into a single item so that the filtering rule reads them once each time and avoids double outputs. To do this, add the Aggregate node, then set the Aggregate setting to Individual Fields and Input Field Name to the row name of your topic list, namely Topic.
Add the If node to set the filtering rule: If the newly generated topic matches any entry of the aggregated list, it returns true. Do this by opening the If node configuration menu and adding the following to the Value1 field:
{{ $json.Title }}Set the condition as String → Contains. Then, enter the following into the Value2 field:
{{ $('Generate a topic').item.json.message.content.topic }}Remember to connect all the nodes. Once finished, your workflow will look like this:

At this point, your workflow should be able to generate a topic and distinguish whether it’s already been written. You’ll then need to automate the processing of this topic into a WordPress post.
4. Add the content writer and WordPress post nodes
To complete the workflow, you’ll then need to set up the nodes that will automate the content writing process in n8n.
Split the workflow into two scenarios using the If filter. For the true condition, simply connect it back to OpenAI’s topic generator node when the generated topic already exists.
For the false condition, direct the workflow to create the WordPress post. Add the Google Sheets Append row node to log new topics on your list. Make sure you select the same document and sheet as specified in the Get row node.

Then, connect and configure another OpenAI Message a model node. Repeat the same configuration as the previous one, but use the following prompt instead.
Create a short 1000-word WordPress blog post on the following topic: {{ $json.Title }}.Expand the prompt if you wish to instruct the AI content writer to follow your style guide.
Important! Remember to convert the OpenAI node output into JSON by toggling the Output Content as JSON setting.
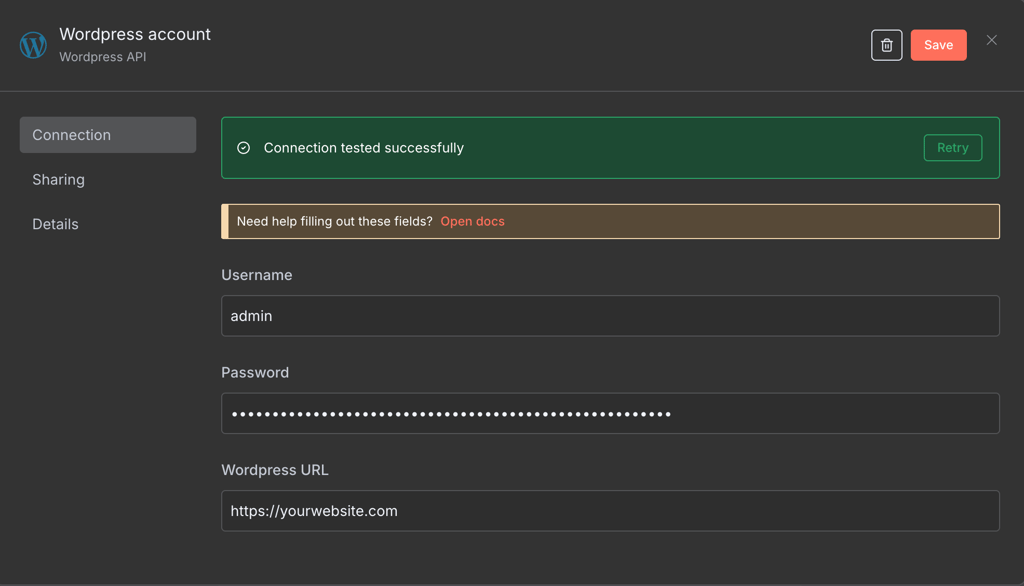
Finally, insert the WordPress Create a post node and follow these steps to configure it:
- Expand the Credential to connect with and click Create new credential.
- Add the WordPress admin username.
- Enter the Application password associated with the username.
- Include your WordPress website URL. It has to start with https://.
- In the Title field, enter the following to fetch the post title of your content:
{{ $json.message.content.title }}- Click Add Field and enter this expression to fetch the generated content:
{{ $json.message.content.content }}That’s it! Your workflow is now complete and should look like the example below. The last step is to check its functionality and troubleshoot errors.

5. Test and troubleshoot the complete workflow
The last step in developing your n8n and WordPress automation is to test it – simply hit the Execute Workflow button at the bottom to do so.
If your workflow runs as intended, it will turn green and show a checkmark. Your sheet will also be updated with the new topic, and a new post draft will appear on your WordPress dashboard.

If there is an error in your workflow, the node with the issue will show a red warning sign. Causes of this error – and their solutions – may be:
- Invalid credentials. Using the wrong credentials prevents n8n from connecting to other applications and using their services. Check the node’s credential setting to see if the entered information is correct, and make sure your WordPress admin user details haven’t been changed.
- Data mapping issue. An expression that selects incorrect or missing data can cause a workflow error. Check each node’s input and output panes to verify that the correct data is being passed.
- Insufficient permission. If the WordPress user connected to n8n doesn’t have the admin permission, it won’t have the permission to create a post on your website. Make sure to select an account with the correct role.
If you encounter multiple errors, we recommend debugging in a chronological order to identify where the issue starts more easily. Start with the node closest to the trigger and work your way through the workflow.
After verifying that your workflow works correctly, click the toggle at the top of your n8n canvas to activate it.

Choose the right hosting for your WordPress and n8n automation
When self-hosting a WordPress-n8n integration, choosing a reliable provider is crucial to maintain stable API communication, avoid downtime, and ensure sufficient computing resources.
Offering robust performance and comprehensive features, Hostinger is an excellent option for self-hosting your WordPress and n8n automation.
Our managed WordPress hosting solution comes with a free domain and SSL certificate so you can get your website up quickly. It also integrates with various developer tools like Git, WP-CLI, and n8n.
Meanwhile, our self-hosted n8n solution provides a one-click installer template that lets you install n8n easily without typing commands. Simply select it during the onboarding process, and it will be ready to integrate with your WordPress website in just a few minutes.
Both our WordPress and n8n hosting plans come with essential security features like automatic backups and a built-in firewall. Moreover, our 99.9% uptime guarantee ensures optimal automation availability.
Other ways to automate WordPress posts
There are other ways to automate content production in WordPress. For example, you can use an alternative automation platform like Zapier instead of n8n.
Or, if you are into the latest trend, you can use OpenClaw. Simply connect OpenClaw to the WordPress website using REST API, and you can interact with the AI agent to generate a post or even create an automation just by prompting.
Several WordPress plugins can also automatically generate content for you. For example, you can ask Hostinger’s AI WordPress plugin to brainstorm topics and write the content for your WordPress post directly from the admin area. Kodee, our AI assistant, lets you use the model context protocol (MCP) in your WordPress instance. This means you can ask it to manage your posts and create new ones.
All of the tutorial content on this website is subject to Hostinger's rigorous editorial standards and values.

Aris is a Content Writer specializing in Linux and WordPress development. He has a passion for networking, front-end web development, and server administration. By combining his IT and writing experience, Aris creates content that helps people easily understand complex technical topics to start their online journey. Follow him on LinkedIn.