If you have an application currently hosted on Vercel—whether you built it from scratch or vibe-coded it with v0—you can migrate it to Hostinger at any time.
Choose the step that applies to your situation:
- If you built your app with v0 and haven’t connected it to GitHub yet, start at Step 1.
- If your app is already on GitHub, skip straight to Step 2.
- If you prefer uploading locally saved project files, skip to Step 2.
Before you start
- Confirm your application is working correctly before migrating
- Note any environment variables your project uses. You may need to re-enter them in Hostinger
- If you are using any Vercel-native features such as Edge Functions or Vercel Blob storage, make sure you have alternatives in place before switching
Step 1 — Export your project to GitHub
Note: Skip this step if your code is already on GitHub.
Option 1 — Connect your v0 app to GitHub
- Open your project in v0.
- In the sidebar panel, click on the Git section.
- Click Connect to start the connection process.
- In the Create Repository modal, select your Git Scope (the GitHub account or organization) and enter a Repository Name.
- Click Create Repository to link your chat to a new private GitHub repository.
v0 will push your project code to the repository automatically. Every change you make in v0 will be committed to a dedicated branch (for example, v0/main-abc123), keeping your main branch protected. - When you are ready to finalize your code, click the Publish button (which shows a PR icon when connected to GitHub).
- Select Open PR to create a pull request from your working branch to main.
- In the publish modal, click Merge PR to merge your changes into main.
Your code is now in the main branch and ready to deploy to Hostinger.
Option 2 — Confirm your existing Vercel app is on GitHub
Most Vercel projects are already connected to a GitHub repository. To confirm:
- Open your project in the Vercel Dashboard.
- Go to Settings → Git.
- Verify that a GitHub repository is connected and that your latest code has been pushed.
If your project is not connected to GitHub, push your code to a new GitHub repository before continuing.
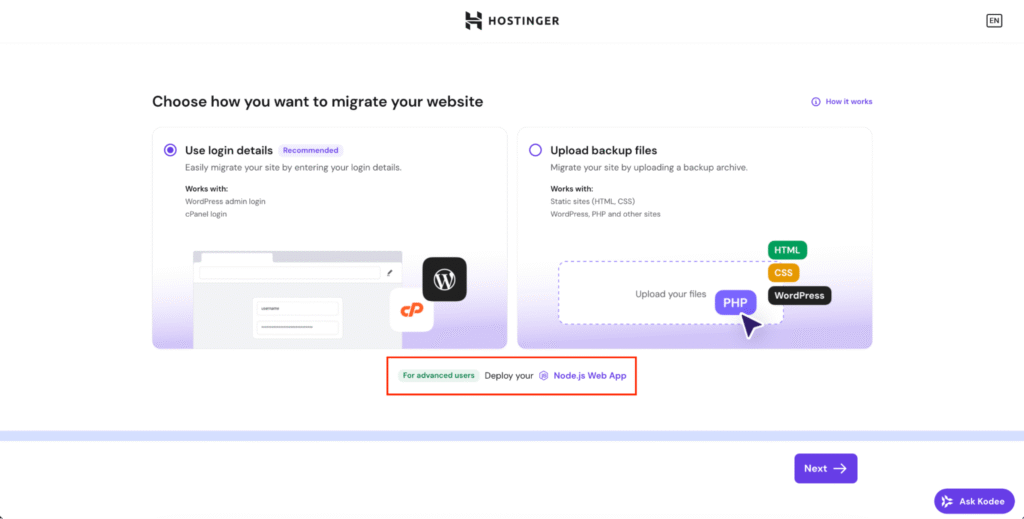
Step 2 — Migrate your project to Hostinger
Hostinger supports two deployment methods. Use GitHub if your code is already in a repository, as it is the fastest and recommended option.
If you only have your project files locally, you can upload them as a ZIP file instead.
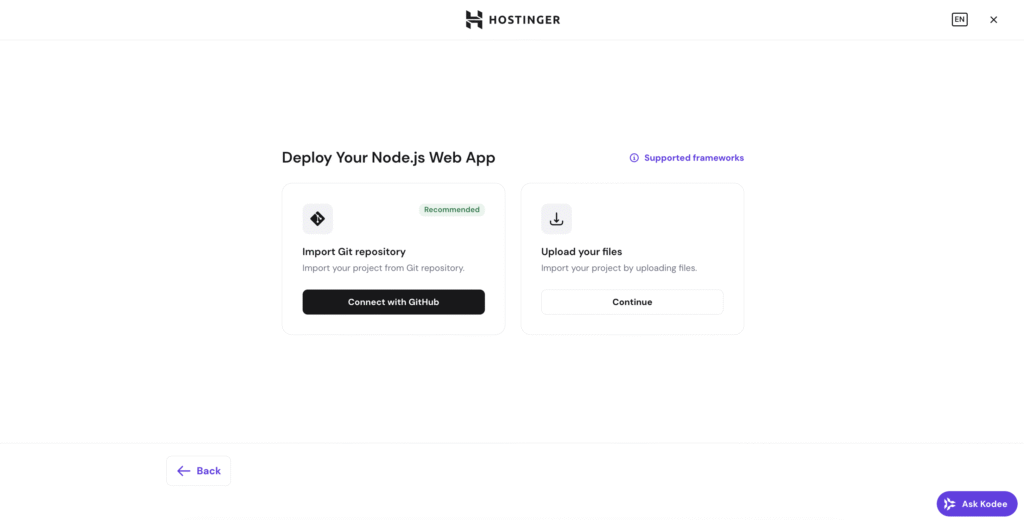
Option 1 — Migrate from GitHub (recommended)
Once your code is on GitHub, migrating it to Hostinger is simple.
- Log in to hPanel.
- When asked to choose how you want to migrate your website, choose Node.js Web App.
- Select a domain name to connect to your web app or use a temporary one.
- Choose Connect with GitHub when prompted.
- Authorize Hostinger to access your GitHub account.
- Select the repository that contains your v0 application.
- Choose the main branch (or whichever branch contains your finalized code).
- Review the build settings and add any required environment variables.
- Start the deployment.
Hostinger will automatically build and deploy your application. Once deployment is complete, you will see a preview confirming your application is live.
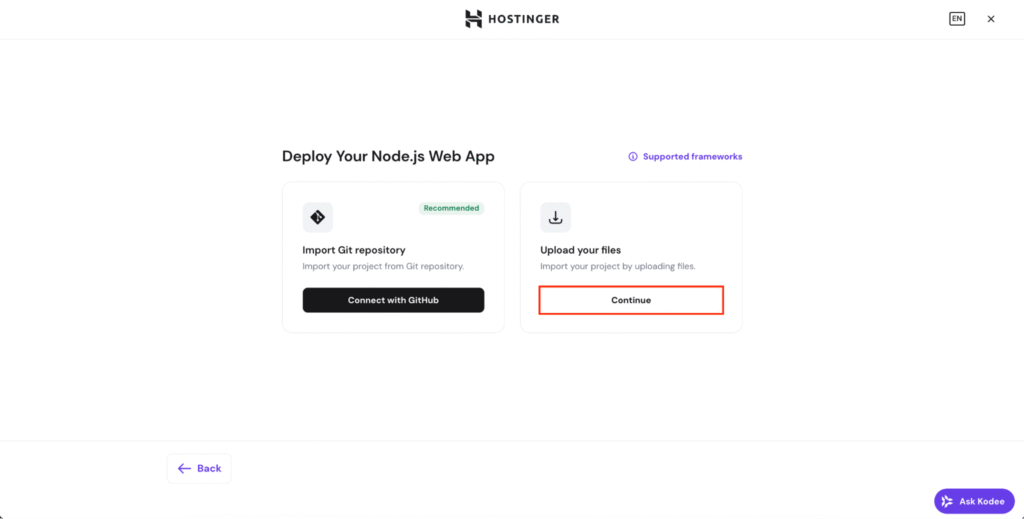
Option 2 — Migrate by uploading your project’s ZIP file
If your project files are stored locally rather than in a GitHub repository, you can migrate by uploading a ZIP archive.
- On your local machine, create a ZIP file of your project.
- Include package.json and all required source files
- Exclude unnecessary files such as node_modules
- Log in to hPanel.
- When asked to choose how you want to migrate your website, choose Node.js Web App.
- Pick the Upload your files method.
- Upload your project’s ZIP file.
- Configure build settings and add any required environment variables.
- Start the deployment.
Hostinger will automatically build and deploy your application. Once deployment is complete, you will see a preview confirming your application is live.
IMPORTANT:
- Applications built with v0 are typically Next.js projects. Make sure the correct Node.js version is selected in Hostinger’s deployment settings to match your project’s requirements.
- Add all environment variables (API keys, database URLs, and so on) during the Hostinger deployment setup. Missing variables are the most common cause of post-migration errors.
- Test your application thoroughly on Hostinger before pointing your domain or switching production traffic to the new URL.
- If you continue making changes in v0 after migrating, merge them to your GitHub main branch and redeploy from hPanel to keep your Hostinger deployment up to date.