Deploying your first container with the Hostinger VPS Docker manager is a streamlined process that allows you to launch applications on your virtual private server in minutes. This guide walks you through the entire process—from accessing the manager within your VPS dashboard to running and maintaining your containerized applications.
Pre-requisites
- A Hostinger VPS with a Docker template installed.
- A Docker Compose file or a URL to a Docker Compose repository.
Deploy your first container
Follow these steps to deploy your first container using the Docker Manager in hPanel.
Step 1 – Access the Hostinger Docker manager
- Go to the VPS section on hPanel
- Select your server by clicking Manage.
- Click Docker Manager in the left sidebar.
- Click on Compose button
- Main options will be displayed as buttons: Compose manually, Compose from URL, One Click Deploy
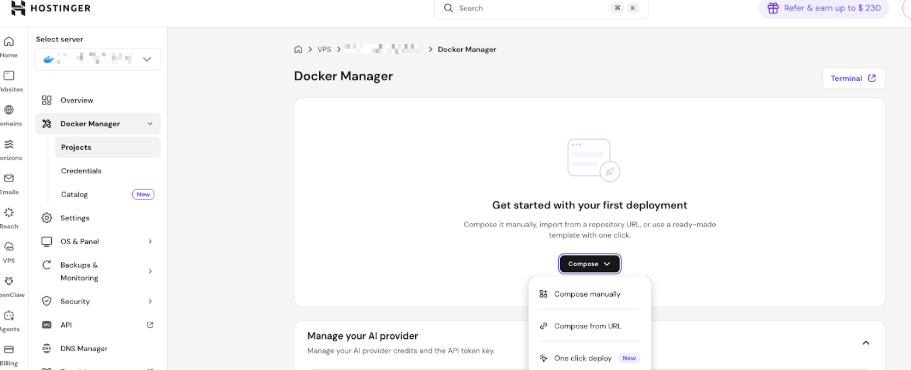
Step 2 – Choose a deployment method
The Hostinger Docker manager offers three primary ways to set up your project:
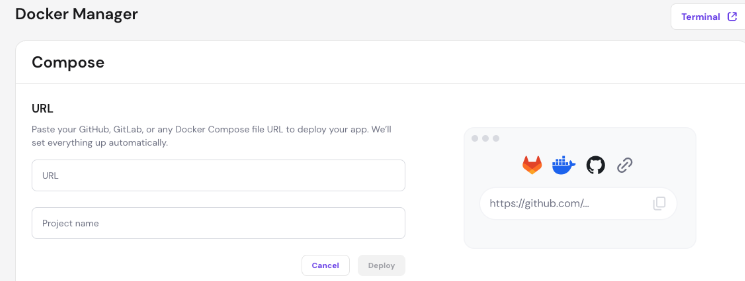
- Option 1 – Compose from URL: It allows you to deploy pre-configured applications from platforms like GitHub or GitLab. Paste the direct link to your docker-compose.yml file in the URL field.
- The system supports GitHub, GitLab, and direct links to Docker Compose files.
- Option 2 – Compose manually: Use this if you want to write or paste your configuration directly into the editor.
- Option 3 – One click deploy: Use this if you already have a specific application in mind. It will redirect you to Hostinger VPS catalog (https://www.hostinger.com/support/hostinger-docker-catalog-applications/) and you will be able to select the application you want to. This would be the easiest option to use.
Step 3 – Configure the container settings
If you choose to compose manually, define the following parameters:
- Project name: Enter a unique, descriptive name (e.g., my-wordpress-site).
- Container name: Give your container a unique identifier
- Image: Specify the Docker image (e.g., nginx:latest, wordpress:6.0)
- Ports: Map container ports to VPS ports using the format VPS-port:Container-port (e.g., 8080:80).
- Volumes (optional): Assign persistent storage paths to save data outside the container. (e.g., /home/mydata:/var/www/html).
- Environment variables (optional): Add necessary configuration keys, such as NODE_ENV=production or PORT=3000.
- Restart policy: Select the option from the dropdown for how the container behaves if it stops.
- always: Container restarts automatically
- unless-stopped: Restarts unless manually stopped
- on-failure: Restarts only on errors
- no: No automatic restart
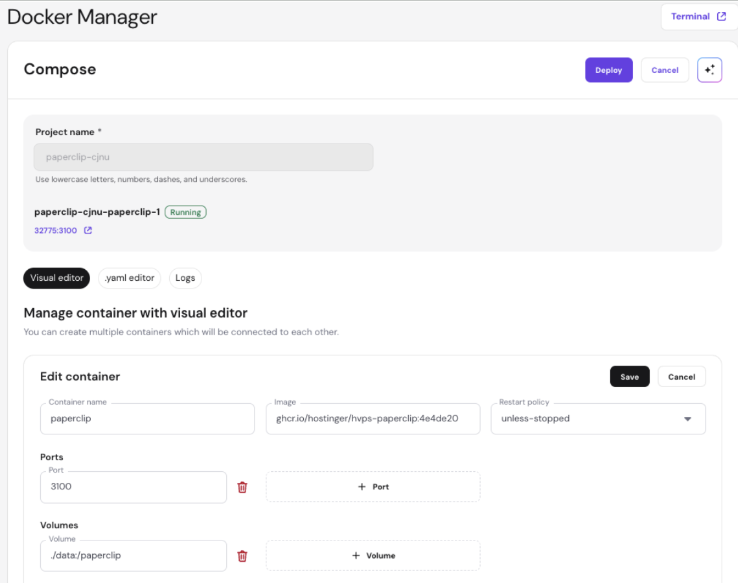
The right panel shows a live preview of your Docker Compose YAML configuration for setting verification, making quick edits and better understand the Docker Compose format.
Here’s an example of an actual Docker Compose YAML file defining a project comprising two interconnected services: a simple web application and a Redis cache instance.
To help you understand the configuration, check the comments to see what each line does.
services:

 web: # Service for the web application

   build: . # Builds the image from the Dockerfile in the current directory

   ports:

     - "8000:5000" # Maps host port 8000 to container port 5000

   depends_on:

     - redis # Ensures 'redis' starts before 'web'

   volumes:

     - ./:/app # Mounts the current directory into the container at /app (bind mount)

   environment:

     REDIS_HOST: ${REDIS_HOST:-redis} # Sets REDIS_HOST from env or defaults to 'redis'

 redis: # Service for the Redis cache

   image: redis:6 # Uses the official Redis image (version 6)

   expose:

     - "6379" # Exposes port 6379 to other services within the Docker network

   volumes:

     - redis_data:/data # Persists Redis data in a named volume

volumes:

 redis_data: {} # Declares the named volume for Redis data persistence
Note that depending on your application, services, and configuration, the exact content of the YAML file varies.
If you choose to compose through URL, all you have to do is to paste valid Github, GitLab or any Docker compose file URL and give your project a name:
Step 4 – Deploy the container
- Review the live YAML preview in the right panel to ensure the syntax is correct.
- Click the Deploy button.
- The system will validate the configuration, pull the required images, and start the services. This usually takes between 30 seconds and 2 minutes.
After successful deployment, you’ll be redirected to the project list for further managing options.
Step 5 – Access your application
To access your deployed application:
- Note the port mapping from your container settings
- Open your browser and navigate to http://your-vps-ip:port, e.g.: http://123.45.67.89:8080
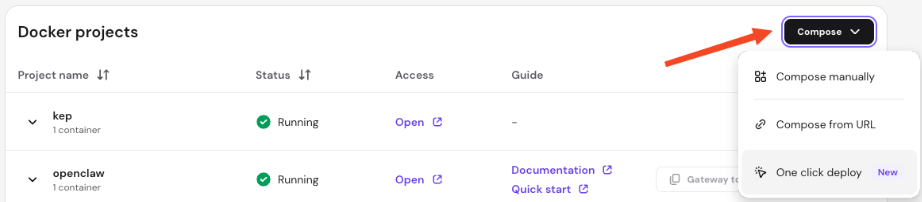
Step 6 – Deploy additional containers
After deploying your initial project, you can easily add more containers to your environment. This allows you to run multiple services on the same server.
- Go to hPanel VPS → click Manage next to the server.
- On the left sidebar, select Docker Manager → Projects
- Click the Compose button located in the top-right corner of the projects list.
- Select your preferred deployment method from the dropdown menu.
- Compose manually: Use this to paste or write a new Docker Compose configuration directly in the editor.
- Compose from URL: Use this to pull a configuration file from a remote repository.
- One click deploy: Select this to access the Docker Catalog applications.
After completing these steps, have successfully deployed your first container using the Hostinger Docker manager. You can now scale your project by adding more containers and exploring more advanced features as you become comfortable with the platform.