How to set up OpenClaw on a Mac mini
Aug 14, 2026
/
By Ariffud M.
/
13 min Read
To set up OpenClaw on a Mac mini, install it through Terminal, connect an AI model and messaging apps, then configure macOS to keep the service available.
A Mac mini works well for this setup because it’s compact, energy-efficient, and built to stay connected to power. It also supports macOS-only features and integrations.
For example, OpenClaw can use iMessage if the Mac mini is signed in to the Messages app.
Running OpenClaw on a Mac mini has become a popular way to create a local agent gateway that stays available 24/7. Follow these steps to install, configure, and secure your OpenClaw setup:
- Install OpenClaw on the Mac mini. Run the official installer in Terminal, then confirm that the Gateway works.
- Complete the onboarding process and connect an AI model. Choose a model provider, add the required credentials, and configure your assistant’s basic behavior.
- Connect your messaging apps. Add channels such as Telegram or WhatsApp, then grant the macOS permissions required for the features you use.
- Keep OpenClaw running without a monitor. Install its background service, then adjust the Mac mini’s sleep and restart settings to keep OpenClaw running continuously.
- Secure the Mac mini and OpenClaw. Control who can contact the assistant, protect its credentials, review its tool permissions, and check the installation for unsafe settings.
What do you need before installing OpenClaw on a Mac mini?
Before installing OpenClaw, update your Mac mini and decide whether you’ll use a cloud AI provider or run a model locally. This choice determines the hardware, accounts, and credentials you’ll need.
Here’s what to prepare:
- An up-to-date version of macOS. Install the latest updates available for your Mac mini.
- Administrator access. The installer may ask for permission to add required software.
- A separate macOS user account, if possible. This helps limit OpenClaw’s access to personal files and credentials, especially on a shared Mac.
- Messaging app credentials. For example, Telegram requires a bot token to connect with OpenClaw.
You don’t need to install Homebrew, Git, or Node.js manually when using OpenClaw’s official installer. It checks for the required software and installs any missing components.
For most users, a cloud AI provider is the simplest option. Services such as Anthropic, OpenAI, and Google handle the AI processing, so your Mac mini only needs to run OpenClaw.
You’ll need a stable internet connection for AI model requests and messaging app connections. Prepare an API key or another supported sign-in method for your chosen provider.
In contrast, running an Ollama model locally with OpenClaw requires more memory and processing power. The exact requirements vary by model, so check that your Mac mini’s specs meet the model’s hardware requirements before continuing.
1. Install OpenClaw on the Mac mini through Terminal
To install OpenClaw on your Mac mini through Terminal, run the official installer. It checks whether Node.js and Git are already on your system, adds them if they’re missing, then installs OpenClaw.
If you’ve set up OpenClaw on Linux with the official installer before, the commands will look familiar. If you used a different installation method, such as Docker, the process won’t be the same.
First, open Finder → Applications → Utilities → Terminal, then run:
curl -fsSL --proto '=https' --tlsv1.2 https://openclaw.ai/install.sh | bash
The installer displays its progress in Terminal while it checks your system and installs the required components.
After the installation finishes, confirm that OpenClaw is available:
openclaw --version
The command should return the installed OpenClaw version.

Next, check the installation for missing software or configuration issues:
openclaw doctor
Review any warnings or errors before continuing to the onboarding step.
If you prefer to manage the required software yourself, you can install OpenClaw manually. First, install Node.js with Homebrew:
brew install node
Then install the latest OpenClaw release:
npm install -g openclaw@latest
Run openclaw –version and openclaw doctor again to verify the installation.
2. Complete onboarding and connect an AI model
Run the onboarding wizard to connect an AI model, configure the local Gateway, and install OpenClaw as a background service on your Mac mini:
openclaw onboard --install-daemon
The onboarding wizard guides you through the setup. The –install-daemon option also installs OpenClaw as a background service, so you don’t need to keep Terminal open.
This service starts the Gateway when you log in and restarts it if the process crashes, so you don’t need to keep Terminal open.
Follow the onboarding prompts to set up your AI model and OpenClaw. Some options depend on whether you choose QuickStart or Manual setup:
- Setup mode. Choose QuickStart to use the recommended defaults and skip some configuration prompts. Choose Manual setup if you want to configure settings such as the Gateway port, bind address, and authentication method yourself.

- AI provider and model. Select a supported provider, then authenticate with an API key or another available sign-in method. OpenClaw supports providers such as Anthropic, OpenAI, and Google, as well as local model services like Ollama. The wizard offers an optional connection test to confirm that your credentials and model work. You can change the provider later by running openclaw onboard again.
- Gateway configuration. You won’t see this option in QuickStart because OpenClaw automatically uses the default Gateway settings: bind address 127.0.0.1 and port 18789. These settings keep direct Gateway access on the Mac mini. Manual setup lets you change them if needed.
- Authentication. You also won’t see this in QuickStart because OpenClaw uses token authentication by default and generates a token when needed. With Manual setup, choose token authentication unless you have a reason to use another option, such as a password. OpenClaw recommends token authentication even when the Gateway uses 127.0.0.1.
- Workspace and assistant setup. Complete the prompts to create the assistant’s workspace and initial configuration. Keep its instructions specific, especially if the assistant can run commands, access files, or send messages. Require confirmation before destructive actions or actions that affect external services instead of relying on a broad instruction such as “be careful.”
- Channels, skills, and optional features. Skip any integrations you don’t need yet. You can return to the optional settings later with openclaw configure, add messaging channels with openclaw channels add, and install skills individually after confirming that the Gateway and model connection work.
By default, OpenClaw stores its main configuration in ~/.openclaw/openclaw.json and the assistant’s workspace in ~/.openclaw/workspace/.
You can edit these files later, but rerunning the onboarding or configuration commands is safer if you’re unfamiliar with the available fields.
After onboarding finishes, verify that the Gateway is running:
openclaw gateway status
You should see the Gateway listening on port 18789. Then open the local dashboard:
openclaw dashboard
If the dashboard loads and the assistant responds to a test message, the model and Gateway are working correctly.
3. Set up messaging channels and grant macOS permissions
To connect OpenClaw to messaging apps, configure each channel separately and grant only the macOS permissions that its integration requires. Start with one channel and test it before adding others.
Telegram is a simple option because you only need a bot token. In Telegram, open @BotFather, create a bot, and note its token.
Next, start the channel setup:
openclaw channels add
Choose Telegram when prompted, then enter the bot token you copied from @BotFather.
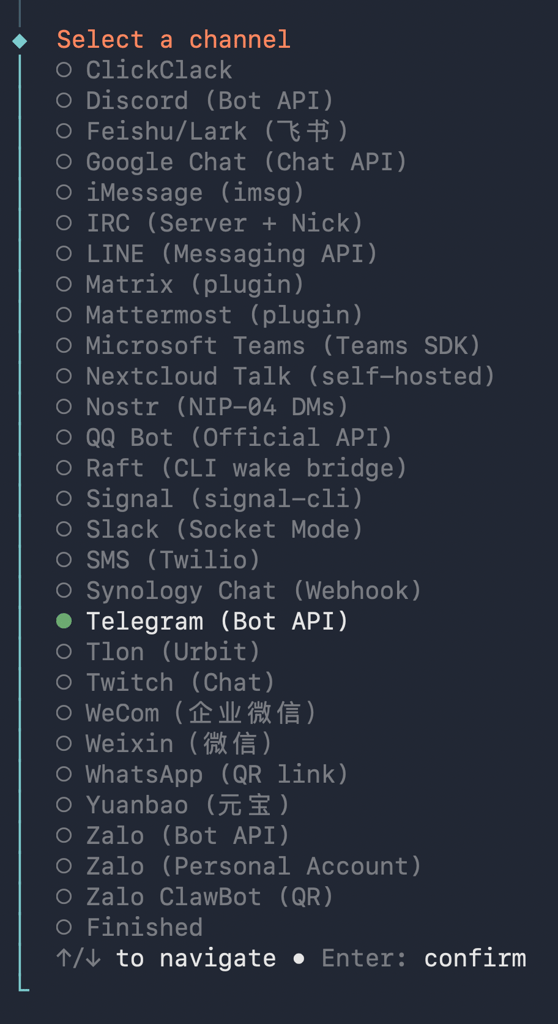
Telegram direct messages use pairing by default. When an unknown user messages the bot, OpenClaw gives them a temporary pairing code. Pairing codes expire after one hour.
Review pending pairing requests:
openclaw pairing list telegram
Approve a request from a trusted user:
openclaw pairing approve telegram PAIRING_CODE
Only approve requests from people you recognize. For a bot that only you use, consider setting the direct-message policy to allowlist and adding your numeric Telegram user ID to channels.telegram.allowFrom in ~/.openclaw/openclaw.json.
Don’t set channels.telegram.dmPolicy to open unless you want anyone to message the bot. This setting also requires channels.telegram.allowFrom to include *. Only use it if you’ve limited what the assistant can access and do.
OpenClaw also supports channels such as WhatsApp, Slack, Discord, Signal, Google Chat, Microsoft Teams, and iMessage. Add a channel with:
openclaw channels add --channel CHANNEL_NAME
Then follow the prompts to install its plugin and provide the required credentials.
Depending on the channel, you may need to enter a token, scan a QR code, or complete another authentication process. Some channel plugins require you to restart the Gateway after installation.
Most messaging channels don’t need extra macOS permissions. However, macOS-specific integrations may request access under System Settings → Privacy & Security.
For example, OpenClaw’s iMessage integration requires Full Disk Access to read the Messages database and Automation permission to send messages through the Messages app.
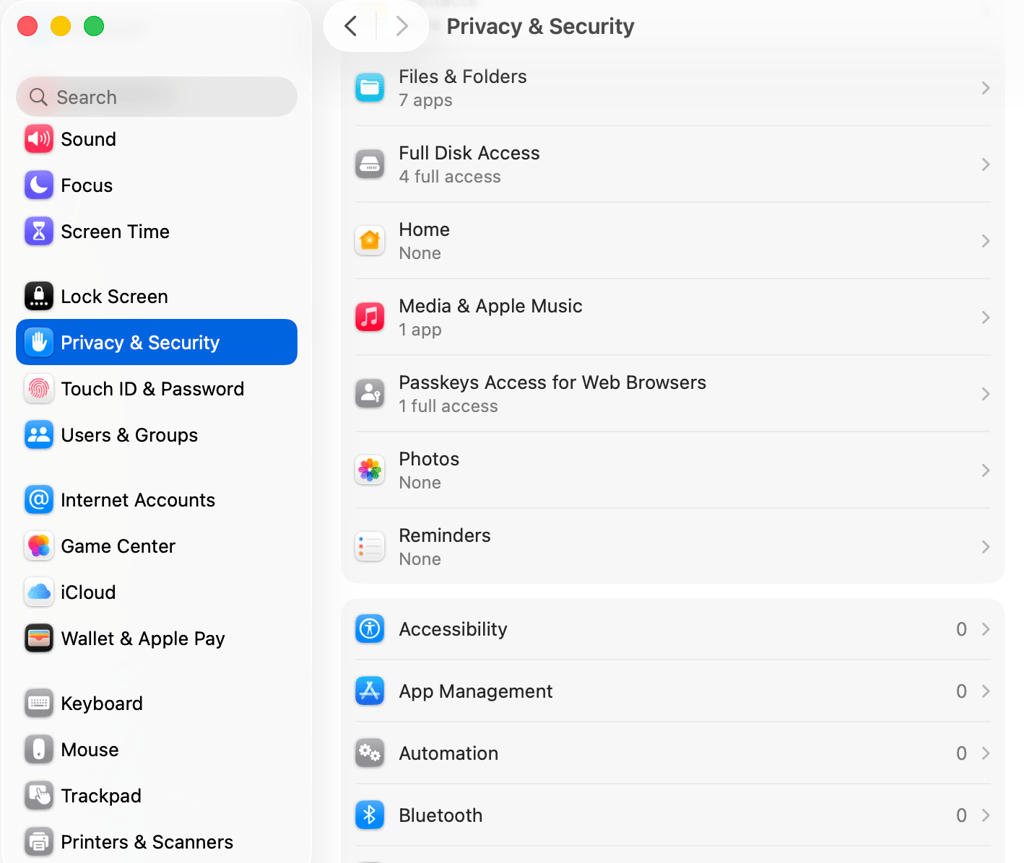
Grant these permissions to OpenClaw and imsg if macOS asks for them. Also, make sure you’re signed in to the Messages app on the Mac mini.
After configuring a channel, send a test message from an approved account. Confirm that OpenClaw receives the message and replies correctly before connecting another messaging app.
4. Configure the Mac mini for always-on operation
You can keep OpenClaw available without a connected display by configuring the Mac mini to stay awake, restarting automatically after a power outage, running the Gateway in the background, and allowing remote access.
- Prevent the Mac mini from sleeping. The Mac mini must stay awake so OpenClaw can receive messages and keep its channels connected. Open System Settings → Energy, then turn on Prevent automatic sleeping when the display is off. Also turn on Wake for network access so the Mac mini can respond to remote connections.
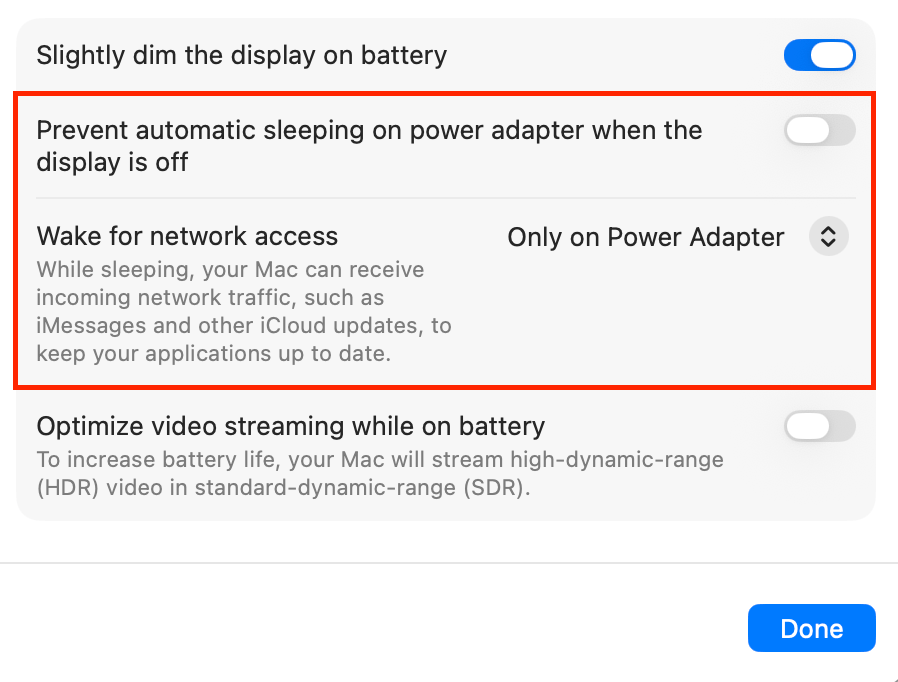
- Restart the Mac mini after a power outage. Configure the Mac mini to turn on automatically after a power failure so OpenClaw doesn’t stay offline. Open System Settings → Energy, then turn on Start up automatically after a power failure, if this option is available.
- Keep the Gateway running in the background. If you ran openclaw onboard –install-daemon during onboarding, the background service is already installed. If you skipped this step, install it now:
openclaw gateway install
- Enable remote access. Remote access lets you manage the Mac mini without connecting a monitor, keyboard, or mouse. Open System Settings → General → Sharing, then turn on Remote Login to manage the Mac mini through SSH. Allow access only for the user accounts that need it. To control the desktop remotely, turn on Screen Sharing in the same menu. For access outside your local network, use a private networking tool such as Tailscale instead of exposing SSH, screen sharing, or the OpenClaw Gateway directly to the internet.
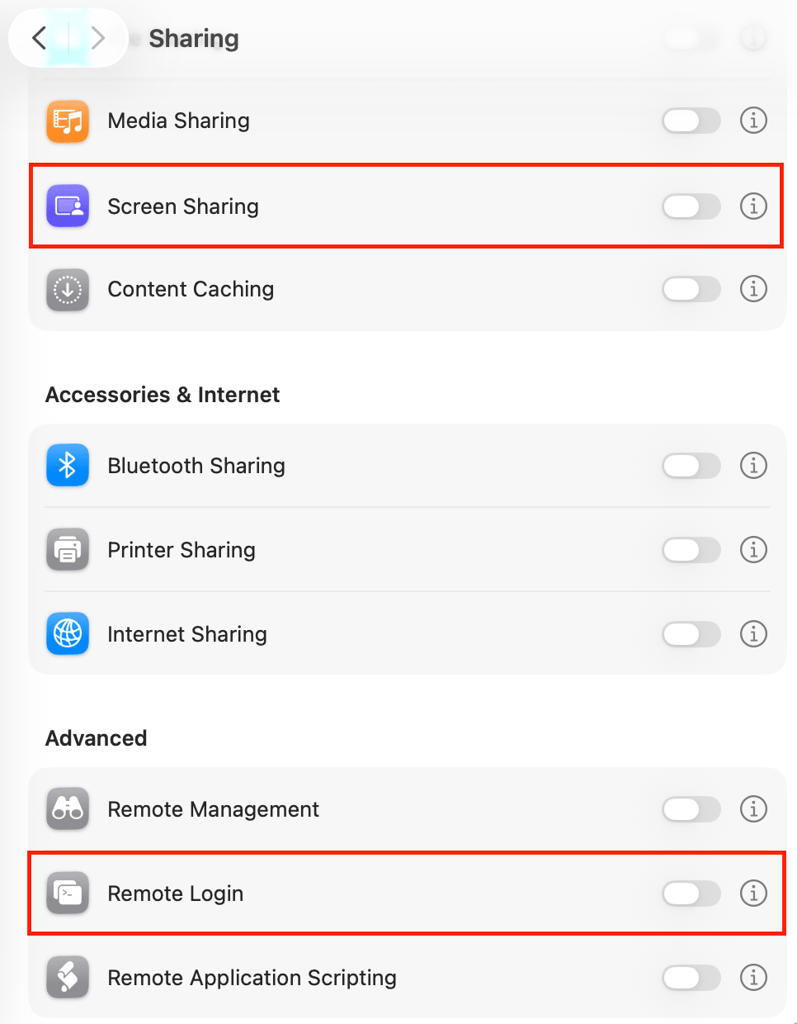
After updating these settings, restart the Mac mini and run openclaw gateway status to confirm that the Gateway starts correctly.
5. Secure the Mac mini and OpenClaw
To secure a Mac mini running OpenClaw, use a separate standard user account, turn on FileVault and the macOS firewall, keep the Gateway private, limit who can contact the assistant, and review its permissions regularly.
- Use a separate macOS account. Create a standard, non-admin account for OpenClaw. This limits which system settings and files it can access. You can add one under System Settings → Users & Groups → Add User. Keep your administrator account for system changes and software maintenance.
- Turn on FileVault. FileVault protects the data stored on your Mac mini if someone steals or accesses the device. Open System Settings → Privacy & Security → FileVault, then confirm that it’s turned on. Store the recovery key somewhere safe.
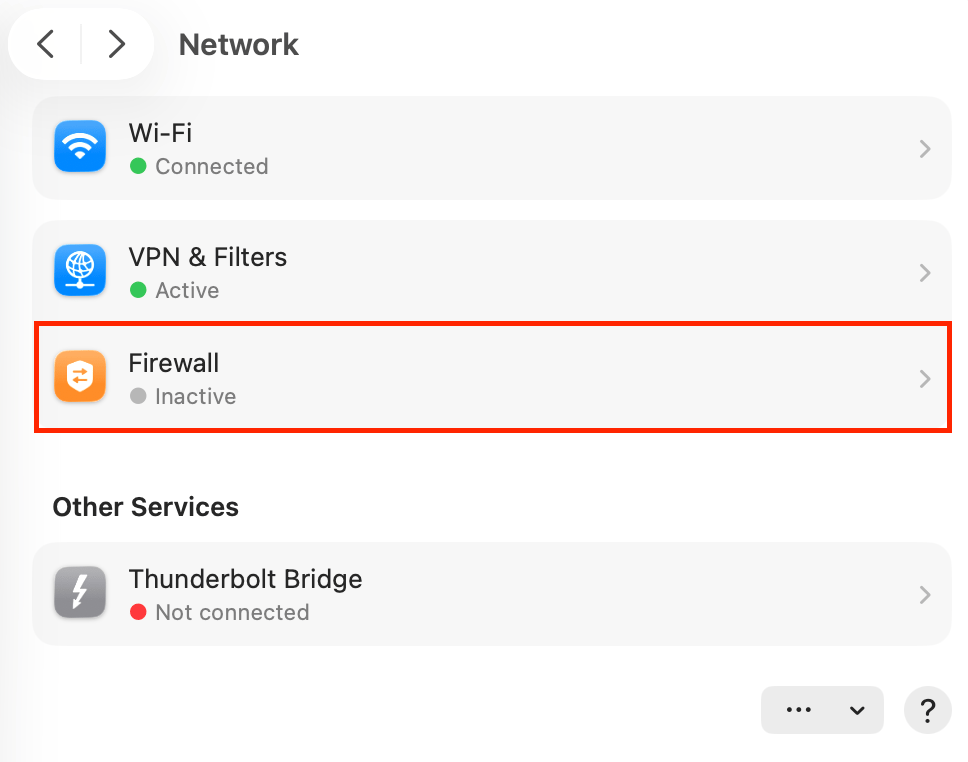
- Enable the macOS firewall. Open System Settings → Network → Firewall, then turn it on. The firewall helps block unwanted incoming connections from other devices and networks.
- Keep the Gateway private. Leave the Gateway bound to 127.0.0.1, also called the loopback address, unless you have a clear reason to change it. This setting allows connections only from the Mac mini itself. Keep token authentication enabled, even for a local Gateway. OpenClaw uses 127.0.0.1:18789 by default and recommends an SSH tunnel or Tailscale for remote access.
- Limit the assistant’s tools. Only enable the commands, files, and integrations that the assistant needs. For a messaging-focused setup, use a restricted tool profile and disable command execution, file access, and automation unless you plan to use them. OpenClaw’s security guidance recommends keeping powerful tools unavailable to untrusted users.
- Restrict messaging access. Keep direct messages in pairing mode or use an allowlist. Only approve users you recognize, and avoid wildcard entries such as * unless you want anyone to contact the bot. OpenClaw isn’t designed to isolate several untrusted users who share the same Gateway.
- Protect your credentials. Don’t paste API keys or tokens into commands, since Terminal keeps a history of what you type. Don’t store secrets in a project folder that you might upload to Git. Keep the ~/.openclaw directory private because it may contain credentials, configuration files, logs, and conversation history.
- Run regular security checks. Scan the configuration, Gateway, plugins, and skills with openclaw security audit –deep. Review the results before applying changes, then run openclaw security audit –fix. The –fix option can tighten file permissions and correct some unsafe channel settings, though it won’t rotate credentials, disable tools, change Gateway exposure, or remove plugins for you.
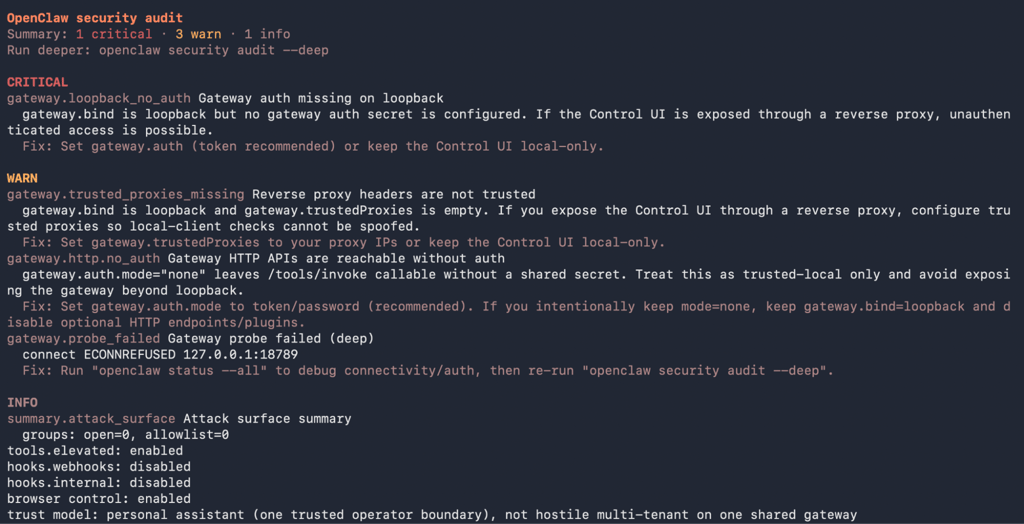
Besides hardening the Mac mini, secure OpenClaw itself. Start with read-only or reversible tasks, such as summaries, reminders, and reports.
Add commands, file changes, and other higher-risk actions only after you understand how OpenClaw behaves and have the right approval rules in place.
Why a Mac mini suits OpenClaw as an always-on AI assistant
A Mac mini is a practical host for OpenClaw because it has low idle power consumption, can run as a dedicated machine, gives OpenClaw access to macOS features, and keeps the setup on hardware you control.
- It uses little power when idle. According to Apple’s Mac mini power consumption data, the 2024 M4 Mac mini uses about 4 W at idle, while the M4 Pro model uses about 5 W. That makes it well suited for a setup that stays powered on throughout the day.
- It keeps OpenClaw separate from your main computer. A dedicated Mac mini can run OpenClaw in the background while you use your primary computer normally. You also don’t need to leave your everyday laptop or desktop running just to keep the assistant available.
- It gives OpenClaw access to macOS features. OpenClaw can use macOS-only tools for notifications, screen capture, camera access, voice input, AppleScript automation, and computer control. These features are useful for workflows that interact directly with apps and services on the Mac.
- It keeps data on hardware you control. OpenClaw, its configuration, logs, local files, and any local AI models can stay on the Mac mini instead of on a third-party server. This gives you more control over where the data is stored and who has physical access to the machine.
A Mac mini makes the most sense if you want a dedicated OpenClaw machine on hardware you own and manage at home.
If you only need the Gateway and messaging channels, then another host, such as a virtual private server (VPS), may be simpler because there’s no physical hardware to maintain.

How much does it cost to run OpenClaw on a Mac mini?
Running OpenClaw on a Mac mini can cost anywhere from less than $1/month with a local AI model to around $50-$55/month with a cloud model.
If you don’t already own a Mac mini, you’ll also need to account for a one-time hardware cost of $799 to more than $1,599. OpenClaw itself is free.
- Mac mini: from $799. Apple’s base Mac mini with the M4 chip, a 10-core CPU and 10-core GPU, 16 GB of unified memory, and a 256 GB SSD starts at $799 in the US. The more powerful M4 Pro model starts at $1,599 with a 12-core CPU, 16-core GPU, 24 GB of unified memory, and 512 GB of storage. The base model is enough for simpler cloud-backed setups, while more complex workflows with larger local AI models benefit from bigger memory and a faster chip.
- Cloud AI: about $50-55/month. Cloud providers charge based on the number of input and output tokens you use. For example, if OpenClaw uses 5 million input tokens and 1 million output tokens in a month, the cost would be about $50/month with Claude Opus 5 or $55/month with GPT-5.6 Sol at standard short-context rates. Your actual bill may be lower or higher depending on how much you use OpenClaw, how long your conversations are, how often automations run, and whether cached tokens qualify for lower rates.
- Local AI: $0 in API fees, but hardware matters. Running a model locally through Ollama avoids the per-token charges you’d pay with cloud AI providers, but you’re limited to models your Mac mini can run well. As your workflows become more complex, you may need a larger model that requires more memory or processing power, which can turn a model upgrade into a hardware upgrade.
- Electricity: about $0.44/month at idle. Apple measures the M4 Mac mini at about 4 W while idle. Running continuously at that level uses about 35 kWh per year. At an electricity rate of $0.15/kWh, that’s roughly $5.25/year, or $0.44/month. Actual costs depend on electricity rates in your region and will typically be higher when the Mac mini is actively processing tasks or running local AI models.
That said, for a basic cloud-based setup, the Mac mini is the biggest upfront expense, while AI API usage is the main recurring cost of running OpenClaw.
Best practices for running OpenClaw on a Mac mini
To run OpenClaw reliably on a mini, limit risky actions, back up its data, keep the software updated, test new automations carefully, and review its activity regularly.
- Add approval for important actions. Don’t let OpenClaw perform sensitive tasks without your confirmation. For example, add approval before it deletes files, sends messages to new contacts, makes purchases, or changes important accounts or settings. Start with limited permissions and add more only when a workflow needs them.
- Back up your OpenClaw data. Regularly back up ~/.openclaw/ so you can recover your configuration and workspace after an accidental change or hardware problem. You can use Time Machine or another backup method you trust. Make sure your backups don’t expose API keys, tokens, or other sensitive credentials.
- Keep OpenClaw and its integrations updated. Check for OpenClaw updates regularly, along with updates for macOS, installed skills, plugins, and other tools it depends on. Review important changes before updating an always-on setup, especially if you rely on OpenClaw for automations.
- Test new skills and automations first. Don’t give a new OpenClaw skill or automation access to important files and accounts right away. Test it with sample files, a separate account, or another low-risk workflow first. Confirm that it works as expected before letting it run unattended.
- Check OpenClaw’s activity regularly. Review logs and recent actions to make sure automations are working as expected. Watch for repeated errors, unexpected messages or commands.. Keep an eye on your AI provider’s usage dashboard too, since a spike there often means an automation is looping.
- Keep a way to access the Mac mini directly. Remote access is convenient, but it can fail after an update, network problem, or configuration change. Make sure you can still access the Mac mini directly if you need to troubleshoot or restore the setup.
For an always-on OpenClaw setup on a Mac mini, make changes gradually. Test one new skill, integration, or automation at a time, then confirm that it works as expected before adding another.
Common mistakes when setting up OpenClaw on a Mac mini
Most OpenClaw setup mistakes follow a few common patterns: assuming one successful check means the entire setup works, changing too many settings at once, or using important accounts for testing.
- Unplugging the monitor before testing a restart. A setup that works right after installation may still fail after the Mac mini restarts or you log in again. Before using it without a display, restart the Mac mini and run openclaw gateway status. Then send a test message through your configured channel to confirm that OpenClaw starts and responds normally.
- Checking only the Gateway and assuming the messaging channel works. A running Gateway doesn’t guarantee that Telegram, WhatsApp, iMessage, or another channel can send and receive messages. After setting up a channel, run openclaw channels status –probe and send a real test message. If the channel fails, check its pairing, permissions, credentials, or connection instead of assuming the Gateway is the problem.
- Changing several settings while troubleshooting. Editing the Gateway configuration, channel settings, permissions, and authentication at the same time makes it harder to identify what caused or fixed the problem. Change one thing at a time, then test the setup before making another change. If something breaks, retrace your changes one by one and return to the last known working configuration where possible.
- Using personal accounts for untested automations. Connecting your main email, messaging, or other sensitive accounts gives a new automation access to real data and contacts from the start. When possible, test with a separate account and low-risk data first. No matter which account you use, give the automation only the minimum access it needs. Confirm what it can read, change, and send before letting it run unattended.
Is there an easier way to run OpenClaw 24/7
Yes. If you want OpenClaw to stay online around the clock without buying a $799+ Mac mini or managing your own server, Hostinger’s AI automation app plan, which includes OpenClaw, is a simpler alternative.
Starting at $5.99/month, Hostinger provides the infrastructure OpenClaw runs on and handles the server setup, software updates, and security settings for you. This reduces the amount of maintenance you need to do yourself.
The biggest differences between the two options are how much infrastructure you need to manage yourself and whether you need access to native macOS apps and features.
| Aspect | Mac mini | Hostinger AI automation app |
| Hardware purchase | $799+ if you don’t already own one | No hardware purchase |
| Initial setup | You install and configure it yourself | Automated setup and guided onboarding |
| 24/7 operation | Depends on your hardware, power, and internet | Runs on Hostinger’s infrastructure |
| Software updates | You manage them | Hostinger manages them |
| Infrastructure security | You manage it | Hostinger manages it |
| CLI access | Yes | Yes |
| Full root access | Yes | No |
| Local AI models | Yes | No |
| macOS apps and features | Yes | No |
That said, a Mac mini is still the better choice if OpenClaw needs to interact directly with macOS apps, use Mac hardware, or run AI models locally. It also gives you more control over the operating system and OpenClaw environment.
Hostinger AI automation app makes more sense if you mainly want an always-on assistant for messaging, reports, research, reminders, and other cloud-based automations without buying and maintaining dedicated hardware.
Whichever setup you choose, check out practical OpenClaw use cases for ideas on what you can automate with your assistant.
All of the tutorial content on this website is subject to Hostinger's rigorous editorial standards and values.

Ariffud is a Technical Content Writer with an educational background in Informatics. He has extensive expertise in Linux and VPS, authoring over 200 articles on server management and web development. Follow him on LinkedIn.