LangGraph tutorial: How to build an AI agent in Python
Sep 10, 2026
/
By Ariffud M.
/
16 min Read
To build an AI agent in Python with LangGraph, define its shared state and model node, connect them in a graph, then add tools, memory, streaming, and human approval.
You’ll build the LangGraph agent in eight stages:
- Set up the project and install LangGraph.
- Define the shared state your nodes use.
- Create the model node that calls the AI.
- Connect and run your first graph.
- Add tools and decide when the agent should use them.
- Add memory across separate agent calls.
- Stream the agent’s responses as they’re generated.
- Pause tool calls for human approval.
After developing your LangGraph agent locally, you’ll deploy it to a Linux virtual private server (VPS) so it keeps running even after you shut down your computer.
What is LangGraph?
LangGraph is a Python framework from LangChain for building stateful AI agents as multi-step graphs of nodes and edges. Stateful means the workflow keeps and updates information as it runs instead of treating every action as isolated.
It gives you direct control over what your agent does next. You can create workflows with branching, loops, tool use, memory, streaming, and human approval instead of forcing every request through the same fixed sequence.
In a LangGraph workflow, nodes perform tasks, edges control which step runs next, and shared state carries information between those steps. The graph can return to an earlier node, letting your agent repeat an action until it reaches a stopping condition.
For example, you can build a research assistant that moves between reasoning and information retrieval until it has enough evidence to answer.
This looping behavior is common in agentic AI, where an agent chooses its next action based on the information it has gathered – the same pattern behind most AI agent examples that need branching, repeated actions, or human review.
Use LangGraph when your agent needs to loop, branch, call tools, or pause for approval. If a single prompt and response solves your problem, call the model API directly.
What’s the difference between LangGraph and LangChain?
The difference between LangGraph and LangChain is the level of control you have over your agent’s workflow.
LangChain provides higher-level APIs and integrations for common agent patterns, while LangGraph gives you direct control over state, routing, loops, and execution flow.
| Area | LangChain | LangGraph |
| Abstraction level | Higher-level agent APIs and integrations | Lower-level control over workflow execution |
| State management | Provides built-in patterns for common agent state | Lets you define and update graph state directly |
Use LangChain when its built-in agent patterns already fit your app. Use LangGraph when you need custom routing, persistent state across turns, repeated workflow steps, or human review.
You don’t need LangChain’s higher-level agent abstractions to use LangGraph. LangGraph works with LangChain components when you want ready-made model and tool integrations, but it doesn’t require them.
The two aren’t competitors – LangChain’s own agent abstraction runs on LangGraph underneath, so you’re choosing how much of the workflow to write yourself.
How to build a LangGraph agent in Python
To build a LangGraph agent in Python, define its state, create nodes that perform tasks, connect them with edges, add tools and conditional routing, and compile the graph into a runnable app.
By the end, you’ll have one working LangGraph agent that remembers conversations, decides when to call tools, streams responses, and pauses selected actions for your approval.
1. Set up the project and install LangGraph
To set up a LangGraph project, create the project folder, activate a Python virtual environment, and install LangGraph with pip.
You’ll need Python 3.10 or later, an API key for an AI model, and the required Python packages. We’ll use DeepSeek, but you can use another provider such as OpenAI or Anthropic by installing its corresponding LangChain package.
Open your terminal, create a folder named langgraph-agent, and move into it:
mkdir langgraph-agent
cd langgraph-agent
Next, create a Python virtual environment so this project’s packages don’t affect your other Python projects. On macOS or Linux, run:
python3 -m venv .venv
source .venv/bin/activate
python -m pip install --upgrade pip
Your terminal should show (.venv) at the beginning of the prompt after activation.
Install LangGraph, the DeepSeek integration, and the other dependencies used in the project:
pip install langgraph==1.2.11 langchain-deepseek==1.1.0 langchain-core==1.6.1 python-dotenv==1.2.3
Pinning these versions keeps the project’s direct dependencies consistent while you follow along.
Create the project files:
touch main.py .env .gitignore requirements.txt
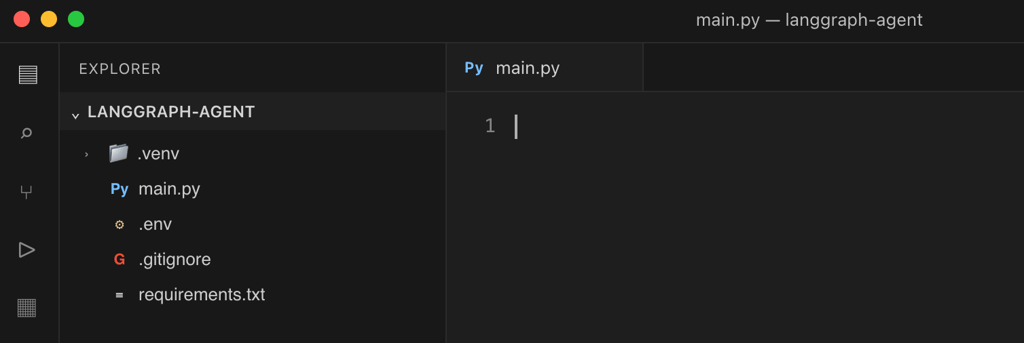
Your langgraph-agent folder should now look like this:
langgraph-agent/
   .venv/
   main.py
   .env
   .gitignore
   requirements.txt
Keep the terminal open, then open langgraph-agent in your code editor. In VS Code, select File → Open Folder, then choose langgraph-agent.
Open requirements.txt and add the same dependencies:
langgraph==1.2.11
langchain-deepseek==1.1.0
langchain-core==1.6.1
python-dotenv==1.2.3
This file lets you recreate the environment later with pip install -r requirements.txt.
Next, open .env and add your DeepSeek API key:
DEEPSEEK_API_KEY=your-deepseek-api-key
Replace your-deepseek-api-key with the API key from your DeepSeek account. Don’t wrap the key in quotation marks.
Open .gitignore and add:
.venv/
.env
__pycache__/
These entries keep your virtual environment, API credentials, and Python cache files out of Git.
Finally, verify that Python loads the installed packages. Open main.py and add:
from dotenv import load_dotenv
from langchain_deepseek import ChatDeepSeek
from langgraph.graph import StateGraph

load_dotenv()

print("LangGraph and DeepSeek imports OK")
Save main.py. Then, return to the terminal and run:
python main.py
Your LangGraph setup is ready after the terminal prints LangGraph and DeepSeek imports OK without an import error. Keep main.py open because you’ll continue building the agent in the same file.

2. Define the agent state
Define the agent state by writing a TypedDict class that lists the fields every node can read and update.
This gives your LangGraph workflow a shared place to store and update conversation history while it runs. For this project, you only need one field called messages.
In main.py, add these imports with the existing imports:
from typing import Annotated

from langchain_core.messages import AnyMessage
from langgraph.graph.message import add_messages
from typing_extensions import TypedDict
Below the imports, add the AgentState schema:
class AgentState(TypedDict):
   messages: Annotated[list[AnyMessage], add_messages]
TypedDict defines the fields available in your state schema. Here, AgentState contains a messages list that each node can read and update as the graph runs.
Annotated attaches the add_messages reducer to the list. A reducer controls how LangGraph combines a node’s update with the existing value instead of replacing it outright.
Without add_messages, a new messages value would replace the existing list. With add_messages, LangGraph merges new messages into the conversation history and updates an existing message when both messages use the same ID.
Return updates instead of changing state directly
Don't edit the incoming state object inside a node. Return only the fields that changed, like {"messages": [response]}, so LangGraph can merge the update into the graph state correctly.
For now, LangGraph doesn’t save this state across separate graph runs. You’ll add a checkpointer later so the agent can retain conversation history between runs.
3. Create the model node
Create the model node as a Python function that reads your agent’s messages, sends them to DeepSeek, and returns the model’s response as a state update. You’ll later register this function as a node in the LangGraph workflow.
In main.py, below the AgentState definition, initialize the model:
model = ChatDeepSeek(
   model="deepseek-v4-flash",
   extra_body={
      "thinking": {
         "type": "disabled"
      }
   },
)Important! DeepSeek V4 Flash uses thinking mode by default. We disable it here because DeepSeek requires reasoning_content from tool-calling responses to be passed back in subsequent requests. A LangChain GitHub issue reports that langchain-deepseek==1.1.0 drops this field in multi-turn tool calls, causing DeepSeek to return a 400 error.
Below the model initialization, add model_node:
def model_node(state: AgentState):
   response = model.invoke(state["messages"])
   return {"messages": [response]}
The function receives the full AgentState but returns only the field it changes. It reads messages, sends the conversation to DeepSeek, and returns the new AI message under the same key.
Add HumanMessage with the existing imports:
from langchain_core.messages import HumanMessage
Then, below model_node, add this temporary test:
test_state = {
   "messages": [
      HumanMessage(content="Reply with exactly OK.")
   ]
}

result = model_node(test_state)
print(result["messages"][-1].content)
You should see OK in the terminal. You now have a working model node that sends conversation state to DeepSeek and returns direct responses.

4. Connect and run the first graph
To connect and run your first graph in LangGraph, add model_node to StateGraph, connect it between START and END, then compile and invoke the graph.
Update the existing LangGraph import in main.py to include START and END:
from langgraph.graph import END, START, StateGraph
START marks where execution enters the graph, while END marks where it stops.
Below the temporary model-node test, create the graph builder with your AgentState schema. Then, register model_node as the model node:
builder = StateGraph(AgentState)
builder.add_node("model", model_node)
The builder stores the nodes and edges that define your workflow before you compile it.
Connect START to model, then connect model to END:
builder.add_edge(START, "model")
builder.add_edge("model", END)
These edges create the path START → model → END. Every request follows it because you haven’t added conditional routing yet.
Then, compile the graph so you can run it:
graph = builder.compile()
compile() turns the StateGraph builder into an executable graph that you can run with methods such as invoke().
Below graph = builder.compile(), add this graph test with invoke(), then print DeepSeek’s response. Remove the temporary test_state code and the HumanMessage import because you no longer need them.
result = graph.invoke(
   {
      "messages": [
         {
            "role": "user",
            "content": "Give me one benefit of VPS hosting."
         }
      ]
   }
)

print(result["messages"][-1].content)
LangGraph sends the user message to the model node, adds DeepSeek’s reply to the messages state, and then reaches END. The result variable contains the final state, including the original user message and DeepSeek’s response.

5. Add tools and conditional routing
Add tools and conditional routing to LangGraph by defining a Python tool, binding it to DeepSeek, and routing the graph based on the model’s response. For this agent, you’ll add a shipping calculator and run it only for shipping-price questions.
In main.py, add tool with the existing imports:
from langchain_core.tools import tool
Below the model initialization and above model_node, define the shipping calculator:
@tool
def calculate_shipping(weight_kg: float, zone: str) -> str:
   """Calculate this demo store's shipping price in USD.
   Use this tool for every shipping-price request.
   Supported zones are US and EU.
   """
   if weight_kg <= 0:
      return "Weight must be greater than 0 kg."

   zone = zone.upper()

   base_rates = {
      "US": 5.00,
      "EU": 8.00,
   }

   per_kg_rates = {
      "US": 1.25,
      "EU": 1.75,
   }

   if zone not in base_rates:
      return "Supported zones are US and EU."

   total = base_rates[zone] + per_kg_rates[zone] * weight_kg
   return f"${total:.2f}"
The @tool decorator turns the Python function into a tool that the model can request. Its name, description, and typed arguments tell DeepSeek what the tool does and what input values it expects.
Immediately below calculate_shipping, create the tool list and bind it to the existing model:
tools = [calculate_shipping]
model_with_tools = model.bind_tools(tools)
bind_tools() makes the tool definition available to DeepSeek but doesn’t execute the Python function. DeepSeek adds a request to the AI message’s tool_calls field after it decides to use the calculator.
Replace the existing model_node function with this tool-enabled version:
def model_node(state: AgentState):
   response = model_with_tools.invoke(state["messages"])
   return {"messages": [response]}
Add ToolNode and tools_condition with the existing imports in main.py:
from langgraph.prebuilt import ToolNode, tools_condition
Replace the current graph-building code, from builder = StateGraph(AgentState) to graph = builder.compile(), with:
builder = StateGraph(AgentState)

builder.add_node("model", model_node)
builder.add_node("tools", ToolNode(tools))

builder.add_edge(START, "model")

builder.add_conditional_edges(
   "model",
   tools_condition,
   {
      "tools": "tools",
      "__end__": END,
   },
)

builder.add_edge("tools", "model")

graph = builder.compile()
tools_condition checks the latest AI message after model runs. It routes execution to tools after DeepSeek requests a tool and routes it to END after DeepSeek returns a final response without tool calls.
Use fixed routing rules when you can
Use regular Python logic when your app already knows which path should run next. Let the model choose a path only when the decision depends on understanding the user's language or context.
ToolNode executes the requested function and adds its result to the conversation state. The edge from tools back to model lets DeepSeek read the tool result and generate a final response.
Your graph now has two execution paths:
- START → model → END for a direct response.
- START → model → tools → model → END for a tool-assisted response.
The second path creates a cycle because the graph returns to model after the tool runs. This loop lets DeepSeek use the tool result before producing its final answer.
Warning! Every loop needs a way to stop, such as a route to END. A graph that keeps looping without reaching an exit eventually hits LangGraph's recursion limit and raises GraphRecursionError.
Replace the previous graph test with this direct-response test:
result = graph.invoke(
   {
      "messages": [
         {
            "role": "user",
            "content": "What does a virtual private server do?"
         }
      ]
   }
)

print(result["messages"][-1].content)
DeepSeek should answer directly because the prompt doesn’t require the shipping calculator.
Add this second test immediately after the direct-response test to verify the tool path:
result = graph.invoke(
   {
      "messages": [
         {
            "role": "user",
            "content": "What is the shipping price for 3 kg to EU?"
         }
      ]
   }
)

print(result["messages"][-1].content)
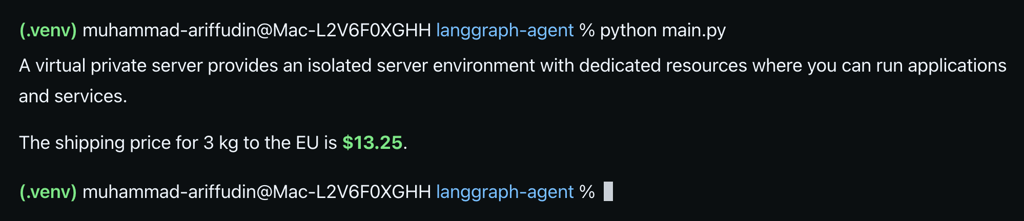
DeepSeek should request calculate_shipping, which sends execution through ToolNode and then back to model. The calculator returns $13.25 based on $8.00 + 3 × $1.75.
6. Add memory and persistence
To add memory and persistence to LangGraph, compile your graph with a checkpointer and assign each conversation a thread_id. InMemorySaver keeps each thread’s checkpoints available across separate invoke() calls while Python is running.
Your current graph in main.py doesn’t retain messages between separate invocations. To see the problem, replace both test blocks at the end of main.py with this temporary test:
graph.invoke(
   {
      "messages": [
         {
            "role": "user",
            "content": "My name is Jack."
         }
      ]
   }
)

result = graph.invoke(
   {
      "messages": [
         {
            "role": "user",
            "content": "What is my name?"
         }
      ]
   }
)

print(result["messages"][-1].content)
The second invocation only receives “What is my name?”, so DeepSeek doesn’t have the earlier message that identifies the user as Jack.
Add InMemorySaver with the existing imports in main.py:
from langgraph.checkpoint.memory import InMemorySaver
Then find the current graph compilation line:
graph = builder.compile()
Replace it with:
memory = InMemorySaver()
graph = builder.compile(checkpointer=memory)
Next, replace the temporary test at the end of main.py with this multi-turn conversation:
config = {
   "configurable": {
      "thread_id": "conversation-1"
   }
}

graph.invoke(
   {
      "messages": [
         {
            "role": "user",
            "content": "My name is Jack."
         }
      ]
   },
   config=config,
)

result = graph.invoke(
   {
      "messages": [
         {
            "role": "user",
            "content": "What is my name?"
         }
      ]
   },
   config=config,
)

print(result["messages"][-1].content)
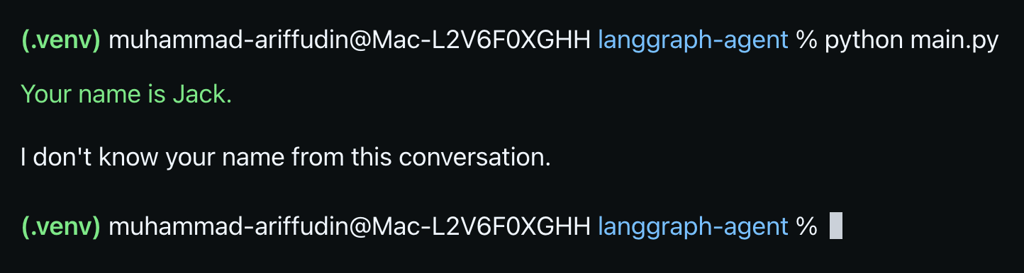
Both calls use conversation-1, so LangGraph loads the checkpoint history for that thread during the second invocation. DeepSeek now receives the earlier message and has the context needed to answer that the user’s name is Jack.
Add this second test immediately after the first conversation to confirm that a different thread_id keeps its history separate:
new_config = {
   "configurable": {
      "thread_id": "conversation-2"
   }
}

result = graph.invoke(
   {
      "messages": [
         {
            "role": "user",
            "content": "What is my name?"
         }
      ]
   },
   config=new_config,
)

print(result["messages"][-1].content)
DeepSeek doesn’t receive Jack’s message because conversation-2 has separate checkpoint history.
7. Stream the agent’s outputs
Stream your LangGraph agent with graph.stream() to receive output while the graph is still running instead of waiting for the entire workflow to finish. You can stream each node’s state updates or display DeepSeek’s response token by token.
Keep the graph-building code in main.py unchanged. Replace the memory tests at the end of the file, starting with config = {…} and ending with the conversation-2 test, with:
stream_config = {
   "configurable": {
      "thread_id": "stream-demo"
   }
}

for chunk in graph.stream(
   {
      "messages": [
         {
            "role": "user",
            "content": "What is the shipping price for 5 kg to US?"
         }
      ]
   },
   config=stream_config,
   stream_mode="updates",
   version="v2",
):
   for node_name, update in chunk["data"].items():
      print(node_name, update)
In updates mode, the loop prints each node’s state update after that node finishes. The intended path for this shipping request is model → tools → model, so you’ll see how the graph progresses instead of receiving only its final state.
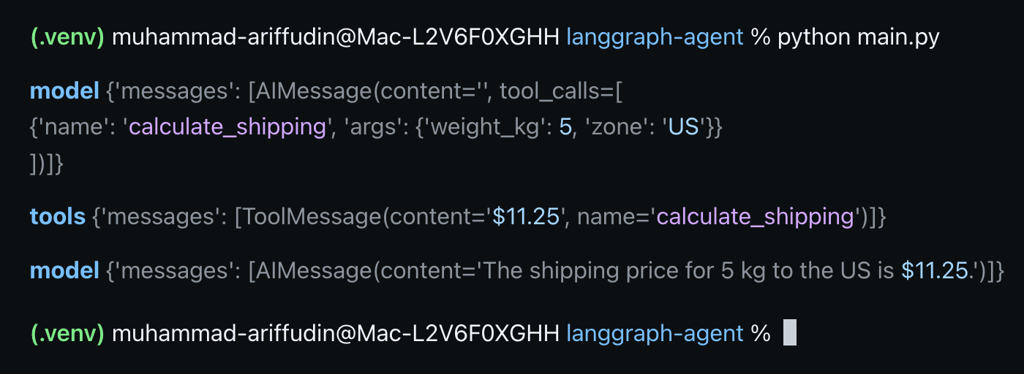
This test uses a new thread_id so the conversation history from the memory examples doesn’t affect the result.
To stream DeepSeek’s response token by token, replace the stream-demo test at the end of main.py with:
for chunk in graph.stream(
   {
      "messages": [
         {
            "role": "user",
            "content": "Explain LangGraph state in two sentences."
         }
      ]
   },
   config={
      "configurable": {
         "thread_id": "token-stream"
      }
   },
   stream_mode="messages",
   version="v2",
):
   token, _ = chunk["data"]

   if token.content:
      print(token.content, end="", flush=True)
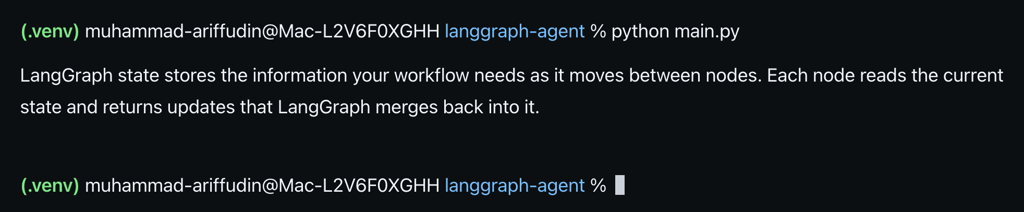
In messages mode, LangGraph streams the model’s response token by token while DeepSeek generates it. Use this mode for a chat interface that should display the response progressively instead of waiting for the complete answer.
8. Add human approval with interrupts
To add human approval with interrupts in LangGraph, pause the graph before a tool runs, then approve or reject the request before execution continues. You’ll use interrupt() to pause the workflow and Command(resume=…) to send your decision back.
Update the existing typing import in main.py:
from typing import Annotated, Literal
Then update the existing LangChain message import:
from langchain_core.messages import AIMessage, AnyMessage, ToolMessage
Add Command and interrupt with the other LangGraph imports:
from langgraph.types import Command, interrupt
Below model_node, add the approval node:
def approval_node(
   state: AgentState,
) -> Command[Literal["tools", "__end__"]]:
   tool_calls = state["messages"][-1].tool_calls

   approved = interrupt(
      {
         "question": "Approve these tool calls?",
         "tool_calls": tool_calls,
      }
   )

   if approved is True:
      return Command(goto="tools")

   rejected_messages = [
      ToolMessage(
         content="Tool execution was rejected by the user.",
         tool_call_id=tool_call["id"],
      )
      for tool_call in tool_calls
   ]

   rejected_messages.append(
      AIMessage(
         content="The tool call was rejected, so no action was taken."
      )
   )

   return Command(
      update={"messages": rejected_messages},
      goto=END,
   )
interrupt() pauses the graph and returns the approval question and pending tool calls to your Python code.
You then resume it by passing Command(resume=True) back into the graph, which sends execution to tools, or Command(resume=False), which follows the rejection path.
The rejection path adds a ToolMessage for each pending call without executing the tool. This keeps the conversation history valid before the graph ends.
Next, replace the current graph-building code, from builder = StateGraph(AgentState) to graph = builder.compile(checkpointer=memory), with:
builder = StateGraph(AgentState)

builder.add_node("model", model_node)
builder.add_node("approval", approval_node)
builder.add_node("tools", ToolNode(tools))

builder.add_edge(START, "model")

builder.add_conditional_edges(
   "model",
   tools_condition,
   {
      "tools": "approval",
      "__end__": END,
   },
)

builder.add_edge("tools", "model")

graph = builder.compile(checkpointer=memory)
Tool requests now pass through approval before they reach tools. Direct responses still follow START → model → END, while tool requests pause at START → model → approval until you send a decision.
Replace the streaming test at the end of main.py with:
approval_config = {
   "configurable": {
      "thread_id": "approval-demo"
   }
}

pending = graph.invoke(
   {
      "messages": [
         {
            "role": "user",
            "content": "What is the shipping price for 3 kg to EU?"
         }
      ]
   },
   config=approval_config,
)

print(pending["__interrupt__"][0].value)
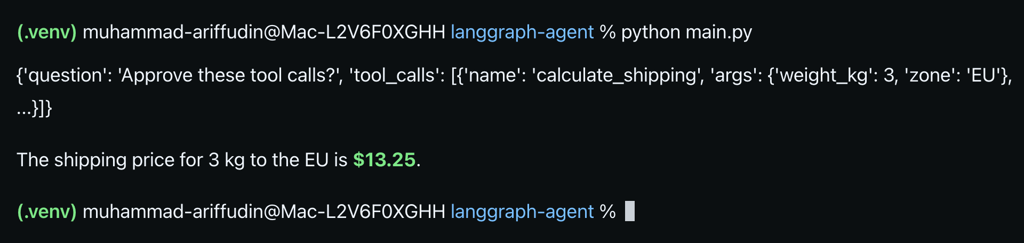
The graph stops inside approval_node before the shipping calculator runs. The value under pending[“__interrupt__”] contains the approval question and requested tool call.
Add this immediately after the test to approve the request:
approved_result = graph.invoke(
   Command(resume=True),
   config=approval_config,
)

print(approved_result["messages"][-1].content)
Both calls use approval-demo because LangGraph needs the same thread_id to resume the paused run. Passing True sends execution to tools, where the calculator returns $13.25 from $8.00 + 3 × $1.75.
Save main.py, go to the terminal, then run:
python main.py
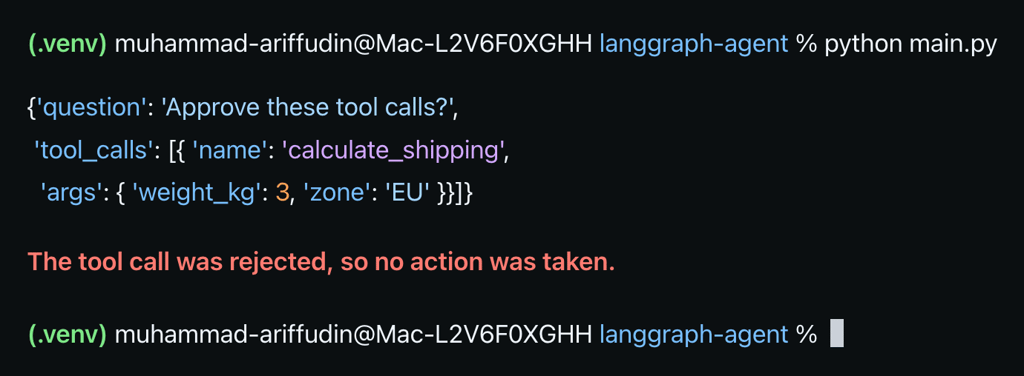
You should see the pending tool call first, followed by DeepSeek’s final response after approval.
To test rejection, replace the approval test at the end of main.py with:
reject_config = {
   "configurable": {
      "thread_id": "reject-demo"
   }
}

pending = graph.invoke(
   {
      "messages": [
         {
            "role": "user",
            "content": "What is the shipping price for 3 kg to EU?"
         }
      ]
   },
   config=reject_config,
)

print(pending["__interrupt__"][0].value)

rejected_result = graph.invoke(
   Command(resume=False),
   config=reject_config,
)

print(rejected_result["messages"][-1].content)
Return to the terminal and run python main.py again. LangGraph follows the rejection path and finishes without running calculate_shipping.
Prevent duplicate actions after an interrupt
LangGraph restarts an interrupted node from the beginning after you resume it, so keep code before interrupt() safe to run more than once. Put one-time actions, such as sending an email or updating a database, after the approval point or in a separate node. For debugging, you can use interrupt_before or interrupt_after to pause before or after a specific node.
How to deploy a LangGraph agent on a VPS
To deploy a LangGraph agent on a VPS, move your local project to a Linux server, replace the in-memory checkpointer with persistent checkpoint storage, serve the agent through FastAPI, and use systemd to keep it running.
This example uses a Hostinger VPS and the same DeepSeek-based project you built in the previous section.
1. Prepare the VPS
Prepare the VPS by choosing a suitable plan and installing Python and the other tools your LangGraph agent needs. You don’t need to install DeepSeek because the agent sends model requests to DeepSeek’s API.
For your LangGraph deployment, the KVM 1 VPS hosting plan with 1 vCPU, 4 GB RAM, and 50 GB NVMe storage for RM25.99/month is a practical starting point.
After purchasing the plan, select Ubuntu 26.04 LTS as the operating system and set a strong password for your VPS.
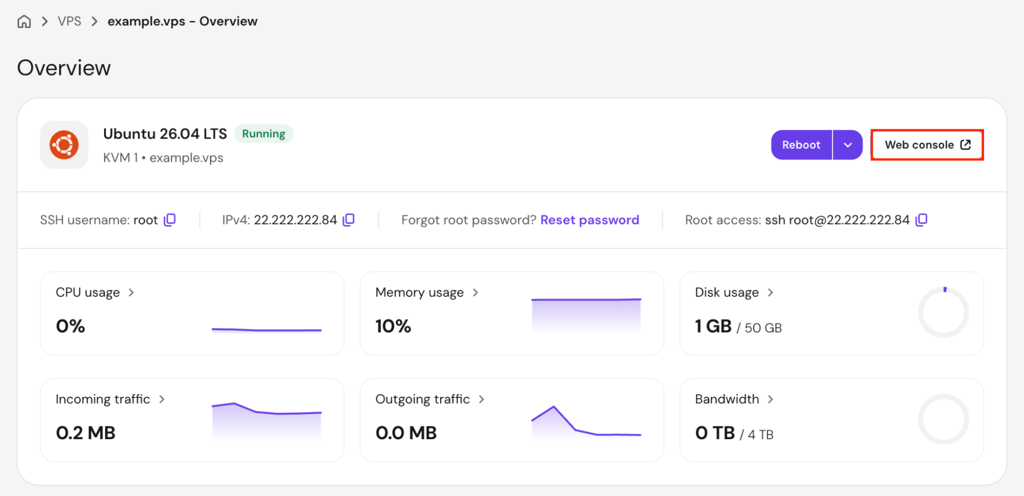
Once Hostinger finishes setting up your VPS, go to VPS → Manage and select Web console to open the browser-based terminal.
Update the server before installing the required packages:
apt update
apt upgrade -y
Next, install Python, virtual environment support, pip, Git, and curl:
apt install -y python3 python3-venv python3-pip git curl
python3 --version
The output should show Python 3.10 or later.

2. Upload and configure the LangGraph project
To upload and configure your LangGraph project, copy the local files to the VPS, create a virtual environment, install the extra packages needed for deployment, and add your DeepSeek API key.
On your local computer, open requirements.txt and add these lines after the existing dependencies:
langgraph-checkpoint-sqlite==3.1.1
fastapi==0.141.1
uvicorn==0.52.4
Go to your VPS terminal and create the app directory:
mkdir -p /opt/langgraph-agent
Next, open your computer’s terminal and move into the langgraph-agent project folder. Use its actual path if you created the folder somewhere else.
cd ~/langgraph-agent
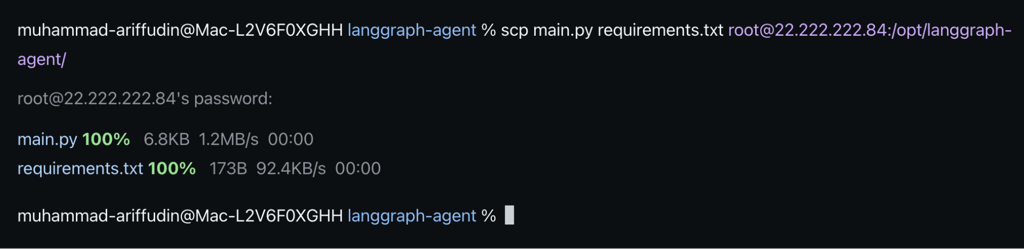
Copy main.py and requirements.txt to the VPS with scp:
scp main.py requirements.txt root@your-vps-ip:/opt/langgraph-agent/
Replace your-vps-ip with your own VPS IP address. You can find it in the VPS Overview page.
Enter your VPS password when prompted.
Switch to your VPS terminal, move into the app directory, and create a Python virtual environment:
cd /opt/langgraph-agent
python3 -m venv .venv
source .venv/bin/activate
Your terminal should now show (.venv) at the beginning of the prompt. Install the pinned dependencies:
python -m pip install --upgrade pip
pip install -r requirements.txt
Next, create .env on the VPS with the nano text editor:
nano .env
Add your DeepSeek API key:
DEEPSEEK_API_KEY=your-deepseek-api-key
Save the file and exit nano with Ctrl + X → Y → Enter.
Modify the file permissions so only the owner can read or edit it:
chmod 600 .env
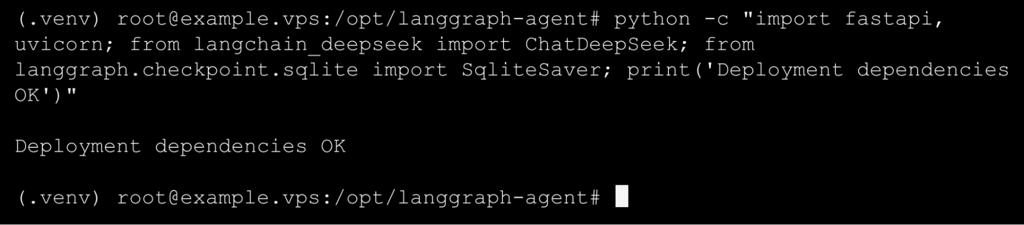
Finally, verify that Python loads the packages:
python -c "import fastapi, uvicorn; from langchain_deepseek import ChatDeepSeek; from langgraph.checkpoint.sqlite import SqliteSaver; print('Deployment dependencies OK')"The terminal should print Deployment dependencies OK without an import error.
3. Add persistent checkpoint storage
Add persistent checkpoint storage by replacing InMemorySaver with SqliteSaver, which saves conversation history and paused approval requests to a database file instead of keeping them only in memory.
In your VPS terminal, open main.py:
nano main.py
At the top of the file, add:
import sqlite3
Then replace the existing InMemorySaver import:
from langgraph.checkpoint.memory import InMemorySaver
with:
from langgraph.checkpoint.sqlite import SqliteSaver
Find the current checkpointer setup:
memory = InMemorySaver()

graph = builder.compile(checkpointer=memory)
Replace it with:
connection = sqlite3.connect(
   "/opt/langgraph-agent/checkpoints.sqlite",
   check_same_thread=False,
)

checkpointer = SqliteSaver(connection)

graph = builder.compile(checkpointer=checkpointer)
SqliteSaver now saves the agent’s checkpoints in /opt/langgraph-agent/checkpoints.sqlite, so they remain available after the Python process restarts.
Keep check_same_thread=False so the FastAPI service you’ll add next can handle requests in different threads.
Save main.py, then run the agent:
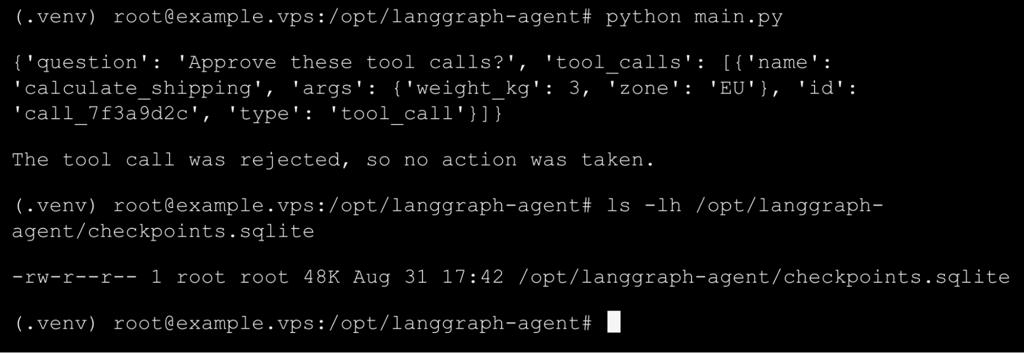
python main.py
You should see the pending shipping request, followed by The tool call was rejected, so no action was taken.
Confirm that the checkpoint database was created:
ls -lh /opt/langgraph-agent/checkpoints.sqlite
The output should list checkpoints.sqlite.
4. Serve and test the agent with FastAPI
Serve and test your LangGraph agent with FastAPI by adding API endpoints, starting the app with Uvicorn, and sending test requests from the VPS.
Open main.py in your VPS terminal, then add these imports with the existing imports:
from fastapi import FastAPI
from pydantic import BaseModel
Remove the rejection test at the end of main.py, starting with reject_config = { and ending with the final print(rejected_result…) line.
Below graph = builder.compile(checkpointer=checkpointer), add the FastAPI app and the request models for chat and approval:
app = FastAPI()


class ChatRequest(BaseModel):
   message: str
   thread_id: str


class ApprovalRequest(BaseModel):
   thread_id: str
   approved: bool
Then add the /chat endpoint to expose your app through an API:
@app.post("/chat")
def chat(request: ChatRequest):
   config = {
      "configurable": {
         "thread_id": request.thread_id
      }
   }

   result = graph.invoke(
      {
         "messages": [
            {
               "role": "user",
               "content": request.message,
            }
         ]
      },
      config=config,
   )

   if "__interrupt__" in result:
      return {
         "status": "needs_approval",
         "request": result["__interrupt__"][0].value,
      }

   return {
      "status": "complete",
      "message": result["messages"][-1].content,
   }
The /chat endpoint passes the message to your graph. It returns DeepSeek’s answer for a direct response or needs_approval when a tool call pauses for your decision.
Immediately below the /chat endpoint, add /approve:
@app.post("/approve")
def approve(request: ApprovalRequest):
   config = {
      "configurable": {
         "thread_id": request.thread_id
      }
   }

   result = graph.invoke(
      Command(resume=request.approved),
      config=config,
   )

   return {
      "status": "complete",
      "message": result["messages"][-1].content,
   }
The /approve endpoint resumes the paused request with the same thread_id. Set approved to true to run the tool or false to reject it.
After saving main.py, start the FastAPI app with Uvicorn:
cd /opt/langgraph-agent
source .venv/bin/activate
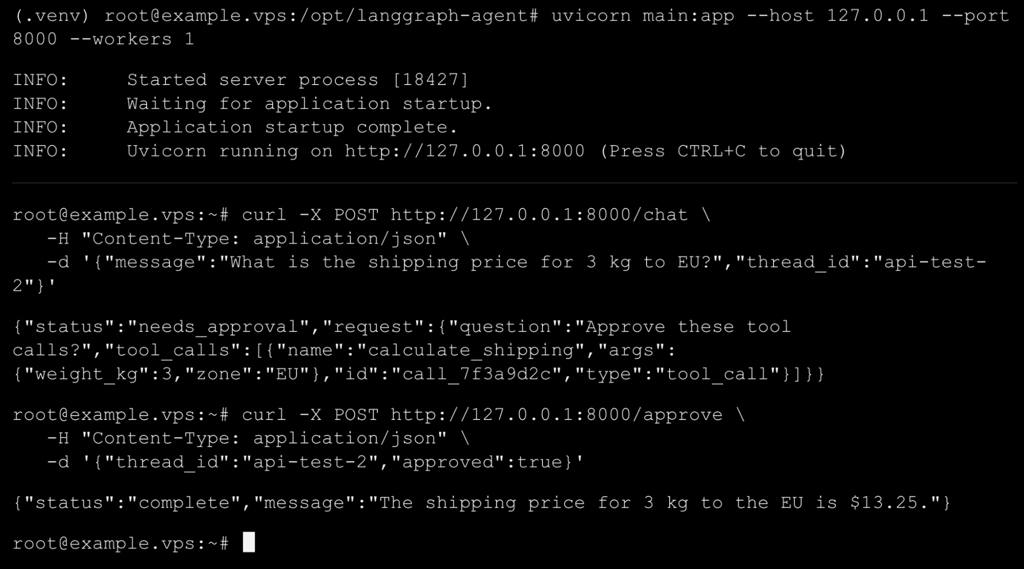
uvicorn main:app --host 127.0.0.1 --port 8000 --workers 1
Using 127.0.0.1 keeps the API accessible only from the VPS. Keep this terminal open while Uvicorn runs, then open a new VPS terminal window.
There, send a request that doesn’t need a tool:
curl -X POST http://127.0.0.1:8000/chat
   -H "Content-Type: application/json"
   -d '{"message":"What does LangGraph state do?","thread_id":"api-test-1"}'
The response should contain “status”:”complete” and DeepSeek’s answer.
Next, send a shipping request to test the approval flow:
curl -X POST http://127.0.0.1:8000/chat
   -H "Content-Type: application/json"
   -d '{"message":"What is the shipping price for 3 kg to EU?","thread_id":"api-test-2"}'
The response should contain “status”:”needs_approval” and the pending calculate_shipping tool call.
Approve the request through /approve:
curl -X POST http://127.0.0.1:8000/approve
   -H "Content-Type: application/json"
   -d '{"thread_id":"api-test-2","approved":true}'
The response should contain “status”:”complete”, and DeepSeek’s answer should include the shipping price of $13.25.
5. Keep the agent running with systemd
Keep your LangGraph agent running with systemd so the API starts automatically after a server reboot and restarts if Uvicorn fails.
Return to the VPS terminal where Uvicorn is running and press Ctrl + C to stop it.
Create a separate Linux user for the service and give it ownership of the app directory:
useradd --system --home /opt/langgraph-agent --shell /usr/sbin/nologin langgraph
chown -R langgraph:langgraph /opt/langgraph-agent
Next, create the systemd service file:
nano /etc/systemd/system/langgraph-agent.service
Add:
[Unit]
Description=LangGraph agent API
After=network-online.target
Wants=network-online.target

[Service]
Type=simple
User=langgraph
Group=langgraph
WorkingDirectory=/opt/langgraph-agent
EnvironmentFile=/opt/langgraph-agent/.env
Environment=LANGGRAPH_STRICT_MSGPACK=true
ExecStart=/opt/langgraph-agent/.venv/bin/uvicorn main:app --host 127.0.0.1 --port 8000 --workers 1
Restart=on-failure
RestartSec=5

[Install]
WantedBy=multi-user.target
The service reads your DeepSeek API key from .env. LANGGRAPH_STRICT_MSGPACK=true limits what LangGraph is allowed to load from saved checkpoints.
Save the file. Then, reload systemd, start the service, and enable it at boot:
systemctl daemon-reload
systemctl enable --now langgraph-agent
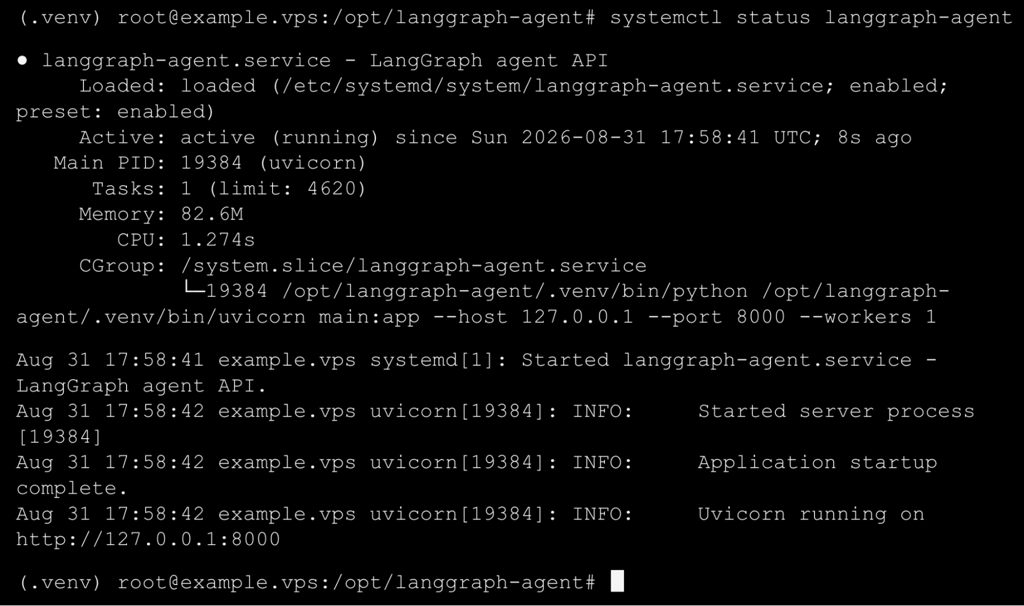
systemctl status langgraph-agent
The status should show active (running).
Check the service logs with journalctl if systemctl status displays a failure:
journalctl -u langgraph-agent -n 50 --no-pager
In the other VPS terminal, verify that the API still responds:
curl -X POST http://127.0.0.1:8000/chat
   -H "Content-Type: application/json"
   -d '{"message":"What does LangGraph state do?","thread_id":"service-test"}'
The response should contain “status”:”complete” and DeepSeek’s answer.
How to improve your LangGraph agent after deployment
Improve your LangGraph agent after deployment by retesting every graph path after changes, keeping conversations on separate thread IDs, using approval only for sensitive actions, backing up checkpoints, and updating pinned packages carefully.
- Retest every graph path after changes. Check the direct-response, tool, approval, and rejection paths after you update the agent. This helps you catch broken routes or tool calls before deployment. Reuse the same test prompts and curl requests you already used, then add new tests as you introduce more routes or expand into workflows with multiple AI agents.
- Keep conversations on separate thread IDs. Use a different thread_id for each new conversation so unrelated messages don’t end up in the same saved history. Create a new thread_id at the start of a conversation, then reuse it only for later messages in that same conversation.
- Use approval for sensitive actions. Add an approval interrupt before tools that perform actions you want to review before they run, such as sending messages, creating orders, deleting data, or changing records. Skip approval for read-only actions that don’t modify data or trigger an external action, such as retrieving information
- Back up the checkpoint database. Keep a copy of checkpoints.sqlite before changing anything that affects saved state, such as the checkpoint setup or the deployed app. Losing this file removes the conversation history your agent relies on, so store the backup outside the VPS, like on your local computer or another backup server.
- Update pinned packages carefully. Change the versions in requirements.txt one at a time instead of upgrading every package at once, because updates can affect how LangGraph, LangChain, FastAPI, or Uvicorn works. Test the updated agent locally before redeploying it to your VPS.
This article is a localized version of LangGraph tutorial: How to build an AI agent in Python, originally published in English.
All of the tutorial content on this website is subject to Hostinger's rigorous editorial standards and values.

Ariffud is a Technical Content Writer with an educational background in Informatics. He has extensive expertise in Linux and VPS, authoring over 200 articles on server management and web development. Follow him on LinkedIn.