How to use the OpenClaw browser extension for web automation
Apr 16, 2026
/
Ariffud M.
/
11 min Read
OpenClaw is an open-source AI agent platform that can connect to your messaging apps, run tasks on your server, and automate workflows across the tools you already use.
The OpenClaw browser extension brings the agent directly into your browser. It lets you automate common tasks like filling forms, scraping pages, taking screenshots, and navigating sites without any coding.
To use the OpenClaw browser extension, you’ll need:
- A running OpenClaw instance.
- The extension installed on a Chromium-based browser.
- A connection between the two.
Configuring the extension involves three steps: OpenClaw running on a VPS, a node host to relay instructions, and the Chrome extension to execute them in your browser tab.
Once connected, you can control the browser through instructions using your everyday language.
This browser automation eliminates repetitive tasks that eat up your day. Instead of filling the same forms, copying data, or clicking through multi-step flows, you describe the task once and let the agent handle it.
How to install and set up the OpenClaw browser extension
If you don’t have an OpenClaw instance running, you can set it up on your local computer or a VPS.
To demonstrate the steps, we’ll set it up on a VPS using Hostinger’s OpenClaw hosting, where you can sign up and get everything pre-configured for deployment in one click.
With the one-click installation method, you simply need to choose a VPS OpenClaw plan, finish the payment, and enter your WhatsApp number in the designated field.
Copy the OpenClaw gateway token shown alongside it, as you’ll need this to log in.
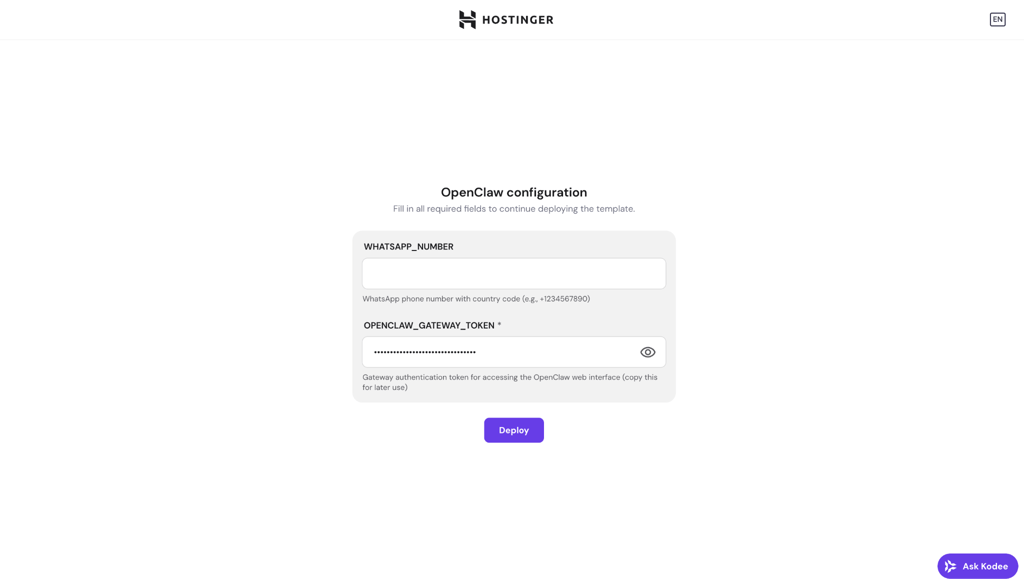
From there, click Deploy and wait for the installation to finish. This usually takes a few minutes.
When it’s done, you’ll see your OpenClaw instance with a Running status in the VPS dashboard. Click Open to go to the OpenClaw login page, paste the token you kept earlier, and you’ll be inside the dashboard.
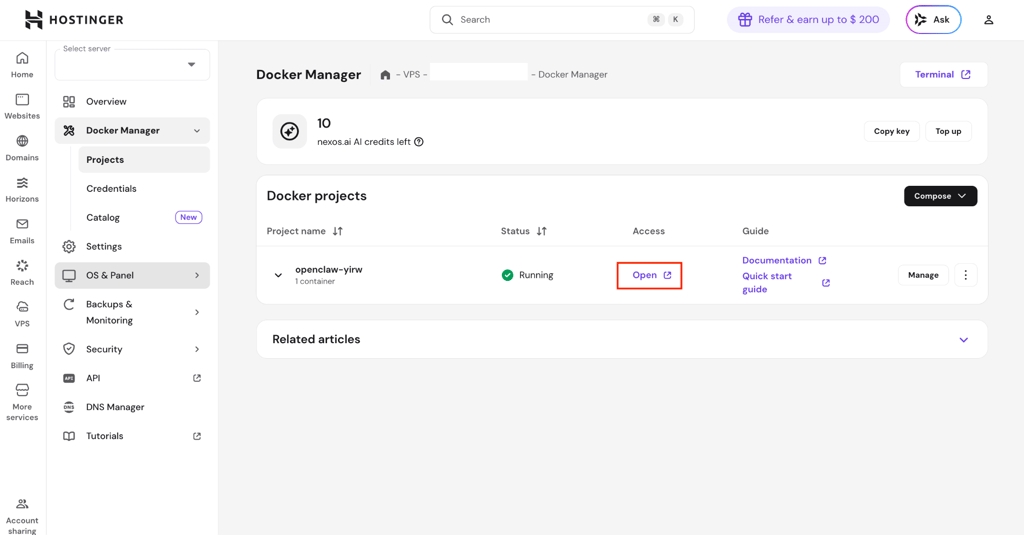
To keep your OpenClaw instance up to date, click the three-dot menu on the OpenClaw container and select Update. This pulls the latest stable version without needing to reconfigure your setup.
If you’d like to try a different method for setting up OpenClaw on a VPS, you can follow our step-by-step guide.
OpenClaw’s browser extension only supports Chromium-based browsers, so this guide uses Google Chrome.
Because OpenClaw runs on the VPS, Chrome needs to run on a separate local machine. So, we’ll install a node host program on the computer where Chrome runs. The node host acts as a relay, allowing the VPS Gateway to send browser instructions to your local machine.
Follow the steps below to connect them via Tailscale to keep data exchange on a private network and minimize the risk of exposure.
Step 1: Set up Tailscale on both your VPS and local device
Before connecting your VPS and local device, you need Tailscale running on both machines.
- Run this command to install Tailscale on your VPS:
curl -fsSL https://tailscale.com/install.sh | sh

sudo tailscale up
- Install Tailscale on the device where you want to run Chrome. You can download the installation package from the official Tailscale site.
- Sign in with the same Tailscale account as the VPS.
- Verify that both your VPS and your device are detected as connected machines in your Tailscale admin panel.
- Note the VPS’s Tailscale IP (starts with 100.x.x.x), as you’ll need it later.
- Set the Gateway on your VPS to listen on the Tailscale network by entering this command:
openclaw config set gateway.bind tailnet

openclaw gateway restart
To proceed with installing the node host, you’ll need your OpenClaw Gateway token, which you got after setting up. In case you lost it, you can find it again by navigating to Config → Gateway in your OpenClaw dashboard. Alternatively, run this command on your VPS:
openclaw config get gateway.auth.token
Step 2: Install the node host on your local device
The node host is what lets the VPS Gateway send browser instructions to your local Chrome. Here’s what you need to install it:
- Install OpenClaw on your local machine by entering this command on your device’s terminal:
npm install -g openclaw@latest
- Set the Gateway token as an environment variable. Don’t forget to replace the placeholder with your actual token when executing this command:
export OPENCLAW_GATEWAY_TOKEN="<insert-your-gateway-token>"
- Enter the command below to start the node host and connect it to your VPS. Make sure to replace the placeholder with your VPS’s Tailscale IP:
openclaw node run --host <your-vps-tailscale-ip> --port 18789 --display-name "My Local Chrome"
- Run the commands below on your VPS to approve the node connection. The request ID will appear in the pending command.
openclaw nodes pending

openclaw nodes approve <requestId>
Step 3: Install the Chrome Extension on your local machine
With the node host running, you can now set up the Chrome extension on your local device. This component gives the agent direct control over your browser tabs.
The OpenClaw browser extension is not published in the Chrome Web Store. It ships as local files inside the OpenClaw npm package, and the steps below install it manually from there.
- Install the OpenClaw browser extension files on your device terminal using this command:
openclaw browser extension install
- Note the installation path printed by the command:
openclaw browser extension path
- Open Chrome and enter chrome://extensions.
- Enable Developer mode by toggling it in the top-right corner.
- Click Load unpacked, then select the extension files you found in step 2.
- Pin the extension to your Chrome toolbar.
Step 4: Run the browser automation
At this stage, your VPS Gateway, node host, and Chrome extension should be communicating correctly. Here’s how to start controlling a browser tab:
- Open the Chrome tab you want OpenClaw to control.
- Click the OpenClaw extension icon. The badge should show ON.
- On your VPS, execute this command to use the chrome browser profile:
openclaw browser --browser-profile chrome tabs
The VPS Gateway routes browser actions through the node host on your local machine. From there, the Chrome extension executes them inside the active tab.
Once that’s done, you can type instructions in plain language through whatever interface you’ve connected to OpenClaw – whether that’s the WebChat dashboard, or a messaging app like Telegram or WhatsApp. The action you wish to perform will be automatically completed in the browser tab.
Automating forms and UI interaction with OpenClaw
Form automation is one of the most common reasons people reach for browser automation, and OpenClaw makes it hands-off. Here’s the common workflow:
- Navigate to the page. Instruct the AI agent to open the URL where the form lives, or attach the extension to a tab that’s already on the right page.
- Take a snapshot. The agent runs a snapshot to identify all interactive elements on the page and assigns a reference number to each.
- Describe what to fill in. Give the agent natural-language instructions like “Enter ‘John Doe’ in the name field, select ‘United States’ from the country dropdown, and check the ‘I agree to terms’ box.” The agent matches your instructions to the snapshot references and executes each action.
- Submit and verify. Tell the agent to click the submit button. It can then take a screenshot or read the confirmation page to verify that the submission went through.
Be specific when writing your instructions. The more detail you provide, the fewer retries the agent needs.
Automating web scraping with the OpenClaw browser extension
Web scraping with OpenClaw follows a similar pattern to form filling but focuses on reading rather than writing. The agent navigates to a page, takes a snapshot to understand the structure, and then extracts the data you ask for.
Here’s how to set up a basic scraping workflow:
- Point the agent to the target page. Give it a specific URL rather than asking it to search around. For example, “Go to example.com/products and extract all product names and prices.”
- Let the agent snap the page. The snapshot gives the agent a map of the page’s interactive and content elements, including tables, lists, and text blocks.
- Specify what to extract. Be explicit about the data structure you want. Instead of “get the pricing info,” try “Extract the product name, monthly price, and annual price from each row in the comparison table.”
- Handle pagination. If the data spans multiple pages, instruct the agent to click the “Next” button and repeat the extraction. The agent takes a new snapshot after each page load to stay oriented.
Some websites load content asynchronously using AJAX or single-page application frameworks.
OpenClaw handles this using its wait system. It can wait for elements to appear, for network requests to finish, or for custom JavaScript conditions to evaluate to true.
This means you’re not stuck scraping half-rendered pages. The agent waits until the content is actually there before extracting it.
For structured output, you can ask the agent to format extracted data as a table, JSON object, or CSV file. If you’re running the scraping from a skill or automation chain, the output can feed directly into the next step, for instance, scraping product prices and then generating a comparison report.
Key features of the OpenClaw browser extension
The OpenClaw browser extension acts as a bridge between the OpenClaw AI agent and your browser.
It uses the Chrome DevTools Protocol (CDP) to interact directly with tabs. This gives it native-level access to your tabs, resulting in faster execution and lower resource usage than tools that spin up a separate browser instance.
Here are the core capabilities of the OpenClaw Chrome Extension:
- Browser control. OpenClaw can navigate to URLs, click elements, type into fields, select dropdown options, scroll pages, and switch between tabs. Since it attaches to your real browser session, it has access to your existing login states, so you don’t need to re-authenticate for every automation run.
- Intelligent snapshots. The snapshot system scans the current page and assigns reference numbers to every interactive element. The agent uses these references to decide which links or interactions to click or engage with. Run openclaw browser snapshot to see it in action, or use –interactive for a role-based snapshot that highlights actionable elements.
- Form automation. The agent can fill out entire forms end-to-end, including text fields, checkboxes, radio buttons, dropdowns, and file uploads. Describe the data you want to enter, and the agent works through each field in sequence.
- Data extraction and web scraping. OpenClaw can read page content, extract structured data from tables, pull text from specific elements, and handle dynamically loaded content. It waits for AJAX requests to complete before scraping, so you get the full page.
- Screenshots and visual records. The agent can capture full-page screenshots or target specific elements. This is useful for record-keeping, monitoring visual changes on a page, or debugging when an automation doesn’t go as planned.
These features work best when combined. For example, you can snapshot a page, scrape a pricing table, fill out a competitor analysis form with the results, and take a screenshot of the final submission – all in a single automation chain.
For more ideas on combining these capabilities, see our guide on popular OpenClaw use cases.
Advanced features of the OpenClaw browser extension
The features covered so far handle most day-to-day automation needs. But OpenClaw goes further.
Under the hood, it’s built to work with AI models and plug into external services, which opens up automation workflows that regular browsers simply can’t match.
AI and machine learning integration
What separates OpenClaw from traditional automation tools is the AI layer sitting on top of the browser control.
The agent is powered by large language models like Claude or GPT, which means it interprets page content, adapts to layout changes, and makes contextual decisions about what to do next.
In practice, this means the agent can handle tasks that would break a regular script the moment a website updates its design.
If a button label changes from “Submit” to “Send Form,” or a form field moves from the left column to the right, the AI recognizes the intent behind the element and continues working.
You describe what you want done in natural language, and the model figures out the execution path.
Integration with external services
OpenClaw’s browser extension is part of the broader OpenClaw gateway ecosystem, so it can be combined with other channels and tools.
For example, a browser automation that scrapes pricing data can push the results to a Slack channel, trigger a WhatsApp notification, or feed data into a Google Sheet via the agent’s other integrations.
OpenClaw uses a skill-based architecture, allowing you to build modular automation components and chain them together.
A “scrape competitor prices” skill might feed into an “analyze pricing trends” skill, which then triggers a “send weekly report” skill. Each skill is reusable across different workflows, so you build once and deploy many times.
Why the OpenClaw browser extension is ideal for automation
OpenClaw is ideal for automation because it lets you control browser tasks using natural language, without writing or maintaining code.
Most traditional browser automation tools, such as Selenium, Puppeteer, and Playwright, are built for developers. They rely on hard-coded scripts, rigid setup processes, and dedicated infrastructure, even for simple tasks like submitting a form. When a website changes its layout or labels, those scripts often break and require manual fixes.
OpenClaw gives you two ways to control browsers. The extension relay connects to your existing Chrome sessions through a local node host, giving the agent access to your real login states.
The managed browser launches an isolated Chrome instance on the VPS, with no extension or local device required. Both are driven by natural-language instructions and adapt to layout changes through the AI layer.
Because automation is driven by an AI layer rather than fixed selectors, OpenClaw adapts to changes in page structure or labels. A button renamed from “Submit” to “Send” or a form field moved to a different section doesn’t stop the workflow. The agent interprets intent and continues the task.
If your automation needs change frequently or you want to avoid maintaining brittle scripts, OpenClaw offers a flexible, resilient alternative to traditional browser automation.
How to use OpenClaw browser automation without the Chrome extension
The extension relay setup requires a local machine, a node host, and Tailscale. OpenClaw also includes a managed browser that skips all of that.
The managed browser launches a dedicated, isolated Chrome instance directly on the VPS. It has its own user data directory and runs separately from any personal browser.
- Start the managed browser on your VPS:
openclaw browser --browser-profile openclaw start
- Check that it’s running:
openclaw browser --browser-profile openclaw status
- Open a page:
openclaw browser --browser-profile openclaw open https://domain.tld
- Take a snapshot:
openclaw browser --browser-profile openclaw snapshot
From here, you can give the agent natural-language instructions the same way you would with the extension relay. The automation capabilities are the same: clicking, typing, form filling, screenshots, and data extraction.
The tradeoff is that the managed browser runs in a clean environment with no existing login sessions. Use it for scraping, background tasks, and any automation that doesn’t need access to accounts you’re already signed into.
Best practices for OpenClaw browser automation
Getting OpenClaw to automate browser tasks is straightforward, but doing so efficiently and safely requires additional care. In addition to implementing the general OpenClaw best practices, do the following to deploy a safe browser automation:
Use a dedicated browser profile
OpenClaw browser extension uses Chrome’s debugger API. When it attaches to a tab, the AI model can click, type, navigate, read page content, and access whatever the tab’s logged-in session can access.
This operates directly within your real browser environment, and isn’t sandboxed like OpenClaw’s built-in managed browser profile.
If you attach OpenClaw to your daily browser profile, you’re giving access for the AI agent to every logged-in account, like email, banking, social media, and admin panels – and it can perform any actions without you realizing it.
To reduce this risk, always create and use a dedicated Chrome profile specifically for the OpenClaw extension relay. Keep it separate from your personal browsing and only connect to the necessary accounts for the automations you want to set up.
Secure your gateway and network
Browser automation means granting an AI model direct control over a browser tab. Treat it with the same caution as remote desktop access, and minimize your exposure:
- Keep the gateway and node hosts on a private network. If you’re using Tailscale, keep everything on the tailnet and rely on gateway authentication combined with node pairing for access control.
- Don’t expose relay ports publicly. Never use Tailscale Funnel, as it can expose services to the public internet.
- Rely on built-in protections. The relay blocks non-extension origins and requires an internal auth token for CDP clients, but these protections only work properly when the network layer is also locked down.
Minimize redundant actions
Every browser action costs time and API tokens. To optimize OpenClaw performance, structure your tasks to avoid unnecessary steps:
- Batch-related tasks in a single session. Instead of opening and closing the browser for each task, chain related actions together so the agent can work through them sequentially without losing page context.
- Be specific in your instructions. Vague prompts cause the agent to explore and retry, so always give as precise instructions as possible. Instead of “find the pricing info,” send “go to example.com/pricing and extract the monthly plan prices from the comparison table.”
- Use snapshots strategically. OpenClaw takes screenshots to understand page content, but excessive screenshot frequency slows everything down. Let the agent decide when it needs visual confirmation rather than forcing it after every action.
Manage tabs deliberately
Close tabs you no longer need, and avoid letting the agent open multiple tabs in parallel unless your task requires comparison or cross-referencing. A single focused tab produces more reliable results than several competing ones.
Debug systematically
When automation doesn’t work as expected, check these areas in order:
- Connection status. Is the extension relay attached? Does the badge show “ON”? Is the gateway running?
- Page state. Did the page fully load before the agent tried to interact? Dynamic content can cause timing issues.
- Permissions. Does the agent have the right profile and tools enabled? Is the tab on a site that blocks automated interactions, such as CAPTCHA or bot detection?
- Logs. Check the gateway logs for specific error messages. Most failures leave a clear trace.
Scaling your OpenClaw automation for larger projects
Once you’ve automated a few tasks, the natural progression is scaling up to handle more complex workflows, process larger datasets, or run automations across multiple sites.
Here’s how to approach performance optimization as your OpenClaw projects grow:
- Match infrastructure to workload. Browser automation is resource-heavy. Monitor CPU/RAM usage and upgrade your VPS as needed (minimum 4GB RAM for anything beyond basic automation). For heavy workloads, offload runs to a separate VPS solely for that purpose.
- Use the managed browser profile for scale. Switch to the OpenClaw-managed, headless browser for server-based or background automation. It’s more efficient and keeps workflows isolated from your personal browser data.
- Break workflows into reusable skills. Split large automations into smaller, modular skills, like scrape data → extract insights → generate reports. This improves reuse, simplifies debugging, and makes scaling easier.
- Control API usage and costs. Set token limits, use lighter models for routine steps, and cache results when pages haven’t changed. Understanding how OpenClaw costs scale helps you plan ahead as your automation grows.
- Schedule and stagger runs. Use cron jobs to space out automations. This balances server load and reduces the risk of rate limits or bot detection.
- Design for failure. Expect breakage at scale. Version skills and configs, back up your workspace regularly, and review logs to catch recurring issues early.
With the right structure in place, OpenClaw can scale from a few automations to a reliable system without turning into a maintenance burden.
All of the tutorial content on this website is subject to Hostinger's rigorous editorial standards and values.

Ariffud is a Technical Content Writer with an educational background in Informatics. He has extensive expertise in Linux and VPS, authoring over 200 articles on server management and web development. Follow him on LinkedIn.


