How to edit a website: 4 methods for any platform
Oct 06, 2026
/
By Bruno S. & Auksė Ž.
/
11 min Read
To edit a website, open it in the tool it was built with: the visual builder provided by your platform, the WordPress dashboard for WordPress sites, or a code editor and file manager for hand-coded files. Browser developer tools offer a fourth option for previewing a change privately – nothing you do there reaches visitors.
There are four editing methods:
- Website builder. Click elements directly in a visual editor and publish.
- WordPress. Update pages in the block editor and theme elements in the Site Editor.
- HTML, CSS, and JavaScript. Open and modify source files directly.
- Browser developer tools. Preview temporary changes without affecting the live site.
Which method should you use to edit your website?
Use the method that matches how your site was built: the builder for builder sites, the WordPress dashboard for WordPress sites, and a code editor for hand-coded sites.
Three checks tell you which setup you have. Your site runs on a website builder if your hosting or platform account has an Edit website or Edit site button that opens a drag-and-drop visual editor. It’s WordPress if yourdomain.tld/wp-admin loads a login screen. The site is hand-coded if your hosting file manager shows .html page files in public_html and no wp-content folder.
These three methods require account access with edit rights: the builder login, a WordPress Editor or Administrator account, or hosting file manager credentials. Without that access, only browser developer tools are available. Those edits appear only to you and disappear when you refresh the page.
Choosing between a visual builder and WordPress shapes how easily you’ll make those edits, so it’s worth settling early if you haven’t picked a platform yet.
What you see | Platform or type | Editing method | Permanent? |
An Edit website or Edit site button that opens a drag-and-drop editor | Website builder (e.g. Hostinger, Wix, Squarespace, GoDaddy) | Visual editor | Yes |
yourdomain.tld/wp-admin loads a login screen | WordPress | Block editor and Site Editor | Yes |
.html, .css, and .js files in File Manager or FTP | Custom code or downloaded template | Code editor or file manager | Yes |
No edit access, or you just want to test something | Any | Browser developer tools | No |
What is the difference between permanent and temporary website edits?
A permanent edit changes the files or database your site is served from, so every visitor sees the update immediately. A temporary edit made with browser developer tools only changes the page in your own browser tab and disappears when you reload.
Website builders, WordPress, and direct code edits all make permanent changes. Use browser developer tools when you want to preview how a change looks before committing to it.
How to edit a website with a website builder
To edit a website built with a website builder, log in to the builder, open the visual editor, click the element you want to change, and publish.
Most website builders work similarly: in Hostinger, Wix, Squarespace, GoDaddy, and others, you select elements in a visual editor and edit them in place, and that approach carries over if you switch builders later.
Hostinger AI website builder offers two modes: Manual mode for visual drag-and-drop editing, and Agentic mode for describing changes to an AI that edits the site’s files directly. Both modes publish to the live site with a single click.
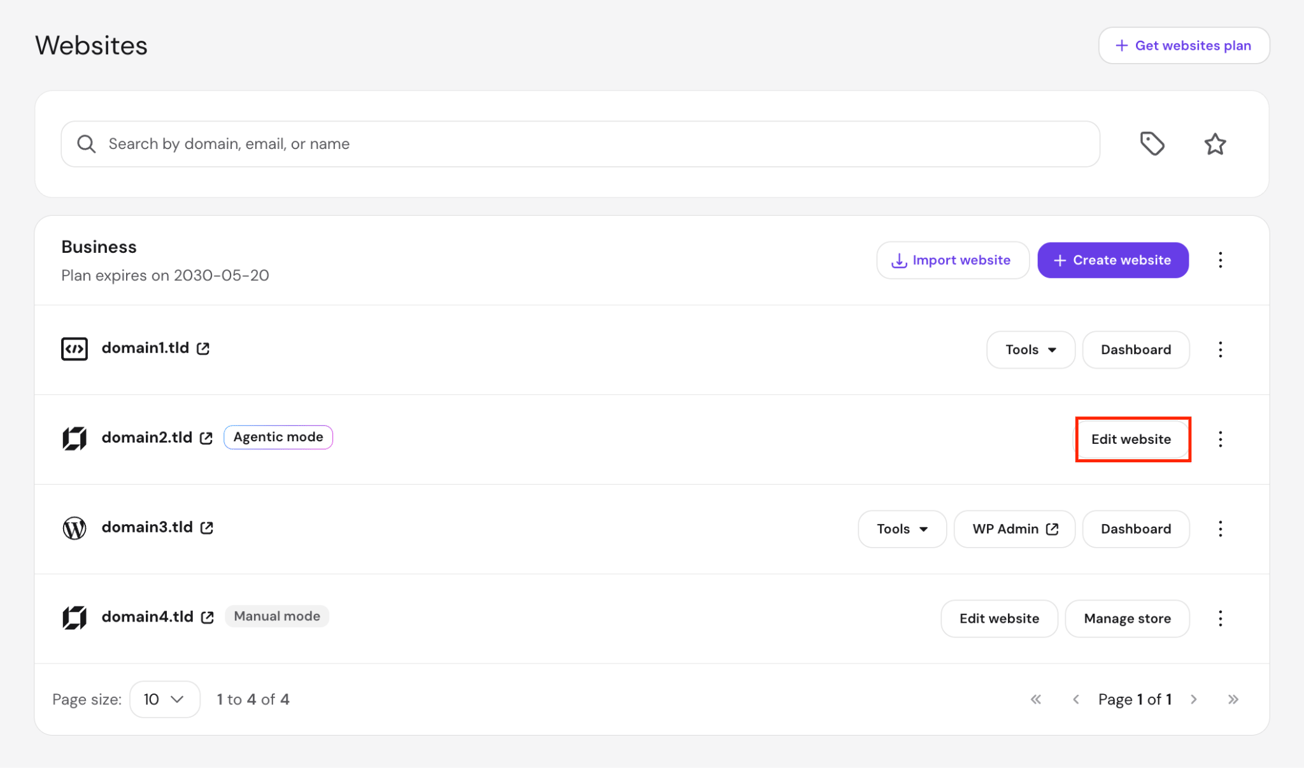
To open the editor for a Hostinger AI Builder site:
- Log in to Hostinger dashboard and go to Websites.
- Find the site you want to edit and click Edit website.
- The editor opens on the last page you viewed, ready to edit.
The top bar shows a Saved indicator as you work. Click Publish to push all changes live. The confirmation reads Your site’s been updated! with links to view on desktop and mobile.
How do you edit the content of a website visually?
Click the text, image, or section you want to change, edit it in place on the page, and publish. No code required.
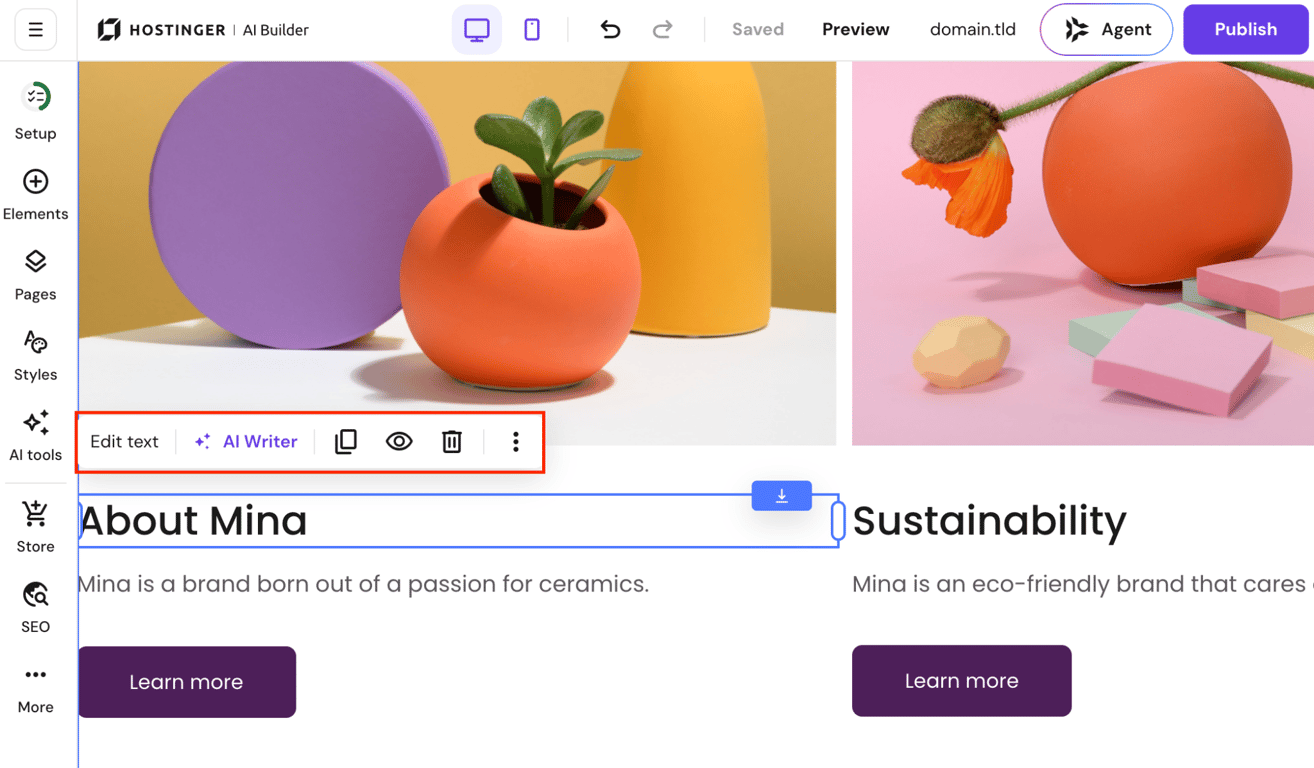
- Text. Click any text on the page. The toolbar shows Edit text to type directly, and AI Writer to rephrase, lengthen, shorten, check grammar, or change tone.
- Images. Click any image. The toolbar shows Edit image for settings, Generate image to create a new one with AI, and Change image to upload a replacement.
- Sections. Hover over any section to reveal the toolbar. Click Edit section to change the background and layout. Use the up and down arrows to reorder sections on the page. Click + Add section between any two sections to open a picker with AI-generated options, a blank section, or pre-made templates.
Pro tip
Switch to mobile view using the phone icon in the top bar before publishing. Sections that look right on desktop sometimes need minor adjustments on smaller screens.
How do you edit a website by describing changes to AI?
Describe the change in plain language and the AI applies it to your site’s files. In Hostinger AI Builder, requests go in the Ask for changes panel in Agentic mode.
Switching a Manual-mode site to Agentic mode creates a new copy of the site on a separate temporary domain. Your original Manual-mode site stays in Hostinger dashboard’s Websites list unchanged. Connect the new copy to your live domain when you’re satisfied with the result.
Specific requests get better results. Say what to change, where it should appear, and how it should look:
Change the announcement bar to “Free shipping on orders over $75” and add a testimonials section below the hero with three short customer quotes, using the site’s existing colors and fonts.
The AI reads the site’s files, applies the changes, and shows a summary with an Undo option.
To edit text directly without prompting, turn on Select & edit above the editor preview, click the element, and type.
How to edit a WordPress website
To edit a WordPress website, log in at yourdomain.com/wp-admin, open pages in the block editor to update their content, and go to Appearance → Editor to change headers, footers, menus, and site-wide styles.
This guide uses WordPress 7.1 with the Twenty Twenty-Five theme. The block editor steps work the same across themes, but the Appearance submenu and theme editing options look different depending on which theme is active.
How to edit WordPress pages and posts with the block editor
To edit pages and posts on WordPress, open the page in the block editor and click any block to change its content, move it, or remove it. The block editor only covers content inside the page, not site-wide elements like the header or footer.
- Log in to your WordPress dashboard at yourdomain.com/wp-admin (or click WP Admin next to your site in Hostinger dashboard if you’re using Hostinger).
- Go to Pages → All Pages.
- Click the page title to open it in the block editor.
- Click any block to select it. The toolbar above the block shows formatting, alignment, and link options.
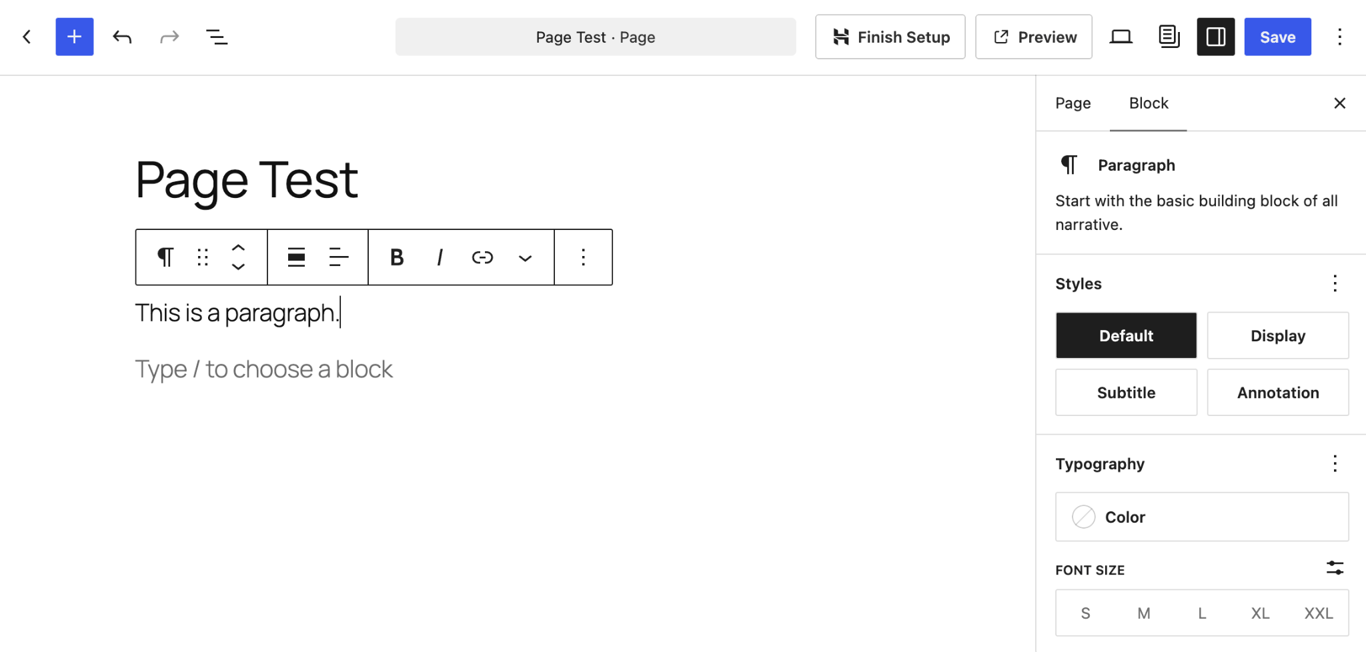
- Click the + icon to add new blocks. A block is WordPress’s term for a single piece of content: a paragraph, image, heading, or button.
- Click Save in the top right corner.
- A message at the bottom of the screen shows Page updated. Click View Page to confirm the change is live.
Pro tip
Some WordPress sites use page builder plugins like Elementor or Divi, which replace the block editor with their own drag-and-drop interface. Edit the page inside that plugin if it opens there instead – the block editor can't access content created with those tools.
When you create a new page, WordPress shows a Choose a pattern popup with ready-made layouts. Close it to start with a blank page, or pick a layout and replace the placeholder content.
The Slug field is in the Page tab of the settings sidebar on the right. Edit it to change the page’s URL path – for example, from /about to /our-story.
How to edit the header, footer, and menu in WordPress
To edit the header, footer, or menu in WordPress, go to Appearance → Editor if you use a block theme, or Appearance → Customize if you use a classic theme. These elements belong to your theme rather than individual pages, so they’re not accessible through the block editor.
Block themes (such as Twenty Twenty-Five):
In Appearance → Editor, the Design panel on the left lists your theme’s main elements: Patterns for the header and footer, Navigation for menus, Identity for the site title and logo, and Styles for fonts and colors.
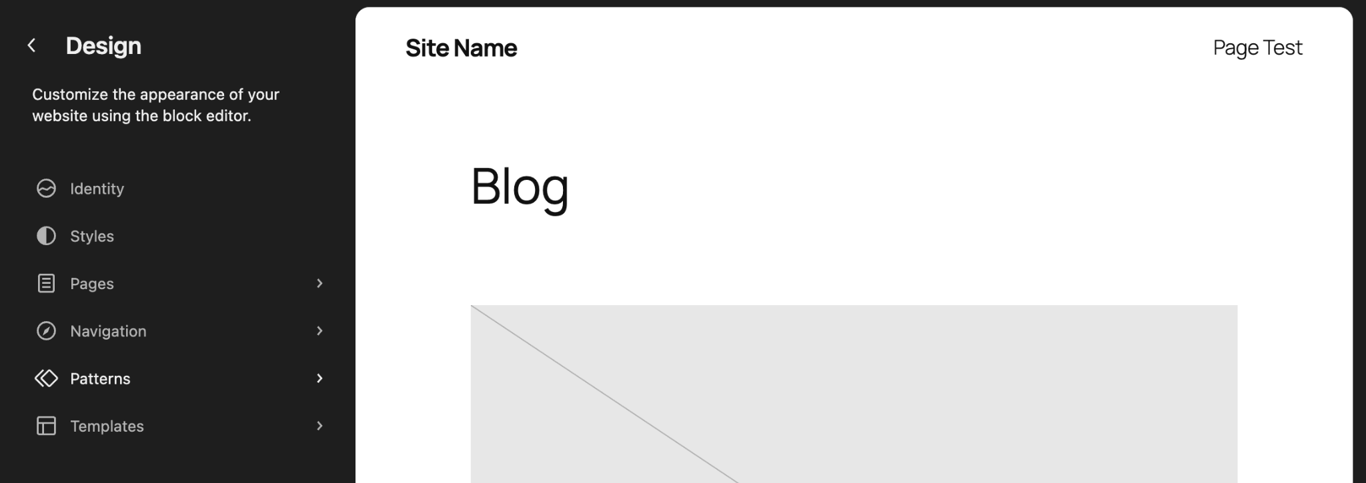
Click any element to open it in the editor, make your changes directly, and click Save when done.
Classic themes (such as Astra or GeneratePress):
In Appearance → Customize, the live preview loads with a sidebar for header settings, menus, and site identity. Click Publish to save.
On any theme:
Go to Settings → General to update the Site Title and Tagline fields.
How to edit a website’s HTML, CSS, and JavaScript
To edit a custom-coded website, open its source files, make the changes, and upload the updated files back to your server.
Code editing gives complete control over every part of the page. The main tradeoff is speed: every small change involves opening a file, editing it, and uploading it back. Whether to use a visual editor or edit the code directly comes down to how often the site needs updating and how comfortable you are with HTML and CSS.
How to open your website files for editing
Open your website files in one of three places: your hosting file manager, an FTP (File Transfer Protocol) client, or a local copy on your own computer. Only the first two reach the server, so local edits still need uploading…
Hosting file manager
A file manager edits files straight in your browser, with nothing to install. Most hosting providers include one in their control panel. In Hostinger dashboard, go to Files → File Manager. It opens at the account root, which is the main folder of your hosting account.
Double-click public_html to reach your site’s files. Right-click any file and choose Edit to open it in a code editor inside your browser. Saving writes the change straight to the server.
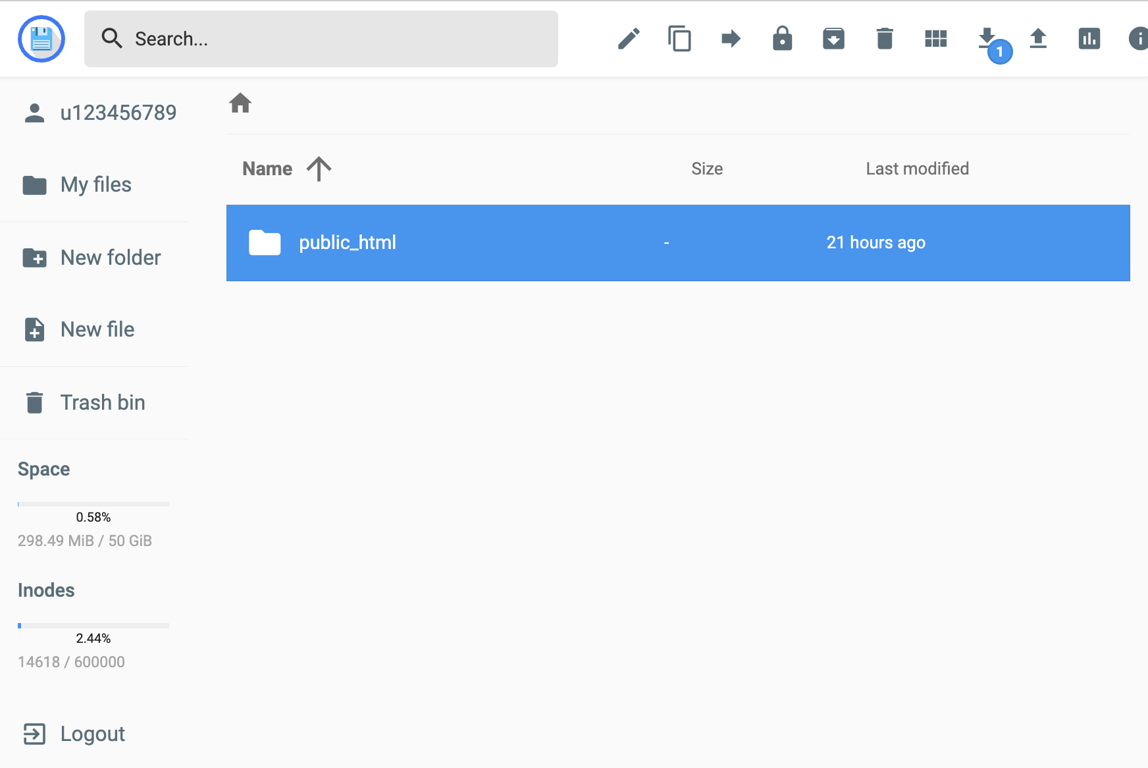
All site files must sit inside public_html. Files in the account root outside that folder are not served to visitors.
FTP
An FTP client connects your computer straight to the server. Your hosting provider’s control panel has your FTP credentials. In Hostinger dashboard, go to Files → FTP Accounts to find your hostname, username, and port (21). Connect with a client such as FileZilla, navigate to public_html, and open a file to edit it. FileZilla prompts you to upload it when you save.
Local project folder
A local project folder is a copy of your site on your own computer, either downloaded from the server or unzipped from a template. Open the project folder in a code editor such as VS Code. Edit the files locally and upload changed files to public_html with your file manager or FTP client.
What do you edit in HTML, CSS, and JavaScript?
Edit HTML to change content and structure, CSS to change colors, fonts, and spacing, and JavaScript to change anything that responds to the user: menus that open, forms that validate, buttons that animate.
- HTML. Open the .html file for the page you want to edit (the homepage is usually index.html) for editing a page’s HTML structure: update heading text inside <h1> and <h2> tags, change link destinations in href attributes, or add and remove elements.
- CSS. Open your site’s .css file (the main one is usually style.css) for changing a website’s styling with CSS: update a color value, change a font size, or adjust padding to shift the layout.
- JavaScript. Open your .js file for modifying interactive website behavior: adjust a menu toggle, change a form validation rule, or modify an animation timing.
Changes to files on a live server take effect as soon as you save and every visitor sees them. One misplaced character can break the page, so save a copy of any file before you edit it.
Each edit to HTML, CSS, or JavaScript follows the same sequence:
- Download or back up the file you’re editing.
- Open it in a code editor or your hosting file manager.
- Make the change.
- Test locally by opening the file in a browser before uploading.
- Upload the updated file to your server.
- Reload the page with Ctrl+Shift+R (Windows/Linux) or Cmd+Shift+R (Mac). This hard refresh pulls the page fresh from the server instead of the copy your browser saved, so you see your changes.
How to edit a downloaded website template
A downloaded HTML template is edited the same way as any site built from raw code: unzip the folder, open index.html in a code editor, replace the placeholder content, and upload the full folder to public_html.
- Unzip the template folder and open it in a code editor.
- Open index.html and search for placeholder text. Templates use “Lorem ipsum” as dummy filler text, so searching for “Lorem” finds it quickly. Also check for the template’s own name or generic phrases like “Your Name Here.”
- Replace placeholder images in the images or assets folder with your own files, keeping the existing file names.
- Open style.css and update colors and fonts to match your brand.
- Test by opening index.html in a browser.
- Upload the full folder to public_html on your server.
The template requires a build step before uploading if the folder contains a package.json file. A build step runs a command that converts the source files into the final versions browsers can read. Check the template’s documentation for the exact command.
How to edit a website temporarily with browser developer tools
Right-click the element you want to change, choose Inspect, and edit it in the panel that opens. You can also press Ctrl+Shift+I (Windows/Linux) or Cmd+Option+I (Mac). The change appears only in your browser tab and disappears when you reload.
No change you make here reaches the server – even features within developer tools that appear to save changes only store them on your computer, not on the live site. To make any edit permanent, use your website builder, WordPress dashboard, or code editor.
The steps below use Chrome, but making temporary changes with browser developer tools works the same in Firefox, Edge, and Safari. Edge matches Chrome exactly. Firefox calls the Elements panel “Inspector.” Safari hides developer tools until you enable Show features for web developers in Safari → Settings → Advanced.
How to change text on a website with inspect element
To change text on a website with inspect element, locate the element through developer tools and edit its text content directly in the browser.
- Right-click the text you want to change and choose Inspect.
- The Elements panel opens and highlights the code for the element you right-clicked.
- Double-click the highlighted text to make it editable.
- Type the new text and press Enter.
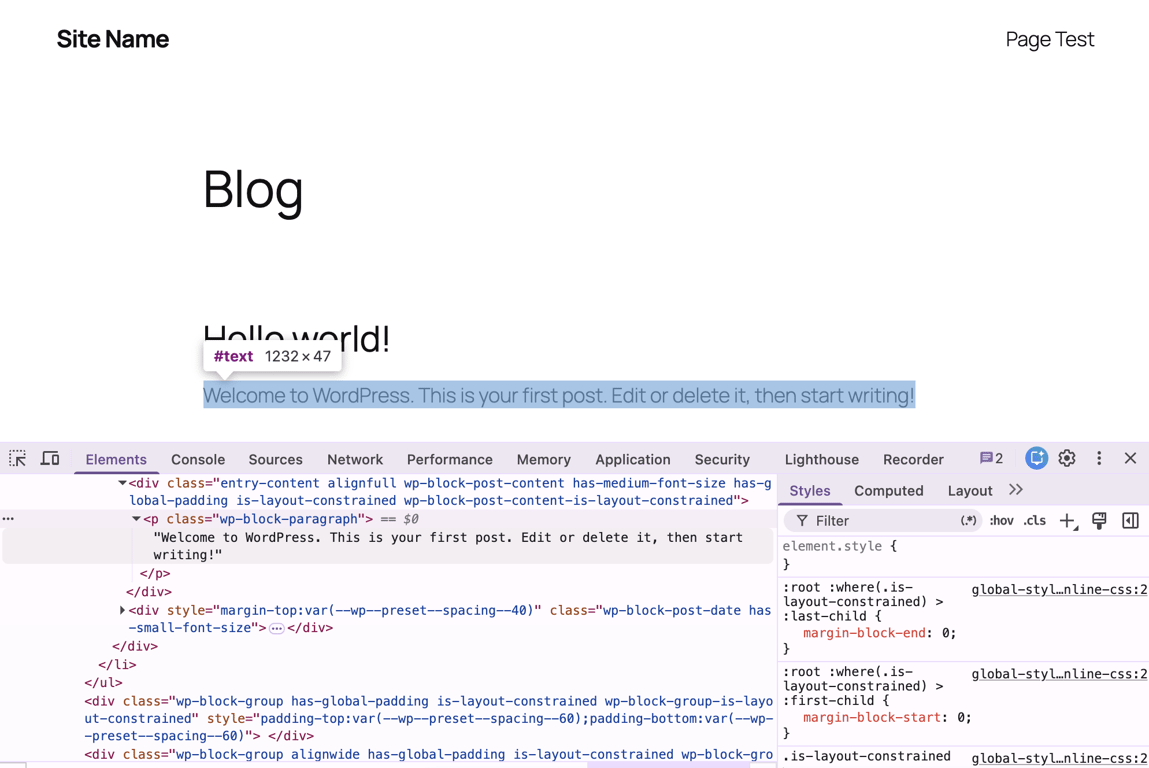
The change appears on the page immediately, but only in your browser tab.
Pro tip
To make the entire page editable like a document, open the Console tab and type document.designMode = 'on', then press Enter. Type allow pasting and press Enter first if Chrome shows a pasting warning, then type the command directly. The page stays editable until you reload.
How to test CSS changes before making them permanent
To test a CSS change before making it permanent, use the Styles panel in developer tools to try values live in the browser without touching your actual CSS file.
- Click the element picker icon in the top-left corner of the developer tools panel (it looks like a cursor over a box), then click the element you want to change on the page. The Styles panel on the right shows all CSS rules affecting that element.
- Click any property value to edit it. Type a new value and press Enter to see the result instantly.
- Once you’ve settled on the right value, copy the full CSS rule.
- Paste it into your site’s CSS file (for code-edited sites), WordPress’s Appearance → Customize → Additional CSS, or your builder’s custom CSS field.
How to edit a website URL
To edit a website URL, update the page slug – the part of the address after your domain – in your builder or WordPress settings, or change the domain through your hosting account.
Page slugs
In Hostinger AI Builder’s Manual mode, go to Pages, click the three-dot menu next to a page, and choose Page URL. Edit the URL Slug field and click Save.
In WordPress, open the page in the block editor. The Slug field is in the Page tab of the settings sidebar on the right. Set up a redirect from the old URL if it is already indexed by search engines. A redirect automatically sends anyone visiting the old address to the new one, so existing links don’t break.
For hand-coded sites, the URL is the file name. To change a page from /about-us to /about, rename about-us.html to about.html in your file manager, then update any internal links on the site that pointed to the old address.
Domain name
Change your domain through your hosting provider’s control panel. In Hostinger dashboard, go to Websites, click the three-dot menu next to the site, and choose Change domain to begin changing your domain name.
Changing your domain removes all email accounts and subdomains tied to the old domain. Read the warnings on the confirmation screen carefully before proceeding.
Troubleshooting website edits that aren’t showing up
Work through the most likely causes in order: an unpublished draft, caching, or an edit made somewhere that never reaches the live site.
- Unpublished draft. Both builders and WordPress save edits without pushing them live. Check for an active Publish or Update button still showing in the editor.
- Browser cache. Reload the page with Ctrl+Shift+R (Windows/Linux) or Cmd+Shift+R (Mac), or open the page in a private window to bypass the cache entirely.
- Site or CDN cache. Clear the cache in your hosting control panel. In Hostinger dashboard, go to Essentials → Cache → Clear cache. Clear any caching plugin or CDN (Content Delivery Network) cache too.
- Wrong file or page. You may have edited a staging copy (a test version of the site), a duplicate page, or a file outside public_html. Confirm the URL you edited matches the URL you’re viewing.
- Change made in developer tools. Developer tools edits never reach the server. Reapply the change in your website builder, WordPress dashboard, or code editor.
- Overriding CSS rule. A more specific CSS rule may be overriding your change. Select the element in developer tools and check the Styles panel for properties crossed out – those are the ones being overridden.
What to check before publishing website edits
Before publishing any edit, preview the page on desktop and mobile, confirm links and forms still work, update the page’s meta description if the content changed, clear the site cache, and keep a copy of the previous version.
- Preview on both screen sizes. Use the mobile toggle in your builder or Chrome’s device toolbar in developer tools.
- Test links, buttons, and forms. Click through every changed element to confirm it works as expected.
- Update the meta description. This is the short summary that appears under your page title in search results. Update it to match if the page content changed significantly.
- Clear the site cache. Do this in your hosting control panel. If you’re using Hostinger, go to the dashboard → Essentials → Cache → Clear cache.
- Keep a backup. Save the previous file version, note what you changed, or use your hosting’s backup tool before overwriting.
For a full site launch or major redesign, checking your website before publishing changes covers additional areas like domain configuration, SEO (search engine optimization), analytics, and performance that go beyond a routine edit.
For sites that still require manual file uploads or developer time for small changes, Hostinger’s AI website builder removes that step. Describe the change in a prompt and the AI applies it to the live site in minutes.
This article is a localized version of How to edit a website: 4 methods for any platform, originally published in English.

Bruno is a Content Writer at Hostinger, focused on creating and optimizing helpful, engaging articles about web development and marketing. With a background in journalism, he combines storytelling with practical insights to make complex topics easier to understand. He has also contributed to publications like MacMagazine and Jornal A Tarde. Outside of work, Bruno enjoys exploring art, cooking, and technology.

Auksė Žirgulė is Vice President of Product at Hostinger, where she focuses on innovating products that help people build and grow their online presence. She currently leads Hostinger AI Builder and Hostinger Ecommerce. Passionate about solving real customer problems, Auksė enjoys turning customer insights into products that drive both user value and business growth. Follow her on LinkedIn.