Add contacts to Hostinger Reach in six ways: add them manually, sync website forms from Hostinger AI Builder or WordPress, connect a Hostinger eCommerce store, import a CSV file, collect them with Reach lead forms, or sync them through the public API. You need contacts in your Reach audience before you can send email campaigns.
Adding contacts manually
This method is best for adding individual subscribers or small groups of contacts one by one.
- Go to Hostinger dashboard → Email marketing.
- Locate your subscription and click Open Reach.
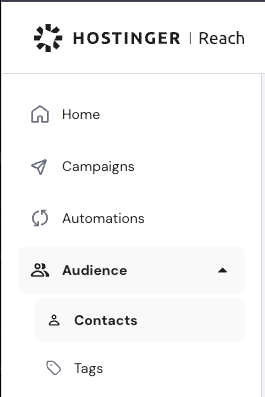
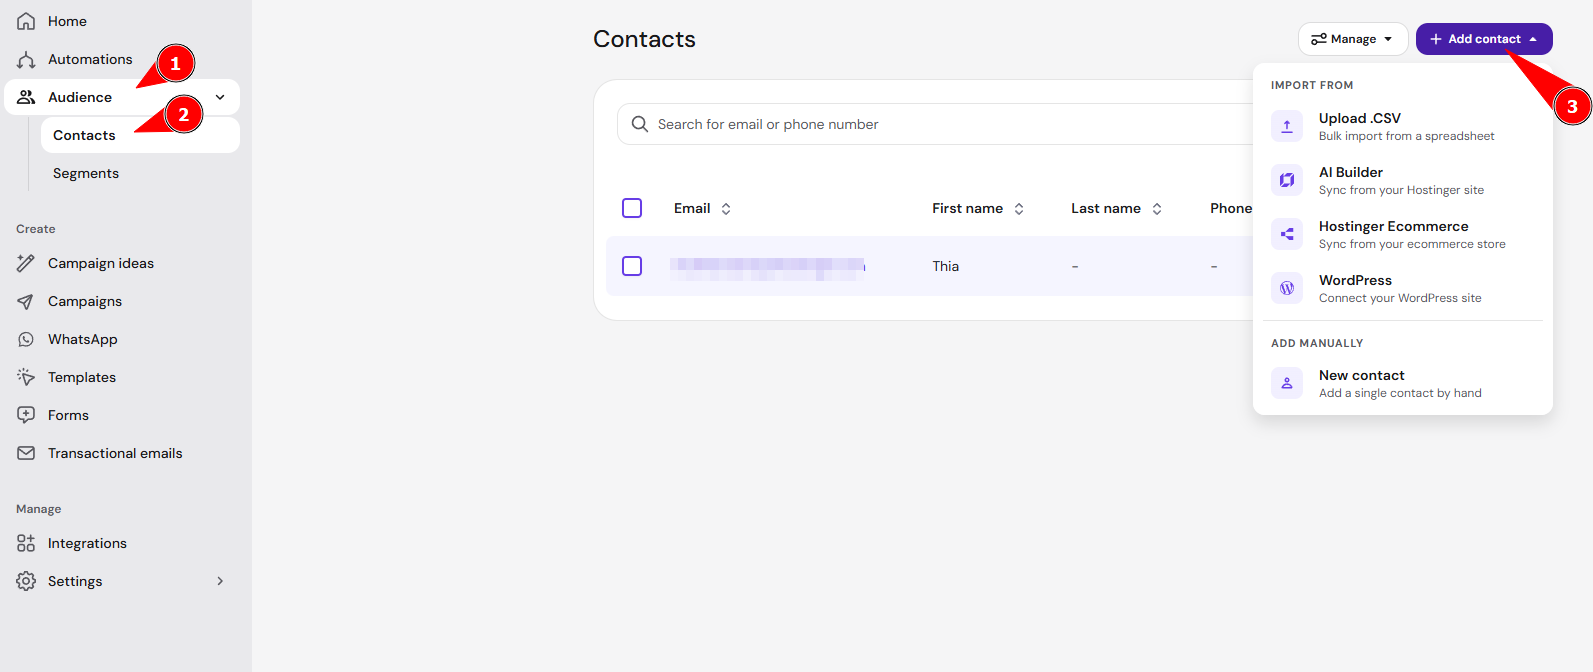
- Navigate to Audience → Contacts.

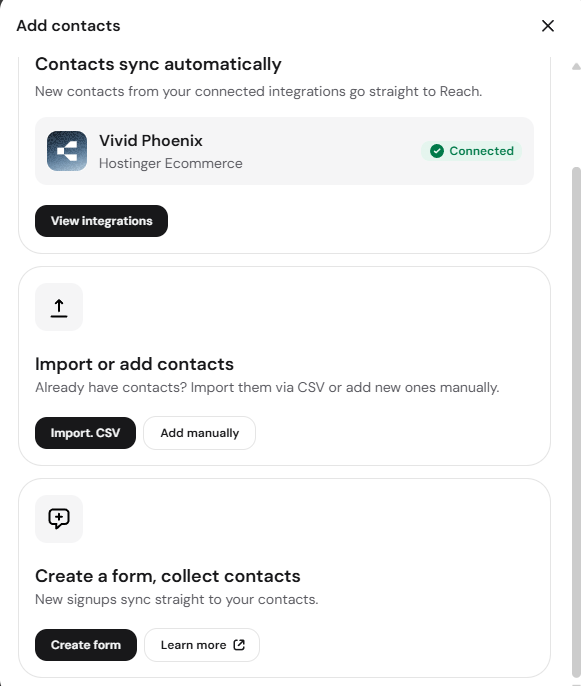
- Click Add contact.
- If no contacts have been added yet, the option will appear below Add contacts with option Add manually

- If contact already exist, click New contact.

-
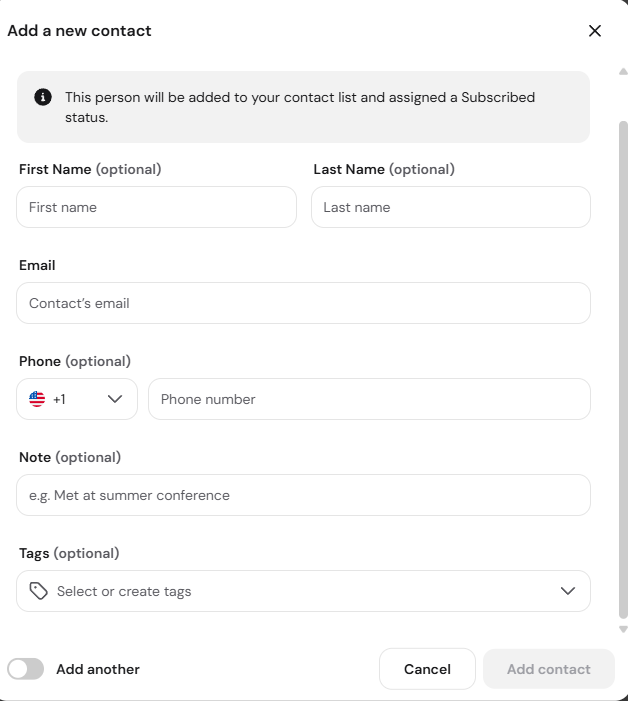
Enter the subscriber details. The email is required; the name, note and tags are optional. If you have any custom fields created, they will also appear here.

-
If you have more than one contact to add, toggle the Add another option to keep the form open.
- Click Add contact. The subscriber will be saved to your list.
- If no contacts have been added yet, the option will appear below Add contacts with option Add manually
To find the new contact later, search for it on the Contacts page, as described in Hostinger Reach: How to view and search your contacts.
Syncing with website form
If you use Hostinger AI Builder or WordPress, you can automate your lead collection by syncing your website forms directly with your email marketing lists:
- Open your Reach dashboard.
- Navigate to Integrations
- Select your website type from the dropdown: Hostinger AI Builder, or WordPress,
- Enter your website’s URL and click Connect site. Sites with a temporary domain are accepted here too — you don’t need to wait until your site is published with a professional domain to connect it.
- Once connected, Hostinger Reach automatically creates separate contact segments for each form on your site, making it easy to manage subscribers based on where they signed up.
Syncing with Hostinger eCommerce
If you have a Hostinger eCommerce store, you can connect it to Reach to collect contacts who opt in to marketing during checkout, along with purchase and abandoned-cart events.
For detailed, step-by-step instructions, refer to our dedicated guide: How to connect and use the Hostinger eCommerce integration.
Importing contacts via CSV
For large lists or migrations from other platforms, you can upload contacts in bulk using a CSV file. This method requires an Email column to ensure data maps correctly to your subscriber emails.
For detailed, step-by-step instructions on file requirements and troubleshooting, refer to our dedicated guide: Hostinger Reach: how to import contacts via CSV.
Collect contacts using lead forms
You can collect new contacts by creating lead forms in Hostinger Reach and adding them to your website or sharing as an URL. This is useful for newsletter signups, event registrations, downloadable content, waitlists, or any other place where you want visitors to leave their email address.
When someone submits a Reach form, their details are automatically added to your contacts list. You can also use forms together with segments, tags, custom fields, and automations to organize new contacts and send follow-up emails based on the form they submitted.
To learn how to create and publish a form, see Hostinger Reach: Form Builder Overview & Setup Guide
Sync contacts using API
You can also manage your Reach data using the public API, including contacts, contact fields, tags, and segments, along with retrieving information on your forms, campaigns, automations, and profile settings (domain status, plan limits, and features). This option is useful if you want to connect Reach with your own website, app, CRM, custom checkout, or another external system, or automate workflows using tools like n8n.
This option is recommended for advanced users or developers who want to build a custom integration with Reach.
To set up API access, go to Integrations → Reach public API in Hostinger Reach.
You can also add, tag, and organize contacts by asking an AI assistant such as ChatGPT, Claude, or Cursor, using Hostinger Connector. See Hostinger API MCP Server for setup steps.
Once your contacts are in Hostinger Reach, organize them with segments and tags to target your email campaigns.
NOTES
- You can store and manage more contacts than your current plan allows; however, your monthly sending volume remains limited by your specific subscription tier.
- To ensure high deliverability, only add contacts who have provided explicit consent to receive marketing communications.